
One thing we knew from the second we peeked through the windows of our house for the first time was that the previous owners——or some previous owners——had a serious affinity for wallpaper. With all the other horrors our house has endured over the years (the kitchen! the bathroom! the other kitchen! the other bathroom! the closets! the attic! the basement! the living room floor! the side porch! the mudroom!) the task of peeling back the layers of paper and restoring pretty much every wall in the house just didn’t seem like such a big deal. I’d never removed wallpaper from anything before, but it’s the sort of thing people do all the time. And not, like, crazy lunatic blogger people who run out of subway tile at 4:30 in the morning and weep about why Lowe’s can’t just be open 24 hours. Like totally normal people who might even have below-average handiness abilities but they do have two working arms and a pulse, and are therefore capable of peeling wallpaper.
This is the part where typically I talk about how wrong and stupid I am about everything and how it was actually so hard and physically and emotionally trying and made me want to be dead. Not so! Peeling wallpaper is actually kind of fun and maybe a little relaxing and overall a pretty gratifying activity. It’s messy and terrible and incredibly tedious and takes forever and leaves you with jelly-arms, but that’s my idea of fun and relaxation. Removing old wallpaper is misery-fun, which is my favorite kind of fun, which is why I was so excited to dive right in as soon as the horrible vestibule wall was down. My friend Nora was in attendance as well (she is the fairy godmother of our renovation, officially), so we went after all the loose bits that were already coming off the wall:
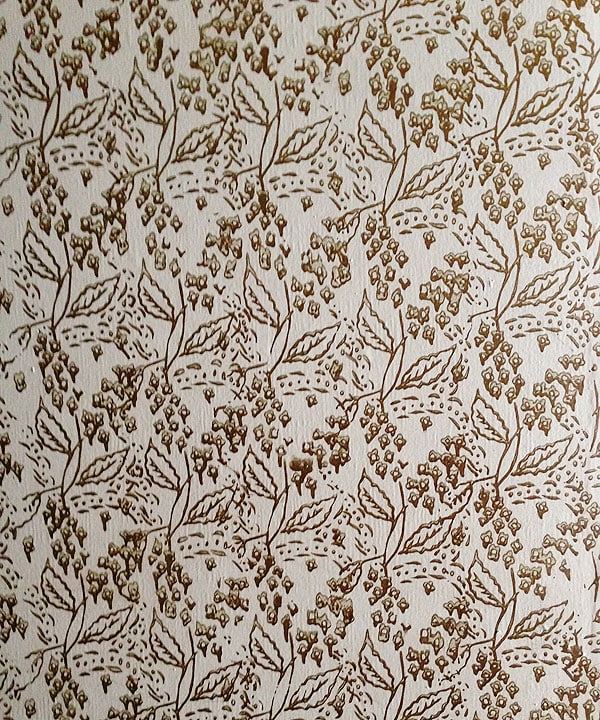
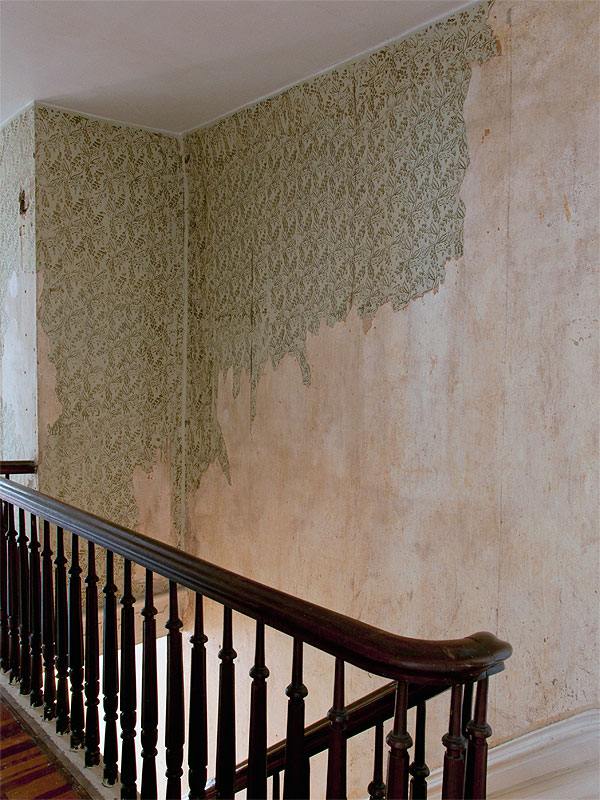
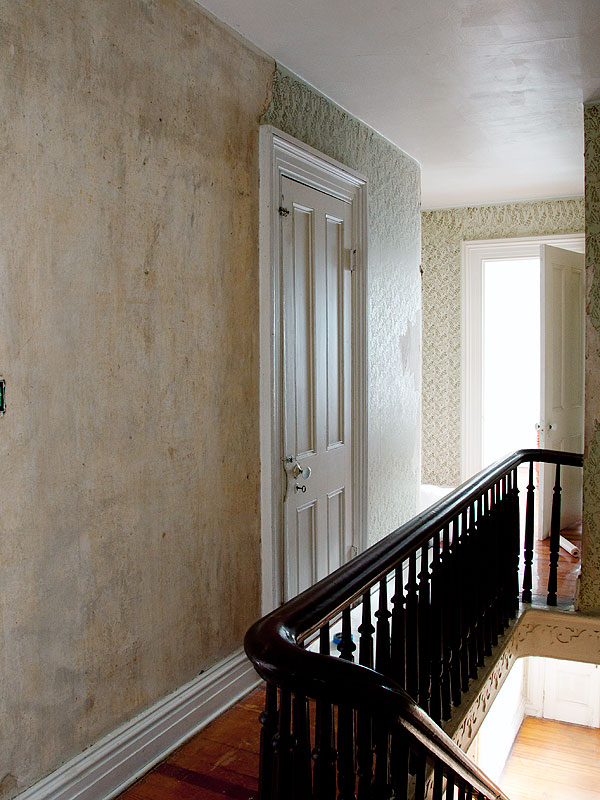
Which is where we left off last time, with things looking like this. I’ve mentioned this a few times before, but it bears repeating: one thing that makes our wallpaper perhaps a little different than other wallpaper is that the outermost pattern——the one in the picture above——is actually painted on, most likely with a patterned roller. The problem is, when you have 150 year old plaster walls with layers of wallpaper and paint on them, and then a house that sat vacant for two winters to freeze and thaw, that old wallpaper adhesive will fail and the wallpaper will come away from the wall in a way that is not cute or charming. I know there are those among you who think this wallpaper is pretty and I should have made an effort to keep it (*cough*VESTIBULE WALL*cough*), but that’s just not happening. Aside from being in horrible, way-too-far-gone condition, it’s just not very pretty. Believe me. It will all be so much better someday.
ANYWAYS.

After all the loose bits were scraped off and thrown away, it was time to bring in the big guns. Luckily, we were able to borrow some supplies from our neighbors, Julian and Philippe (whose house Max shot for Design*Sponge today!), who are veteran wallpaper strippers.
I’ve gotten a lot of comments since I started posting about the house regarding wallpaper removal, and people have some strong feelings. Use strippers! Don’t use strippers! Use water! Use vinegar! Use steam! Steam is the devil’s work! And so on. So I’m just going to say that this is the method that’s worked best for me, after playing around with a few different methods over the course of this whole fun stripping adventure thingy.
SUPPLIES:
1. Electric kettle: I don’t know how I lived for so long without one of these, but it’s amazing! We use it for coffee and tea and stuff, but it heats up water to 200+ degrees in a couple of minutes, which really speeds up the whole process. The wallpaper steamer takes a while to really get going enough to emit steam (like maybe 20 minutes), so it really helps to pour already super hot water into it.
2. Wallpaper scoring tool: this tiny thang is the most important tool in the wallpaper peeling arsenal. Basically you just run it all over the wall and it creates hundreds of tiny holes in the surface of the paper, which allows the hot liquids/steam to penetrate into the underside of the paper. It’s ABSOLUTELY essential.
3. Spackle knife: I like to keep a couple handy, since the smaller one is good to get into corners and other tight spots. I think there’s a scraper specifically for this, but any old putty knife should do the trick.
4. Wallpaper steamer: People have a lot of feelings about the merits of steam, but I found it really pretty necessary. Some people mentioned steam causing their plaster to fall apart or get squishy, but it really didn’t affect mine at all. Except for the parts that are already damaged, our plaster is in shockingly solid, great shape.
5. Handheld wallpaper sprayer: This is my new favorite thing. IN THE WORLD. All it is is a little handheld sprayer, with a pump on top to pressurize the container. That way, the spray is long and continuous, unlike a spray bottle that gives you carpal tunnel from all the repeated squeezing. Also, the plastic is much more rigid than a regular spray bottle, so pouring 210 degree water into it is A-OK. It won’t melt or anything! I added a couple drops of laundry detergent to the water, which I figured probably couldn’t hurt and would, at the very least, make things smell nice. After I was finished stripping wallpaper for the day, I used more hot water mixed with a wood floor cleaner to Swiffer the floors, which is now my new favorite floor-cleaning method.
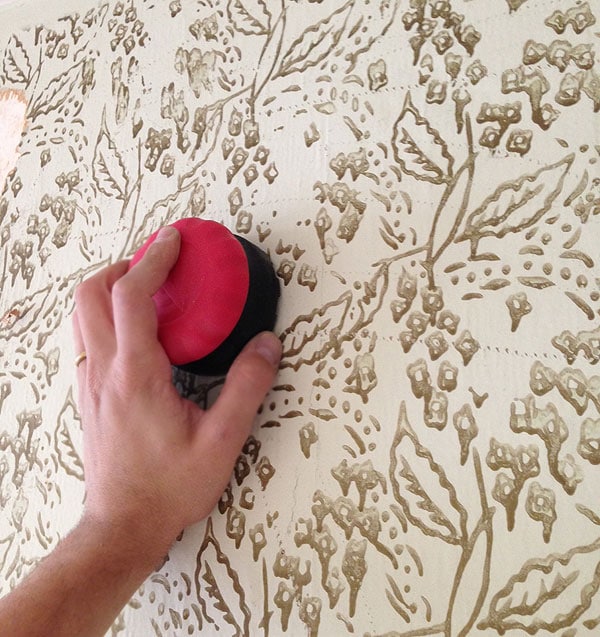
Did I mention how important the scoring tool is?? SO IMPORTANT. I got into a groove where while the water was heating up, I scored the crap out of the paper. Back and forth, up and down, round and round, and back again. The more you score, the easier everything is. Scoring is the least fun part of the whole thing because it makes an unpleasant noise and requires a little strength, but it’s very necessary.
SCORE. Don’t forget it.
After I’d scored a decent-sized area (I liked working in about 6’x6′ sections), I doused the whole area generously with super hot water from the wallpaper sprayer. After dousing, I kept myself occupied for about 5-10 minutes (maybe scoring another section of wall), then came back and doused the same area again. After waiting a minute or so, I was able to peel fairly large pieces off the wall with relative ease. YAY BARE PLASTER.
That method worked well for about 3/4 of each wall, but the rest of it really needed the steamer. All I did was hold the head of the steamer over any stuck areas for about ten seconds, and for the most part they scraped right off afterward. It really works best if you peel RIGHT after you take the steam away. After all the wallpaper was mostly gone, I sprayed the wall again and scraped off any clinging bits of backing paper and stuff and moved on. That’s it!

In case the mysteries of my house weren’t bountiful enough, I just wanted to share that generous portions of my walls were actually covered with wallpaper and paint, which was then skim-coated over with joint compound, then repainted in the same pattern! WHYYYYYYYYY. The same removal techniques pretty much worked for these areas (and the plaster underneath was——for the most part——totally fine, so I’m not sure why anyone did this in the first place!), but it just made everything extra-hard and extra-miserable. By which I mean extra FUN and WALLPAPERTASTIC.

I didn’t take tons of “process” photos, but you get the idea. Lots of old painted wallpaper, all over the place. I lined the floor with plain white paper (an easel roll from the kid’s section of IKEA), which helped moderately in protecting the floor and made clean-up slightly easier. The adhesive on our paper was so old that it didn’t really stick to the floor even if it landed there instead of on the paper, but I’ve heard that can be a problem. So protect your floors. You know. Use your brain and stuff.
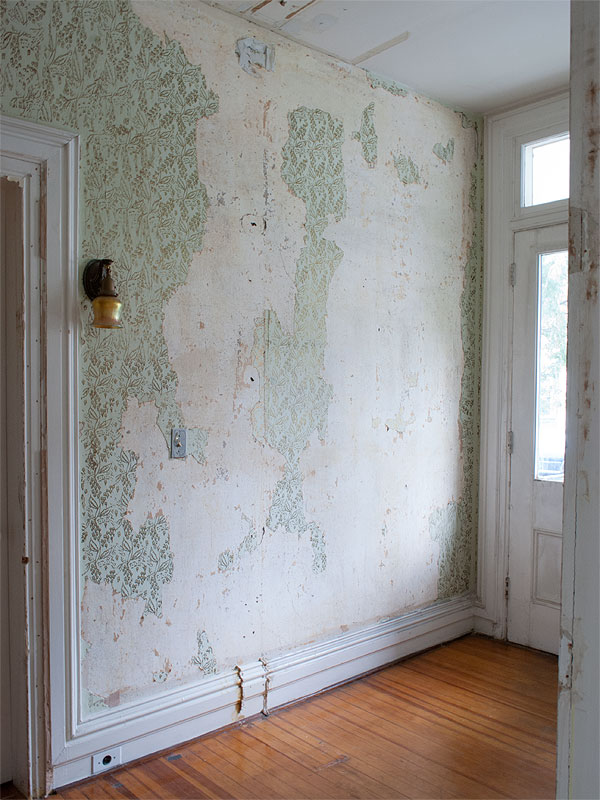
ANYWAY. Hours and hours and hours later…CHECK IT OUTTTT.
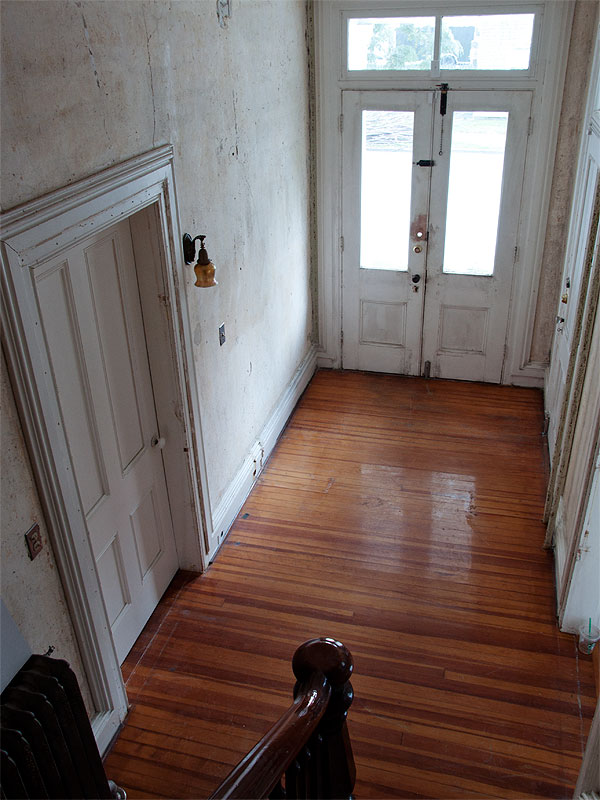
Yeah. I so don’t miss that wallpaper. Even though we’ll need to give the plaster a final scrub-down to get off any remaining adhesive, repair big holes and other damage, prime, and figure out what the hell we’re doing with the ceiling before we can paint, THIS IS SO EXCITING.
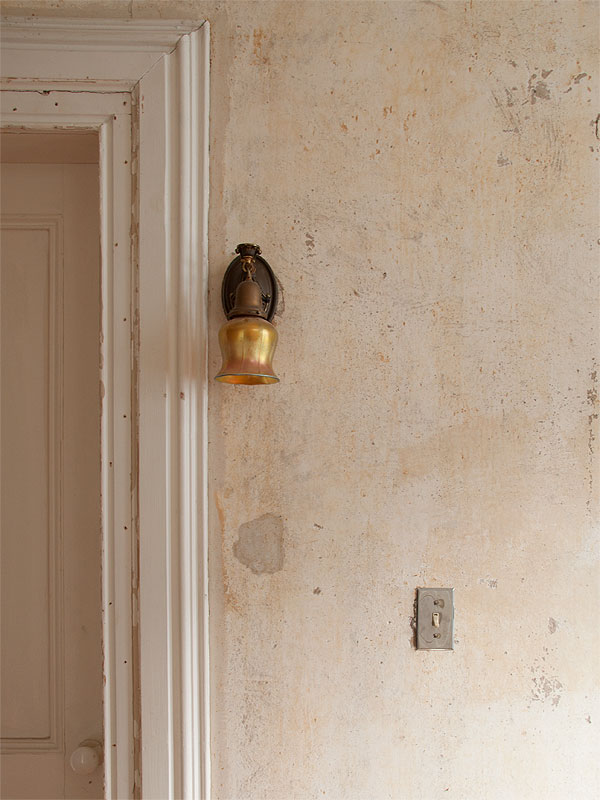
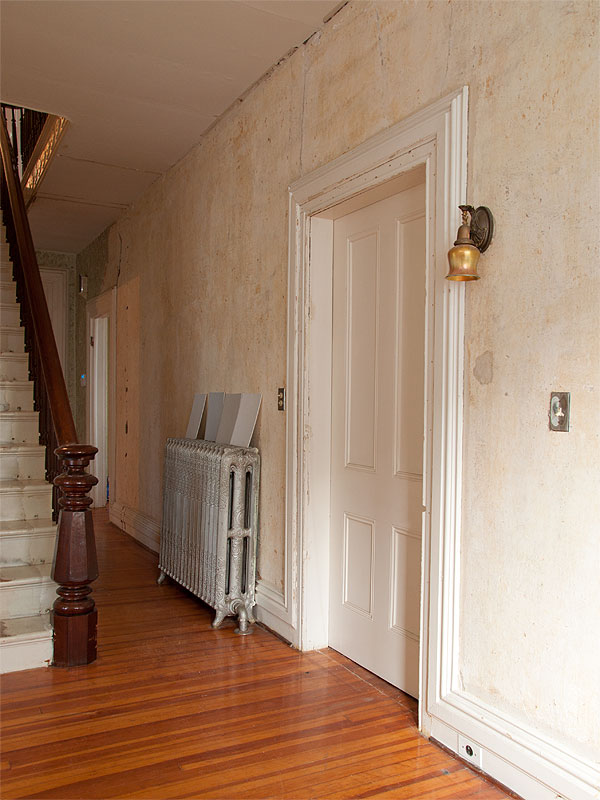
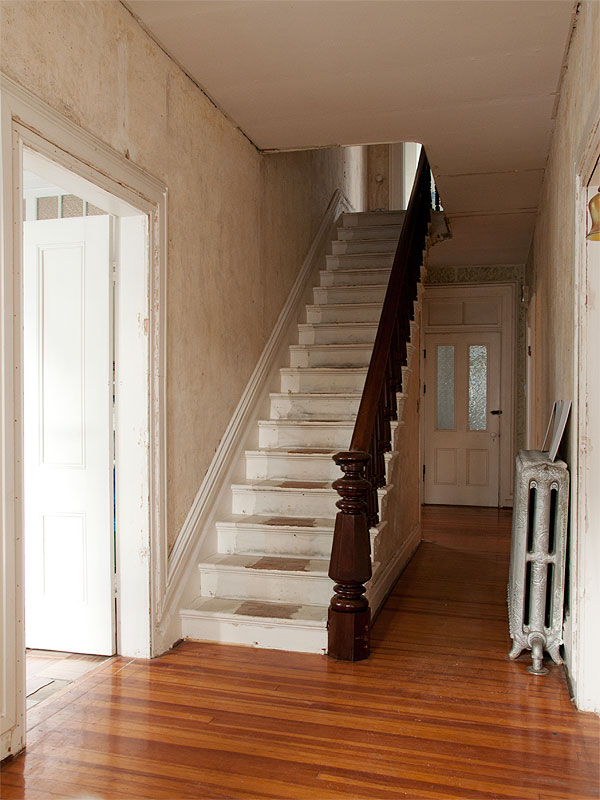
I’m SO CLOSE to being done with peeling the entire first floor hallway. I had to stop in this back corner because the only light source in the entire entryway/hallway is that tiny little sconce up by the door, and I was doing this at night and I just couldn’t see what I was doing well enough to deal with this corner. Soon!
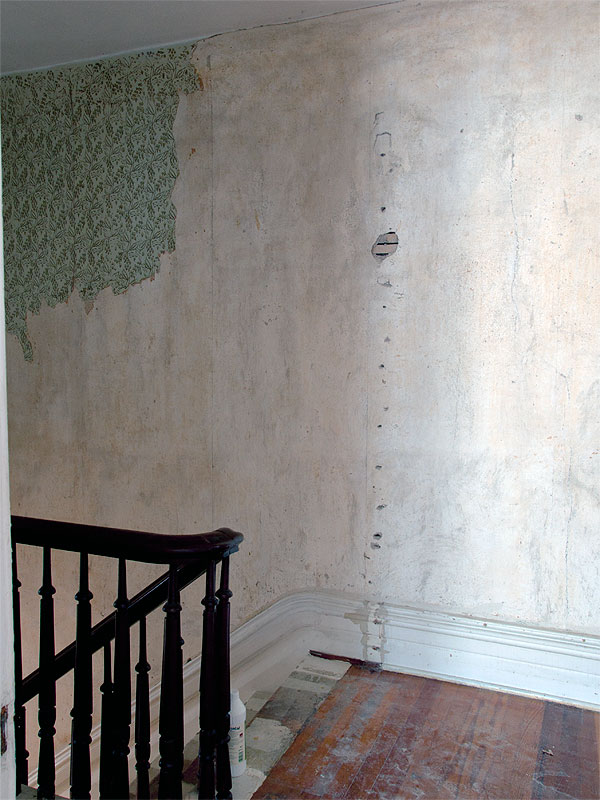
But check it out! This wall: totally peeled! That hole is from where the basement light switch used to be, but I guess at some point it was relocated to the inside of the stairwell. I think it makes more sense there anyway, so I have to patch this hole. It was previously patched with masking tape, so I think there is room for improvement.
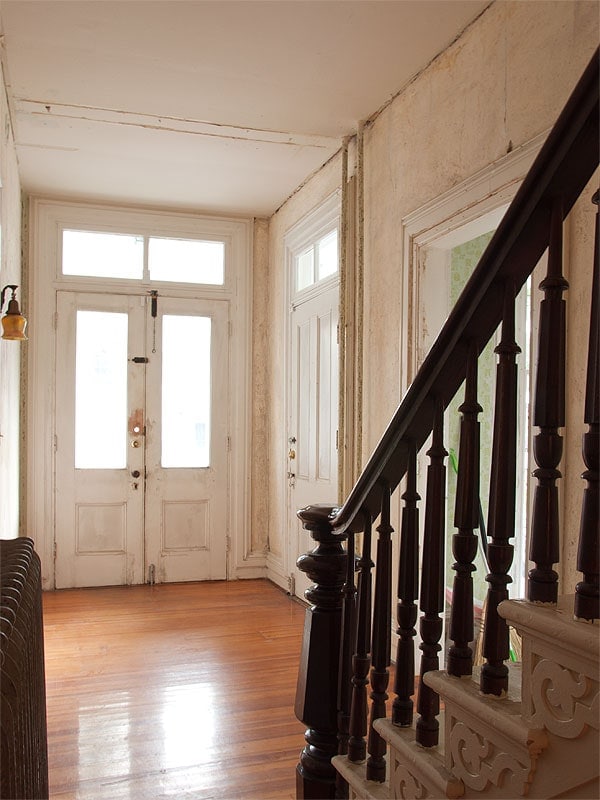
YAY! YAYYYYYYY! Now that the walls aren’t so wacky, can’t you totally see the soft white/grey walls with the white moldings and the black doors and the rug and the chandelier and everything being so beautiful? GUH. I can’t even wait. This is the phase where I kind of wish I could just hire everything out, if only so it would be done, like, yesterday. It’s going to take a ton of work to get there, but someday it’ll be amazing in here.
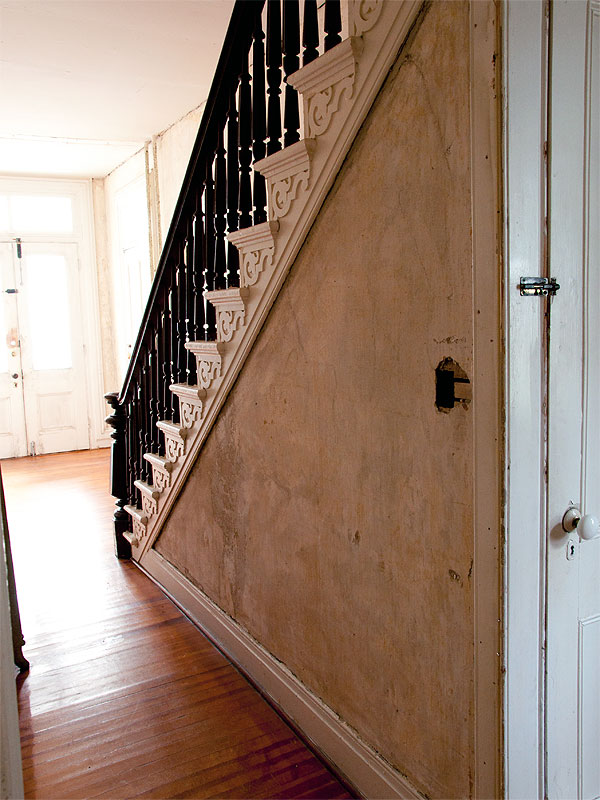
Now that the big ugly dumb wall is gone, this picture is possible! I still love that stairwell as much as the first time I saw it (so, so much). I *think* my new plan is to strip and refinish the treads, stained to match the dark mahogany-ish color of the newel post and banister. Then I’ll paint the risers white. Yeah? I considered just stripping and sealing the treads (which are probably pine), or just painting both the treads and the risers, but I don’t really want to introduce another wood tone between the flooring and the banister. I think if the treads and the banister match, though, it’ll look great.
Speaking of, THANK YOU to all the amazing people who gave their input on refinishing the floors in the comments of my last post! To clarify, the photos do make the floors look better than they are, but the floors in this area are actually in pretty good shape. The floors in the front “parlor” room and the dining room, though, are a mess, and it’s all continuous flooring (no thresholds), so it doesn’t really make a ton of sense to refinish one room without just doing it all to match. I’d also like to use either a water-based poly or some type of other sealer (Osmo?) to cut down on the yellowness of the current varnish and minimize the inevitable scratches that the floor will continue to get with time and use. All of that is probably quite a while down the line (I’d like to deal with the walls and ceilings first!), but just the idea is really exciting.
As for doing it myself…the general consensus seems to be that it’s POSSIBLE, but it’s difficult and takes forever and has a high potential screw-up factor, so I think it’s probably worth saving up for having it done professionally. I don’t really want to spend weeks of my life dealing with sanding and refinishing floors, especially with everything else that I could be doing with that time, and it sounds like maybe it’s not as expensive as I thought.
I have no idea what to do about the ceiling, though. As some point this ceiling was replaced with drywall, but it looks TERRIBLE. All the seams are super obvious, and the “repairs” over the years have just made everything worse. I guess it might be worth pricing out how much it would cost to just have the ceiling re-sheetrocked, taped, and mudded (assuming we do the demo and the priming/painting), but I don’t know. Maybe this ceiling is salvageable. I just keep staring at it an no answers are coming to me. I really don’t want to deal with drywalling a ceiling. That just sounds incredibly crappy.
I made some progress in the upstairs hallway, too! I couldn’t really reach the area that’s left, and I’m not quite sure how I’ll deal with it yet. It’s really high! I’m guessing it will involve some creative ladder positioning and a death-defying balancing act, which I’m sure Max will dutifully Instagram for your viewing pleasure before I plummet to my death?
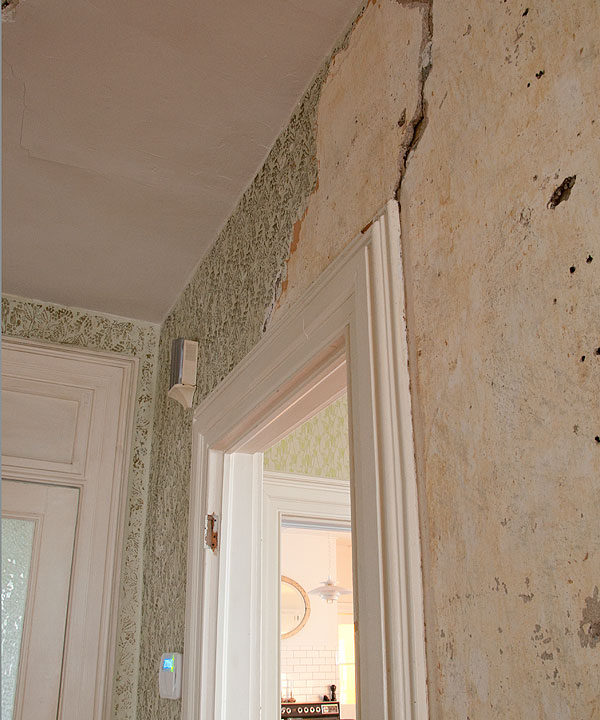
I don’t know. More pictures. I took a lot of pictures. You can see where the wall used to be. That repair shouldn’t be too bad, and then it’ll be like it was never there!
And that’s how far I’ve made it! So close to being done! Hopefully over the next couple of weeks we can finish the stripping, the patching, and can get some paint on these walls. I never thought I’d be this excited about painting, but all this prep work really makes that seem like the fun part.
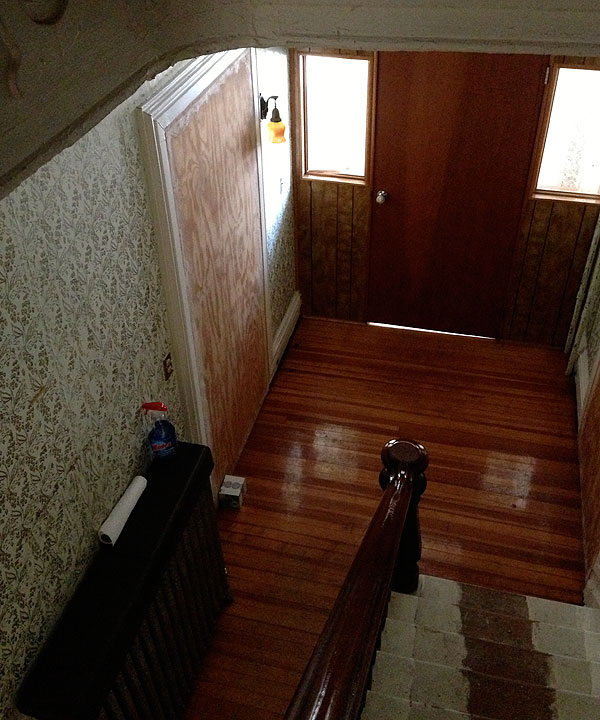
Just because it wouldn’t be complete without a little before-and-after action, behold! This whole area really has made a total turnaround already. I can’t even describe how dark and sad and scary this whole entryway/hallway was before, what with the closed-off doors and the extra walls and the peeling wallpaper…I’m just overjoyed that it’s starting to look like a nice house again.
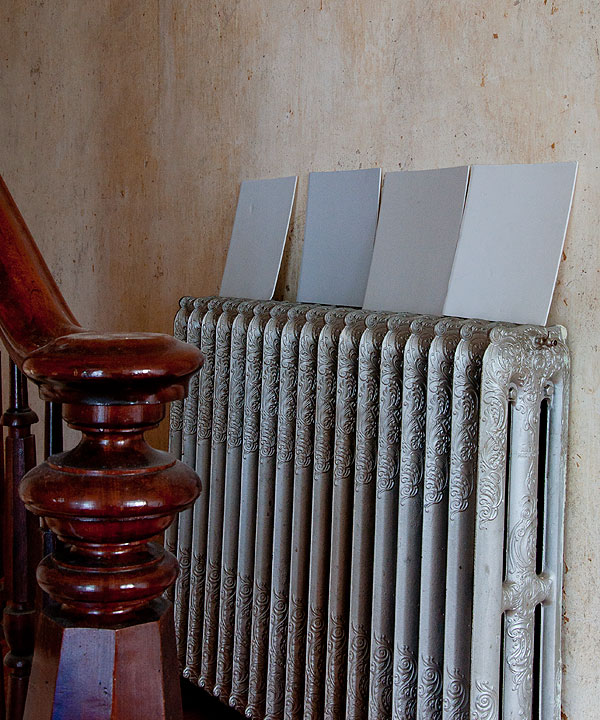
Uh-oh, I’m already looking at swatches! I actually had these already from choosing a color for a client, but I’m not sure if I LOVE any of them here. I feel like I’ll spend my entire life looking for a grey that doesn’t go blue or purple, and is warm without being at all beige or taupe or anything like that. Also, super light but not in a way that reads as white. DOES IT EXIST? I need to paint a sample of the trim color on another board to see how they relate. That will help. I’ll figure it out.


Damn, dude. That’s all I got. Damn.
(It’s gonna be soooooooooo good!!!)
Silver Drop by Behr is a pale gray like you describe!
Thank you! I’ll check it out!
I was going to say Behr Silver Drop too. Did my entire house in it and love it to pieces.
I suggest Mindful Grey from Sherwin Williams. Also, their Repose Grey is quite good. But it does read with a slightly blue tone when only seen in artificial light.
GREAT job, by the way!
I love the plans you have for the entry. Pee my pants excited to see it come to life!
Wow. Lots of work, but what a payoff!
It’s going to be grand, and I am sure you are making that house very happy once again.
Re ceilings: coffered? moldings?
Or maybe this stuff: http://www.ceilume.com/ceilingtile_detail.cfm/productID.476
Thanks! I think the ceiling really needs to be flat…maaayyyybeee with crown molding, maybe with a medallion around the new light fixture, but that’s about it. I think coffered ceilings work really well in large, rectangular spaces, but here it would just look a little nuts!
What about slightly textured? Beadboard might be too country for this house, but maybe a tin ceiling? You could try a textured wallpaper instead of the real thing. Unless you’re off wallpaper entirely.
I must say your incredibly talented and I love your commitment to your projects. The house is looking incredible and it gives me joy to tune into your blog and see your progress. I’m just slightly jealous because if my partner and I would have stayed in the NY area we probably would be doing something similar!
With every post I get more and more invested in the transformation of your beautiful house. I’m already enraptured by that entryway, but it is going to be STUNNING when it is complete. From the wide trim around the doors and the single antique light fixture, all the way down to the embellishments on the side of the stairs … I love everything about it, as well as all the care you are putting into restoring/renovating it. Thank you for sharing this journey with us!
The random Starbucks iced coffee cup in the after photo is a nice touch as well. LoL!
I wish you luck in finding the perfect grey; I recently re-painted a guest bedroom in Behr’s “Silver Drop” after weeks of test samples and lighting experiments, and it STILL completely went beige on me once the whole room was done. So disappointing.
Hahahahaha, the secret of my elixir is out! Iced coffee 4 life.
(I didn’t even notice! I’m such a slob.)
Is Farrow and Ball ‘Cornforth White’ too light for you? Back in the day (waaaaaaaay back!), the Martha Stewart full-spectrum line for Kmart had a shade called ‘Weimaraner’ that I used in a dining room. Honestly the most perfect greige of all time…so sad it’s gone. But I think in that Hudson Valley light, Cornforth White might do it. (This is by way of recompense and apology for my insane tweets of this evening.)
Yeah, that might be great! I’m trying to avoid getting too tempted by Farrow & Ball because of the price, but it might be worth it. I feel like you can’t really go wrong with F & B!
Replying to this AND your reply to my very extreme paint geekery comment later…want to really have some fun? Get ahold of Donald Kaufman’s book on color and mix your own grey. I did it once (BK coop 20 years ago, oh God, I’m OLD) and, although I ended up painting over what I’d done, it was a great learning experience. Somehow you want that in the home you own vs. the home you rent…it honors your commitment to the space (I promise I’m not gonna make us all hold hands and sing ‘Kumbaya’ now).
I found this! http://www.theenglishroom.biz/2013/07/06/farrow-ball-colors-matched-to-benjamin-moore/
Farrow and Ball matched to Benjamin Moore! (I read about this on another blog… I think young house love?, but here’s an actual color chart.)
Thanks, Molly! I’ve been told that any company that claims to match Farrow & Ball is more marketing than truth…and having now seen f&b in person, I have to agree. Farrow & Ball uses completely different ingredients and tints, and their depth of color is just…different than anything BM or another brand does. That’s why it’s so spendy! I’m sure they can get close, but it’s just not going to be the same unless you spring for the real thing, I think.
Love your renovation, love how rapidly you’re progressing, and love your creative ideas and can-do attitude.
Two pieces of advice:
1. Benj Moore “Thundercloud Gray” works really well and looks like a true gray in my house. It is a medium gray. There is “Bunny Gray” on the same sample card, but that wound up looking like dirty white.
2. I learned the hard way to NEVER put the stool on top of the drop cloth as the feet have nothing to grip, so when you bend over the stool goes east and you go west. I’m currently sporting an ankle cast b/c of this. I was steaming wallpaper when it happened.
Good luck with the rest of the reno. Post often!
Yes, you are so right, Ann!! I’ll be more careful. :)
Wow, wow, wow! More amazing progress. It already looks so nice, I can’t wait to see the finished result. I’ve removed tons of wood chip wallpaper in my parents house, but never as organized as you, with a steamer and everything. We would just sort of splatter the walls with hot soapy water after scoring them. What I found really helpful though, was a huge ass spackle. Like a broom, but with a large spackle at the end. Sometimes it would remove entire square meters in a matter of seconds.
Have you ever considered leaving the walls in their raw plaster state and not paint them, like your neighbours? I’ve seen that done in Berlin a few times, but can’t decide whether or not I would like it for myself.
Please, please, please get yourself a sturdy ladder! There is a type that has three joints and can be folded into multiple shapes. Also some planks and please be safe doing that bit above the staircase. Working there really is a death trap and I do love reading this blog so much, so please don’t perish only halfway done! You readers need before/after closure.
i love it!
and more specifically, I love that since you have so much demo and prep and repairs, that we get to hear about your ideas for design bouncing around in your head long before they materialize before our eyes!
I also love that you are discovering the modern wonders of the electric kettle and the Swiffer. I remember when my mom first got each of those, and as a result they were essentials when first moving into my own place!
Ha! The swiffer has been my BFF for years (it’s the wallpaper sprayer to add extra liquid while swiffering that’s revolutionizing my life!), but yes, that electric kettle! I never knew how useful they were!
Balboa Mist by Benjamin Moore is the greatest light grey ever. Collingwood is the best warm grey ever.
Gosh, you are doing such a good job! You will have a show home when you are finished.
Your walls are looking great!
I quite enjoy Sherwin Williams Worldly Gray – sometimes it’s a tiny bit purple and sometimes it’s a tiny bit taupe but most of the day it’s just a lovely share of gray.
oh how i love your blog! endlessly inspiring and delightful. i’ve heard that benjamin moore’s Stonington Grey is great.
My boyfriend and I own a bar in Berlin and we renovated the whole thing ourselves last year, which took about 5 months. I scraped wallpaper for 2 months straight. It holds a special place in my heart.
I found boxcutters to be sometimes more effective than the scoring tool (but be careful not to press too hard as to slash the plaster underneath)! Boxcutters are also super useful for slicing off the remaining wallpaper right up against the moulding (that is, if it doesn’t come off easily). As for the remaining adhesive, I sponged the areas with warm soapy water, let it sit for about 10 minutes, then used either steel wool (for the tough spots), or just scraped it off normally.
The house is looking wonderful! Good luck with the grey!
You know, I kept wondering about whether a box cutter would work! I decided my system was working OK and I didn’t want to risk damaging the walls more, but maybe I’ll try for other spaces. Some of the upstairs rooms have a LOT of layers of paint, and I don’t think the scoring tool is going to cut it.
Really amazing!! so,OK, maybe not your thing, but that creamy old plaster-kinda matches your lovely kitchen mirror. Would be a nice leitmotif for this grand lady, with crisp painted white trim and your mid-century/Scandi accessories. (I stripped my entire moldy turn of the century NOLA house way back in the 80’s and loved how it looked after I painted just the trim white . Clean but warm with a vintage vibe, and you can always paint the gray whenever.
I might even keep the cracks, but you could fix them and faux-paint(sponge and brush) to match the rest like I did – I was a professional mural painter of French quarter mansions, but you cold totally do it.)
Please keep that gold bell glass sconce,too – so Glam! Maybe shine up the metal or paint it white.Good luck!
Love that patina in old homes that you see when the wallpaper is removed…. such character. You could probably get away with doing a skim coat of joint compound (the blue lid bucket) over the plaster to make it a paintable surface again. Really spectacular space, though. Looks great.
I love that misery-fun comment. You have to love misery-fun if you want to restore a home yourself. It’s like when you tell people that you enjoy working on homes and home projects as a hobby and they look at you like you’re from another planet. Wait, you LIKE that kind of stuff? You actually like chores and work?
I am loving this renovation so much. We went through the same, “Is there a grey that exists that isn’t blue/green/taupe in undertone but a pure neutral light grey?!” After much searching (we are in the UK) we used Farrow & Ball ‘Strong White’ which is a true neutral very pale grey and teamed it up with Farrow & Ball ‘Pavilion Grey’ (light-mid neutral grey) for woodwork. Nearly our whole Regency (1830s) flat was done in this colour scheme [Pics here http://www.flickr.com/photos/macchinafotografica/tags/house2012finalrefurbishedbrighton/%5D. Plus, y’know F&B paints are super dense in colour and coverage (albeit pricy)! Continued good luck and good restoring in your lovely sleeping beauty of a house. Having done two complete historic flat/house renovations I know the pain, but it is so worth it!
Thanks, Beatrice! Your place looks amazing!! I’m always a little afraid to entertain Farrow & Ball because of the price, but the colors really do seem amazing, particularly for neutrals. I recently used Farrow & Ball on a job for the first time, and it’s beautiful.
Wow Daniel. You have been busy. I knew you couldn’t resist that hallway and would have to do it next and not your bedroom. Can you find out what the original ceilings were like and recreate them? We have the National Trust here who give advice to owners of old homes as to what would have been done originally. if not, I assure you will find a result which will be stunning.
Need you to post everyday! I’m addicted and can’t wait. Hey what about live feeds (only joking).
As far as I can tell, the original ceilings were just flat plaster! Our guess is that this section of the house is probably 1840s-1850s, but everything may have been modified around the 1870s or 80s (that’s when we’re assuming the Greek Revival details were added, and maybe when the additions were built, or at least one of the additions…). The upstairs ceiling is still plaster in the hallway and two of the bedrooms, so I’m assuming it just looked like that. I don’t *think* there was crown molding, but I really don’t know (and keep thinking that maybe it would be nice…). There is a town historian who I’d like to talk to about what he thinks the history of the house is, and maybe he’ll have some pointers on the ceiling.
Paint colors are so tricky because they end up looking different in each room and will probably look different when you hit the 6 or 7 months of dismal overcast sky that is my memory of winter in upstate NY. But I will play along and recommend BM Gray Owl. I’ve seen a blogger have this color mixed 50% lighter and actually like the lighter version better. Here is a link http://theletteredcottage.net/how-to-lighten-or-darken-paint/
Can’t wait to see the finished result!
one more…Emily Henderson wrote this post where she compares different grays to different moods of Ryan Gosling – Gray Owl is one of them. http://stylebyemilyhenderson.com/blog/best-gray-paint-colors-according-to-ryan-gosling/
Timber Wolf Grey – “a dudes’ grey and great with wood”… Hmmmmm, sounds like it could be a possibility, eh?
That Ryan Gosling post was hilarious, nancy50!
Glad you liked it Dusa! I always feel a bit foolish to have spent time searching for the right link that I think might assist a blogger and then not to have any response from them…I’m an old dog but I’m hoping to learn to stop writing on these silly blogs – I can go argue politics on DailyKos instead! :)
Oops, for I thought I did respond! It must have been to a different vote for Gray Owl. I really do appreciate all the comments and I look at the links (I remember when Emily posted that, but thank you for reminding me of it!), even if I don’t respond to all of them. Apologies if that came across as unappreciative!
Oh uau!
It looks soooo good!
Kudos, guys!
The thing I love the most is the straircase – the sides of the steps are beautiful.
Can’t wait to see how everything turns out.
The little giant ladder was a life-saver (literally) while renovating an old 1907 house with 14 foot ceilings and huge stair cases. http://www.littlegiantladder.com/little-giant/type-1a-revolution.html
They’re not cheap, but they are amazing, and being able to do scaffolding really makes painting high ceilings doable.
Everything is looking SO amazing. I can’t wait to see this old house be brought back to life.
Yes, I have one!! (actually, I think mine is a knock-off from another brand, but it’s the same design). I don’t usually use it unless I have to because it’s so heavy and difficult to move around, but it’s been good. I have to play around with the other configurations and see what will get me that high above the stairs. I’m a little frightened…
May I recommend a grey? Glidden Smooth Stone is a perfect light grey. It doesn’t go blue or lavender, and it’s warm without going beige. We have it in two rooms. It’s best for walls that get lots of indirect light, and I swear it makes rooms bigger. You can probably have it matched if you’re using sponsored paint.
One thing: you have to paint a large section of wall before the Smmoth Stone starts looking anything like it does when complete (it looks dirty white when first applied, and its light-magnifying properties only become apparent when a good portion of space has the paint up).
Good luck!
Thanks, Ann! That sounds nice…
Wow, it’s already looking SO much better–like the house is starting to emerge from the cave someone stuffed it into. Check out Kristi’s blog http://www.addicted2decorating.com/ for some great before-and-afters and tips on hardwood floor refinishing–she just did all of the floors in a 1948 house by herself!
Wow, Kristi’s floors look great!
We just bought an old house and while we don’t have wallpaper (at least that we’ve found yet) we have some shoddy drywall work that needs to be redone. It looks like it’s actually over the original plaster. Will you guys be doing any plaster repair? We’re thinking about attempting to restore everything to plaster and lathe but I’m not sure if there’s actual value in it or if it will just be a lot of messy work for almost the same result as drywall.
Now I’m nervous – we were going to refinish our floors but maybe I’m underestimating the skill level required!
The walls are looking good – can’t wait to see what paint color you choose.
I don’t think we’re doing any MAJOR plaster repair, no, and certainly not trying to redo entire walls with plaster and lathe! That sounds so hard. I’ve seen old walls redone with regular sheetrock with a skim-coat over the top to give it a little more irregularity than sheetrock typically looks. That’s probably what we’ll end up doing for areas in need of major repair, but hopefully the plaster will continue to surprise us! I was mentally preparing for having to, like, get rid of ALL OF IT (plaster in an unheated house can be bad news, and winters here aren’t exactly balmy!), but it’s really in good shape so far.
I think it’s probably good to be nervous about the floors! That means you won’t mess it up! :)
It MIGHT be worth at least getting a couple flooring contractors out to quote you a price, though. Just to see.
Amazing work!! You are a magical. Can not wait to see it painted! Just wondering if you thought about tin ceiling tiles(painted)? That ceiling is a tricky one. Cheers to team Gay Gardens!!
Thanks! I don’t think tin ceiling tiles are really appropriate to this space/this house. Tin ceilings are really a Victorian phenomenon (1890-1930 or so), and I’m pretty certain that our house (at least this section) is older than that. I just don’t think it would look right! But thank you! It’s a good idea.
Sounds like we’re looking for the same gray. I thought I found a perfect gray but by the time the entire downstairs was finished it just looked so purple (and that was after painting a million samples in different rooms). Ugh, I can’t even deal. I’ve got another gray picked out right now but I haven’t been able to bite the bullet and buy it because it’s a little too taupe. Sigh.
That’s what I’m TERRIFIED OF. That’s kind of what happened in my apartment living room…I thought I found the PERFECT grey/white (BM Paper White), and it looked great in the samples and test swatches, and now that it’s on the wall…BLUE. Not, like, offensively blue (almost two years later and it’s still on the walls…), but I’m a little disappointed by it everyday. haha.
Have you tried the Affinity line from BM? My understanding is that they’re taken up and down with more than black and white (i.e., they’re pretty close to full-spectrum). Expensive, because they’re all Aura bases, but maybe worth it for a space that has to read well in a relatively large array of lights? Hudson Valley light is tough–that weird combination of sort of northern light and sort of Tuscan light is hard to get colors to play with. (Just ask all those painters.) I just went through major light change (Brooklyn to VT) and of course everything reads completely differently here. OTOH, I now have my perfect forever completely neutral white (Behr Ultra Pure White) but of course where you are that would read much creamier. Don’t you love this paint geekery?
It’s so overwhelming! I feel like I’m going to wind up with 400 test jars, then realize how much money I’ve spent on test jars, then just mix them all together and slap that on the walls. Then I’ll cry and feel so ashamed.
re. the ‘test jar blend’, you know people will be chasing you for that exact colour… so you can just say ‘yeah, it’s custom’.
I may stand alone in loving the raw plaster, cracks and all. It’s very John Derian. I’d hang an antique gilt mirror, a black sputnik pendant and enjoy it.
You’re not alone! I like that look in some places, but I think here it would be overwhelming. It’s a really large space, the plaster needs a lot of repair (which would take some tricky faux-painting and stuff…), and the ceiling is an issue——in some places, the drywall starts a good 3/4″ from the wall, so there’s a huge gap that needs to be taped/mudded to make those corners seamless. A couple of our friends have done raw plaster (sealed with a protective coating) that looks great in the right space, and I have a room in mind that I might try that for. I think this just isn’t it!
Amazing! So much hard work. Very satisfying to look back one day and say…”We did THIS!” My search for the perfect grey led me to Ben Moore’s Revere Pewter. Have it in my open dining / living area and down the main hallway for continuity. I love it in every light and shadow. Your place is going to be gorgeous! It already shows:)
I think our neighbor, John used that color all over his house! It IS really amazing. It might be a little bit darker than what I had in mind, but maybe it could work. I agree——seems to look good in all lights!
Your house is the location for every Anthropologie home catalog photoshoot ever.
hahahahahaha, kind of!! Don’t worry…someday it will not be.
Regarding the ceiling: A couple of people have suggested those tin ceiling tiles. My first thought was somewhere along those lines but EIGHT MILLION TIMES CHEAPER–wallpaper! They have that paintable wallpaper stuff that LOOKS like the tin ceiling tiles but is really reasonably priced and easy to paint whatever color you want. I did a wall of it in my kitchen and it’s had no problems at all in the years it’s been up. I think it was something like $15 a roll at Lowe’s.
Daniel, your house is going to be so lovely! I just get such a nice feeling from it. It’s amazing to see the progress you’re making – you have really achieved so much in such a short time.
Paint colours: I would be inclined to try a green-grey, to avoid it turning beige. You could try out a large section (even the whole of that wall next to the front door), painting opposite walls different shades, then live with it for at least a few days to compare the tone changes in different light conditions.
Regarding the ceiling – get a few reputable contractors to take a look, and make sure you tell them you’re getting several quotes for the work. Then you’ll have a better idea of what’s involved and how much it would cost. I’d say this kind of work falls into the ‘hire it out’ category though, because you don’t want a ceiling coming down on your heads . . . that would be a whole lot worse than getting carpel tunnel syndrome.
I looked at your neighbours’ house, and was really impressed by their understated taste, so I understand how you are thinking of doing the staircase. I do like that a lot, but did you consider carpet or jute-like floor covering? You know the stuff I mean? There are lots of different patterns and shades. I had that on a little staircase once, and it is very hard wearing and is also very sympathetic to a period house aesthetic. Thought of that after seeing the hessian curtains at your neighbours’ place (which I also really like).
Finally, Daniel, as some others have already commented, please keep safety issues in mind when you are working! Get the proper ladders and supports, no dangerous late-night DIY sessions when you’re alone in the house, and make sure you eat extra large helpings of Ramen noodles to keep your strength up. It’s just a matter of common sense really, yes, as I’m sure you already know anyway . . .
Thanks, Thel! I’m less concerned about the ceiling falling down than just the amount of work/misery that would be involved in drywalling the ceiling ourselves. I think we’re probably going to need to redo the ceiling in the dining room and the front room, as well, so it might make sense to just hire it all our at once and get it over with. I have a pretty strong natural aversion to doing my own drywall (I’ve never done it…it just seems like the least fun thing ever, and hard to do really well), and I REALLY don’t want to have my first big drywall experience be with CEILINGS. But yes, we’ll shop around for estimates when that time comes and see…
I have thought about doing some kind of runner, but I don’t think I really want to do that. ESPECIALLY while we’re still doing so much work on the house…it would just get so dirty! But even after that, I think I’d rather just have them naked and fixed up. I agree that it’s a good option, though.
And yes, I’ll stay safe!!
Love what you are doing–that kitchen redo is spectacular.
Just want to say that the safest way to work over an open stairway like you have is to put a temporary cleat on the far wall and build a temporary floor covering the open part and attached to the part where the railing is. Then you can use a ladder on it. I have also seen dry-wallers use a “reverse stairway” that they can put on top of the stairs to create a level working space. It’s a movable wooden stairway that they can put upside down on existing stairs, moving it up and down as needed, creating a flat space to put the ladder on. The idea still makes me nervous though. Be safe.
Didn’t have time to read the previous posts, so forgive if I’m repeating, but have you thought about pressed tin for the ceiling in the entry hall? perhaps you could find some for cheap in a salvage yard?
If not, I’ve seen/worked on gilded ceilings in entries that are utterly sublime – perhaps something silvery? Doesn’t the thought of laying in your back on a ladder for countless hours applying silver leaf just sound FUN??? ;)
Hi Daniel, I look forward to your posts so much! You guys are my favorite. I went through pot after pot of gray looking for the perfect one for our open kitchen/living room, and Benjamin Moore Horizon Gray ended up being pretty close to the color you described, I think. It can skew a tiny bit green, but it depends on the light (ugh, doesn’t it always…). My favorite place I have ever seen it is here: http://fortheloveofahouse.blogspot.com/2011/05/master-bath-details.html Not my house or anyone I know, just really really pretty.
Oh, that does look like a nice color! So many factors involved in judging colors from photographs on a computer screen, but that does look like a great shade…
saw max’s post on designsponge of Julian Lesser and Philippe Trinh’s house and wonder if you were inspired by their raw wall at all. I’ve never been a fan but they did such a beautiful job mixing new (painted wall) with the old (raw ones)- it was downright nostaglic, and full of character. it made me think of your house and all the “wallpaper” walls.
Julian and Philippe did a great job on their house, but their style is really different from mine, as is their house! That said, I think the reason the plaster walls work is that they’re confined to small, cozy, fully-furnished spaces, like bedrooms and the den. This area of my house just has HUGE stretches of wall and won’t have very much stuff in it, so I really think this plaster needs to be painted or else it will look kind of incomplete in a bad way! I’m considering it for another room in the house, though! I’ll probably get tired of it immediately and paint over the whole thing, knowing myself…
It’s looking great. I hate washing wallpaper glue off of walls so I don’t envy you that job. Have fun! Have you thought about a patterned tin tile for your ceilings? That seems like it would fit the period of your house and save you from having to redo all the ceilings.
Your place is going to look so grand. Can’t wait to see it with paint!
I gave up and went with a taupey grey (Dulux Beige Royal, quarter strength) for areas in my place. Our house gets very blue light, especially in winter, and a warm grey on the chip would have turned icy on the walls.
Re-drywalling sounds horrible. Definitely worth getting a quote. Can you do a temporary fix with the ceiling? Even just sanding the bulges, plastering the dips and throwing on some flat ceiling paint can hide a lot of ugly.
We had (have) awful ceilings and walls, our house was rehabbed by drunk squirrels. A good plasterer can skim coat the ceilings and make it all work with the walls. It’s not even terribly expensive.
Yeah, I definitely want to have a consult with a plasterer before, like, tearing down the ceiling! I think it can be saved…the drywall is in OK shape, it’s really just the finishing work that looks so bad.
I like Benjamin Moore’s Intense White!
I used it in my living areas of our townhouse! Here are some pics so you can get an idea of the shade. :)
http://www.apartmenttherapy.com/shannons-modern-light-bright-room-194394
The 4th photo shows the true color best!
Great progress on the wallpaper removal! Excited to see what color you choose in here! :)
Oh, yeah, that looks nice! Thanks!
I was definitely on camp don’t touch the wallpaper! But now? All bets are off. You’ve convinced me!
Wow. Isn’t stripping wallpaper just the most satisfying thing? If I lived closer I’d help!
I have to say I’m enjoying this so much, probably more than I should. I’d like to suggest planking the ceiling with pine, v-channel boards and then painting them white (or not?). Lowe’s sells a somewhat cheap, very thin product that we just installed on our laundry ceiling. It goes up relatively quickly with a nail gun. John and Sherry at Young House Love just installed it on their back porch ceiling if you want to check it out. We used the 4″ boards vs. their 6″, but both are nice. Cheers to redoing a ceiling w/o sheetrock work! :)
Thanks, Robin. That’s actually what I used for the plumbing chase in my kitchen, so I’m familiar! I don’t think it’s right for this space and the era of my house, but you’re right——would be nice to not have to deal with sheetrock! :)
I’m so excited to see this foyer come together. It’s gonna be gorgeous! I have Stonington Gray (Benjamin Moore) in my foyer and love it. It’s a perfect straightforward light gray.
I found Benjamin Moore’s Owl Grey and used it in my house, I love it. It’s just dark enough to give contrast with the white trim and is a neutral grey that doesn’t look purple, blue or green (that being said someone I know tried it in their dining room and said it looked baby blue).
http://www.benjaminmoore.com/en-us/paint-color/grayowl
That is definitely worse than removing popcorn ceiling stuff yuck! I am happy to see the transformation coming along. exciting, yet a whole lotta elbow grease. It will all pay off. I actually brought the water hose into my home to remove the popcorn and my partner had a FIT! LOL good luck!
Yikes! Yeah, we have acoustic ceiling tiles, but I’m SOOOOOO glad we don’t have popcorn anywhere! I think I’d lose my mind!
(assuming you know that if the popcorn was applied before 1970, it likely contains asbestos? in which case the water hose is a good plan!)
Thank you for the phrase “misery-fun,” because I seriously needed a way to describe things I like. Including peeling old wallpaper. Speaking of which, I am 100% down to help out with any house stuff if y’all need a hand. Making grime-y things nice is my favorite. And organizing. And cleaning. I cook too. WHY HAVE I NOT BEEN WIFE’D YET?!
This has been real talk with Jill.
Be careful what you wish for, Jill! People walk through my doors and I put them to WORK. I’m a total slave-driver.
I can attest to this. Dad and I came to check out the new digs and I was put to work on wallpaper removal. I still have the remnants of a blister to show for it. Idea: put the work gloves on before you get the blister, not after.
I gave you a blister?! Nobody leaves my house without injury!
As long as Max and I can dance to Britney’s new song about working while we work, I’m willing to subject myself to possible slavery.
I was looking for that exact same gray! After legit 12 samples, and having the Lowe’s guy continually ignore the fact that I HAD THE RECIPE and he DIDN’T NEED TO LOOK IT UP, I ended up having Wal-Mart color match the sample he gave me– that may or may not actually be “Gray Pearl” from Martha’s old line at Lowes. (Not her current Home Depot line.)
Here’s my inspiration photo and the formula if you want to try it: http://www.pinterest.com/pin/255790453809065102/
It does have a fair amount of blue, but I feel like that’s just inevitable on a dreary day. In any case there is NO yellowy beige, and isn’t that the real goal?
If you still have those gray paint samples, try them again! We have Pratt & Lambert “pearl white” on our walls, which is lovely, but my friend tried it at her house and her lighting made it read a less flattering gray. You’d be surprised what a difference it makes! Another neutral we love is Pratt & Lambert’s “lambswool” which is a perfect neutral tan. Trust.
It looks awesome! I have serious home envy right now (as in, almost want to buy a house that needs serious TLC).
It’s looking fantastic! And can I say I’m a bit relieved to hear you say that you almost want to hire someone just so it would be done? We finally reached that point with our bathroom, after 2 years of it being studs. Especially since right now my husband and I are working about 160 hours a week between the two of us.
As for paint color – for the love of all that is holy, please do not use the super-trendy 50%-lightened Gray Owl like everyone else. I’ve been loving some of the Valspar Allen + Roth grays recently, but I’m sure there are other (non-Gray Owl) Ben Moore colors, or Clark & Kennsington colors that would be perfect, too.
Ha! Strong feelings! I had no idea that 50% lightened Gray Owl was such a trend! I am so not kewl enough. :(
I tend to have some strong (read: ragey) feelings about things. I think it means you’re avoiding picking paint colors because someone else says it’s the OMGBESTCOLOROEVAR and so you blindly choose it without looking at it in your house’s lighting. It makes me all stabby when people do that. Possibly it also means that you don’t read many blogs full of cutesy, cottagey, shabby-chic-threw-up-all-over style houses. Which sounds about right.
For the record, I’m sure Gray Owl is a lovely color when picked for the right reasons. Just like “mocha” (gag) floors in the right situation.
Caaaaaaaait! Fancy seeing you here!
As for Grey, I like Touch of Grey CIL, but that doesnt exist in the US (Go Canada!) It is an awesome light grey that has never looked anything but grey to me.
For the few first commenters that suggested Silver Drop – I almost agreed until I remembered that it does, indeed, go too beige! We just went through this gray-swatch-hell ourselves, trying to find the same thing you’re looking for:
http://www.yellowbrickhome.com/2013/09/09/prep-and-paint-sort-of/
Silver SCREEN (also by Behr) might do it for you though. We actually settled on a cool gray, Subtle Touch by Behr. In the awful hideousness that is our current overhead lighting situation, it looks slightly purple, but in the natural light that it will get once we install our new door and transom window (hopefully sooner than later), it’s a very bright gray. Still light, NOT warm, and contrasts against pure white trim!
I am looking at all your work and I’m ready to burst into tears of joy. I love houses, beautiful architecture and it makes me really sad when I see how people can abuse their homes with silly and ugly treatments… It’s obviously a very beautiful house – or at least it was once. A lot of crime against architecture was committed in this house, but we can see that you will restore it to it’s previous glory! Nice job :)
I tooooootally understand what you’re saying, Agata, but it could be so much worse! A lot of the truly unflattering alterations to the house were made to split it into two units, but they really were easily reversible, all things considered. They could have completely removed those two doors in the entryway that were blocked with plywood and drywalled over the openings, or torn down walls, or any number of things, and I’m just so glad that never happened! I really don’t know much about the previous owners, but they lived here for 40 years and I really do think——however misguided some of their fixes were——that they loved and respected this house as well as they knew how and under whatever circumstances they were in. That’s really why we bought it in the first place——I was just completely in love with all the original features. It’s not often that houses like this have all the original windows, all the original doors, the original layout, moldings, flooring, etc. etc. And really, when stuff like the wallpaper paint was done, I’m sure it was amazing! It’s suffered a lot of fading and damage over the years, and it’s not exactly appropriate to the house, but I bet it used to be killer. And a TON of work/effort, which people don’t exactly expend if they don’t care…
ANYWAY. It’s probably worth writing a post about this stuff…maybe if only just as it pertains to the history of the house. We’ve found out some interesting things!
Yo! I’m loving this all. Seriously. I look forward to these posts so much.
For the stairs–yes, strip and stain the treads to match. They’ll be beautiful.
The ceiling–We lived in an old home from the 1860’s. The dining room ceiling was in a similar shape to yours. We had some contractors redo it with 3/8″ gyp board screwed right over the plaster and lathe (into the ceiling joists). No need to demo at all. I think they had the whole thing screwed and taped in the course of a couple of hours. And for cheap, since they were moon-lighting for us on a Sunday afternoon. They came back to finish it off a weekend later. We did the priming and painting ourselves.
I’ve considered that, but I can’t add any thickness to the existing ceiling! As it is, the ceiling overlaps the top of the front door molding VERY slightly, and it’s flush with the cut-out part above the stairwell, so adding another layer of ceiling in either part wouldn’t work here. I’ve seen that done in plenty of applications, though, and it works great! Our kitchen ceiling is actually like that, except we didn’t do it. Someday when we renovate it (again) I’d like to demo out the entire ceiling and start fresh…it’ll be fun hauling TWO layers of drywall AND plaster and lathe out of the house! O_O
I went through 12 paint samples before I found the one I wanted. I used Quill by Olympic. It reads very beige on the sample but in my house it is a perfect creamy grey.
Here is a picture of the grey.
http://tinypic.com/r/2dj5s91/5
Your last paragraph got me thinking. I had, then had stolen, but now am on the way to recovering, (long story) a 1959 Austin mini which I painted the original Austin/Morris colour Farina Grey. I know that’s a car colour, but I know colour better than anyone I know (artist), and that colour is consistently a warm neutral grey without going horrid green or violet. Just a thought. :) Well done on the wallpaper. I had one house with about 17 different wallpapers in it and one was black with a huge, wall sized silver bloom which started in one corner, twirled its way up the wall and swirled around with silver leaves and buds then bloomed one insipid, two foot wide bloom in the middle. Who thinks of these things?
Oh man, that sounds…glamorous? hahaha. I want a picture of that!
Just an idea for all that wallpaper (and that stupid contact paper from the kitchen), I hope you keep semi big pieces of each one (8×10 ish) to frame and hang in a gallery wall when the home is finished. Would be a nice reminder of how far you came in this whole process.
I love how quickly you’ve revived the “historic” in your home. I can almost see ghosts of 19th century children running up and down those stairs now, in a really good way! BTW, Valspar Bay Waves.
Yes!!! So excited for you guys!! Please, please, please do a post about the ceilings! Followed the blog for a few years now & when you guys bought a home I immediately thought FINALLY he’ll address some of our own old house issues & You are! Thank you so much for reinspiring us to finish those over looked problems like a disasterous ceiling! FYI- Every post is like Christmas morning! Love you guys! X
:)
Cabinet Designers out on Rt. 28 in Kingston has a color specialist in their paint department. They have huge paint chips too. Joan helped us choose paint for a renovation and is restoring an old house herself.
Your hall looks great.
Thanks for the tip!!
You’re stairwell and railing is dreamy. It’s gonna look great.
Hey! I’m new to your blog. And don’t you dare expect me to be quiet. I’m loud, and I’m here. And I LOVE your house. I could seriously bone your house for hours. You guys are doing a great job. Wall paper stripping is like that weirdly wonderful feeling of peeling off a sunburn. And then you’re left with nasty dead skin all around. But your walls are headed for a sweet salvation. I’m enthralled to see what happens next :)
BM Silver Chain – though it may be more concentration than you are wanting.
And totally pay someone to do your floors. Even hiring some Vietnamese guys in the city and sending them to the house would be more affordable than diy. Couple thousand.
I’m so jealous that you can work your ass off on wallpaper and crap like that! Why is my home so perfect!?.. I also should buy an old house to use my lifetime doing these awesome tasks 99% of people in the world dont find enjoyable to do :D
And i know the “gray-problem”.. i thought i found the perfect tone for my living room – turned out that it looks anyway greenish, pinkish or whiteish depending on the time of the day.
I see someone has already recommended my favourite Benjamin Moore grey shade (Revere Pewter). We also used Titanium in our home. It’s a very, very light, almost silvery grey. Not sure if you want to go quite that light, but something to consider. I love your idea for the stairs. We had the original reddish-brown gumwood stairs in our house when we bought it. We painted the treads and banister glossy black (using marine paint) and the risers are white. Looks so fresh with the contrast and really brightens up the whole stairwell.
This is SO amazing! Just jaw on the floor amazing. I am glad you decided to do this room. When you are working on all the others, to have this and the kitchen when you walk in the door each time will give you a lift instead of a drag. Not many people have this kind of vision. Amazing. (did I say that already?)
Daniel it looks so friggin awesome!!! Wallpaper removal is a torturous pain in the ass, but instant gratification!
Hehehehe. Misery-fun. hehehe.
Anyway. The hallways is looking so great! That’s some serious hard work going in to those walls, so impressive…
When it comes to wall color, The combination light grey, white trimmings and dark doors sounds perfect. I painted the walls in our hallway a very light grey – so light you could hardly see it wasn’t grey until you compared with the trimmings – and I’m really happy with it. Do you guys use NSC-codes for color over there? For me that’s the easiest way to decide on color, since if you can interpret them the codes are really descriptive. If I don’t remember incorrectly we used NCS S 1000-N, so that would be a completely neutral grey. http://www.ncscolour.com/en/ncs/ncs-navigator/
I feel like I’ll spend my entire life looking for a grey that doesn’t go blue or purple, and is warm without being at all beige or taupe or anything like that. Also, super light but not in a way that reads as white.
Try BM Lacey Pearl ?
:)
I LOVE Lacey Pearl. Anna at Door Sixteen painted it in her guest room, and it’s reallllly lovely. SLIGHTLY lighter than I was envisioning for here, but I don’t know. I really do want it very light…anything too medium-tone is a bit too conservative for my taste, I think.
Have you looked into seeing in your house qualifies as historic? You might be able to get some tax breaks / grants to help with the cost of hiring out!
Have you looked at BM’s grey owl? I know everyone uses it, but it’s a pretty middle of the road, very light grey. We tried a couple others (iceburg, revere pewter) and this one stayed the most grey while being very light. Iceburg looked blue and revere pewter read beige (not grey at all! boo) on our walls.
P.S. I think you should invent that perfect color (aka mix all the samples together idea minus the shame and crying…) and give it a really cool name that has nothing to do with the color itself, like…”High Knees” or “Fountain View” or “Candy Maldonado” (that’s a real person, and happens to be my dog’s name..but I digress…). Challenge accepted?
Benjamin Moore Moonshine is the best grey ever. Not too cool, not too warm, not too attention grabbing, not too sterile, not browny, not bluey. I got it from Young House Love’s second house — they used it in the hallway.
Definitely worth checking out.
Absolutely LOVE what you’re doing with this house. I had a similar stairway wallpaper removal scenario that I solved like this: http://diydiva.net/2012/09/scraps/ (2×10 balanced on the railing and a ladder. That sound you just heard was someone at OSHA falling over dead at the sight of this…) Eh? It seemed like a good idea at the time, but lots of things sound like a good idea after midnight when you have a wallpaper scraper in your hand. Anyway, a few weeks after this bit of brilliance I did a little asking around and found out you can rent scaffolding for a stairway from most equipment rental companies for $25/day. Might be worth it.
OMG! OMG! OMG! I can’t even look at that picture! You’re crazy!!!
Damn, could you possibly work round the clock – I am just loving all your updates and it’s torturous to wait so long ;-}
I am just loving everything you guys are doing!
I kind of do!! But I’m trying to blog more…I didn’t mean to have so much time lapse between posts! I have a lot to blog about!
MAXWELL TIELMAN of design sponge fame is YOUR MAX. Holy Cow… mind blown. Your future kids are so lucky.
Ha, yes! I nabbed him when he was just a college student, filled with big dreams and promise (and also cuteness). :)
I’m so glad that you got rid of that wallpaper yaaay!
This transformation is just amazing!!! Maybe you’d like Stonington Gray or Gray Owl by Benjamin Moore?
You have such a beautiful mid-19th-century Greek Revival Italianate house. Love the simplicity of Greek Revival. Re the stairs, I’ve seen people prop a ladder between a tread and the bulkhead over the stair. Re the floors, I agree it is best left to the pros. You can find someone very, very experienced who will do it for $1 to $1.50 a foot. Pine and fir are very tricky to work with, as they take color unevenly and can turn horrible shades of purple, yellow and orange. Usually staining them a dark color is not a good idea. An experienced person should be able to get good results (with a medium or light shade) by testing first and using a sealer before they apply the stain. Also, what kind of poly you choose will affect the color — four coats of satin works best in my opinion. (Don’t worry if you can’t see the poly — it will show up on the fourth coat. We panicked and switched to semi-gloss and ruined our floors.) Re the ceilings, ceilings are tricky. Best to pay a real plasterer to do it right. Not sure how big your entry is, but will probably cost $1,000 to $2,000 to fix the ceiling in that space. Re wallpaper, that stuff looks like it could be wallpaper liner put on in the early 20th century to “preserve” the plaster. Unfortunately, it’s not acid free so it disintegrates long before the plaster. Nice job on removal. I’ve got some 50s/60s flocked paper that won’t steam off even with a scoring tool. Anyway, have been following along for quite a while and am totally addicted to reading about your Hudson Valley place.
I actually feel like I can breathe looking at the “after” picture. Well done!
I reno’d a bathroom recently, and painted the walls “Coastal Fog” by Benjamin Moore. Online images that I’ve seen of it read strangely, from beige to lavender, but in person, it’s just a lovely, whispy light grey.
I am really enjoying following along with your renovation. I took down wallpaper in my own house and agree that it can really be fun in a weird sort of way. Your entryway is going to be beautiful. The color on the bannister and matching treads on the stairs will be fantastic. Thank you for sharing with us.
I love following the progress in your house. Living vicariously through you and Max, since with the house prices in Germany, it’s doubtful I’ll ever own anything.
But, even as a renter, there’s lots of renovating going on, and I say: do get thee a builder’s lamp! Ok, no idea what the actual English term is (we call them ”žBaustrahler”), but they are cheap and bright and are made specifically to bring light into rooms with insufficient or turned off lights while renovating. They look like this:
http://www.arturus24.de/images_extern/tools/varopromo/licht/powli025/halogen_gr_powli025.jpg
Really cheap, and with long cords for plugging in in rooms where the electric isn’t shut off while you rewire your ceiling lights etc. Dead useful! I’d suggest buying a pair. They’re around 20€ including taxes and last forever. You’ll love them! Renovating all through the night will be so easy!
I know, I need one!
This is looking amazing! Also – totally feel you on this grey situation. Still searching myself.
thanks for the tips! im sure it will be very helpful when i tackle the wallpaper in my hosue
I see there have already been eleventy thousand paint rec’s given, but I had to pipe up for Valspar Notre Dame. It is a true medium cement-color gray. Not too blue, just straight gray.
So many suggestions already – but have you looked at (go with me here) the Martha Stewart Living “Heavy Goose?” color? It’s a true grey, without going purple or taupe – it can go warm or cool depending on the light. But next to white trim it definitely doesn’t look white. I looked at a bunch of different colors and settled on this one, and loved it everyday.
I need to spend more time with the Martha colors! I love Martha, and her paints always look really good when I see them in pictures. I’ll check it out!
Excitement builds with your every update, Daniel!
How about a beadboard ceiling look? Easier to install than re-drywalling and gives an opportunity for color. Hard for me to picture with your mouldings and all, but maybe …
YHL recently did a post on a beadboard-style ceiling they installed: http://www.younghouselove.com/2013/09/well-take-one-beadboard-ceiling-please/
What an improvement! And I didn’t notice before but I live the scroll detail under your stairs! So nice!
We’re having our floors redone professionally too, they are just too big an investment and I am hoping they can tone down the orange a bit. I wish we did them right away tho! We moved in october (almost 5 yrs ago) all the floor places were back-logged until late january due to people wanting to get them done before the holidays. So we said fuck that for now since some of the floors are in good condition and spent money elsewhere BUT now I am so not looking forward to moving all our furniture out to deal with the floors.
I totally get it, Sherry! I’m having that debate, too…get the floors done ASAP and be extra careful about them while we do other renovations, or wait and do them when most of the other big stuff is done, but we also have huge furniture to move and deal with???
Have you decided what you’re going to do finish-wise to tone down the orange? That’s the biggest thing I don’ love with my floors…
Pratt & Lambert “Winter’s Gate”. A fabulous, totally neutral grey. used it in my last apartment, you can sort of grasp its awesomeness in these photos: http://anotherbrooklynblog.blogspot.com/2011/04/bum-bum-bum.html Not beige, not blue or purple-y. Just… PERFECT.
A friend bought scaffolding off craigslist and then rents additional pieces to add onto it as needed. When he’s done he can sell it again on craigslist and get his money back. Might be good for interior work, ceiling work and exterior work.
You know, I’d be tempted to treat the obvious seams in the ceiling like you would a crack, just carve out the bumpy part, fill and prime. I say there’s nothing that can’t be fixed with a little mud. But then I did sand and skim coat our textured ceilings. Now THAT is a miserable job.
DANIEL, Promise not to plummet; we can’t live without your clever, funny and inspiring blog.
That vestibule is going to be dynamite!
It looks AMAZING!! What about tin tiles for the ceiling? Might cover up the drywall mess and add a little drama? Don’t know if it’s the right period though….
Oh man.. I can totally *smell* that wet wallpaper. It’s taking me back. hah
Do you know about plaster washers? They have been invaluable for me. I used over 250 in my dining room alone. After cutting out cracks with a utility blade, I stagger the plaster washers on either side (I chisel out a circle into the plaster so that the washer is countersunk and even with the wall). Then, I fill 3/4s of the crack with Durabond and finish off with easily sandable drywall compound. Hardly any cracks have returned and my walls are incredibly solid, and it’s been 9 years in some rooms.
Anyway, you’re doing an amazing job! Your house looks so much better already.
I’ve never seen those, but thank you!! Definitely could be helpful in several areas!
This is absolutely stunning and proof that this house so very desperately needed you to come along and save it. Also, may I suggest Ben Moore’s Revere pewter? A soft, subtle gray and I don’t detect any purplishness to it. Can’t wait to see how things unfold!
Daniel, I see that you stopped doing the wallpaper removal at its most precarious. This brings back memories of angled ladders and death defying balancing acts. I still can’t believe we did it that way (and I can’t believe the previous poster who used a 2 X 10-nuts!). I’d suggest scaffolding too. Please be careful…
I can’t think of anything else to add to all the comments about your fab. work here, but one important note – make sure you get rid of ANY SOAP RESIDUE on the walls before painting…otherwise there is the utter misery of failed paint adhesion to look forward to…and stripping that really makes wallpaper a fun job.
Your progress is so inspiring and wonderful! We too are renovating a duplex, though it is nowhere near the state yours is in — the aesthetics aren’t the greatest.
One thing we are wrestling with is peeling paint and cracks occuring over our plaster-on-lath walls and something that professional painters have advised me to do: prime your plaster prior to anything else. Supposedly, the plaster has an acidic contact which makes bonding almost impossible over a long period — hence flaking paint and cracks. I was even advised to prime BEFORE doing any plaster repairs to maximize chances. This seems counter-intuitive, but so far nothing has cracked! So on bare plaster: prime! I’ve been using Zinsser oil paint.
Yes, I’m definitely planning to prime!! We’ll clean the walls well, but aside from the plaster itself, I want to make sure we seal in any remaining traces of wallpaper adhesive that might mess up the paint. I’ve learned many times over that good priming is NOT to be underrated!
Regarding the ceiling dilemma: tin ceiling tiles?
Have no idea about cost or historic suitability…but thought that covering up the ceiling might be an easier work around.
hey, i know that you said the ceiling was drywalled, but if you do have plaster ceilings in disrepair, check out this post: http://oldtownhome.com/2012/4/17/Toolbox-Tuesday-Plaster-Buttons-to-Fix-Your-Crumbling-Ceiling/
Thank you, Wilma! Another commenter recommended the buttons as well, but it’s great to see them in action! I never knew this existed before…very exciting!
Their entire blog seems to be a lot like your’s–they’re just 10 years in! It’s sooooooooo cool to see you doing this, right from the beginning. Living vicariously, I must say!
Also, if you want a cool souvenier from *your* work, have you considered a guest book for your workers (I mean, friends, ahem) to sign when they come to work (visit)?
Aka plaster washers, and sadly, not easy to find in the usual outlets. I’m also dealing w/ original 1870’s plaster, and have looked in Lowe’s, Home Depot, and various hardware stores all over this area (Pittsburgh). There are so many old houses here, you’d think local stores would carry plaster washers.
ps We rented sanders from HD to do our pine floors, and while it wasn’t my favorite thing to do, it wasn’t that bad. Used Osmo to finish them and are very happy with it. It’s a lot per can, but we did three rooms, three coats per room, with 1.5 gallons. And one of those rooms was 22 feet square. I love Osmo. It’s also super easy to repair scratches, unlike poly.
Daniel, check BM #1460 – Silver Dollar. Awesome house!
Your posts are my secret treat, the kind I hoard to savor with tea, hot chocolate, or — let’s be real here — a stronger quaff. Although your personality and writing are the best thing about your blog (love your decorating style, too, of course), your readers’ comments are a close second. Can’t think of another blog where I get as many chuckles out of the responses as the original post. So way to go, Daniel AND Daniel’s loyal readers. Keep it up in both arenas! :)
What about a blackened white like this…
http://www.designsponge.com/2013/09/a-light-filled-london-loft-with-a-dreamy-kitchen.html
Also, adding to (maybe duplicating?) the eleventy billion paint suggestions, here’s a pricey one (color matching possible?), Pratt & Lambert’s Wolf, shown here: http://www.apartmenttherapy.com/a-baby-bachelor-pad-with-a-bit-138823
oooh! oohhh! Let me tell you what color of grey to use — NOT! Ha, I’m so far ahead of the trends I painted a room Revere Pewter over 30 years go but that’s all I know about grey paint.
Now to be serious — even longer ago than the grey paint, I lived in an 1870 house with 3 stories and stairwells like yours to remove wallpaper from, then paint. We didn’t hava a lot of money but we did have a sturdy extension ladder. We secured that to the stairs a few steps up from the floor/landing below so the top of the ladder rested at a slant on the wall near the top of the stairs. Then we rented from a tool place a scaffolding board — probably maple with narrow parallel slats that pulled apart making it twice its closed length — and it was not the least bit rickety as it was designed for this purpose. This was long enough to reach a step at or near the top and from that I was able to walk up and down the scaffolding board to reach all walls (and I’m only 5’5″). It worked great, but probably helped that I was 35 years younger and had a couple of beers before I got up there.
Heh heh; Amazing what a few years less and a couple of beers can do for your confidence…(sighs nostalgically)
Okay, I got…very sick…this summer and I missed a LOT of your updates! Whoa. Whoa. Just whoa. That kitchen. Whoa.
I may be a bit late on part of the house for this, but you surely still have more demo to do… You. You NEED this tool:
http://www.ebtoolcompany.com/kwickgripper/
Here’s where I heard about it and have posted some commentary on its quality and ohgodohgodohgod its usability:
http://toolguyd.com/kwick-gripper-nail-puller-now-available-and-10-off-coupon/
[Insert happy swearing here], this thing DOES what it claims to. Someone [me] with a really bad shoulder and wrists can get rusted, long, stuck nails out of very hard old pressure-treated wood with minimal effort and pain. Think what you could do :)
~ ~ ~
Keep an eye on Craigslist for people selling table saws. They’re so incredibly useful and you can find old ones in good working condition that will last forever, pretty cheap. And you even have somewhere to put one. Incidentally, I’m planning a separate wood shop in my new farm, but I’m also planning to use the house’s mud room as an interior workshop for smaller and less noisy/messy projects; you may want to consider that before you reduce the size of yours.
Among other things, I am pretty sure it will be the dog bath/grooming room, with a giant sink for handwashing when coming inside… and bathing spaniels, with a counter next to it for grooming without bending over (not that any giant sink could hold Mekko, but you could look into a tub maybe). Heh. I have my own clippers, but I know exactly what you mean about Linus coming home looking like a totally different dog. My severe-allergy dog who gets her coat clipped really short goes from looking like Mr. Ages in /The Secret of NIMH/ to a sleek and elegant little thing. At least until she moves, and reveals that she has no grace or dignity :) It’ll be a lot easier to keep her clipped and groomed with a dedicated space inside to do it.
~ ~ ~
Incidentally, have you considered that your garage may initially have been a carriage house?
Oh hey. I did mention previously that I knew someone who undertook a very similar renovation (wonderful old house cut up into multiple apartments, doors in walls, so many layers of flooring and plywood and more flooring that in some places the floor sank under the weight into a bowl shape, strange decisions like cutting through _a_supportive_beam_ to add an AC vent, weird additions, weird adjustments, horrible age-related disasters, etc). Her separate garage was known to have been a carriage house, for what it’s worth.
Anyway, one of the weird things she had to cope with was that one of the owners had been friends with a concrete company owner. At the end of the day, he’d have concrete trucks come just dump their excess concrete (not much) in the “driveway” of the house. So there was something vaguely resembling a driveway, but made of dribbles. Uneven and horrible and randomly placed and shaped and…oh geez.
She looked into it, and discovered the best option was to call a concrete recycling company. They came out and removed it and took away the pieces. They did charge her for it, but less than what other contractors would have charged, and the concrete got reused. Perhaps there’s something similar for asphalt?
I’ve been washing wallpaper paste off walls for the past 3 days. I hate this part! Just want to get to patching holes, priming, painting and decorating now! Our house is only 33 years old, but has 7 rooms filled with wallpaper (ugly, country, cutesy, 80’s wallpaper in peach, mint green and purples – Oy!)
Keep up the great work, Daniel. I am SO enjoying your writing, humor, and mad design skillz. (I’ve looked at your kitchen reveal post about 6 times over the past week – I am just THAT amazed!)
i painted my bedroom in nimbus gray by BM and i love it. warm but not taupe-y AT ALL. my doors and trim are painted in simply white, and the grey is definitely noticeable against the white, but it’s pretty light. my bedroom faces east, btw.
this first picture is a good representation: http://www.houzz.com/Nimbus
As soon as I saw that post title, it sent me to memory lane to 5 years ago, when I removed all the nasty paint over wallpaper from our vestibule/entrance/2nd floor in our house, . The horror removing little piece by little piece, cleaning the walls after and the mucus look alike thing that came off from the walls… yuck! the close friendship that I had with the bucket of joint compound to “fix” the walls and fill in holes…
it was all worth it, I can’t wait to see what you do… btw, that kitchen. WOW!
Daniel, I love this house more with every post! Two suggestions for you. 1. beadboard on the ceiling. This was the answer for us in the kitchen of our 1906 Victorian. We love it! And 2. Benjamin Moore Grey Owl – a wonderful soft warmish grey. Keep up the good work!
I like the print of that old wallpaper — I thought from your earlier pictures it was a light green background with a dark green print, but now when I see the close up picture, it looks cream with brown/gold/something/whoknows/ancient. (Or maybe it’s the same stamp, multiple places.)
I would love to have that pattern on a fabric, like through Spoonflower!
Either way — congrats on finishing the wallpaper, what a nightmare. -_- I helped my family take wallpaper off a teeny tiny bathroom once, but it was enough, just scrubbing at that horrible glue with toothbrushes… Kudos to you, sir.
I enjoy that you enjoy removing wallpaper. I do too – so satisfying! Have you looked at Benjamin Moore, Balboa Mist? After a lot of deliberation, I ended up going with it for a warm light gray in my old apt and I really loved it. It turns out feeling lighter than how it looks on the little swatch.
Gorgeous. Way to get rid of that yucky wall paper!
Mythic’s “Silver Side” was the only gray that stayed gray in my house. The paint was a bit pricey, but it went on really well. I just pretended the extra $20/gallon was both my personal donation to saving the planet and a reduction in future medical bills….
I totally agree with you, wallpaper stripping is SO calming and satisfyng! I use a different method than you did (no scoring tool, only steam), but I guess different wallpapers require different approaches :) Your hallway looks more and more amazing with each blog update. I can’t wait to see it finished, although the progress updates are so much fun to read that I kind of don’t want them to ever stop!
Daniel, try Ash by Restoration Hardware for your perfect pale pale gray. It’s the main color in the downstairs of our home, which has a lot of windows but still not much natural light (too many trees).
Wow, great stuff. This house is going to be AMAZING.
One thing I feel I should point out though, is that you probably want to be very careful around that beautiful antique light fixture. The shade (if it’s a real original) is an art-glass shade and it’s worth well over 100$ (just the shade). The fixture is from around 1910-1920.
I love the opened up entry and hall. Your vision was absolutely spot on. Years and years ago I stripped the wallpaper in a small bedroom. Did it in midwinter in Minneapolis, using a steamer, and it was like being transported to Hawaii for a few hours. (I hope your experience is as pleasant.)
Daniel – check out this grey!
http://www.chezlarsson.com/myblog/2013/10/gray-wall.html
Hi Daniel,
What beautiful bones that house has but that wallpaper project!!! That’s why you are my inspiration…. keep going, you are amazing!
xx
Airi
Sleigh Bells by Benjamin Moore is my go-to gray. It’s the WORST when you’ve just finished painting a room only to realize that it is either baby boy blue or lavender.
Hi Daniel, I spent the weekend binge reading your blog and got as far as 2013 so far. So glad that I did. I can really appreciate how far you’ve come. You probably chose your gray by now but if you didn’t, I hope you’ll look at Farrow and Ball “blackened”. I used it in our midcentury apartment (eastern & northern exposures ) and I LOVE it. It’s ethereal, goes with all my midcentury furniture and art work, and looks great in every light. I actually used Ben Moore paint matched to F&B Blackened because the Brittish primers scared me away. Anyhow, it turned out great. It’s lighter than your lightest sample here, without being ever mistaken for white.