
I did that!
If you’ve been following my blog for the past several of months, you’ve been pretty familiarized with the back of my house. I wrote a few pretty detailed posts about the process—which was somewhat grueling in the way that restoration work often is—so I won’t rehash the whole thing here. Suffice to say this was one of those projects that started as a fairly modest proposition and spiraled into a much bigger endeavor than I was prepared for.
Because this area of the house saw a lot of abuse over the years in the form of additions, non-original doors and windows, and the conversion of the house to a duplex with the legally-required fire escape, this is probably one of the more heavy-handed renovations this house is likely to see under my care. Most of the house is an extended exercise in restoring what’s already there, but this wall needed to be re-thought and re-imagined. Absent any evidence of how it looked back here originally, well, I kind of just had to let the house dictate what it seemed to want (with a little help from nearby examples). I know that sounds like voodoo, but that’s how I make probably the majority of my decisions about my house. We’re buds by now and she tells me what she needs.
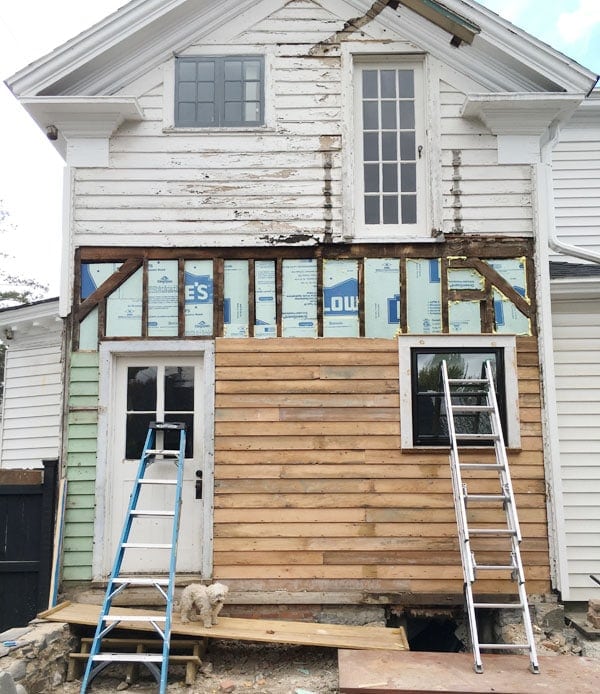
SO! Additions were removed. Approximately 4 billion pounds of concrete got jackhammered and hauled away by the truck-full. Vinyl siding was removed. All original clapboard was removed. All original brick and mortar insulation was removed. Then the walls were insulated. Original clapboard was planed down to remove all old paint and crap, then carefully put back up. New windows were framed, trimmed out, painted, and installed. Cornice details were restored. Siding was primed, caulked, and painted. Even the eavestrough on the laundry room roof was rebuilt. By me! I don’t know why I’m writing all of this in passive voice, because it sounds like it happened by magic.
It was not magic. It was a shit ton of work.
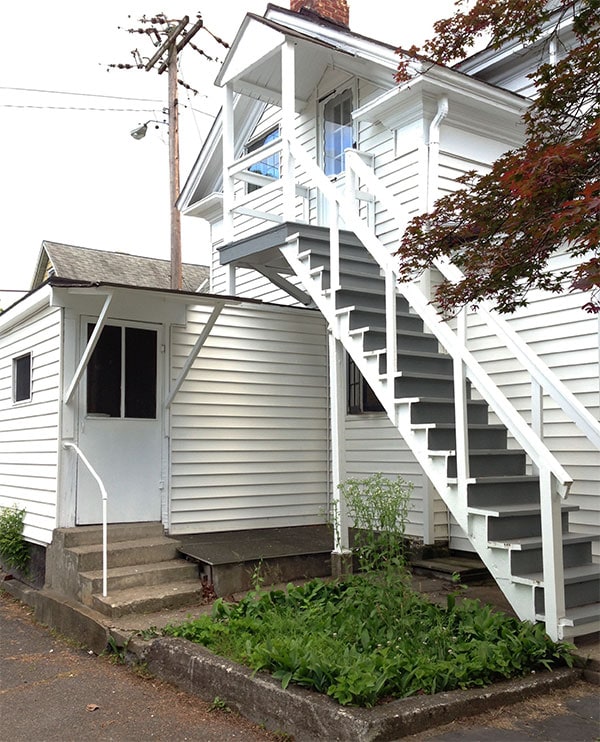
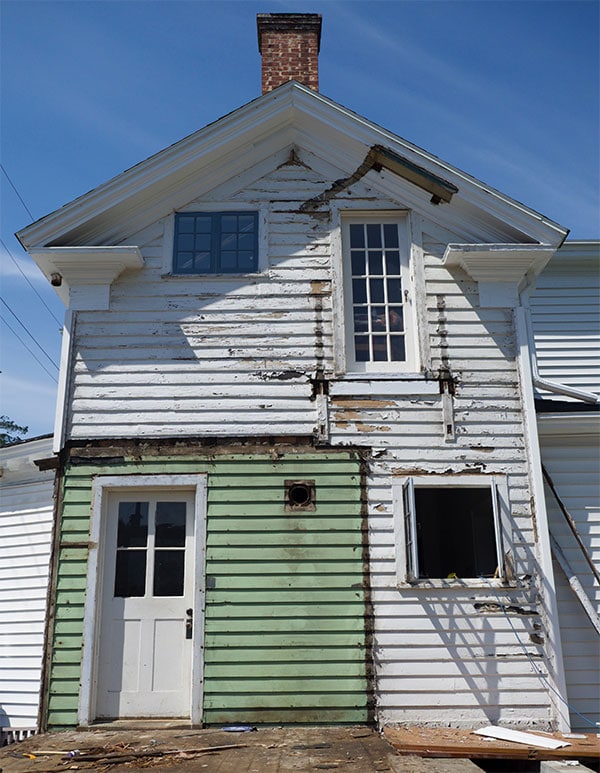
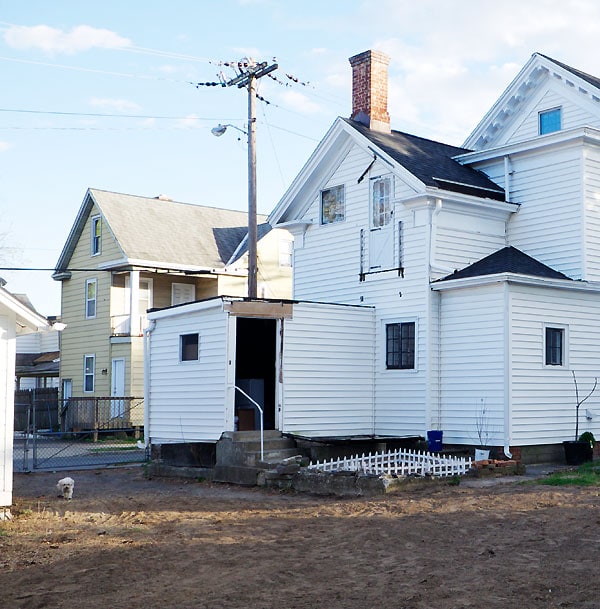
Take a gander at that! This is when I bought the house. I honestly don’t even remember thinking it was so bad but now I think it’s really pretty bad.
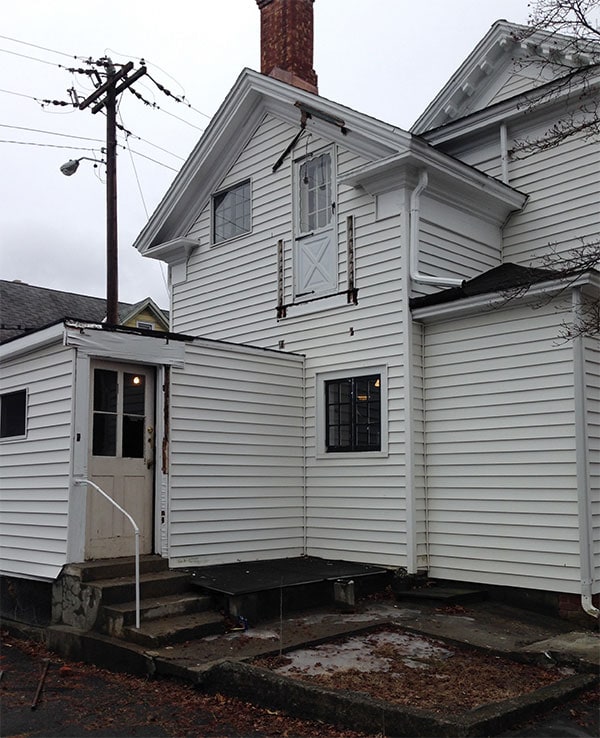
Fast-forward a year and the roof has been redone, with the overhang over the mudroom door and the fire escape removed in the process. Then that second floor door continued to hang out there, leading to nowhere, for roughly two years. It remained locked throughout the entire duration of that time, but it still looked a little…unique.
BOOM.
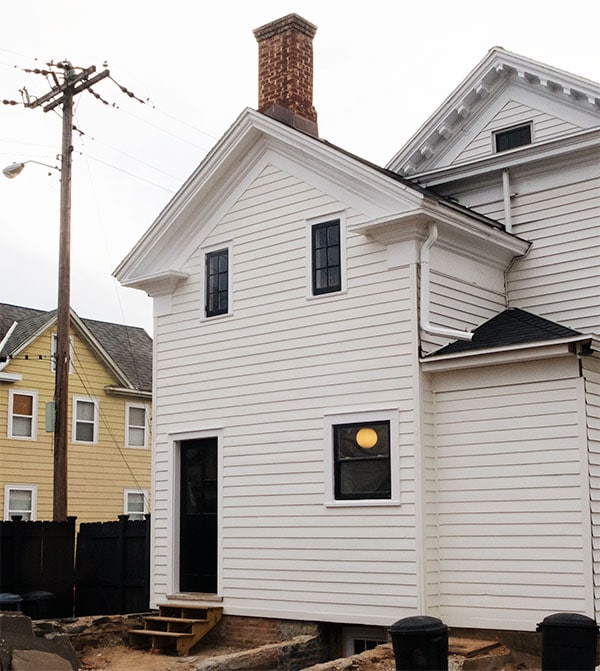
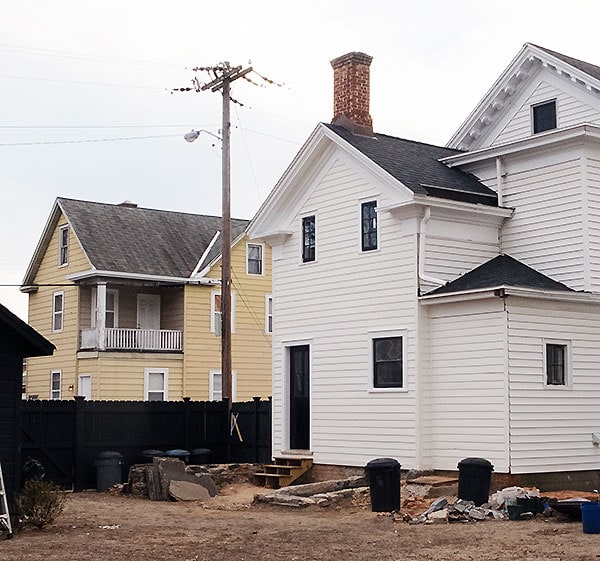
I’m sorry I didn’t turn the kitchen light off when I took these pictures. I’m also sorry that the yard is such a total disaster. I couldn’t even move those black trashcans in the foreground because they’re full of bricks and currently frozen to the ground. I’m pretty fancy.
In the past six months or so we went from this…
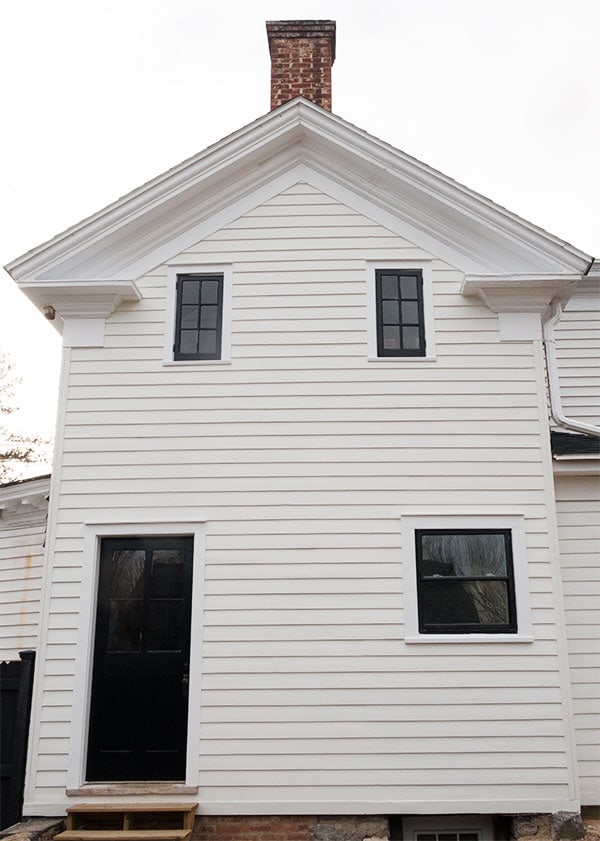
And finally, to this! Long. Strange. Trip.
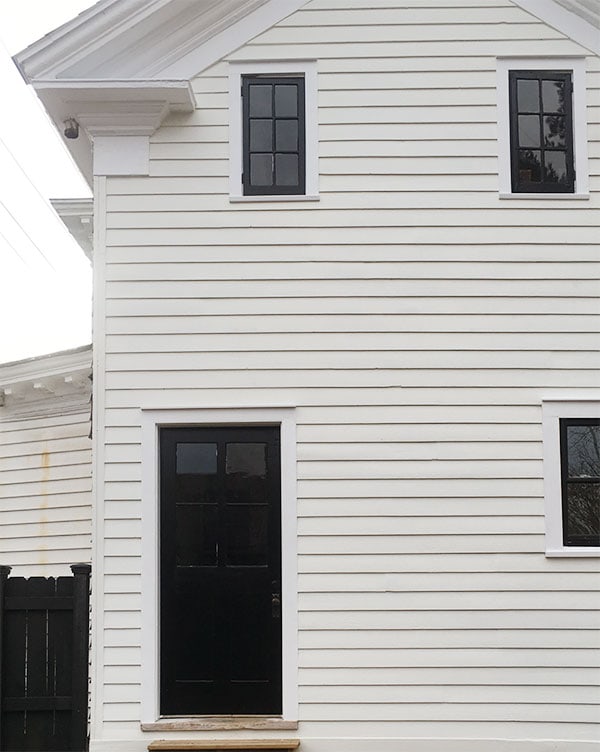
And yes, I know I’m crazy, but I still think of this as phase 1. Long-term, I can still see a nice covered porch out here, with that door switched to the other side and a nice 6-over-6 double-hung window where the door is, scaled more like the windows on the rest of the house. Theoretically the porch could have been done during this, but finances were running super dry and it’s not necessary right now. The current first floor window is just a cheap vinyl one that I spray-painted black so that I could use the sashes from the old kitchen window to make those two little windows upstairs. Changes to the door/window placement on the first floor might take place quite a while from now and would be part of a more extensive kitchen renovation than the slap-dash one I did when I moved in.
If I were to do it over again (and considering this is more or less the same process I plan to use on the rest of the house, I should have many opportunities), I’d do a few things differently.
- I would have probably sistered in new studs next to the originals to beef up the structure a bit. I’m not sure how much it’d actually accomplish, but it wouldn’t be a ton of money and it’d help support the old bones of this lady.
- I would have added blocking—or horizontal pieces of framing that span between vertical studs. This is common practice now, and required for spans of framing that are over 8 feet. It adds more structural stability and aids a little in fireproofing.
- I might have tried harder to add sheathing. This house is built with clapboard running right over the studs, and sheathing seems like it would add a little structural rigidity and create a more robust barrier between the inside of the house and the elements. Adding sheathing is complicated here because all of the trim work was installed with the thickness of this clapboard in mind, so I’m still not really sure how to accomplish this without throwing everything off.
- I might have experimented with using opaque stain (I like Cabot’s solid-color acrylic siding stain) rather than paint on the clapboard. I didn’t do this because the clapboard is still old with lots of knots, remnants of old finishes, and quite a bit of Bondo was employed to fill gaps and old nail holes and stuff, so I wasn’t sure how the stain would take given all of that. Instead I just went with what I knew, which was to use a good oil-based primer (I like Zinsser products) and two coats of flat exterior paint on top.
- I would have added flashing at the butt joints between boards. You wouldn’t see it, but it would be some added protection against water infiltration. I just didn’t know any better.
- I went back and forth and back and forth on beefing up the corner boards, and ultimately decided to leave them as-is. It wouldn’t be such a hard thing to change at some point, but I wasn’t ready to commit to it. I’m totally happy with the end result but I can see wider corner boards (maybe half the width of the frieze under the eaves returns) looking nice and kind of increasing the formality and stateliness of the architecture. I think that’s an OK thing to do, by the way—a person with more experience in restoration work than me once told me not to be afraid of getting too formal with old houses. As long as new details are added well and are in keeping with the house, it can be just fine to add stuff that wasn’t there originally. I try to keep that in mind when I get too hung up on just trying to stick with what’s original—those decisions made 150 years ago weren’t always the right ones, the best ones, or the most considered (unless they were, ha!), so who knows. I’ll keep thinking about it.
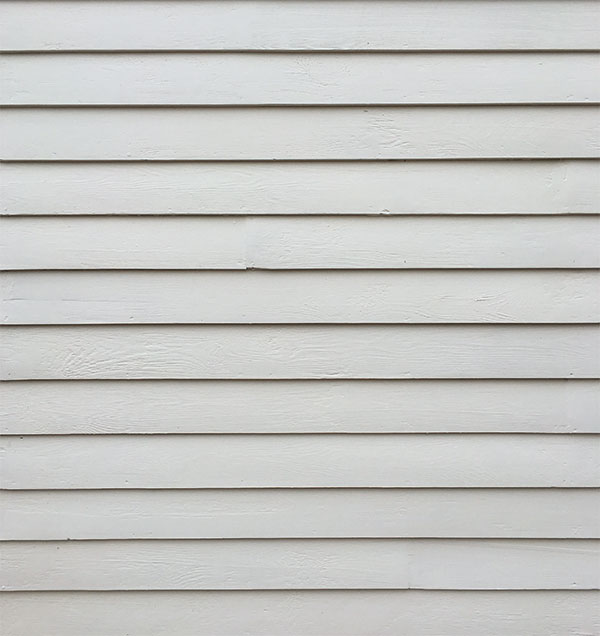
Look. At. That. Clapboard! It’s far from perfect, which is just fine. It makes me like it better. If I weren’t able to do so much of this work myself, it would probably have been totally impractical to try to reuse the original boards, given their prior condition. It might surprise some people to hear this, but my alternative would probably be to use JamesHardie lap siding with the same exposure as the original boards. Hardie (there are a few competitors, but that’s the big brand) is a cementitious wood composite product that does a nice job of mimicking the look of real clapboard, but requires less maintenance because it takes paint really well, is pest and rot resistance, and doesn’t expand and contract like wood does. It’s relatively inexpensive, too—so if you are thinking of re-siding but can’t reuse what’s already there and want to avoid real wood, CONSIDER IT, PLEASE. With all the products out there these days, I can’t fathom choosing vinyl or aluminum!
ANYWAY, I’m so happy (and proud!) that these are the original boards that were put on the house when it was built. I didn’t buy a single piece of lumber for this entire project, which feels both thrifty and environmentally responsible. And really, nothing would compare to these boards…the thickness, the character of the grain patterns, even the dents and divots and imperfections from so many years of use just enhance how right it looks on the house. New siding like Hardie (or even real wood) would have been fine and a huge improvement over the vinyl, but this is just…the best, I think.
HAHAHAHA, OK, we don’t have to pretend like this “after” picture is the most satisfying thing in the world, but WHATEVER. Sometimes you just gotta make sure your clapboard is painted before winter hits and accept that you have garbage cans full of bricks and piles of bluestone and dirt for landscaping. Clearly I did not get as far into my backyard plans as I’d hoped, but progress is progress and I’ll take it!
I don’t feel like it’s translating particularly well in photos, but the difference between the vinyl and the clapboard in real life is HUGE. And by huge, I mean subtly a million times better. The difference is really not that dramatic because the vinyl siding has the same exposure (the part of the board that shows) and is basically the same color, which makes it extra cool just how much better the real clapboard looks. The house looks so…SOLID now. Because vinyl is so hollow-looking I feel like it always makes houses look like they could just whither up and fall over, but the wood siding meeting up with trim pieces and stuff just looks super substantial and…right. Ahhhhh.
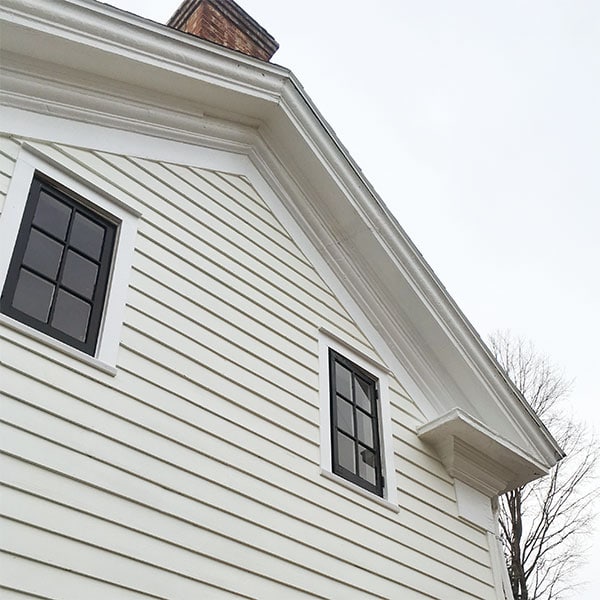
By the way, the clapboard was painted using Valspar Reserve exterior paint (flat) from Lowe’s, and the trim is Valspar Reserve exterior paint in semi-gloss. I had the siding paint color-matched to Benjamin Moore’s Simply White, which is a really nice off-white that’s bright but has definite yellow/greenish undertones that keep it from looking too stark. I considered going darker and more grey to create more contrast with the trim, but that kind of seemed like a decision that would serve before-and-after pictures better than it would really serve the house. The trim is off-the-shelf…I think it’s called Ultra White but naturally I can’t locate the can right now.
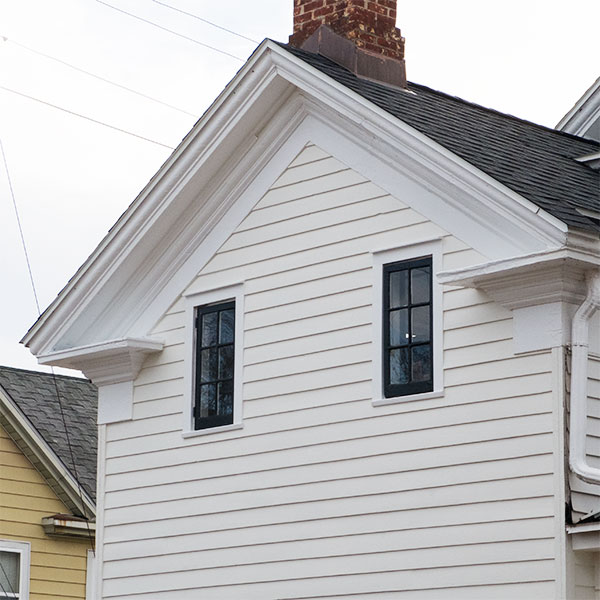
I love how those little windows turned out, seriously. They might look small but they’re really about as big as they could be without interrupting the rake frieze and still fitting in the room. They need more extensive restoration work (reglazing, a couple of panes replaced, some rotted areas epoxied) but in the meantime I just gave them both a liberal coating of Valspar’s Latex Enamel (semi-gloss) in off-the-shelf-black. I used the same paint on the door, too, and it’s awesome stuff! It’s VERY thick, dries quickly, and looks much like oil paint after it’s fully cured. I highly recommend it!
The door threshold is the original one, which I LOVE and guarded with my life throughout this ordeal. It’s beautifully worn from foot traffic in the center, and is so beefy! It had some old paint on it that I didn’t want to totally annihilate with scraping and sanding, so I tried hitting it with some wood hardener to see what that would do. Unfortunately it’s turned this hazy white color so in the spring I’ll probably sand it down a little and do a proper polyurethane or waterlox or something to really protect it and bring out the natural tones of the wood. That wood hardener product seems pretty great but I’ve yet to find an application for it that hasn’t given me grief later on. Oh well.
I think that’s about it! I’m so happy with how this turned out. Now to just do THE ENTIRE REST OF THE HOUSE.
I’m going to be renovating this thing forever, right? OK, cool.


And now that you are done…it does not look like you did anything!
Perfect!
It is a treat being a witness to your hard work transforming an UGLY backside into something so LOVELY.
Congrats. A pleasure to behold!
Thank you, Ross! This looks like child’s play compared to some of the stuff you do! :)
The house looks so happy! Like it just took a big breath after being suffocated under all that stuff for so many years. I know it was hard work but it really paid off. Congrats!
WHEEEEEEE! Congrats! It does look AMAZING, so clean and classic! I redid a part of my kitchen (created a mock hoozier with add’l cabinetry) and it didn’t feel like it translated in pictures either. I think you’ve done a wonderful job! I’d just love to see the before and after pics of the area upstairs (from the inside) where you changed it from door and window to a matching set.
I’ll post progress shots of that room soon! It’s kinda mid-demo but sorta cool I guess. :)
This looks beautiful Daniel!
Ho-ly crap! This is AMAZING! I almost gasped out loud when I saw it — even with the black trash cans full of bricks and piles of bluestone it looks gorgeous! And I am beyond impressed by your dedication to saving the original materials and doing so much of the work yourself. In this world of “hurry up and finish”, I appreciate that there are still people who want to take it slow and preserve aesthetic as well as function.
It looks really great. We recently removed the super shitty fence one of the previous owners installed and it felt like it took forever and we cursed them for half-assing their way through everything they did and leaving us a huge mess, and then I found out they buried plastic bags of dirt in the backyard 8 inches deep (as in they cut open the bags and left them there, and planted trees on top of them) and it’s taking an eternity to unearth them by hand. Not to mention the 15 tons of crushed glass that was installed as “landscaping” then ignored for nobody knows how long. But all that seems pretty small and relatively manageable compared to what you’ve been dealing with, and I’m inspired by your perseverance through it all.
buried plastic? crushed glass??? My, my! Sounds like you have your work cut out! Good luck!!
OMG. Landscape designer here, and I just gasped and said “OH MY GOD” really loudly. My condolances. I’ve seen some very questionable landscaping choices, but planting trees on top of still-bagged soil really takes the cake. If it’s any consolation, my next door neighbors bought their house from an eccentric old chain smoker, and they report tthat whenever they dig a hole in the backyard, they’re likely to hit a deep pit entirely full of cigarette butts. Shudder.
I absolutely love it! I so enjoy following along with your progress. Bringing old things back to vibrancy makes me so happy. Thanks for sharing your journeys with us!!
YESSSSSSS!!!! You are an inspiration and a hero!
Awesome job bring the back of the house back to the way it should be. Fresh painted clapboard is a thing of beauty.
Whenver I see exterior shots of your exquisite Greek Revival house and thinking of the even more exquisite house you’re slowly pulling out of its shell, I think about that scene from Deconstructing Harry when Woody Allen’s character goes to hell and meets this unassuming-looking little man.
“What did you do?”, he asks.
“I invented aluminum siding”, the man responds, and shuffles off to the torture chamber, clutching some siding.
…so what I’m really saying is you’re doing the work of God (but you knew that already! hahaha)
hahahaha! I’ve actually never seen that movie, but now I feel like I have to just for that scene! Hysterical.
WOW! Looks amazing and like thats how the house should have always been :D
Congratulations. You did good!
Oh wow Daniel!!!! Well done! It looks fantastic
I’m so, so impressed. Thank you for using the original boards and bringing this house back to life!
No trouble at all! Haha :)
Yaaaaaas this looks so good. It’s winter, forget the yard, they’re supposed to look shitty in winter. Knew you would pull this off. I could have seen a darker grey on the house, but I see the logic in that not working as well in person as it would in the photos, good on you to know and trust that instinct. Now we just have to wait to see how the other [three?] houses are coming! Thanks for letting us see the finale.
It looks so great! All of your hard work has paid off big time :) Can’t wait to see what else you have up your sleeve.
Damn!
I personally think the kitchen light being on looks really cool in that photo! The whole thing looks amazing, you’ve done a phenomenal job.
Yes. Yes, you are going to be renovating your house forever. :)
Congrats on wrapping up the back of the house, it looks amazing and took a hell of a lot of work. That house is lucky to have you!
Daniel the house looks just beautiful. I can hear her saying, “Oh, yes, yes, yes!
House looks great! Did something happen to your fence already or are my eyes playing tricks on me?
Thanks, Robin! I’m having some issues with a couple of the gates on the fence…looked and worked great when they were put in but have warped in the time since as the pressure-treated lumber dried out. SIGH. It’s a fairly common thing and Lowe’s (who installed it) offered to fix it (not because I’m a blogger or anything, just because I mentioned it to the salesperson at the store a few weeks ago and they were shocked I hadn’t called yet!) but I figure it’s not such a big deal and I can probably fix it myself. I think it just has to do with the way they frame the gates that doesn’t really keep it rigid enough. Anyway, what you’re seeing is me pulling off one of the diagonal cross-braces to try to replace it with a metal bracket to bring it back into square, which didn’t really work, and then I got cold so I stopped! Just some unstained wood that’s exposed now…easy to touch-up when I figure it out. :)
Makes sense! Glad to hear they are so willing to work on it : ) Can’t wait to see what you do next!
They make gate supports out of tubular or square stock welded into squares, they’ve done a good job for us, but I’ve never tried to apply them retroactively. You could probably make something similar out of lengths of angle iron and practice your welding a bit, but to make a warped gate hang true again you might have to deconstruct the whole thing and re-place the boards to account for the shrinkage. Gates aren’t my favorite.
I’ll have to look for something like that, Sterling! I really just want to buy something and get it done so a solution like that sounds good. I got enough to do!
It looks amazing!! I I am actually yelling!
I think it’s incredible that you were able to salvage and use the old clapboard. That was a lot of extra work that would have deterred most people, but you did it and it makes the after all the more special.
Looks great. And is it wrong that I giggled when I read “butt joint”?
I giggle whenever I have to write it! Not as bad as talking about nipples when discussing plumbing, though!
I had to search for a rain shower head drop from the ceiling, also known as a 12 inch nipple with two male ends. Oye, who names these things?!
barf!!!
Set up a lawn chair in the backyard and admire your work. Heck, set up a row of chairs so EVERYONE can admire the transformation. Incredible! Congrats!
Well done Daniel!! That’s look fabulous, so much improvement! Looking forward to the rest of the renovations :)
This reminds me of the scene in one of the recent(ish) movies on Coco Chanel (Coco Before Chanel?) where guests get to Coco Chanel’s house and are shocked to see that her window frames are painted black – unseen at the time!
A
Ha! I don’t know what movie that is, but that’s interesting! Was it the molding around the windows, or the sashes themselves? Black sashes and doors are actually a super traditional choice, especially on greek revival buildings—the idea being that the windows and doors kind of disappear and appear as voids, which more closely mimics the greek temples that the architecture was trying to evoke. Black was used very commonly on moldings inside the house, too, but I think more pre-1900-ish…I guess the bottom part of baseboards especially was commonly painted “mop bucket black” since dirty mops would stain lighter paints at the bottom of a baseboard. Fun stuff! :)
Interesting! I imagine the Greek Revival movement was more present in America and probably was not seen as much in France, and especially not in residential architecture.
The exact movie is Coco Chanel & Igor Stravinsky (Konen, 2009). I don’t remember it being particularly good, but for some reason that line about the black windows stuck with me!
I think that’s probably true! I don’t really know much about european architecture pre-modernism, but I think Greek Revival is a pretty American phenomenon.
I think maybe I saw that movie! No recollection of that scene but I do remember some pretty great-looking sets!
Looks amazing! I’m sure that this was back breaking but you must be so proud of yourself. I showed my husband what you did and how you did it and he wondered how many planer blades you went thru?
Not very many, actually! My machine takes blades that are double-sided, so when one side wears out you just unscrew and flip it. It takes two blades at a time, and I’m pretty sure I used 4 total. You can see on some of the boards where I started to get funny patterns from blades that were goofed up, but it’s not really noticeable on fairly rough boards, ya know? On, like, fine woodworking I definitely would have gone through more, but for this I kinda just used them until they weren’t cutting it.
I see what you did there.
Well of course I love it. Those black windows just make the whole thing. And a covered porch, maybe even a screened porch would be amazing, eventually.
Now when do we get to see the inside?
When I put all the tools away! :)
Oh Daniel it looks so great!
Wow.
I don’t comment often, because by the time I am able to set aside some time to fully enjoy your posts, other people have already said what I would have wanted to say, so I find myself thinking, “Yeah. What they said.” And thinking that I would rather you spend your time working (and writing about it) rather than reading my repetitive offerings. Even if I didn’t share your approach to home improvement, I would probably enjoy reading whatever you chose to write about. You are such a talent, Daniel, and your work is so enriching. Please, keep going. Forever.
Wow. And, what they said.
Awww, thank you! That’s one nice comment! *hugs*
I know everyone is loving the siding – which does indeed look great – but I am impressed with the upper windows, which turned out so perfectly! The restored frieze was worth all the messing around on ladders, inserting replacement wood, patching compound, etc, to get such a beautiful, restored, uninterrupted line. And the window proportions are perfect, your photo research and pulling the kitchen window apart paid off. They really look like they were always there, like they belong to the house. You have an eye for the style and proportions of your house, no doubt!
Thank you, RT! Those windows were a tough decision, but I’m really pleased with how they came out, too! I need to figure out the right combo of interior hardware, but I think they look pretty legit from the outside!
I think the photos translate very well- the difference between the original wood and vinyl is night and day! So classy and so satisfying to see the transformation. The planing of the boards was ingenious! Really.
We recently resided our house and used LP smartside siding, which is a treated, engineered wood that is supposed to be sustainably harvested. We discovered in our research and talking to different contractors, that cement board products, like Hardie, are better for dryer climates like California, not necessarily the wetter climate of the northeast. It has a tendency to fail if not installed exactly to spec. Also, if it’s not installed by a certified-trained installer, the 50 year warranty on the product is null/void. But seriously, anything but vinyl!
Interesting, Diana! I went between LP and Hardie for a different project and ended up pulling the trigger on Hardie—around here at least it was a bit cheaper, contractors are more familiar with it, and the LP was proving basically impossible to find! They both seem like good products and all things being equal I would have probably gone with the LP (the 16 foot lengths of the boards was especially appealing), but yeah…it’s not vinyl, I’m happy! I was also pleasantly surprised by how affordable it was. I should price out the same amount of vinyl just for comparison’s sake…mostly so I can talk people out of it!
You are right about LP being impossible to find! We talked to about 8+ contractors and finally found one who was willing to try it out with no prior experience. No one else has heard of it or worked with it, and therefore did not want to bother. They don’t sell directly to consumers, usually to big lumber yards or big box stores. I believe Lowe’s carries it but probably not in all their stores and they are usually limited on the styles and quantities they offer. http://www.lowes.com/pd_176830-132-25814_0__?productId=3434256
I really hope it catches on in the northeast because it’s a great product and they have a lot of options like board and batten, clapboard, shingles, panel, and just most traditional styles.
Yeah, my local Lowe’s and Home Depot are both listed as authorized retailers in my area, but nobody in either store knew what I was talking about or whether it could be ordered, and they just could NOT seem to figure it out. The local lumberyards/smaller hardware stores that were also listed as retailers found out their suppliers stopped carrying it, so they couldn’t get it either. Frustrating! I did have a very nice chat with an LP customer service person over the phone, but that didn’t really get me anywhere in terms of actually getting my hands on the stuff, either.
I think it’ll catch on…these products are still sort of new to the market (relative to vinyl) and I think consumers are a little wary of them and they haven’t caught on perhaps as much as they should have. Siding is such a big decision that I understand consumers deciding to go with what they know than “risk” using a product that isn’t as time-tested as its claims suggest (how do we know it lasts 50 years? it’s only been around for like 15!), but I’m guessing that will change! I also feel like we’re entering a period of more preservation/restoration-minded homeowners, and I think these are good products for old houses that may need to be re-sided, where the homeowner is concerned with maintaining the original look of real clapboard.
I love all the choices you have made, you are doing that wonderful old house justice! It’s coming together so beautifully. It must be so satisfying to just stand back and look at all that has been accomplished. What are your neighbors saying? I hope they are properly appreciative of the beauty you are bringing out in the neighborhood :P
Thanks, Cathy! I have great neighbors who have all been very kind and supportive. I think they thought I was insane for spending so much time up there on rickety makeshift scaffolding throughout the fall, but they’ve been very complimentary since it’s been done! It’s a nice feeling. :)
Most satisfying before /after ever! You are a superstar.
Ha! I want my prize!
I will just add my “Well Done!” So impressed that you planed the old boards and reused them. That was a giant project and it looks great. I also hope that your neighbors appreciate your efforts.
Ahhhhh….the satisfaction of a job well done! It looks fantastic, Daniel, and I think you (and by extension, us) learned some useful things to apply when you reside the rest of the house. I really enjoy hearing about the technical construction aspects, especially what you can do to make the framing stronger. I am going to have to gut and redo a bunch of things in my house in the next few years, and considering this place was built extremely quickly and cheaply with cut corners back in the day, I have been taking notes on what I can do to make it less of a flimsy POS. :)
Interesting detail about the mop bucket black baseboards in the comment above. It’s hard for me to visualize, considering how white or stained seems to be the way to go in every restoration I’ve seen!
P.S. I actually covet your trash can collection. My construction extras are all in 15 and 30 gallon tree pots stacked up in my driveway, which really lends an element of class and rakish sophistication to my curb appeal. :P
Thanks, Lori! Good luck on your house projects!! It can be scary to dive in when you’re not really sure what you’ll find!
Paint colors are funny that way, particularly black! I think a lot of times (most of the time?) it was just on the bottom part of the baseboard—so if the molding had various grooves and details, black paint would just be applied to the part closest to the floor. I’ll try to find out more because now I’m curious!
Come take some of my cans away!! I have so many…all full…which really needs to change. They’re handy but they take up a lot of space and don’t look particularly good doing it!
Oh, nicely done! Congrats!
Omg amazing. I don’t even care if you finish the rest of the house (yes I do… I love your blog), this is such a beautiful work of art! SO satisfying just looking at it! You are incredible.
Damn Daniel, that girl is the hottest bitch on the track! She looks so proud, and the BM white is a perfect choice. Can’t wait to see what’s going on inside the house and other projects! Xx
Dan, it looks GORGEOUS! What an amazing job! No matter what your plans are from here, I know you must be happy to have all of that finally done.
SO HAPPY! It was actually a fun project for the most part, it just took a long time which made it stressful because I got such a late start. I think as a spring/summer project I’ll have a better time! Thank you!
You have a healthy respect for the past with a vision for the future, the skills to make your vision a reality and an entertaining way of sharing your story. Its always a pleasure to see an update from your blog in my inbox.
Congrats on getting the back of the house done!
Fantastic! Love love love.
words fail.
you are an artist and a craftsman.
its an honor to be a part of this journey … onward!
Aw, too kind! I’m neither but I’ll take it! <3
PLEASE tell me your neighbors are just thrilled with the transformation. They have to be!
They are!
Have you ever seen the movie The Money Pit with a very young Tom Hanks and Shelley Long? Its 80’s-tastic. You are living the real life version of that. Spoiler alert: we just need to find you a husband so you can get married in the grounds and live happily ever after just like the movie.
I have seen it! It’s a fun movie…I can definitely relate, although I think I had a better sense of what I was getting into than they did! I signed up for this stuff on purpose, ha!
Bravo, bravissimo. C’est magnifique! Quel résultat!
Oh Daniel, your house is just beautiful. It is so lucky to have you.
It looks fabulous! Don’t even think about the trash cans, none of your readers are. We are just admiring the beautiful clapboard and restored symmetry to this lovely old house.
Great job!
One of the most exciting moments of my day is when I find out you have a new blog post up (yes, I lead a boring life). Seriously, I LOVE what you are doing to this beautiful old house, and I’m really impressed at your willingness to just jump in with both feet and figure things out. The back of your house now looks amazing, and — more importantly — it looks the way it’s supposed to look without all of the messy additions and adjustments made along the way. GREAT job!
It looks amazing, and the difference between the clapboard and vinyl is NOT subtle, it is everything!! Agree with you that Hardie siding looks good too, but reusing the original clapboard is so awesome.
Amazing job! The house looks so stately, now. The upper windows are fantastic. Can’t wait to see what you do in that upstairs room.
Daniel, it’s gorgeous! You are a straight up magician.
It looks fantastic! I am with you, clapboard, Hardi board etc is way way better than vinyl siding. :) Looks soooo much better. You should be extremely proud! GOOD JOB!!!
Total. Clap board. Porn. If only our clap board looks that good one day. Seriously amazing job. #clapboardgoals
Oh Em Gee. I can’t stop looking at these photos. You may say that parts of it still look not up to snuff, but my jaw dropped when I saw the photos. I’ve been following along for a few years and your attention to detail on this project is *incredible*. Thank you for sharing!!!
Beautiful.
Congratulations on getting all of that accomplished! It looks so good! I know how satisfying it feels to get something done RIGHT, not just done to be done. If that makes sense. Living in central New York, I’m super enjoying how mild this winter is so I can actually get more done on our house without feeling like I just need to go to bed with red wine and old Criminal Minds episodes. Compared to last winter, anyway!
Re: crappy backyard in reveal pics
Don’t you know the best way to have a dramatic reveal is to have a really shitty “before” comparison? You’re just being tactical and forethinking-y for this summer’s landscaping makeover. Yeah… Seriously though, it looks super nice and I’m sure it’s a treat to check that off your lengthy list. Vive, les renovateurs! (probably not a real French word)
It looks sensational, trash cans and all! The off white color is gorgeous and the fact that it’s flat makes it more so. Your neighbors must be so happy.
Daniel, the best wood hardener product is found at ACE. It’s PC-Petrifier. It dries clear. I refinished a third of a window sill. It not only made the rotted wood hard as a rock, but the sawdust mixed with glue stuck to it like crazy. No one can tell that area is not real wood. The only thing that has peeled is the paint which has made stop using Behr products.
That’s good to know! Have you had issues with other brands of paint adhering? The Minwax product says (online, I think, not on the package…grumble) that it’s not really supposed to be painted over, which I think was part of my problem—I’d previously used it on my front doors where the paint did peel, but I was using Benjamin Moore Aura exterior so I sorta don’t feel like I can blame the paint since it’s usually super great! I think the intended use for the product is really just to stabilize rotting/soft wood to prep for a patching epoxy, so I’ve just been using it wrong, I think.
I don’t use Minwax brand for anything at all. My experience with their brand is bad, including the water based polyurethane. The PC Petrifier can be painted over without anything else done to it. The only thing that needs to be done is to wait 24 hours. I have restored a 1952 home with my husband. It included similar work to have you have done here except the window stuff which was done by professionals. Benjamin Moore is excellent for anything. The only peeling paint in the house is Behr brand. Actually, my husband had an idea and it worked perfectly. We saw Restore brand products at Home Depot. Lowes also carries them. We used this decking ‘paint’ to do the cedar shingles (someone had painted them with latex instead of using stain and they were a mess). This stuff is the hardest thing I have ever used. We scrapped all of the peeling paint, fixed loose shingles, repaired tons of it, cleaned, primed and then used the Restore in a dark gray color. The trim was Behr and it is peeling like crazy!!! GRRRR… By the way the door of the house is black. And oh how I love the dark door with white trim against dark gray. My husband was adamant but after all was done he looked in admiration saying: ‘I have to give to the black door’. All my neighbors were in love too! HA!
Huh! I’ve used Minwax brand products for all sorts of things over the years (mainly stains and polyurethanes) and never had an issue with quality! I don’t even really think I’m having one now, I think I’m just using the product wrong which is my fault!
That’s interesting about the Behr. I’ve used it VERY infrequently throughout the years and never liked it, but the higher-end lines are OK and they seem to be very well-liked on consumer reports and such…but I agree. Great tip about the Restore stuff, though! I never would have thought to use it for shingles but it makes total sense. Glad to hear it’s holding up!
It looks SO good! Well done!!
Sweet baby Jesus this is amazing. The house looks so so so so so freaking good. The classic style of it is really showcased without the mudroom/fire escape stuff hanging off the back. Wow. Seriously well done.
Wow! Just wow. It looks amazing. Congrats on a job well done!
ps – I didn’t even notice the trash cans til you mentioned them. Covered cans are better than Home Depot buckets of junk, ala, our backyard patio at the moment. Most likely also frozen in place.
Hello Daniel,
Congratulations on completing all that work, and thank you for sharing. Have you ever thought about putting a couple of oversized shade sails out there in the meantime, before you start on the covered porch? I bet you could even get them in grey or black ;
Thanks, Michelle! I haven’t, really…not because I don’t like them, just because they aren’t really necessary for this area. There’s a front porch and other areas of the backyard that are probably better suited to lounging for the time being than right here, ya know? And I barely use those, because I barely lounge! ha!
Daniel – it looks beautiful! I admire so much the work you’ve put into the house. I feel like I’m learning so much and building confidence to attempt (very small) projects just reading your blog. Thanks for sharing; you’re such a great writer.
Thank you, Anna! That’s very nice to hear! <3
congrats!! looks so good! it really gives you an idea of how good the rest of the house is going to look!! now only if spring was here!!
Bite your tongue, haha! I need a break from this! Winter’s all I’ve got! :)
Daniel,
This looks amazing! I’m so proud of you and all you’ve accomplished and recycling all the original material is just so cool.
Way to go! You’ve come so far. ENJOY! If I lived closer, I’d come help you work on your backyard this year. Have fun knowing how far you’ve come! Proud of you!
xx
Thank you, Trish! Lord knows I need the help! I’ll put ya up! haha!
Daniel, I am SO happy for you! It looks so stinkin good! I LOVE LOVE IT! I would hug you if I knew you. You did it!!!! Congrats on a job WELL done!
Congrats for managing the final work before upstate winter settled in. Any plans for the newly revealed stairs–to the basement? Will they be covered by the porch whenever the porch happens?
Hope you find time to just stop now and then and, y’know, enjoy the comfortable spaces you’ve created in that old lady of a house you’re busy saving.
Thank you, Gillianne! So, I THINK I’d be able to build the porch basically with a large trap door to keep that door accessible. Luckily there’s access to the basement from inside the house, too, so I don’t really mind if accessing this one becomes kind of a hassle. It’s handy to have in case I ever need to bring in or remove something really large, so I definitely don’t want to lose it completely, but I think I could get away with having it more hidden and less handy.
Is that a basement entrance under the kitchen window? How does that fit into your covered porch/backyard plans? Are you planning to just seal it off and fill it in? I never noticed it before…
There is! See my response to Gillianne, above! :)
Caitlin, we must have had a cyberspace mind-meld, with the same question at the same time.
I swear the house looks like it’s smiling now. It’s almost as good as your rehab of Linus! You’re amazing!
You ARE the wind beneath my wings.
It looks so good! Fresh and creamy and definitely looks solid. Good job!
So, so, so so, great! Congratulations – you’ve done an amazing job!
Such a big difference! Great job getting it all done. The black windows are perfect against the white siding.
Our house isn’t nearly as old as yours (built in the late 70’s) but the original vertical cedar siding wasn’t in the best shape. We also replaced all of the old, broken windows so all the siding came off. I’ve reclaimed some of it for various projects, so not all is lost. After replacing every window and door, we wrapped the house with rigid foam insulation to keep it as tight and efficient as possible. Then, after all of that was done, we resided the house using a mix of CorTen steel siding and LP SmartSide planks. They have a similar look to Hardie plank, but don’t require special saw blades, predrilling or dust masks to work with it. Like Hardie, it comes in several prefinished colors or you can paint it. We absolutely love it and it should hold up for years to come. Just thought it might be beneficial to you if you’re in need of other options.
Sorry for the rambling comment!
Amanda
No, thank you so much! I always welcome information like that, and I’m sure others find it helpful, too! I recently looked into LP SmartSide for a different project and it seems like a great product. Unfortunately we were under a big time crunch and a tight budget, and the SmartSide priced out a little more expensive than the Hardie and I couldn’t find anywhere locally that carried it or could even get it anyway, so we just went with the Hardie. Installation wasn’t nearly as strenuous as it sounds, for what it’s worth…we found that regular saw blades worked OK and haven’t had issues with breakage or anything using regular siding nails and a pneumatic nail gun, but SmartSide does seem like it’s perhaps a better overall product. Glad to hear it’s working out!
It looks great! I love the visual improvements, and I was wondering if there’s practical improvements too. Has adding the insulation made any difference to the temperature inside the house? Can you tell if there was any benefit to the new windows or blocking up the old second-floor door? You probably don’t have utility bills yet from the winter months, but it’d be interesting to compare. Is there a negative to no longer having the back shed/mudroom, or is it hard to tell? I live in the north-east (further north than you!) and love having an enclosed porch or entrance hall so I’m not going straight from the outside to the living space, but I completely understand why you knocked down the porch. Also, is there any difference to the amount of light getting into the back of the house?
Thanks, Daisy! We’ve had a very uncharacteristically mild winter here, so it’s a little hard to say, but I do think the new insulation has helped pretty significantly, yes! It definitely feels more comfortable in the kitchen, and the temperature drop as you enter it isn’t nearly as dramatic as it used to be, despite other serious draft sources in the room that haven’t been addressed yet. I don’t think the missing mudroom makes a big difference, but that room was uninsulated, unheated, and its “window” was missing, so it was always the same temperature as outside anyway. I think down the line I’ll probably invest in a storm door for this back door…even with weatherstripping it’s pretty drafty, but I don’t want to replace it.
And yes, there’s a HUGE difference in the amount of light! The mudroom blocked almost all the light that would otherwise come in that door, so the amount of natural light with the door opening to the outdoors is really significant and feels great. I want to add two additional windows to the kitchen down the line, so I’m very excited about the prospect of someday having even more light!
Daniel, it is fabulous!!! Congrats on persevering all the way through. You are amazing!
Michelle
Bravo! Well done. Insert slow hand clap.
AWESOME!
1. Thank you for getting rid of vinyl. It irks me to see that nasty stuff go on some renovated houses in my ‘hood (foursquares and Queen Annes).
2. Water/mold issues for original beams + insulation QUESTION: I’m in a stucco foursquare with balloon framing. The plaster helps, but no insulation = leaky house. I haven’t considered adding insulation because I was told (by someone with far more old house experience than me) that because old timber isn’t treated, you can’t blow-in insulation into the sides as it will trap water and create mold/rot. What do you know about this?
Thanks Lauren! I’m really not an expert on this stuff, but…do you mean that the walls are drafty, like with cold air coming in, or leaky in terms of water infiltration? If the issue is really just cold air and your wall cavities are empty and dry, as far as I know blown-in insulation shouldn’t be trapping moisture excessively like that—it’s not a vapor barrier so even if there is some moisture content, it shouldn’t be all that “trapped,” you know? You’re correct that old timber isn’t treated, but typically it’s harder/denser than new framing which—unless it’s going below grade—isn’t treated either. New framing lumber is kiln-dried, which as far as I know would be about as susceptible to the same type of rot and moisture issues as old wood.
That’s my take on it, but I’m probably not the best source to consult! Blown-in insulation is used really commonly to retrofit old houses with insulation and I’ve never heard of that sort of thing being a major issue with it. It may also depend on what type of blown-in insulation you use, too, but again that’s sorta outside my wheelhouse!
Mercy me, she’s feeling like a right proper stately old gal again! Oh the many fine things you’ve accomplished in a relatively short amount of time, Daniel, considering how long she’s borne various and sundry insults over many decades. Bless your properly picky heart!!
interesting how much construction/insulation savvy you’ve picked up along the way. still, the reclamation and installation of the old clapboards is almost a kind of spiritual practice, truly inspiring. thank you for more talk about it and more pictures. happy new year!
Thank you, Jeannette! :)
Daniel, you SHOULD be proud, VERY proud. You’ve done an amazing job … you’re learning, grasshopper. Soon, you’ll overtake the Master.
This was a really satisfying post to read. I’m excited for you and the back of your house!
I’m so happy when you post! #progress
Huge Fan! Vlog! Casey Neistat style!
I read your entire blog over Christmas and let me tell you, it was an excellent life choice :)
I’m so in awe of the work and effort and design choices you put into your projects. Thank you for sharing with the world!
Oh man, that’s a lot of reading! Ha! Thank you!! That’s very kind!
Looking awesome! The hard work and vision is paying off – enjoy.
No pretending necessary, that after is gorgeous and amazing difference. Well done!
This looks so. dang. good.
Bravo, Daniel!!!
Cheers to you for all your hard work! You can tell from the photos that the house is finally starting to breath again, thanks for your crazy determination. Those wonky window/door/addition situations really were crushing her spirit!
I had two questions when I saw the back of the house – you already replied to one about the amount of light that you get in your kitchen now (yay for more natural light!!!). The other one, did you remember to go back to your insurance company and let them know you no longer have a second story door to nowhere? Seems like it should help with your premium – holding on to those hard earned dollars is always a good thing! Can’t wait to hear more. All these improvements give me hope that my boyfriend’s house can be saved. Oh, the terrible things people do to old homes.
You know, I haven’t! But that’s a good thing to check up on. Luckily my insurance company doesn’t seem to care too terribly much about those things (why they were able to write the policy in the first place) but it never hurts to ask!
What an impressive and classy transformation. The planing of the boards is spectacular. Kudos to you.
Oh my god, you maniac, it’s gorgeous!
My goodness! It looks so pretty! You have done a phenomenal job!