
This post is in partnership with Lowe’s! Thank you for supporting my sponsors!
![]()
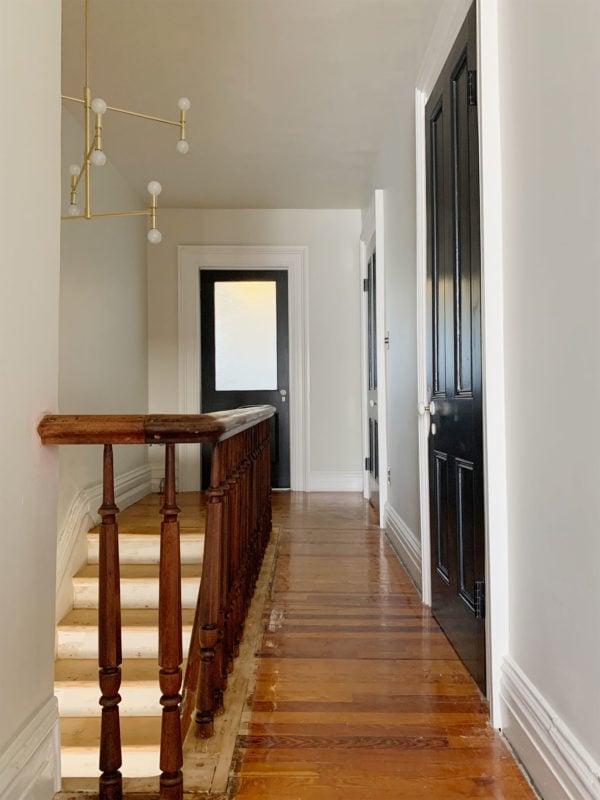
This. Hallway! I knew it would be a lot of project, and oh man…it’s a lot of project. No surprises there.
Because of this, I really want it to turn out well. I don’t want to be bummed with my results, or feel like it needs a do-over down the line. Painting in an old house requires some special care and attention—especially if the work over the years has been less-than-stellar—but after years of learning through trial and error, I feel like I’ve figured out how to achieve a beautiful result no matter what existing conditions are thrown my way!
It’s been nearly NINE YEARS since I did a “how I paint” post, and a lot has changed in that time. Mostly that I know how to do things a lot better now. I used to think really nice, slick paint jobs were just something for other people (or the result of photoshop) and that my results were good enough. But the difference a really good paint job makes is HUGE. So let’s! Get! Into! It! We have a lot of ground to cover.
PREP—WALLS AND MOLDINGS:
I’ve learned to never walk into a paint project thinking that I’ll get paint on the walls on Day 1 (or 2 or 3), because the key to a good paint job is the prep. Say it with me: THE KEY. IS. THE PREP. Scream it from the mountaintops. Here are the tools that get it done, elegantly displayed on my dining table for your viewing pleasure:

I should note that I try to avoid fully stripping painted wood unless it’s truly necessary. Chemical strippers are super messy (and sometimes not especially effective), heat guns are hazardous with lead paint, and I truly don’t mind woodwork that’s been painted and repainted over the years! I don’t think old things need to look brand new. It’s a balancing act.
SUPPLIES:
- Sanders: I like to use 3 different electric sanders depending on the size and the surface. For large surfaces, a 5″ orbital sander is a must-have. For smaller detail work, I put all my faith in my very affordable and effective mouse sander. For the really nitty-gritty stuff, my Dremel MM50 with the sanding attachment is great, and easier to maneuver than most oscillating tools because of its low vibration. And for curvy bits and detail work, regular old sandpaper and your two god-given hands are the answer.
- Respirator: Any time you’re creating dust, but especially if that dust might contain lead (you can get instant lead tests to verify this if you wish, although I just always assume lead at this point), you want to—at the very least—wear a dust mask. If you think you might be dealing with lead, I encourage you to read up on lead-safe practices! Extra precautions should be taken around children or pets.
- Stiff wire brush: Not always necessary, but you may need it for flaking paint on a radiator, for instance.
- Scraper: In areas that may need more than a sanding (or where sanding will create too much dust), a hand scraper is your friend! Look for ones with blades you can change out as they dull with use.
- Disposable Gloves: For any time you’re working with harsh chemicals, or even when you aren’t. Dust, paint, and caulk will all dry out your beautiful hands, and you worked so hard on those cuticles!
- Patching Compound: My favorite is 3M Patch Plus Primer. It takes some getting used to, but it’s amazing stuff—it dries really fast, sands really smooth and easily, and doesn’t shrink or crack. It’s great for plaster/drywall patching and small patches or nail holes in woodwork.
- Hammer and Nail Set: Sometimes you come across a nail head that needs to be sunk down before painting. Otherwise that nail head will accumulate paint and become a big blob or cause drips.
- Assortment of scrapers and putty knives: for aforementioned patching and scraping off loose paint or big blobs in old paint jobs.
- Utility Knife: Useful for removing screws, cutting out old dried-up or sloppy caulk, and more!
- Flathead Screwdriver: In old houses, all the screws are flat-head, and it’s best to remove them manually rather than with a drill or driver. I HIGHLY recommend picking up a double-drive screwdriver, which speeds things up and creates less fatigue in your hands and arms.
- Electrical tester: usually you want to remove any existing light fixtures, outlets, and switches (depending on your circumstance) so you can paint right up to the box. Any time you’re messing with electric, a circuit-tester is a must-have so you can confirm that the power has been turned off before you touch hot wires and get a little electrocuted. That’s no fun.
- Temporary light: With your old light removed, take 5 seconds and throw up a temporary with a bright bulb. More lighting will help avoid mistakes and drips. You may also want to keep a work light handy for darker areas—I like these newer LED models.
- TSP Substitute + Microfiber cloths: ALWAYS. ALWAYS. ALWAYS wipe everything down before painting. TSP substitute is great for removing dirt, wax or grease build-up, and getting a surface clean enough to nicely accept new paint or primer.
- Caulk + Caulking Gun: I SWEAR by Big Stretch caulk. After years of Alex Plus breaking my heart as it cracked and failed only a few weeks or months after painting, Big Stretch is a slightly-more-expensive-but-far-superior life-saver. Whatever caulk you use, make sure that it’s PAINTABLE if, indeed, that is the intention.
So. Let’s put these things to work!
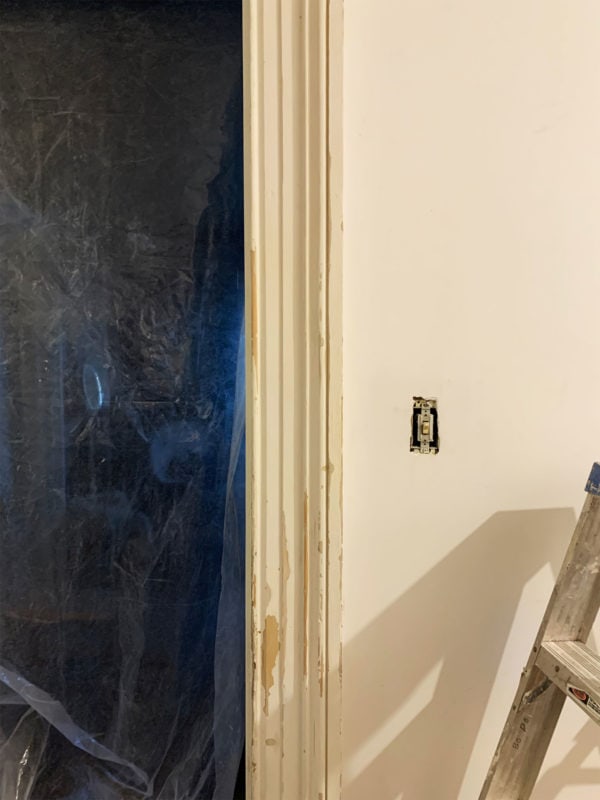
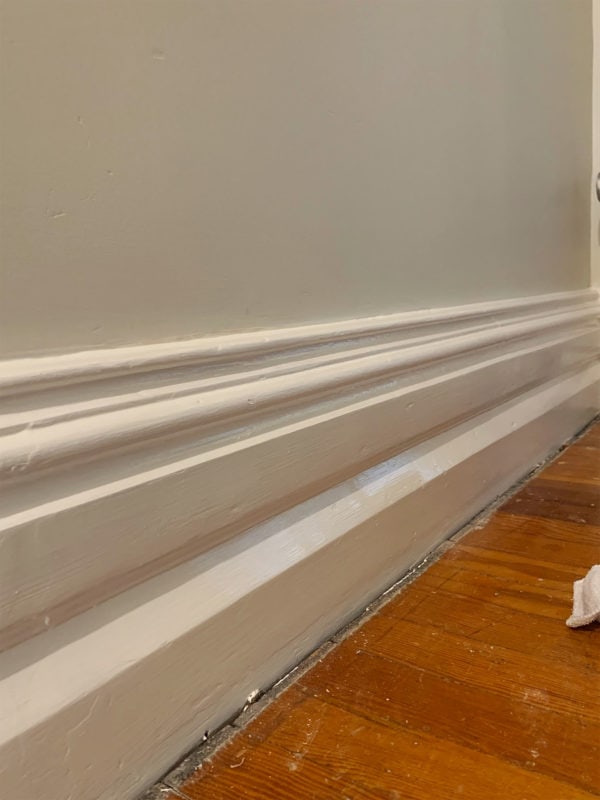
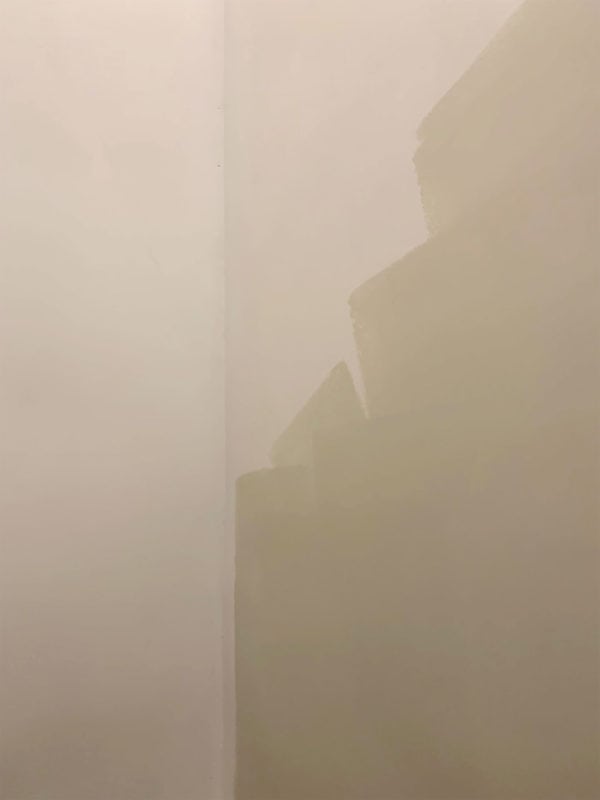
From a distance, my trim looked pretty good. Up close, it did not—it had a lot of lumps and bumps and drips from sloppy older paint jobs, and some peeling paint here and there.
Step 1: I use a rigid putty knife or scraper to flake off any actively peeling paint. Peeling paint will not provide a good substrate for new paint, duh.
Step 2: Then use a scraper to knock down any large lumps and bumps. You want to constantly run your hands over what you’re working on, as things will start to look worse and worse but you’re aiming for it to feel smooth at this stage. Trust yourself! You’ll know.
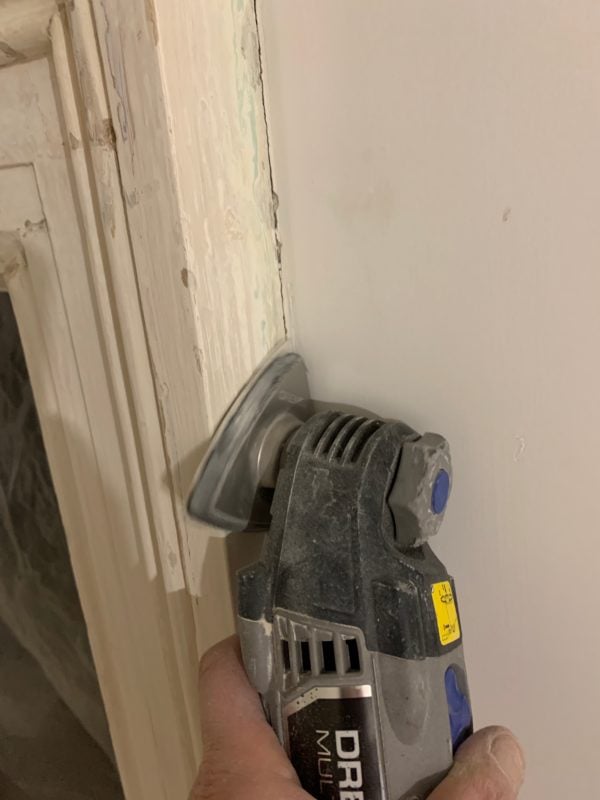
Step 3: Then I sand any flat portions with one of my electric sanders, which makes quick work of smoothing out remaining imperfections. I love my Dremel MM50 for this, especially when working next to the wall. The mouse sander vibrates too much and will damage the wall, which you then need to patch. The MM50 helps avoid that problem! It’s all very time-consuming depending on the condition of your trim, so get ready for a few marathon sessions, followed by a few marathon cleaning sessions assuming health and safety is a priority in your household. Curvy bits have to be sanded by hand. I tend to go for a pretty low-grit (aka, rougher) sandpaper, like 40, 60, or 80 grit.
Step 4: Vacuum up all the dust (if lead is present, make sure your vacuum is equipped with a HEPA filter), and wipe everything down with a damp microfiber cloth. It doesn’t hurt to just use the TSP at this point, but this is not the last time you will wipe things down.
Step 5: Patch. Using your fingers or a flexible putty knife, apply 3M Patch Plus Primer to any smaller holes or damage you wish to fill. I don’t fill every little knick and ding—I like to see a little character that comes with age. Wait for it to dry, and then sand it smooth. Do not jump ahead and caulk because you’re bored of waiting for it to dry. Go cook dinner or whatever.
Step 6: Clean off your new sanding dust from the Patch Plus Primer.
Step 7: If the surface is previously painted or primed, at this point you can caulk. Cut off the verrrrrry end of the tube of caulk to create a small hole, and apply a small bead of caulk where molding hits walls or ceilings, or where the pieces of a multi-part molding has separated and created gaps. Keep a bowl of water with you. Dip your finger in the water, and smooth the caulk. It may take a couple of passes to get it really nice and smooth. Once you move on though, DO NOT GO BACK. Once the caulk starts to skin over, you’ll make a mess if you try to smooth it out further, so take your time on the first pass. I like to let caulk dry for at least 12 hours (ideally more like 24) before painting, even if the package says it’s paint-ready in an hour or two.
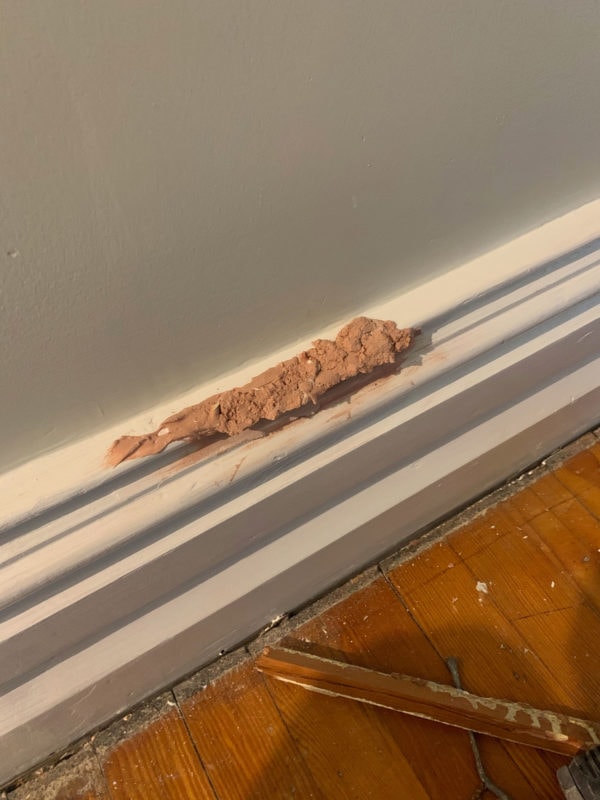
One last thing! For large repairs on interior woodwork, I like good old-fashioned Bondo. Bondo is a 2-part epoxy auto body filler that’s hard as nails, but dries VERY quickly and can be shaped nicely by sanding. I’m stupid and forgot to take a “before” picture, but there was a big chunk missing out of the top of this piece of baseboard, so Bondo to the rescue!
Bondo should be about the consistency of peanut butter, but I was working with an old can that had dried out a lot. It still works, you just get that grainy texture that’s more of a pain to sand out.
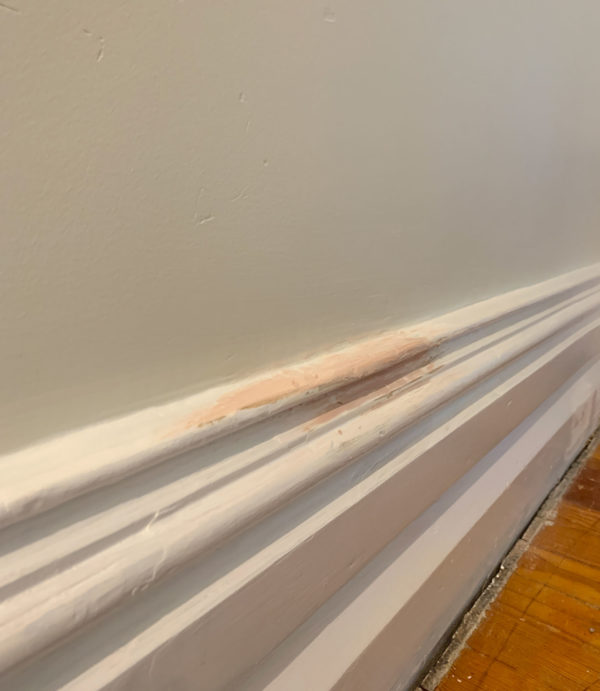
This is where the artistry comes in. Be one with the Bondo. Shape and smooth it until it’s justtttt right. I mostly used my Dremel sander since this is an odd shape.
After painting, can you spot the repair?? I can’t. I’m very proud of my Bondo artistry.
NOTE: Don’t use Bondo for exterior wood repairs. I’ve never had it fail inside, but outside is a different story. It doesn’t expand and contract with the wood, so eventually it just separates and falls off. Interior wood doesn’t go through the same fluctuations in temperature and moisture. A better product for exterior wood repair (whether it’s rot or other damage) is Abatron WoodEpox, available online.
PRIMING:
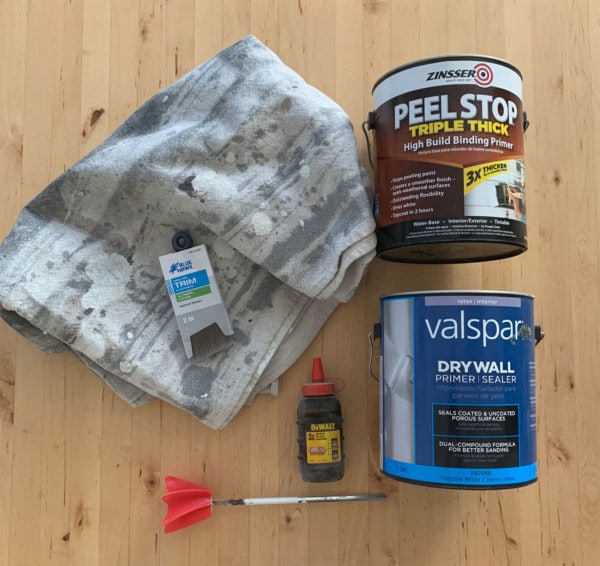
Here are your priming supplies to add to the prep supplies:
- Canvas Drop Cloths (+ extra, or plastic sheets if you need to cover furniture)
- Blue Hawk 2″ angled brush(es—I like to keep a bunch around, and they’re cheap)
- Drywall Primer/Sealer
- High Quality Oil or Water-Based Primer (here I’m using Zinsser Peel Stop Primer—a true miracle of modern science!)
- Spiral Mixing Arm
- Optional: Marking Line Chalk (so cheap and a container will last a lifetime)
If your surfaces aren’t painted or primed, you’ll want to prime before you caulk to extend the life of the caulk. Caulking onto unpainted wood or drywall/joint compound will suck the moisture out of the caulk, causing it to fail prematurely.
I hate to tell you, but it needs to be said: all major paint retailers are selling “Paint Plus Primer” paint products now, with the implication being that you don’t have to prime. Here’s the truth: essentially it’s just really thick paint, so you can get good coverage if you’re painting, say, white over burgundy or something.
BUT: if you’re painting over unpainted drywall or joint compound (as I was, since my walls are skim-coated in joint compound), you want to use a drywall primer/sealer first. This is specifically formulated to seal in the drywall and give yourself a solid foundation for paint. It IS different (and much cheaper!) than regular paint, whether or not that paint claims to have primer included. DON’T SKIP IT if this is the first coat of paint over new drywall or joint compound.
PRIMING WALLS:
Step 1: Lay down drop cloths over anything you don’t want to get primer on. A plastic sheet is fine for covering furniture pushed into the center of a room, but you want canvas for the floor. That way, paint will soak in and dry on the canvas, rather than staying wet on a plastic tarp and inevitably end with you tracking it around the house.
Step 2: WIPE. DOWN. THE. WALLS. DO NOT SKIP THIS. I REPEAT, DO NOT SKIP THIS. If you’ve ever had the experience of new paint peeling off of newly finished walls or coming up when you remove painter’s tape, that’s usually because the walls weren’t adequately cleaned to remove any joint compound dust. You can use a wet microber cloth, or even a mop! You want to be able to wipe your hand against the dried wall without it getting covered in white powder. If your walls are already painted, you’ll want to wipe them down with TSP substitute (or similar) to remove any dust, dirt, or oils. If your walls are glossy, a liquid deglosser isn’t a bad idea.
Step 3: I prefer to “cut in” (brushing corners—or areas where molding meets the walls—that you can’t reach with a roller) before rolling, but you can do it in reverse if you want. I like to use a cheap brush for this to preserve the nicer brush I’ll use for the finish coats of paint. I love these short-handled 2″ Blue Hawk angled brushes for anything I don’t need an especially high-quality brush for. The short handle allows you to get into tight spaces where a longer handle might prevent that.
PRIMING MOLDINGS:
After sinking any nail heads, sanding, filling, cleaning, and caulking, it’s time to prime. Again—with these newer paints on the market, it’s tempting to skip priming, and while it’s not a crisis if you don’t, priming is never a bad idea.
Paint can continue to peel even after removing anything that’s loose now, so my new favorite thing in the world is Peel Stop Primer by Zinsser. It bonds to both oil and latex paints, can be used for interior or exterior work, and it’s almost like a paintable glue that kind of seals everything in. The Triple Thick formula has the added benefit of helping to fill/smooth out imperfections left by paint that’s been removed, although you don’t want to rely on that aspect too much—you’ll be better off getting a smooth surface by sanding first. Peel Stop Primer leaves behind a beautiful matte finish—slightly toothy?—that is the perfect foundation for finish coats of paint.
While Peel Stop does have my heart, any high-quality oil or water-based primer will do. But if you have issues with peeling paint specifically, check out Peel Stop!
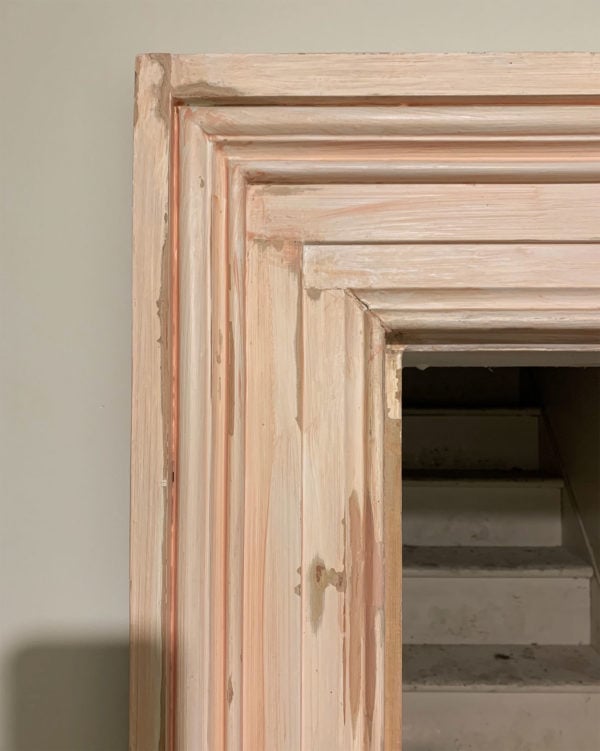
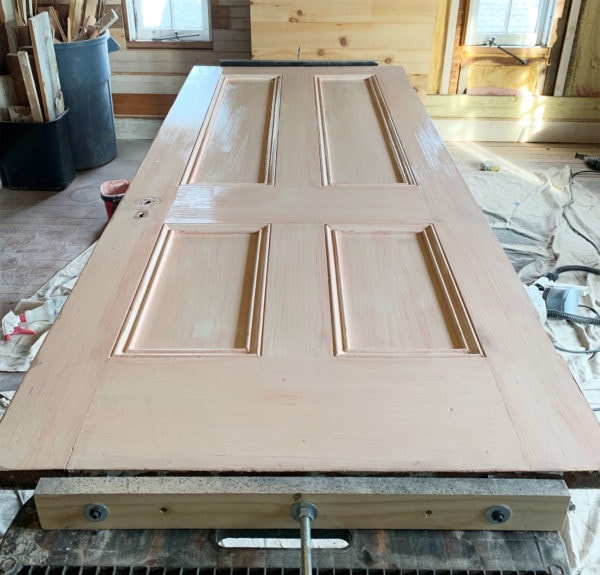
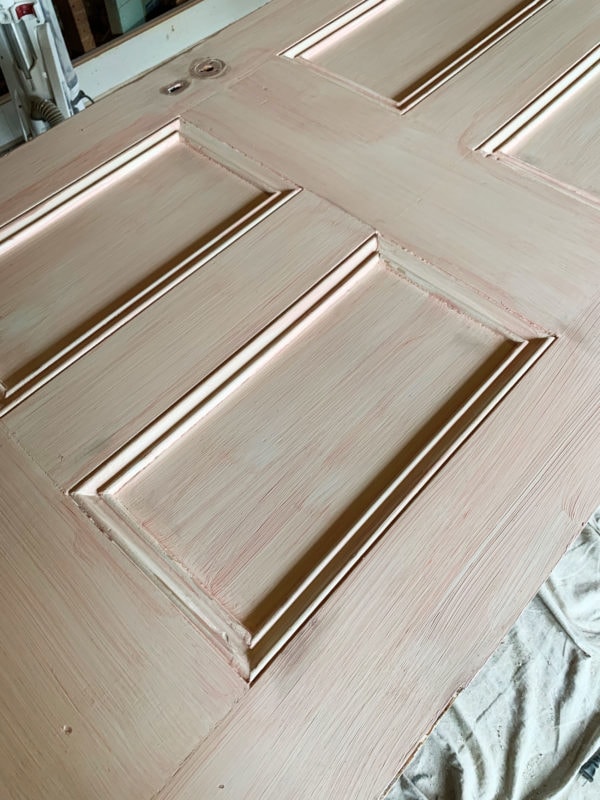
I know this casing LOOKS rough, but I promise at this point it’s smooth as a baby’s butt! I hate that phrase.
You may notice that my Peel Stop is pink! That’s because I added a little bit of red chalk, which is made for creating snap lines. It’s my fun little hack—just add a little chalk and mix it with a paint mixer attached to a drill until it’s all combined. Peel Stop is a white-ish clear, so this allows me to see it and make sure I’m getting decent coverage and not missing any areas because it’s invisible! I do this with patching compound too if it’s the same-ish color as the walls, so I make sure I don’t miss any sanding before painting.
PAINT:
FINALLY! LET’S PAINT!
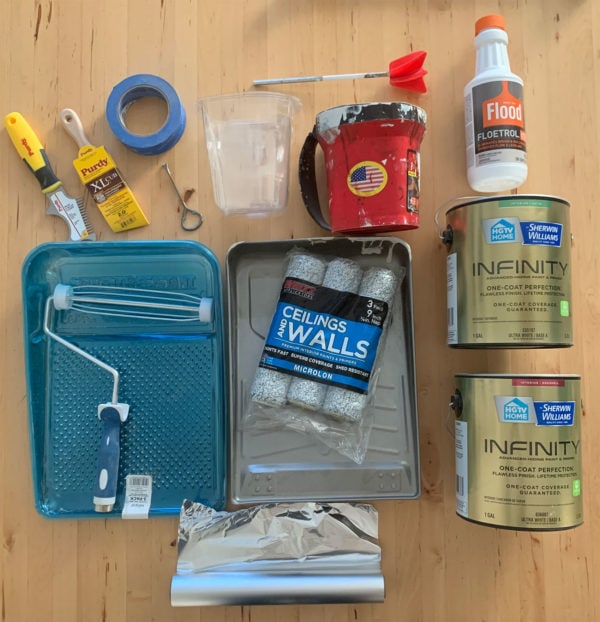
SUPPLIES:
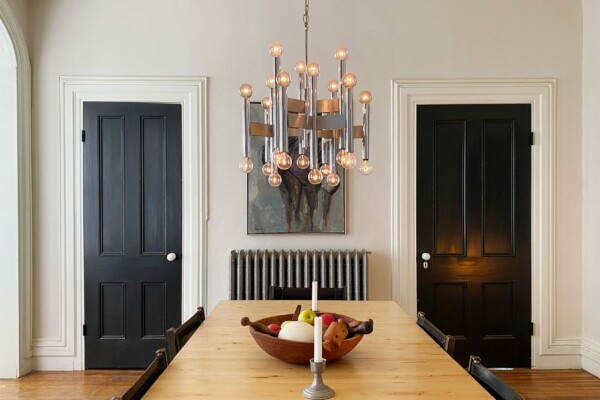
- HGTV Home by Sherwin-Williams Infinity Paint. I typically like a flat/matte finish for walls, but in this high-traffic space I went with Eggshell. For trim and doors, I prefer Satin finish to Semi-Gloss—I just usually think Semi-Gloss is too shiny. The shinier the paint, the more it will show off imperfections.
- Floetrol. YOU. GUYS. WHY HAVE I NEVER USED FLOETROL. It is a game-changing paint additive that extends the dry time of latex paint, allowing it to self-level (evening out brush strokes) and behave more like oil paint. It’s INCREDIBLE. This particular Sherwin-Williams paint is VERY thick and dries VERY fast, which can quickly lead to a messy paint job if you go back over the same area even a minute or two after painting it, so I HIGHLY HIGHLY recommend using Floetrol. And yes, it does work better than watering down the paint a little, which was my old method.
- Metal (or plastic) Paint tray and disposable liners. I don’t like plastic waste either, but I’m only human—disposable liners make my life easier and save a little on the already considerable clean-up time.
- Paint Roller: These can vary in cost significantly, but I’ve never had a problem with the cheap ones. This one by Blue Hawk is perfectly fine, and only a few bucks.
- Paint Roller Pads: For the past few years, I’ve been in LOVE with these microfiber roller pads by Whizz. I prefer them because they never leave lint behind like traditional rollers, and I HATE finding little fibers dried into a brand new paint job. I used to just throw away roller pads when I was done with them because I found that they never held up well to washing, so I just gave up. NOT THESE! I literally just throw them in my washing machine, and they come out as good as new. I’ve been using the same roller pads for years! They work best when you pre-wet them in the sink and wring them out a little, so they’re just a little damp. LOVE.
- High-Quality Brush: For trim, you want a nicer brush than you use for primer or even for cutting in the walls. I love Purdy’s brushes—a little pricey up-front, which is why I try to preserve them and avoid using them for everything. I prefer the short-handled ones, and for painting trim with latex paint I like a Medium Stiff bristle.
- Handy Pail + Disposable Liners: For cutting in walls or painting trim, I love my Handy Pail! They have a little magnet built-in which holds the paint brush from falling into the paint, and a handle so you’re less likely to drop a gallon or quart all over your floor. Again, you could skip the plastic liner as long as you’re diligent about washing the thing after every use. I am not.
- Spiral Mixing Arm: Even if your paint is freshly mixed, it’s never a bad idea to really mix it up and incorporate any pigments that might settle toward the top before painting. Wash it immediately after so it stays clean! You can also use the wood paint stirrer they give you when you buy the paint, but I feel like the mixing arm is faster and more thorough.
- Brush/Roller Cleaning Tool: This one by Purdy is for cleaning both brushes and rollers. The teeth help separate any bristles that get gunked up, especially up toward the handle of the brush.
- Painter’s Tape: It has a time and a place. I do NOT use it to tape off walls/ceilings or trim—I find I can get a cleaner line with some focus and a steady hand. But sometimes you need a little bit.
- Aluminum Foil: I use it to wrap wet brushes or rollers if I know I’ll come back to them within a day or so. Otherwise, it’s best to wash them. Some people keep these in the fridge or freezer—I’ve never found that helpful, but hey! You do you.
- Paint can opener: It’s better than a flathead screwdriver at getting the lid off the paint without messing it up, so you can close the can later. They’ll give you one for free at the paint desk. Use it!
The first coat is always so exciting! I include this primarily so you can get a sense of how NOT white this paint is, even though the end result reads like a pale off-white. This is Sherwin-Williams Oyster White, which is SUCH a nice color that—in my hallway at least—looks great in all lighting conditions. LOVE.
Step 1: I usually cut in with the brush before grabbing the roller, but I was so antsy to paint and my caulk hadn’t dried yet, so I rolled first. I typically work top-down, starting with the ceiling. While there’s nothing wrong with a white ceiling, in here I decided to paint it the same as the wall color and I’m really glad I did! I think it softens the whole thing, and maybe makes the ceilings appear higher? The ceiling looks like a lighter color, but that’s just because it’s on a different plane than the walls.
Step 2: With your first coat dry, hit any areas you may have missed with patching compound and caulk. Make sure you sand the patching compound before proceeding.
Step 3: Cut in and roll all over again. Note that this paint, like many others on the market now, promises “One Coat Coverage.” This is a lie. There is no such thing, full stop. So while you can stop at one coat, don’t come crying to me when your paint job looks lousy. Always two coats, minimum. You’ve done all the hard work already so there’s no sense in letting a final coat of paint get you down.
DOORS:
Doors are their own special beasts that require extra attention to do right. And, you guessed it, it’s all about TLC and prep.
When possible/practical, I like to remove the door entirely—it’s easier to work through all the steps, and easier to avoid drips that tend to come with gravity around the ogee molding in the panels.
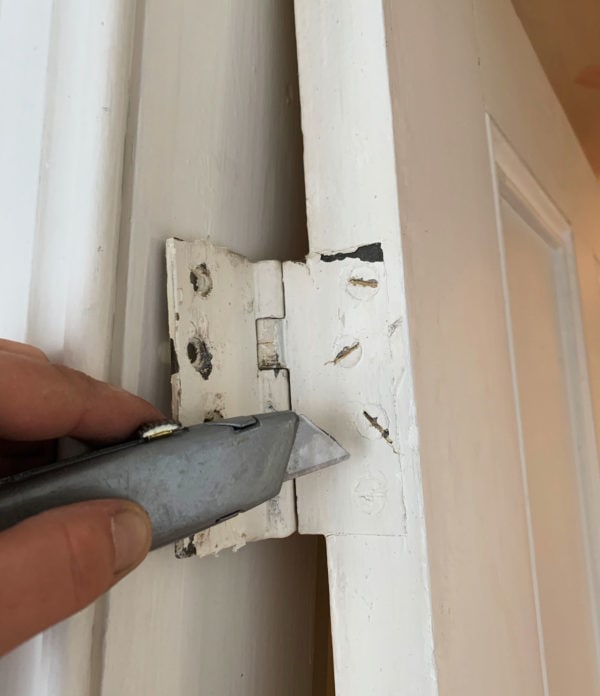
Step 1: Use a utility knife to score out the slot in the flat-head screws so your screwdriver can get a good grip. Also score around the hinge itself so the paint doesn’t lift off wood with it. Remove the hinges.
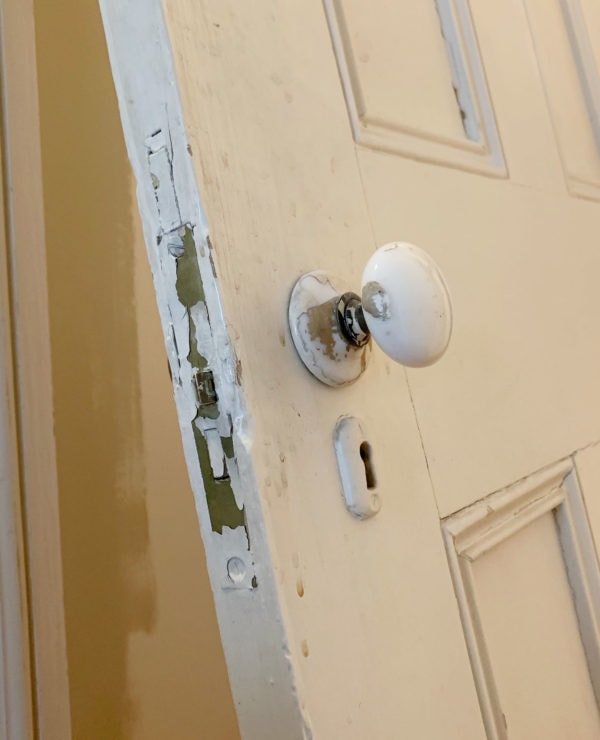
Step 2: Remove any additional hardware like knobs, keyholes, and the mortise.
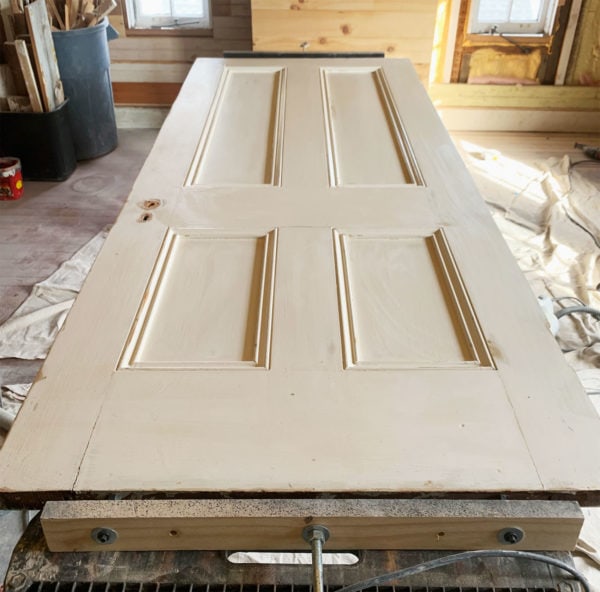
Step 3: Lay your door flat on sawhorses (I like these!) in an area that can get dusty. Luckily I’m still living with a few un-renovated rooms that are good for this kind of thing.
NOW. If you’ve ever painted a door this way, you know how it goes: you can really only do one side at a time, and the sawhorse tends to damage the new paint job when you flip it over to do the other side. With solid wood doors, flipping the door can be really difficult, particularly when you’re working solo! Which I pretty much always am, while praying I can find a man that will put up with me.
Don’t worry about that. See the thing that’s screwed into the top and bottom of the door? Well. Let me tell you about it.
ENTER: THE SPINSTER DOOR FLIPPER™. I straight-up ripped this off from @chalkstonewoodworking’s instagram, but the name is all my own. Get it? It’s a cheap pun. Because it spins the door but also it’s for spinsters like myself.
Essentially a set of two allows you to flip the door while you’re working, without the need for it to dry, and they cost about $15 to make. They speed things up SO MUCH, especially if you’re tackling a bunch of doors at once. Here’s how to make one:
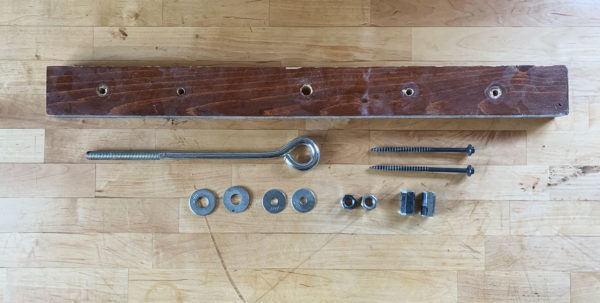
- Start with a piece of scrap wood that’s close-ish to the width of your doors. A little shorter is fine. This is a piece of 5/4″ lumber (which used to be one of the shelves in my now-defunct pantry! Don’t throw away good wood, y’all). You could also use a 2x, but I think a modern 1x would be too flimsy. Drill one hole in the center for the threaded rod, and two holes large enough to fit the lag bolts through.
- A long threaded rod, or something like this big eyelet bolt. It doesn’t really matter, as long as it’s hefty enough to bear some weight.
- Two nuts that fit the threaded rod
- 4 large washers
- Two large lag bolts—mine are 5″. Err on the side of bigger rather than smaller: it needs to support the weight of the door.
- 2 Metal spacers large enough for the lag bolts to fit through. I can’t remember what these were called…dig around in those specialty hardware drawers until you find what you need.

Assemble it like so!

Assembled, it should look like this. Pre-drill the top and bottom of your door at the locations of the lag bolts, and screw in the lag bolts into the top and bottom of your door with your driver.
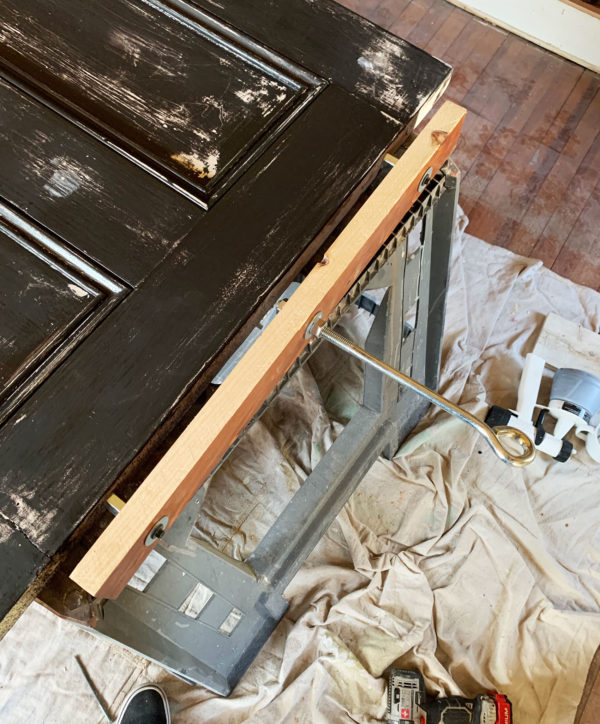
SO. The door is actually floating slightly off of the sawhorses and being supported by the Spinster Door Flipper™. The beauty is that all you need to do to flip the door over is shimmy your sawhorse out a few inches so that the threaded rod is resting on the sawhorse. Do this on both ends, and you can pivot the door on the threaded rod to rotate it 180 degrees.
You will feel like an all-powerful trick that don’t need no man. Trust. It’s worth the 30 minutes it takes to fabricate the thing.
From there, it’s really a matter of following the same steps as the rest of your trim! I sand to remove any lumps and bumps and mostly leave small knicks and damage alone. I like using my mouse sander with 60 grit pads, and then follow up with hand-sanding on the detailed bits. Then clean and prime with Zinsser Peel Stop.
Once the Peel Stop is fully dry, you may wish to do some light sanding or skip it. Then it’s time to paint! I prefer to do it all with a brush and fairly thick 2 coats of Floetrol-infused paint, taking care to proceed in an orderly manner that keeps brush marks in the direction of the grain for the different parts of the door. You’ll get into a groove. I’d caution going more matte than a Satin finish, but you’re a grown adult and can make your own choices. I like satin, personally!
Note: depending on condition, you MAY want to do some strategic caulking around the ogee moldings, if present. It will take away some dimension, so use sparingly!
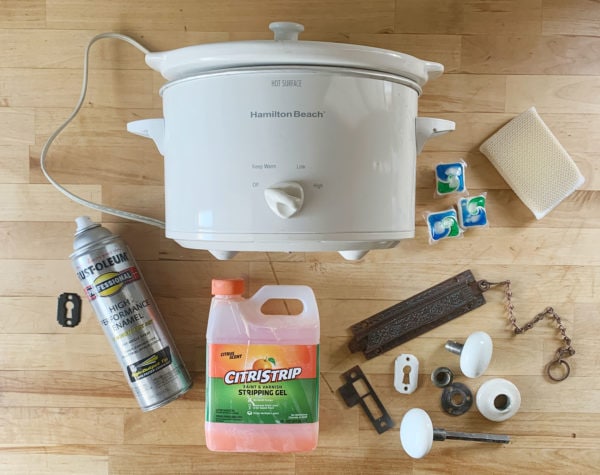
Now! Let’s get that hardware all nice n’ naked.
My preferred method is the classic Crock Pot Method. I got this from my friend Anna, who got it from This Old House, who got it from Brad Kittel, who has a podcast about Tiny Houses in case you’re curious.
Here’s all it is:
Step 1. Buy a cheap crock pot. You can always find these at thrift stores for a few dollars.
Step 2: Place your paint-laden hardware in the crock pot. Fill with water. I like to throw in a dishwasher detergent pod—I’m not positive it actually helps, but I love to try to hack a system.
Step 3: Set the crock pot on low and leave it for several hours. I usually let it go overnight. The low heat of the crock pot prevents lead from vaporizing and killing your family and pets.
Step 4: Dump all the cooked hardware in a colander, and clean each piece with a scrubby sponge and dish soap. All the paint should slide off—if there are stubborn bits, just let that piece simmer a while longer.
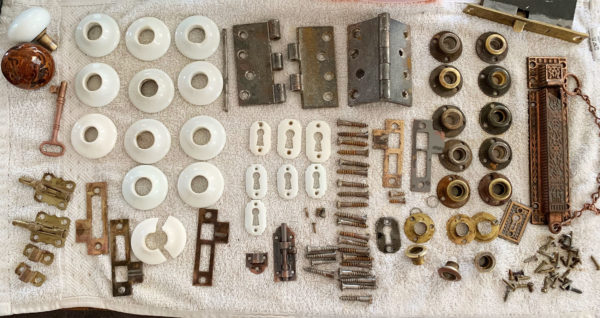
LOOK AT IT ALL! SPOTLESS. MY PRECIOUSSSSSS.
Small caveat: This method removes paint effectively, but can also mess up brass plating. If your hardware is brass-plated, a better method is to use Citristrip—either submerge the piece in Citristrip, or coat and wrap in plastic wrap and clean after about 24 hours.
Iron hardware will rust if left untreated, so I typically spray paint it with a good-quality spray paint. I love Rust-Oleum’s Professional High-Performance Enamel in Semi-gloss, but it’s up to you. You could also use a clear varnish if you want to preserve the raw look. Options!
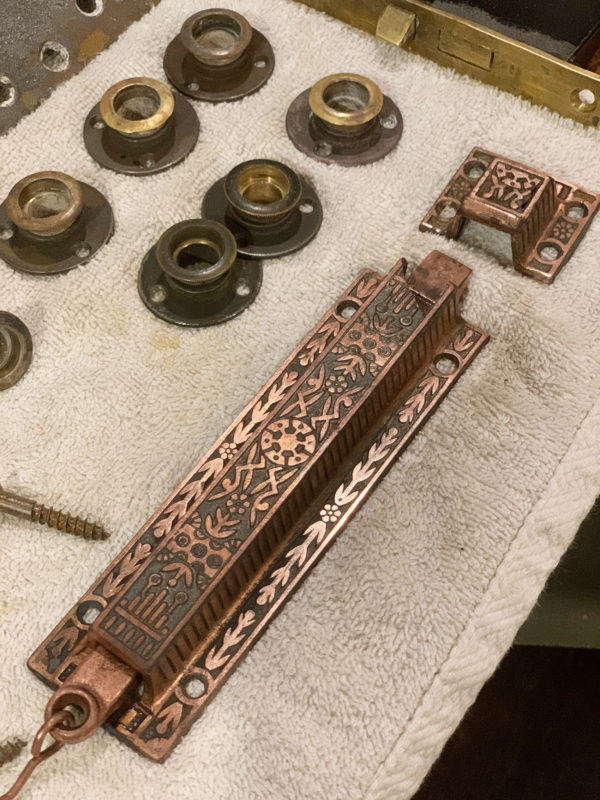
Let’s just take a collective pause to appreciate this spring-bolt lock that belongs on the front doors. I MEAN. Eastlake goodness.
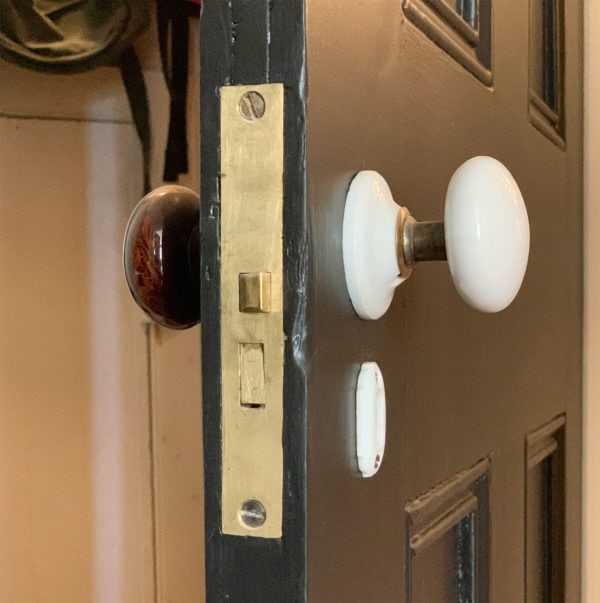
Patience is a virtue when you’re re-hanging the door and re-installing all your fresh and beautiful hardware. Each of my doors require THIRTY individual screws to put back together, and it takes about an hour per door. So put on a podcast, grab a drink, and get busy.
Pro-Tip #1: Sometimes, the screw holes in the jamb will be too large to hold the screw effectively. Stick a toothpick or a section of a bamboo skewer into the hole, and your screw should go in nice and tight.
Pro-Tip #2: For the love of god, don’t toss your flathead screws and replace them with the modern and, admittedly, easier phillips-head screws. It will look stupid and wrong, and you’ve come too far for that!
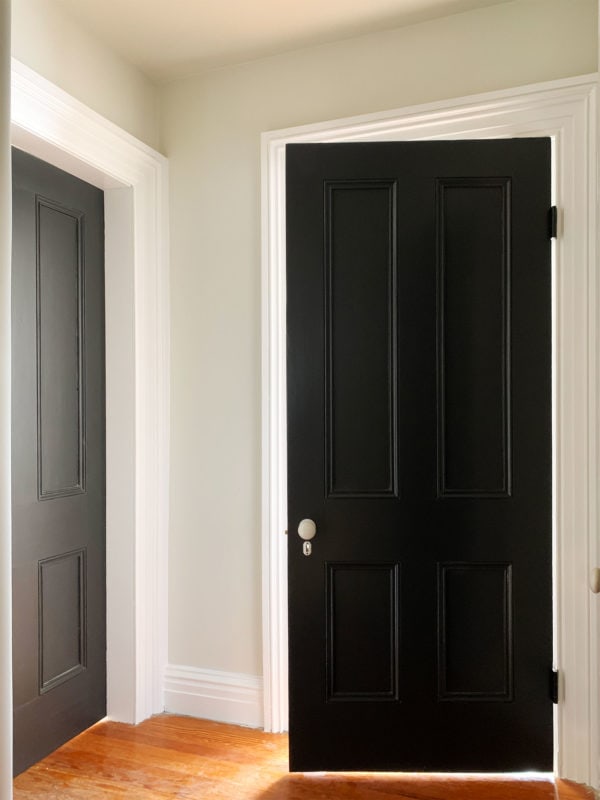
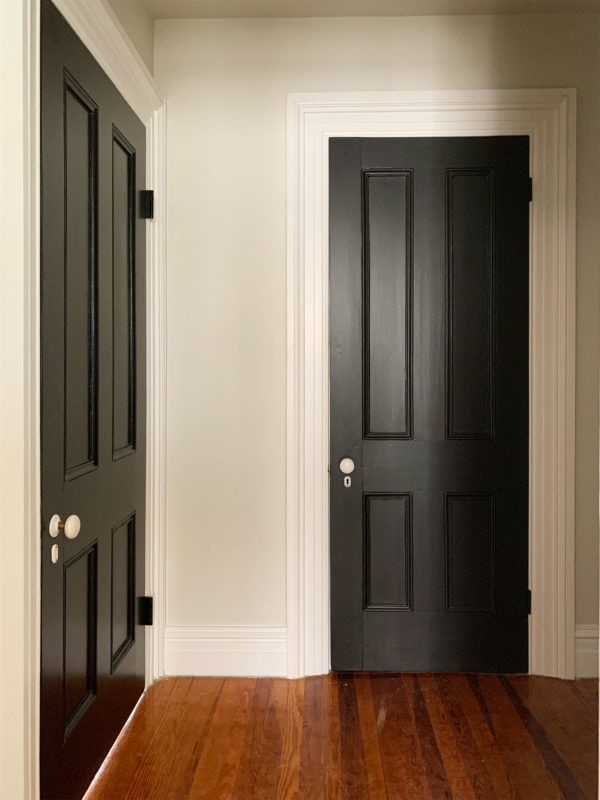
OK. PHEW. BEFORE YOU KNOW IT (jk, well after you thought it would be done…), YOU WILL HAVE THE SLICKEST PAINT JOB IN THE NEIGHBORHOOD. CHECK IT OUT:
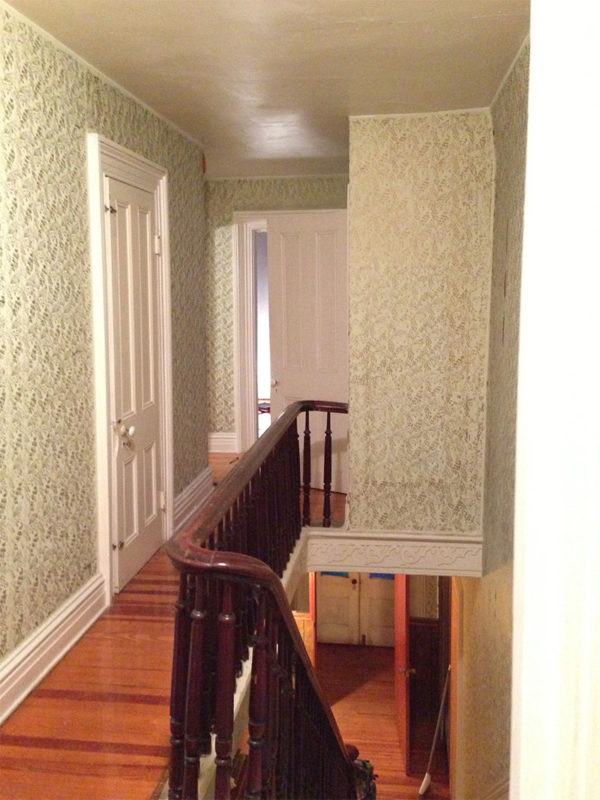
2013.
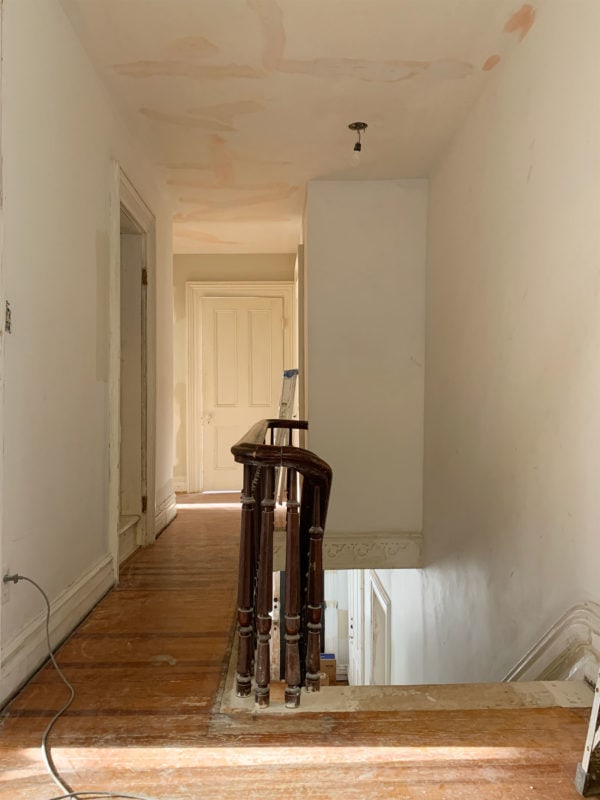
This was a couple weeks ago. And nowwwwwww…
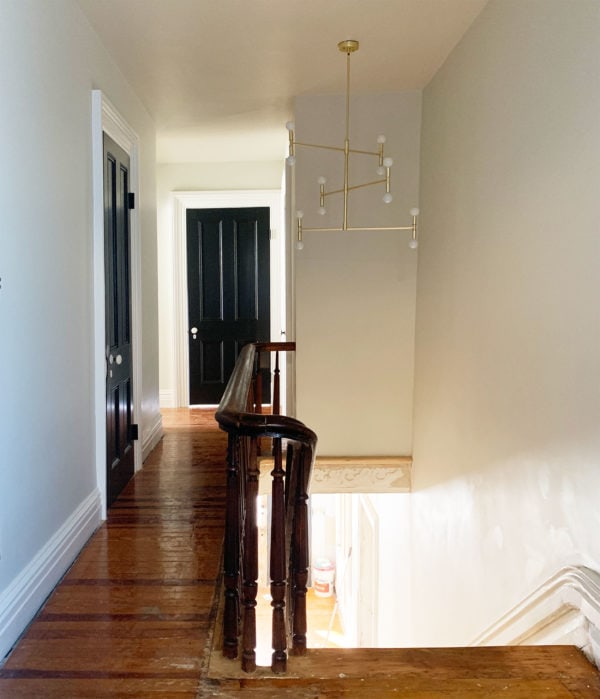
LOOK AT US. Thank you for your support.
Guys. My house is starting to look like a functional person lives here. I’m not sure what to do with that, but I know I like it.
I keep considering cutting out the top two panels of this door and replacing them with a piece of textured glass—just like the bathroom door at the other end of the hall—to let more light into the hallway. This is the one space in the house that feels starved for natural light. The rest of the house gets so much light, for which I’m extremely lucky. It’s one of the reasons I fell in love with it in the first place.
I’m just so happy with how this all panned out. I’ve taken on some big renovations but honestly? I feel like I’ve had to apply everything I’ve learned over the past decade+, mostly through trial and error, in this one space. And the results are NICE. Doors so smooth you could lick ’em. That’s a good feeling!
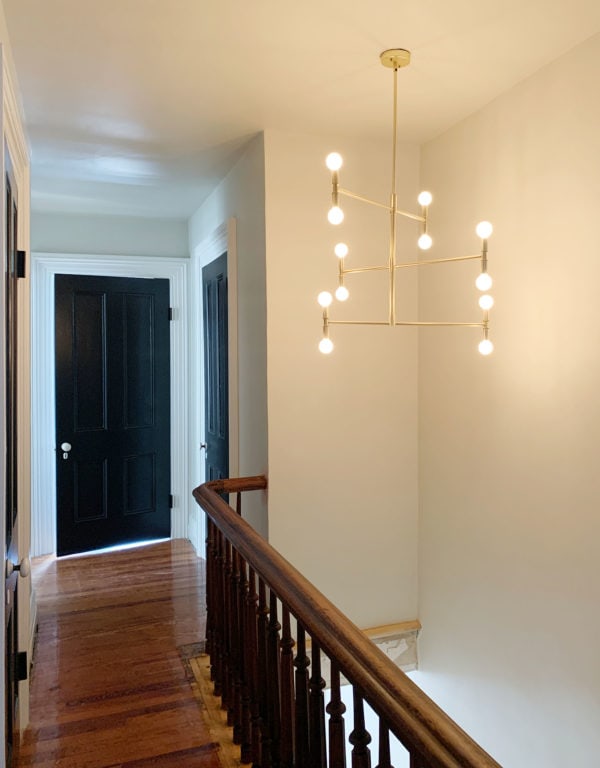
To finish off the upstairs, I added this great light fixture from Globe Electric! It’s super nice and looks way fancier than the $145 price tag suggests. I like having the contrast of a modern touch in a nicely restored space—it kinda reminds me of a modern mobile, and lights the space so nicely!
Now. Onwards! We have 17 stairs, the entire downstairs, and things like art and rugs and hooks to contend with. Stay! Tuned!


Hi Daniel! It looks fantastic, and I KNOW how you feel when you say the prep takes soooo long but is totally worth it! I always want the paint to go up INSTANTLY, lol. I am curious if you changed the paint finish for the ceilings, or if you used eggshell throughout walls and ceilinG? I love using something other than white, but wondered if you went for a flat or matte version of the color, or just stuck with the eggshell?
Can’t wait to see the next floor come together!
Cheers,
Meredith
Thanks, Meredith! I used eggshell for both—honestly mostly because it made the paint job a little easier, and I didn’t want to buy another can of paint, haha! I was worried I’d regret it, but I think it looks fine!
THIS LOOKS SO AMAZING! Every time you post a photo of the newly painted doors I wish I could reach through the screen and pet them.
Great work, and thanks for sharing the journey. It’s so fun watching you work through these projects and sharing all the trial and error and craziness along the way!
Looks sooo good! You did a fantastic job and thank you so much for the tutorial! I would like to know what color you chose for the doors…
Thanks, Karen! Doors are Sherwin-Williams Tricorn Black!
WOW !
Magnificent ! Thank you for the thorough step by step detailed post . It is perfection and inspirational !
The SPINSTER DOOR FLIPPER!!! Oh my gosh, I love it so much. As an adult who has lived alone for 10 of the last 15 years, there really should be a whole line of products to make life easier for people who don’t have another adult at the ready—add this to the catalog!
I support this project!
I agree! I’m an expert at putting together Ikea furniture solo, but there are so many other projects it’s hard to do by myself, especially as a not-particularly-strong, rather small woman.
Yes, the description also made me think of all the Ikea furniture I put together alone, using ladders and various other props, as stand-ins for the goofy roundish 2 persons pictured in the Ikea instructions telling you to have a second person and not to attempt assembly alone.
I’ve never commented before but the spinster door flipper did me in. Bravo!
WOOHOOO!! This looks incredible, and while I’m sure it has felt like a lifetime to you I’m shocked at the speed you’ve gotten all this done!?!! Can’t wait to see the rest of the space progress Also for what it’s worth, I’m pro the vintagey glass panel in the nursery(??) room door, and would be very interested in a how-to post if you end up doing it :-) Take care of yourself and thanks for posting!
Another vote for glass panel here.
For me, the lazy-person’s way to get light in a hallway, easier than installing glass panels, would just be to leave the door to that room open during the daytime. It would also be a nice view – into the room – after coming up the stairs and rounding the corner.
That way, you’d let more light into the hallway than glass panels would, and when the room was used for a guest room, the guest(s) would have more privacy and quiet by not having glass panels in the doors.
I forget what the door that opening the door would block access to when open leads to, but it looks like it can’t be anything but a closet, and one could always just shut the small room’s door to access the closet.
Yes, I remember that the room is now full of cast-off stuff you might not want to look at, but at one point, if I remember correctly, it was a cute and functional guest room, and will be again, or else will be a room with some other use you’d not hesitate to look at, no?
You are giving me courage! Thank you for the fantastic information!
Perfection. Those doors all restored like that with such care and detail. I’m all heart eyes over here. Love your work!
Looks beautiful, of course. Doing all that prep requires the patience of a thousand saints. (Only you could make a list of tools so entertaining to read, Daniel.) Do I even want to know how you were able to reach that scary-high spot over the stairs to install your spiffy new light fixture? :)
Oh lord, now that you bring it up, I’m almost afraid to know! It seems like the kind of thing where you text a friend, “if you don’t get an all clear from me sometime in the next 45 minutes, call 911.”
You all are too dramatic! LOL
Just a ladder, haha! I have this one! Each side extends, which makes it perfect for stairwells!
Eeeeeeeeee I’m so excited for you! I’ve been watching your instastories pretty much religiously (and at work shhhh) and I know you’ve said that you think it’s hella boring but I feel like it’s just so helpful because I feel like so many times, I think to myself that whatever, I just gotta paint and it’ll be fine and done in an hour! GIRL, NO. You always show the nitty gritty and I love and appreciate that (and you!).
Thanks, Kathy! That’s so nice to hear! :)
This looks incredible. Your instagram stories on this has been giving me life and it’s so nice to see the pictures and get a run down on it. You always do amazing things and can’t wait to see more on this project!
This is such fantastic info (have pinned so many recommendations from this post), and a truly remarkable example of patience being rewarded – your hallway looks amazing!
My tip for the Handy Pail without using a liner.. after you’re done with it, leave a thickish coat of paint in it to dry. Once it’s dry, the slick plastic on the inside of the Pail will just allow the paint to peel right out. Even more fun if you are the type that likes to peel sunburns
It looks fantastic by the way! So excited to see the stairs and downstairs!
Clever!
You genius, genius human. This post is insanely detailed and makes me wish you had a Patreon. I would totally kick in some funds for you to lay down this knowledge. (Also, because selfishly I need help fixing ancient mortise and doorknobs that spin – can we get that next?)
The hallway looks phenomenal and retains its age while still feeling modern. I want to paint all my doors black now. I mean, I wanted to when Nicole with Making It Lovely did, but now I want to even more.
I sent a DM to Daniel on one of his instagram stories about stripping the stairs and suggested that he let us join forces to buy him a infrared paint stripper. Maybe if we keep suggesting it?
Just a quick tip for your doorknobs that spin, you might need to replace the spindle. Often over time the set screw that holds the knob to the spindle has worn a grove so it slips around the spindle when you turn the knob. If you’re not ready to buy new spindles you can loosen the set screw and back the handle off a bit to find a fresh spot on the spindle for the set screw to grab onto. I have several doors with loose and spinny knobs that I haven’t bothered to fix yet but I should. So many things I should fix…eventually.
I would love to contribute to an infrared paint stripper for Daniel!
Thank you, Jenn! I can try to talk doorknobs but I think Ryan is probably right! Mine are an older style, I think? There’s a little set screw that goes into a squared spindle, so it doesn’t rely on…friction? I’m not sure, I might need pics!
I love that light fixture SO much! I’ve actually been trolling eBay looking for a nice mobile but I may just make my own. Please tell me how you hung that! Do you have a super tall ladder?
NO! Tell only Susan, it will make your mother crazy.
Thanks! I have this kind of ladder, so I can extend one end out long and keep the other short, perfect for stairs!
Did I miss the trim and door paint colors? Looks amazing. Thanks for all the tips.
Doors are Sherwin Williams Tricorn Black, and trim is Sherwin Williams Extra White!
I’m so in love! As a pro painter, was thrilled to learn a few new tricks (tinting the peel stop is brilliant). I’ve had clients believe they needed to rip put all their old trim and start over and then be shocked and amazed at how great it looks with proper prep, caulk and paint. Lots of old houses in my town. Love the subtle color scheme too. It will stand the test of time no matter how often you change anything else in the space. Brilliant yet again Daniel!
Thank you for saving old trim! I can’t imagine thinking it’s easier to rip out amazing old trim and replace it all rather than working with what’s there!!
You taught me a new word today! Ogee, thanks for that :)
The hallway looks killer. I vote for glass panels in the door at the far end! Thanks as always for your incredibly fun to read posts!
The first router bit I ever bout was a “roman ogee”.. Which made me wonder if all the scandalous history of Rome was actually pretty tame until some historian made a spelling/translation error.
Turns out, Caesar just really liked moldings.
Caesar and I have that in common!
My parents’ 1909 house needs some care & detail on their hallways like you’ve given yours. Incredible.
The doors are stunning! I’m so glad the knobs turned out well.
Wow,
That’s a glow-up transformation. That prep work paid off big time! Love your upstairs hallway.
P.s. I have some doors I have been thinking of putting glass in for the same reason. It’s nice to get any additional light into an interior space!
Also… that light fixture is A-MAZ-ING
This is GREAT!!! I’m printing it all up and it will be my go-to reference guide! Thanks so much for taking the time to put out this very detailed post. You’re the best!!!!
So glad it’s helpful!! You might need a heavy-duty stapler for the printed version, haha!
Thank you Lowes. Thank you thank you, Daniel. So helpful, and I’ve done a lot of prep and painting over my many years.
Thanks especially for these details: the non-Bondo exterior recommendation, the caulk you use. I’ll use these very soon. I’ve bookmarked the page for future stuff and will reference before I start, and will, of course, go to Lowes.
Oh, I think it is my mom, Lillian, who every one is ripping off for the crockpot thing. She showed me that trick about 50 years ago. Probably adapted from her mother doing a slow simmer on the wood stove.
So, oyster on the walls, what is the color for the trim and doors? And do you regret using a dark color for the doors because they require regular dusting?
Thanks, Lynne! Thank you Lillian! Love that!
Trim is SW Extra White, and doors are SW Tricorn Black! I’ve painted a lot of doors black (kinda a habit since 2011, apparently!), and I don’t really find that they need any more dusting than white doors! The dust settles in the same spot and looks just as dirty either way, I think.
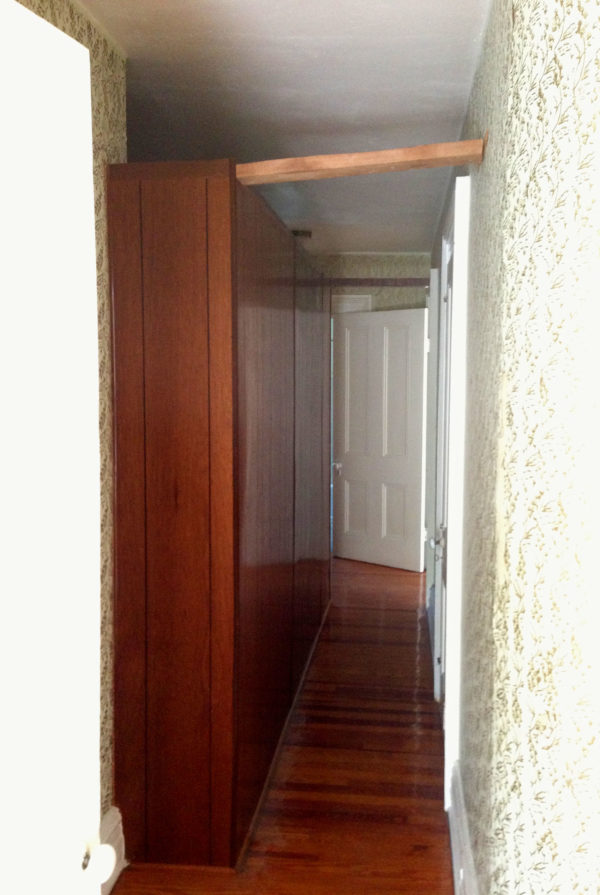
The house is exhaling with the removal of that terrible partition. You can just see the life in it coming out.
Are you watching The Repair Shop? It’s all about resurrection. And it so reminds me your work.
https://www.theguardian.com/tv-and-radio/shortcuts/2019/aug/26/most-moving-show-television-we-should-all-watch-the-repair-shop
No, but someone was telling me how great it was the other day! Thanks for the reminder, I’ll try to find it!
I second The Repair Shop. Delightfully British, and just charming. Gentility oozing from every frame!
-slow clap-
WoWEEEEEEE!!!!!
Oh my god this looks amazing!!! I’ve been following your stories on Instagram but seeing it all together like this is just incredible!
Also, nine years? HOW???
I KNOW. HORRIFYING!!
If you really don’t want to spoil the look of all t hose lovely doors, had you considered a sun-pipe? Our upstairs has no light at all if the doors are closed….. that is, until we put in a sun-pipe. Lots of light now!
By the way, well done with everything……. Perfection only requires time and elbow grease and obviously you’ve cracked it!!
I have kinda entertained the idea! I don’t think I’ve ever seen one in real life but they seem awfully nice!
So, it’s probably not the time to ask– when the walls are so beautiful, but did you consider a transom above the door instead? I have a similar problem and that was my solution.
Sun-pipes or suntubes or whatever name the brand you choose uses look awesome in real life … in modern and contemporary houses. They look like… imagine a huge can light, like 12″ wide, covered in a translucent plate of glass/plexiglass. They positively glow during the daytime, and look really ethereal during dawn/dusk when there isn’t much other light coming into whatever dark room of the house you’ve installed the suntube in.
I’m really not sure how a round glowy plate on your very traditional ceiling would look — I think it would REALLY throw off your vibe, unless you did something cool like a series of three of them down the hallway or something to be “edgy”. Traditional skylight would look awesome. Transom window would look awesome.
Your work…your vision…your writing…it’s all such a gift. I LOVE that you don’t fill your blog just for the sake of filling your blog. Your posts are well worth the wait. Following your progress on your various projects brings me immense joy! Thank you. (And thank you, Lowe’s, for sponsoring this gem.)
Coincidence or divine intervention that I’m reading this while ACTIVELY PROCRASTINATING fixing and painting trim? A coat of latex primer was slopped on stained trim a few years ago with a low quality brush. Now it’s time to fix it to FINALLY finish a bathroom remodel (ahem, a year in the making). The brushstrokes are deep. The stain came through the latex primer. I sucked it up and used a quality oil-based primer to block the stain but it didn’t touch the brushstrokes. I started to sand out the brushstrokes but quickly got down to wood. I got disgusted with the thought of sanding to wood and having to use oil-based primer again before painting so I did the only logical thing and turned my back on it.
But I forgot about Floetrol! I wonder if I can use Floetrol together with Peel Stop Triple Thick to “fill in” the brushstrokes? If this works, my esteem for you will be inestimable!
Thank you so much for the kind words, Jennifer!
I’m not sure about mixing Floetrol with the Peel Stop, but hey—I don’t think it would hurt to try! The Peel Stop might actually work better on its own in that situation, maybe a little light sanding after that’s dry to knock down the texture? Good luck with it!! I know how frustrating that kind of thing can be, and hard to get yourself to go back to it . You can doooo ittttttt!
I love this house & I love your taste! Every room/hall you do looks fantastic!
YOUR BANNISTER! YAAAAAASSSSS!!!! Every picture of that little woggy bit at the end made me sad. I was afraid it was damage done by the previous owners that you wouldn’t be able to fix. So satisfying to see it repaired. All of it looks incredible.
So funny on the banister—I thought I was the only one who ever thought twice about it! I’m so glad it’s fixed now and thank you for noticing, haha!
Oh, so, so pretty! I love the petite chandelier! Can we please talk about that glass in door idea some more? My otherwise light-filled house has the same dark hallway problem and I’m trying to figure out a solution. I need pictures to convince my dear husband there’s a way to brighten the hallway.
Well you can show him the existing bathroom door! The one downstairs is a little different but also has glass, so that’s coming up too. And if I do end up putting glass in the other door, you’ll be hearing alllll about it! :)
The job you did is nothing less than stunning. 100% classic look.
I cannot get over how gorgeous and smooth those doors are! I was wondering what the sheen of paint was, as I thought maybe I could achieve this with the right sheen. Looks like I need the right sheen, as well as a shit ton of perseverance and hard work, which is great but also not! My lazy streak is starting to rear its ugly head. Ah, well. I can at least enjoy your baby-smooth paint job vicariously. Seriously, this hallway looks amazing.
Thank you, Sara L! The doors are satin! More glossy than eggshell but less than semi-gloss!
This looks well beyond fabulous! And I love your writing voice.
But I am stuck on the idea of putting wet, painty roller covers IN THE WASHING MACHINE??!!??
It may get the covers clean…but what happens to your washer? And how does the water sensing work when all that’s in there are a few lightweight roller covers? Do you have to run a load of rags to get the washer clean? We need a lot more details on this process!
YES YES YES. I had NO CLUE you could wash roller covers? My mind is BLOWN, and also SO MANY QUESTIONS. Is the inside not cardboard? Does it not disintegrate?
It doesn’t! The inside (of these ones at least) is a very rigid plastic!
Haha! Idk, the washer seems fine! It cleans the thing and in the process it cleans itself! That’s all it does! Clean! I can’t explain it! I’m not a doctor!!
It looks outrageously good!
Wow! This looks so good and warm and inviting. I can’t wait to see it in person. Thanks Lowes!!
Daniel, what an industrious spinster you are! I admire your patience. It’s a beautiful space!
Your post doesn’t come close to capturing how much work I know went into creating the content for the post! It’s beautiful.
I think replacing some of the panels with frosted glass in the door to get more light sounds wonderful.
Gorgeous! Thanks for your always excellent step by step skinny! So many fabulous tips and hacks. Will the Spinster Door Flipper tm also work for a Divorcée?
Yes 100% guaranteed!
Bless this post, it is super relevant to my interests! I will be making my own Spinster Door Flipper as soon as the giant bats of RockWool and pile of Hardiboard products are out of my garage (this will happen by Friday, so help me god). I have like 8 doors to strip down and paint, and this is gonna save so. much. time.
I actually got one door sanded down and primed with that shellac primer you recommended a while back and then the first coat of white latex. Two days later, mold or mildew spots were showing through the paint. Do you have any idea how to fix something like that? I’ve painted plenty of doors in my day, but haven’t had this issue before, and unfortunately, most of the doors I salvaged have that mildew issue from being stored on a covered porch.
Anyway, your hallway looks amazing and I love that you take the time to do things right. Have followed IG Stories religiously. Such a transformation!
P.S. If you haven’t used RockWool yet, it is AWESOME. I am now completely sold on it. So easy to cut with one of those extra long utility blades and install goes crazy fast since it stands up by itself and fits tightly into the wall cavity. Two thumbs up, will use forevermore.
HMMMMM. I’ve never encountered that mold/mildew issue before! I guess my two thoughts would be….
1) maybe the doors need to dry out? You can get a little moisture meter if the primer/paint has a guideline for the minimum moisture content to see?
2) This primer! Zinsser knows what’s up.
Ooooh, buying these both! I had no idea you could buy a moisture meter like that. Thank you!
Nice job! I strikes me as odd that all the doors open into the hall…..all mine open into the room.
It’s a little odd! But I think makes sense to preserve a little more floor space in the smaller rooms like the bathroom and “nursery.” My bedroom door opens in!
So, did you reverse your bathroom door to open outward when you reinstalled it – to make more room in the bathroom when one is in it?
Those doors are just perfect. The contrast! What an upgrade. And you can really see those gorgeous porcelain doorknobs.
My husband is anti-prep. I offered to lay dropcloths when he painted our bathroom. “I won’t spill,” he said, adding some swear words. Nor did he wipe down any walls. We shall see how it lasts. It’s just the part above the tile, which starts far above my head and goes much farther, so I can’t make out anything up there.
Damn, the hardware on those doors. SO. GOOD!!
Thanks so much for this tutorial! I just got an estimate from a contractor for painting trim in my newly-purchased old house, and it was so high (plus all the other costs like bathrooms that are coming soon!) that I’ve decided to do all painting myself. Perfect timing for me! A few questions for you: All the walls in my house are covered in wallpaper, and underneath the plaster is bare. How would you prep bare plaster for paint? Should I use a Zinsser primer? I’m also wondering if you’ve heard of or tried linseed oil paint. I’ve been reading about its benefits, and I’m curious to know what you think.
That’s so funny, I think I saw an ad for linseed oil paint this morning and was like “what’s that??”. I’m curious to know more but haven’t looked into it yet! For the plaster, it kind of depends on the condition of it. Often plaster that was intended for wallpaper didn’t get the smooth finish coat and will be kind of rough, so for smoooooth walls you have to skim-coat them with either joint compound or new plaster. Plastering is technically quite difficult, but joint compound is pretty forgiving and can be sanded easily. But if the plaster is smooth enough to paint, I’d say wash the walls down really well (vinegar + water and a garden sprayer works nicely—plaster can take a ton of water! that old paste can be a pain.) and probably an oil-based primer to be on the safe side. I pretty much always hire out skim-coating (I hate doing it!!) and do the rest myself. Hope that’s helpful but I’m here if ya need me!
Thanks for this response! My plaster walls are nice and smooth, so I think a good washing with vinegar + water, followed by an oil-based primer, will do the trick.
No expert here, so don’t rely on without researching, but I seem to remember that bare plaster soaks up a lot of paint – and I remember that there is this stuff called paintable wallpaper that comes in white that is meant to be painted. While you likely don’t want to put up new wallpaper on a wall you’ve just stripped old wallpaper from, it strikes me that it might be a way to prep an old plaster wall for painting that could be far easier than joint compounding and sanding the whole thing.
A*MAZ*ING!!!!
If you’re interested, you can follow my house projects on Instagram @thegermantowndutchcolonial.
Halfway through and I jumped down here to comment that someday…not today maybe…you should put these in a book. Thank you for so clearly showing and explaining your work. It’s amazing! And loads of DIY-ers and wanna-bees and folks that love home improvement and remodeling would love your book. I’m surely the umpteenth person to suggest this but I couldn’t help myself. Back to the post….
Thank you, Amanda!
This is a fabulous tutorial! I’ll chime in with three things I swear by: Purdy cut-in brushes (never mask again!), my silicone – lined paint tray (let it dry and peel out the paint, good as new!) and wrapping the entire roller pan, roller and brush in a plastic bag on the fridge between coats, for long breaks, touch up, etc.. If you paint like I do (a little too late, a little too buzzed) it’s nice to have everything ready for morning/daylight touch up. Warning: do NOT attempt this fridge trick with oil-based, your leftover breakfast pizza will taste decidedly off.
Congratulations on the progress and I hope you find yourself a long-armed man to change those light bulbs over the stairs!
Silicone-lined paint tray! I will check this out, thank you!
Amazing!! You are so patient and methodical! Love it!!
Los of great tips, and your result is beautiful. I would one more tool: a rubber mallet to use for replacing the lid of the paint can. Also for tapping around the frame of a stuck window.
True!! I knew I missed something ;)
My one year old flushed a paint can opener. The young plumber who came to retrieve it didn’t know what I was talking about. He had only ever used screw drivers.
Hahahahaha. Kids!
It’s so good :) It’s like the house is giving a sigh of relief :) Also, your Mom’s comment made me laugh out loud!
Great info on painting! I have beautiful door hardware in my 80 year old house, which had been sloppily painted over many times. What monster would paint over brass Art Deco door plates?!? Anyway, did the crockpot stripping technique. Instead of paint or varnish I read about something online – melt beeswax with a little oil, and rub on the hardware. It’s taken time (12 doors) but the hardware now has a nice protective shine.
Oh, Daniel! I could read Anything you write. You make it sound so interesting. You are so thorough! But, there are no dogs in your photos. Do you have to close them in a room? I have lived in many old houses, in fact I prefer them. You are on a tear now, so keep going.
Thanks for reminding me how fantastic black doors can look in an older house. I live in a Victorian terrace in Melbourne, Australia. After reading this, I think I’m ready to take the plunge on painting my interior doors.
It looks so so so good; congratulations! I gasped when I saw that front door lock. I love how beautifully manufacturers attended to details back then.
Also, I was literally thinking the finished doors looked like candy, so I’m happy you also kind of had the weird urge to “lick ’em”
Okay, now I am concerned for my health and safety after reading the proper way you should clean old hardware! I put it all in a crummy thrift store pot, boiled it and then used an old credit card to scrape off all of the paint and gunk. MEANWHILE, inhaling any possible lead paint vapors :-O Oy vey. Going forward I will definitely do the crock pot method because we have A LOT of hardware that needs to be done. It all came out so beautifully, good job! I’ve been following along with your process and taking all of your podcast recommendations while simultaneously working on our own house projects.
Let me just put my head between my knees and breathe…. I’ve never painted anything before and I’m looking at painting my (rented) apartment next year. I know if the maintenance people do it they will not do a good job b/c they half ass everything. I kind of want to do it myself so I can do it right… but hooo boy I don’t see myself spending days and days sanding trim!
The most in depth blog I only wish I had when I started 3 years ago! Growing up in a log cabin in the woods (literally) I never painted a wall in my life. Fixing up my victorian and trying to learn all the things all at once and there have been many trials and LOTS of errors. This is so so helpful, and your process is inspirational! Thanks so much!
You may want to check out tips at https://www.oldtownhome.com/, too. I believe that’s where I leaned a ton about the best way to patch plaster.
Damn, this looks great. Congrats on making so much progress! It’s been fun to follow along on IG.
So beautiful! You have inspired me to repaint my bedroom (and may have borrowed your colour palette). But I have a question about hardware stripping. I only have one door with hardware that I want to strip, and acquiring a whole crockpot doesn’t feel worth it. Whats the most efficient method/product for restoring brass hardware by hand?
ohmygawdddddd this looks so good. Seriously, I don’t even own a house (yet!) and you have me so excited to take on the challenge when/if the time comes
Just gorgeous!!!! I paint alot since I work on my kids houses too. Always like to see what others use. Those rollers are new to me. Going to pick up a pack. Have a ceiling and walls to continue in my daughter’s house. Thanks!
WOW!. It looks beautiful. Love the light fixture too.
Question: I’m really worried about you and those stair treads. Could you have replaced the treads themselves? Would that have been crazy expensive? Historically wrong? Just curious.
Everything looks wonderful! I love the hanging light fixture. The door at the end of the hallway looks like it is blocking a lot of light. Replacing the panels seems like a good idea. Or maybe you could just take that door off and put in some plants peeking through the doorway? Or hang a painting on the outside of the door in side the hallway. Just ideas. I think the closed door at the end of the hallway looks a little scary.
The hallway looks amazing!! Especially the lovely doors. Thank you for the tips and I appreciate the product recommendations, esp the patch, peel stop and caulk. I have been using dynaflex in some areas that keep cracking. It works, but it’s super hard to work with; it’s like caulking with super sticky chewing gum. I’ll def give Big Stretch a try. Floetrol is fantastic, and a must if you’re painting furniture. Finally, Purdy brushes are the best. I have a few that I have used for years. They also make a nice roller called White Dove (avail from Lowes), which I recently used to apply Ben White Dove to my walls :). Anyway, I am eagerly waiting the next chapter!
Perfect timing. Painting my back room/back entrance is on my late-winter to do list. Delusional about getting it all done in one weekend, so thanks for reining that back.
I was waiting for the hardware/crockpot tutorial. Guess I’ve been reading for awhile! Nothing so elegant in my ’20s bungalow, but it’s fun reading. Thanks!
This post is absolutely brilliant, thank you for always being so funny and detailed in your posts. They’re some of my most favorite to read and I’ve been reading since before you created that fancy desk hack in your super old apartment. Crazy!
Would your advice for sanding and scraping be the same for instances when there’s a latex layer of paint over an enamel or oil layer? The people who owned my house before me just slopped paint on prior to sale and it is very clear they weren’t either thinking or were too lazy or I don’t know, and now all of our trim of course is a mess of peel/it’ll-scrape-if-you-hit-it-with-your-fingernail-too-hard type of finish. I know there will be a decent amount of prep, but I’m worried that a sanding pad will just get gunked up, despite the amount of scraping I do. Have you ever run into anything like that at any of your jobs?
This is so sexy. Damn.
Someday , if I ever have a house that needs love and attention, I will come back to this blog as my renovation bible.
Daniel – holy crap this is amazing. Wow. just… wow. YOU ARE AMAZING
A bit off topic- I was looking on Design*Sponge for your marble cleaning post, and noticed that Design*Sponge is going away! Do you think you could convince them to release your posts and for you to add them to your site? Your contributions there are too valuable to just go away!
This looks so great Daniel! Thanks for this; it was super-informative and far more interesting than I expected a paint tutorial to be. Question: how do you paint the area above the stairs? It seems scary and dangerous.
This came just in time for me as I was prepping for a big ol’ DIY kitchen renovation that includes a lot of paint and trim and such. Thank you for knowing what I needed before I did! I took a lot of notes, especially on the caulk, because I have yet to find a caulk that doesn’t disappoint me. Do you have bathroom and kitchen caulk recommendations? A mere 6 months after caulking my bathroom with a Loctite product, I need to re-do it because it shrank so much :( I also need to caulk all around the seams between my newly installed beadboard tongue-and-groove backsplash (BEAUTIFUL in my 1923 home!) and the upper cabinets. Ugh, caulk is stressful.
This looks Fantastic!!! Im curious as to how you reached the higher ceilings and higher walls on your staircase area? Did you spray paint this area?
Nope, just a ladder! I have one a lot like this, so you can adjust each side to account for the slope of the stairs. :)
That metal “discovery” looks like a latch hole for a pocket door?
Daniel,
The hallway looks very chique and fitting to the house. I can imagine that it took quite some elbow grease and late hours.
About the ‘glass in door’ dilema. I hope your not thinking of cutting out the middle divider, like the bathroom door?! If you just take out the panels and replace them with glass, I theory you should be able to put them back in the future. Depending on the construction of your doors, you can try to cut out the edge that is holding the panel and put them back as trim around the glass.
I looking forward to the next update, your really bringing the house back to its former glory! I really like your mix of construction/renovation/styling in this blog, there is no other blog like it!
Beautiful work! I love that you know when to be thorough and know when to it’s okay to let something slide. I’ll definitely be revisiting this post.
If you have any tips or tricks for refinishing 80 year old hardwood floors, I’d love to hear ”˜em! Ours are in rough shape (some staining from carpet + pets, spots where the finish has nearly rubbed bare, some gaps) and we’re thinking of tackling it ourselves. We’ve done tons of work on our house ourselves, and I’m a woodworker, but I’m still a little nervous to take it on!
It’s not so bad! You can rent the equipment and watch a few videos online and you should be good to go. I’ve heard that orbital-style sanders are easier to manage than drum sanders, but my local place only rents drums. I got through it without too much trouble!
Loving all the insta-stories you are posting. Just can’t wait to see how frikken beautiful your steps & hallway are going to look!
Wish I could help & speed up the process (not) ;)
Dearest Daniel
Thank you for sharing so much of your home, your work and your amazing DIY ……but most of all for sharing your heart.
Your beautiful home has inspired so many of us.
Please don’t ever loose heart, we all love hearing your passion for making everything as beautiful and original as is possible.
Your patience and determination give such encouragement to those of us embarking on similar projects.
We all know working on them is a true labour of love.
Please don’t ever feel disheartened or think you are on your own because you have an enormous following who send love and support winging their way to you!
Thank you :)
Thank you, Colleen! Much appreciated. <3 <3
These are such great tips – bookmarking this post ASAP!
Kate
that was only $145???? ahhh!!
this looks so good :))))))
Hi Daniel! This project was so inspiring, and suddenly we have a ton of time on our hands. We’ve wanted to redo our trim. The previous owners painted latex over oil based paint and it’s peeling off in sheets. Are you able to skip the oil based primer if you use the peel stop product? Thanks for your awesome article, account, and advice!
yes you should be able to, but try to get as much of the peeling stuff as possible off first!
Oh man, if you do add glass to those door panels we need a full on tutorial (planning to do it myself and want tips)!
You have my word!
I’m not quite visualizing how the flipper works. It revolves on the lag bolts, steered by the threaded rod, which is not drilled into the door? How do you work both ends of the door simultaneously?
I hate to pester you about this — this is a brilliantly inspiring post — but I could not locate any info at Chalkstone link. With thanks for the inspo.
Thank you so much for this guide Daniel!! Gives me such confidence that my project will go well. I just bought everything available on this list from my local Lowes – taking my husband through the aisles with this page open on my phone “THIS is the one Daniel says to get!” Thank you for passing on this wisdom + experience!
Loading up my Lowe’s cart for a tomorrow pickup! Glad your affiliate links still appear to work. I have a bunch of trim that has mitered corners that have separated, and i vaguely remembered reading this post back in the day and remembered you had a stretchy caulk you liked. (Hope i should be caulking and not using patch+prime, stuff, got more googling to do.) Anyway, Daniel to the rescue! Thanks!!!