
First order of business: you guys are the best. I truly felt like garbage about everything going on with the house when I wrote the post about my roofing woes last week, and half-jokingly solicited some consolation in the form of your renovation horror stories, and you wonderful creatures came out in the comments in force and delivered! Knowing that so many people have been in the same boat (and, often, worse boats) and reading all about it really made me feel better. Perhaps that speaks to something unsavory about my schadenfreude-istic personality, but the fact that you all lived to tell the tale was truly heartening. Hugs all around! We hopefully have a wonderful contractor starting work this week on the gutters (!), and along with getting some exciting electrical work done this week (!!!) and our heating system up and running (!!!!!), things are looking up again. Updates forthcoming!
Second order of business: after I pledged to let some qualified pros handle the roof, I started in on another little room because that’s just how I do. Nobody puts Baby in a corner. Except maybe box gutters. And when box gutters put Baby in a corner, Baby finds another corner. This corner:

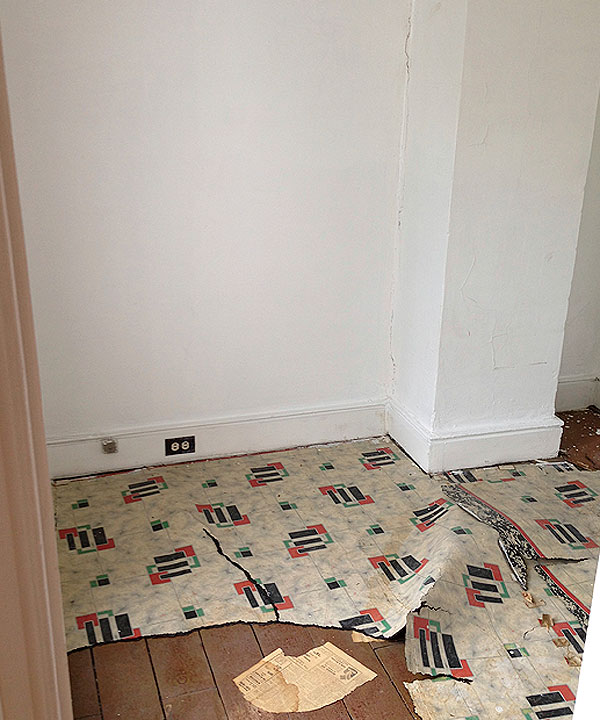
What corner am I in? Funny you should ask. I’m in that tiny room upstairs that I generally refer to as “that creepy closet with the creepy closet in it.”
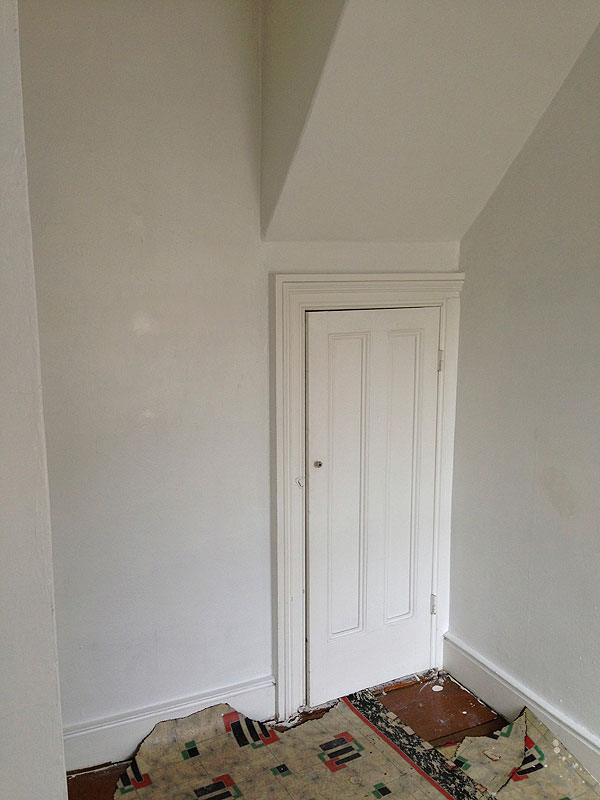
I’m not sure exactly what this room was originally (maid’s quarters? dressing room? sewing room? nursery?), but I do know that it’s tiny and weird and full of potential.
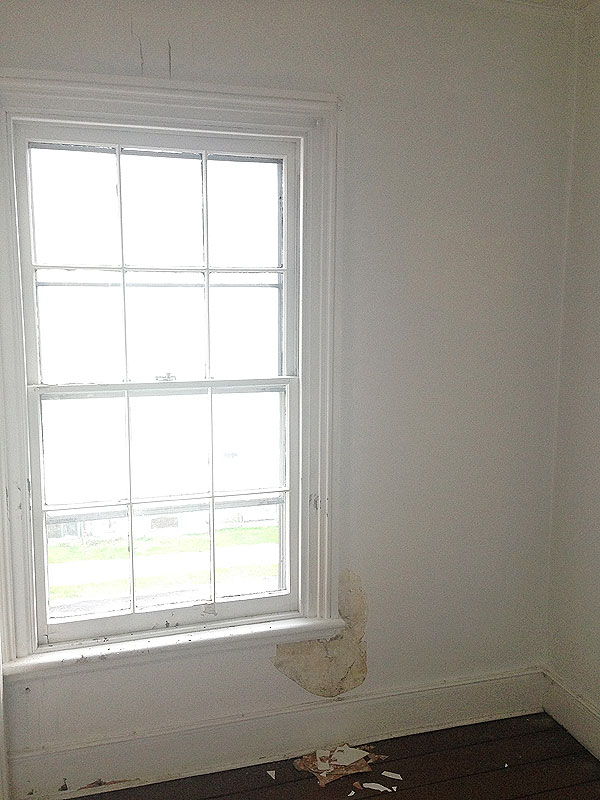
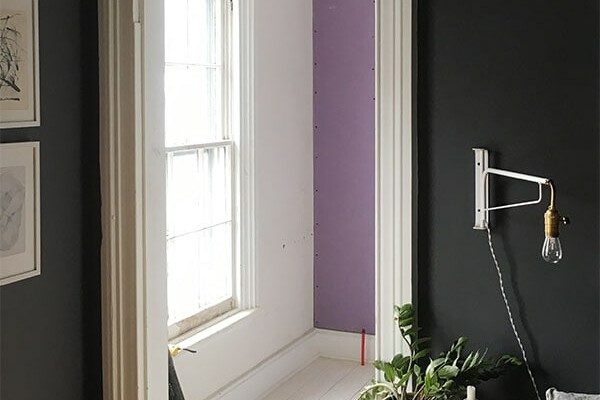
It has a wonderfully large south-facing window and gets terrific light.
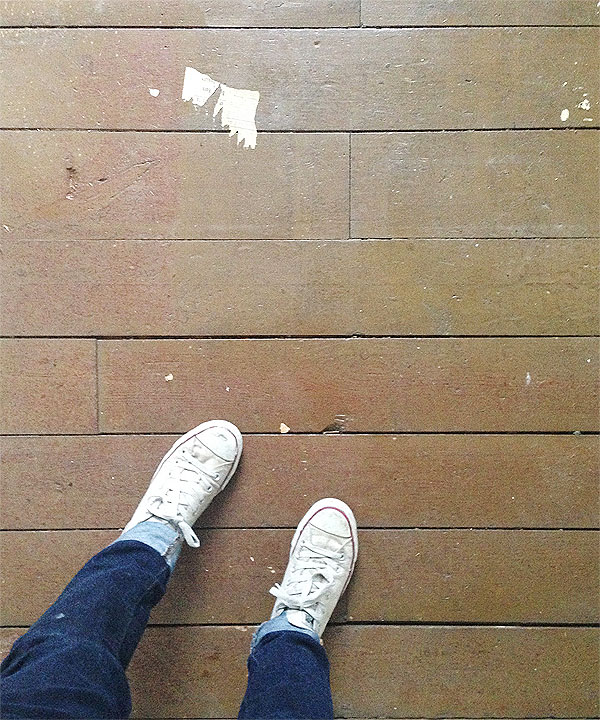
After I pulled out and disposed of the several layers of old linoleum (keeping it wet and wearing a mask, lest the backing contained asbestos), I was left with basically a blank space. Unlike the larger rooms in our house, this one just has the original pine tongue-and-groove subfloor, which I LOVE. It’s already painted, too, so I don’t have to feel even a little guilty about painting it again.
I like the idea of making the room a little office mostly because it’s so compact and secluded from the rest of the house. I don’t really like to work in large public spaces because I’m easily distracted, so I’ll be better off keeping myself cooped up in here where I can’t stare at the other gajillion things I need to fix on the house. I want it to be bright and happy and minimal and cozy and pretty. It’s going to be great!
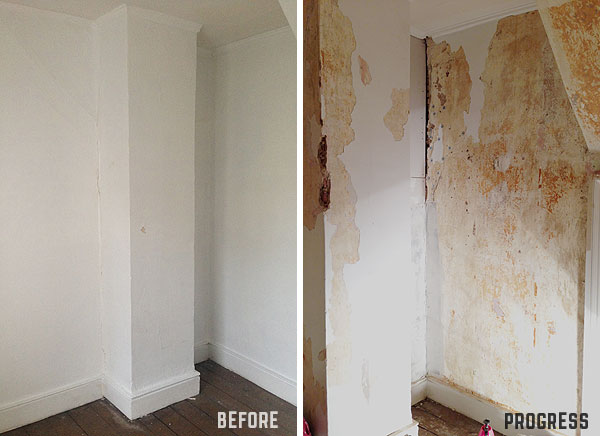
Looks like a totally fun and pretty easy little weekend job, right? Wrong.

Like pretty much every other wall in our house, this one was originally covered in wallpaper, which is now very old wallpaper clinging to the plaster with very old adhesive, covered in layers and layers of paint. Over time (and over the course of the house freezing into a block of ice for two winters when it was vacant) that ancient wallpaper adhesive has mostly failed, causing the wallpaper and layers of paint on top if it to separate from the plaster walls. Everything you see in this picture came off the walls with a simple scrape of a spackle knife——no special products or even steam! The problem with scraping off any extra-loose areas, patching, and just repainting the whole thing is that over time more problem areas will inevitably develop. Even though it feels like I’m totally destroying a perfectly decent-looking room (which is partially the fault of these bad pictures, which mask a lot of the in-person flaws), it’ll be much better off in the long run if I do this stuff NOW and do it thoroughly and correctly. On top of the wallpaper/paint thing, the underlying plaster is also failing and cracked in a few places, so I can do a much more thorough repair job if the walls are stripped down and bare.
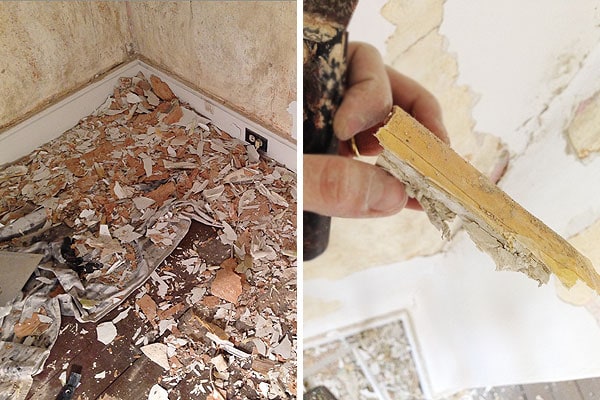
On top if that, it feels kind of nice to strip all this garbage off the walls before adding a skim coat and a fresh coat of paint. The picture on the right shows what the corners of the room are “constructed” out of: masking tape! I wasn’t kidding when I’ve mentioned that there is masking tape EVERYWHERE in this house, including under layers of wallpaper and paint. It appears that instead of fixing cracks in the corners of the plaster walls, a previous owner just decided to tape over them and cover it all up. While I admire the ingenuity, it’s not exactly a solution built to stand the test of time.
I know this room might seem totally inconsequential and like it should be last on the agenda, but I wanted to get to it now for a couple of reasons:
1. I’d really like to have a place to work. When so much of the house feels like complete and utter chaos, I’m really excited to have this little space done and polished to escape from it all when need be. I’m HORRENDOUS about blogging/answering email/writing/functioning generally when I’m at the house, so having a designated location to take a break and do that stuff is going to be pretty awesome.
2. Because this is a small space that isn’t that important, it’s a good place to practice all this stuff. I’ve never skim-coated a wall before or done any real plaster repair, so before I try to take on the entire entryway that basically spans two floors, the entire length of the house, and a stairwell, I think the time it will take to fix the walls in this room will be we well-spent in the long run when I take on more extensive and larger scale repairs.
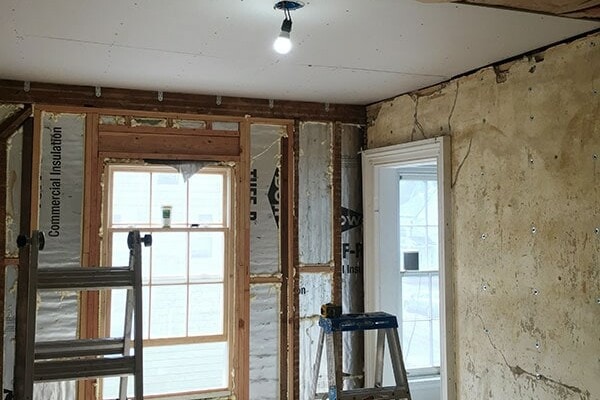
BOOM—progress? If you look closely at the image on the right, you can see a bunch of plaster buttons securing crumbly plaster to the wall, some new drywall where the old plaster really couldn’t be salvaged (largely due to previous bad repairs) and the beginnings of some fancy Old Town Home-style skim coating with the help of fiberglass mesh screens! Trying all of this stuff for the first time, I’m really glad I’m giving myself this test run on this room before moving on to the more public/high-traffic/important areas. I won’t lie, it’s going to take some practice. But after spending so long on the roof trying to fix my crazy gutters, all this stuff that I probably would have been hating now feels like super fun and manageable child’s play!
I’m SO excited to get to the point where I can prime and paint these walls. They’re pretty much entirely stripped of the old wallpaper and paint at this point (I wore a heavy-duty dust mask throughout to avoid lead paint that may be lurking a few layers of paint deep…), so now it’s time to scrub them down to get rid of the paste residue and start repairing! Joint compound and I are going to be best friends——I can feel it.


I always love it when I open up my feed reader and see a MN post.
Looks great! Any hints on where you’re going with the finished product? What color will the floor/walls be? Will you build a desk in?
I’ll post a plan later in the week, I think! I’ve started to pull together a few plans and ideas. I think the desktop will be built-in, yes, and trying to decide about some of the other elements. I’ll probably paint the floor white!
I like the built-in idea. Those chimney bumps outs are perfect for them. Let me know if you need some help designing/building one. We’re making a custom built-in TV stand on our blog at the moment.
fun times. fun times.
thanks, John! I think mine will be more just like a floating desktop——super duper simple, and maybe some freestanding drawers beneath. I don’t really need anything more advanced than that!
Glad I read this–I had never heard of plaster buttons! I did some quick research, and it sounds like a great alternative to tearing down plaster. Our bathroom ceiling is a wreck.
Yes, they’re a wonderful alternative, and plaster is a fabulous wall material for lots of reasons! So far I’m finding them very effective and pretty easy to use. Just buy a ton!
Wow! I felt so badly about your roof. This is why we love you. You might get bummed out for a while, but you pop back up – better than ever. I know you solicited stories about nightmares last post, but I feel a sense of connection with you on this post. We call the previous owners of our house, “The Crack-heads Who Used to Own the House”. (And we use that phrase frequently around here.) I swear, if they hadn’t done something wrong, they would have never done anything to the house at all. I digress. We found that these crack-heads had textured over wallpaper in the guest room. Not so bad, right? Well it was some g-d-awful self-done sort of texture job. It actually hurt to rub your hand up against it. I told guests, “don’t rub up against the walls, they will draw blood”. We didn’t realize it at first, but when the wallpaper started detaching from the walls (perhaps from the sheer weight of the 3.2 metric tons of texture on the walls?) we started pulling and saw that it was texture over wallpaper (with a fair amount of masking tape and blue tape). We spent two full weekends scraping the heck out of the room and repainting. Nightmare! But it looks amazing now, so it was worth it. Good luck with this smaller project, I know it will look great!
That room will be amazing soon! The light is great, and it will make a fantastic office.
The room is a tad creepy as is, but so what?
I just learned recently that you can burnish joint compound. The description I read said that it ends up being nearly indistinguishable from plaster. The way I understand it, the burnishing process basically compresses the joint compound, so that it ends up much harder than before, with somewhat of a sheen, instead of soft and sort-of dusty looking…
from http://starcraftcustombuilders.com/HowToFixPlasterWall.htm:
Burnishing
The other finish is burnishing. We like burnishing because (1) it raises less dust and, therefore, makes less of a mess and (2) in appearance it is virtually indistinguishable from true plaster.
Burnishing is a very simple technique, but it is work, so you may not get it all done at once. Since you can burnish any time before you paint or paper the wall, there is no hurry about it.
You will need a sprayer full of tap water and a 5″ or 6″ taping knife. If you are applying a decorative finish coat (see “Burnishing as Decorative Wall Treatment” at right), use a stainless steel knife to avoid leaving rust marks on the wall. Working about 4 square feet at a time, spray the top coat until it is damp, but no water is flowing. Holding the knife at a very low angle, almost flat against the wall, run it across the damp surface several times in different directions. Use short, very firm strokes. We have a pattern we use for consistent results: top to bottom, then side to side, then both diagonals, then top to bottom again to finish off.
Here’s another url for a post that describes the process, titled “My faux Venetian Plaster on a budget”
http://salvagealchemy.com/plastered/
I like the idea of having a nice, finished spot where you can get away from the chaos elsewhere – good luck with the office!
Can’t wait to see you transform this room.I know it will be amazing as always! Any tips on how to most effectively remove old wallpaper paste? I have a room that I stripped the wallpaper from and the walls are in good shape but for all that old wheat paste. Any helpful ideas would be greatly appreciated.
There something very interesting in the photo of your window. You see the water damage in the lower right corner? There’s a very good chance you have the same issue that’s impacted several of our original windows. It’s actually one of the main reasons I’m restoring our bathroom window right now. It even happened when we had storm windows in place. For us, it has to do with how the sash weight pockets were cut into the original windows. The pocket doors go all of the way down to the sill, and when it rains and water gets into the corner of the window and below the sash, it goes right into the weight pocket and into the wall.
To remedy this I’ve been altering the weight pockets slightly and sealing the whole thing about an inch or two above the sill. It’s worked quite well in our front two windows for about 4 years now. I’m going to write up a complete how to in a few weeks to show how to do just what we did, as well as how to restring the sash, weather strip, etc. It’s not rocket surgery, but hopefully the guide will be helpful.
We did our small office years ago and it’s one of the best rooms of the house. We hope your office is as fulfilling as ours ended up. It looks like it should be a great space.
Daniel, it pleases me that you are off of the roof and now in a warm, sheltered place.
Love that you’ll have a painted floor in your future office, & suppose you have a tres lovely paint design in mind. Can’t wait to see it materialize into a beautiful space.
Do hope the gutter contractor does a super job for you, so you can concentrate only on the office & hope to have Updates on the gutters too.
You are amazing your know!
I am glad to hear, but not surprised, that the roof didn’t kill you after all. I would have missed the posts, but you’re tough. You made it, and now I can’t wait to see what you do with the office.
So call me crazy, but I absolutely adore the look of old, peeling plaster. Especially if one colourwashes it for a focal point, in such a small room at least one unfinished wall would be stunning. I could only hope to one day live in a house where I can strip layers and layers of old wallpaper that’s been painted over. But I am glad you are moving on from the gutters, since that was a complicated situation.
Just a note to say I absolutely love your blog. Your writing makes me giggle and I look forward to seeing what projects you get yourself into.
I love that closet in the closet! It has such an Alice in Wonderland vibe to it. So if a white rabbit tries to solicit your help – don’t go! Or perhaps go, and write about it afterwards.
Doubt this was a maid’s room or a nursery, wrong motifs, but maybe a home office, even then?
Love creepy photo but it’s that old time warp “constructivist” linoleum that floored me! Reminds me of “Planar Tension with Red” by my dad’s fascinating friend Willi Baumeister.http://www.wikipaintings.org/en/willi-baumeister/planar-tension-with-red-1926. (My dad was forgotten AbEx Artist Alfred Russell, who was also pals with the Eames and traded art for LCW chairs with them before going off the deep end.)
Willi Baumeister’s amazing story: http://en.wikipedia.org/wiki/Willi_Baumeister.
I would definitely keep a piece and frame it boldly to display in the room like a tiny sketch, and scrap of early populist modernism, that made art available to all, not just the elites,and changed our world forever.
What an inspiring sunny room, no longer creepy at all! Best luck, Daniel. You’ll make it through with flying colors. (Been there too, several times)
Not sure if this has been suggested before, but have you thought about taking the door off the creepy closet and making it into a swank dog house? I’m sure you’ll want them to be able to hang out with you, and there’s not a lot of other floor space. I know I wouldn’t be able to concentrate with that little door in the same room with me…
That closet is quite creepy. I wouldn’t be able to turn it into an office without putting many locks on that door incase something evil creeped out and dragged me in to be eaten whilst working late into the night.
That old linoleum is kind of fabulous, although I can see why it had to go. I’ll enjoy seeing your progress in this room. I wish the previous owners of our house had kept the plaster in repair, (or even just left the cracked plaster for us to deal with) rather than slapping drywall over it in an unprofessional, homemade sort of way.
What a sweet room. What a great project. May I make a suggestion? Once you get all that gunk removed and are ready to begin plastering, brush the entire plaster surface with a very thin coat of PlasterWeld (the pink stuff). I think you can let it dry, not sure. It’s tacky like glue. Then apply that mesh stuff that comes in big rolls (it’s fiberglass?) on every wall surface you are going to skim coat. (If there is decorative molding in the middle of your wall, don’t cover the molding — just go to the edge.) When that is done, then start your skim coat process — usually three layers. We learned the hard way that if you don’t use the mesh under every surface, all the cracks will come back. (We have now skimcoated our third floor three times.) For the last time, we hired plaster experts (not drywall guys but true plaster people who do decorative plaster). And this is how they do it. (Incidentally, they were no more expensive than painters, and they did a fantastic job. They covered the floors with super thick something, they had scaffolding on wheels so they could move around the room at cornice height very quickly, and best of all they made almost no dust. I can’t wait to hire them again. (This was in Brooklyn.))
YOU TOO!!!
I am pathetically glad that someone else in this universe knows and understands the frustration of masking tape EVERYWHERE instead of practical, quality repairs. I’m currently putting our rental back into move in condition and I keep finding masking tape repairs that I’m now responsible for fixing! Its on the walls, its on the window/door frames its even on the doors like horrible little painted over band-aids of suckiness!
I’ve been repairing the rental (163 years old) I’m living in (because I’m nuts and I love it) and have come across some of these same issues. The best one and the one I’m having the most difficulty with is they used spray foam to foam a bunch of the old windows shut because they were drafty. Nevermind that they could of acctually weather proofed the windows the right way… I still have all original windows in my kitchen, dinning room and bathroom and one of the two windows in my bed room. And for proof I already fixed the one in my room and it is less drafty then my second window (a replacement)
My landlord was thrilled when they realized I was saving and resoring the old windows rather then letting them replace them. So thrilled they helped fill my oil tank!
You have a luggage closet! That’s what the tiny closet is: a place to keep your trunks and suitcases.
As for masking tape, I feel your pain. My last house had a lovely French door with sidelights opening out of a sunroom on the ground floor, and the entire bottom third of the whole thing was “repaired” with masking tape and wadded-up newspaper. *sigh*
That’s exactly what we’ve been using it for!
This is a cute little closet-room! And so sunny that I think you’ll enjoy using it as a get-away home office. Glad you’re back from box gutter hell and can’t wait to see that follow up post!
Luggage closet! What an interesting idea. I thought that room must be a nursery, but the Alice in Wonderland closet still didn’t make sense.
I’m sure you will do a fantastic job as always. And I know I didn’t listen either when my mom told me never do white or black floors, but mom was right. Holy crap, what a bunch of wasted time cleaning and cleaning. Soft gray is your friend. Still looks fresh and interesting but hides enough dust to keep your sanity.
Daniel, that first photo of you is classic, I think you need to put it somewhere on your wall under the paint, imagine the person who finds this doing reno in like 100 year!!! Spooky! Also,we love you, take care!
The luggage closet could be such a fun space for a small child IF it was fitted out with some light, bright colors, pillows, a small book shelf. Would be a great place for a wee one to chill out, read, reflect, dream whilst dad is working on his plans, computer. You guys are planning on a family, right?
I will be following your progress on this room for sure. Our whole house has plaster walls and they are in need of repair in lots of places. I’ll be curious to see how you tackle it. I think that little room will be wonderful when you finish it.
Thanks, Susan. In the meantime, I know I keep linking to this, but Alex at Old Town Home has a great series of posts about plaster repair, and I’m basically trying to replicate his process! This is all new territory for me, too!
I drove to Albany (from MoCo,MD) last Thursday to attend a funeral and was feeling pretty blue about things – the weather was crappy – raining, windy – traffic was bad and then I got to Kingston and thought “at least I’m not standing on a roof” and felt a bit better – I get the whole schadenfreude thing. Anyway, just writing in to tell you I’m glad you hired out that job so you can concentrate on projects that play to your strengths.
Hi Daniel – So this would be room #3 on your floor plan from September, right?
The linoleum is the same as we had in my childhood kitchen and I’m pretty old so it’s been there for awhile.
Love your energy and your blog. Keep it up!
Ah the joys of skimcoating. HAVE FUN STORMING THE CASTLE!!! I’m almost done skimming my kitchen/dining room. We can commiserate.
It’ll take a miracle!
I think I might buy that sander thing. I have to do like every damn room. I will die.
Later we can all get together and compare skim coating scars (emotional and physical) over Scotch.
I so love finding a new post from you!
I just had to mention that all of the bedrooms in our house had the same flooring that you found– painted plank floor with linoleum on top (with a layer of newspaper in between). In one room there were a couple of layers– newspapers from the 20’s and then again from war time. The weird part about my floors is that they painted then except for a perfect square in the middle. I’m thinking when the house was built (1898) they must have had one of those canvas floor cloths in the middle?
Anyway, what was the date on the newspapers under your linoleum? The pattern looks like the 30’s or 40’s maybe? I hope you save a piece to frame!
Oh and speaking of weird repair material. The dents and holes in the wood floor of our bedroom were filled with candle wax! Imagine trying to paint over that! Ingenious, really, but hard to get rid of.
An old trick for candlewax: put two sheets of newspaper on top, set your iron (for ironing clothes) on low to medium (test it a bit) and iron the newspaper. The candlewax will melt and be absorbed by the newspaper. Good luck!
Be careful with the joint compound. Those big buckets are a back breaker!
I wish I had known about plaster buttons when I redid my kid’s room… I may need to redo my redo.
http://vorpaks.blogspot.com/2013/04/the-kids-bedroom-makeover-during.html
After a roof major break down, I think the best way to get back on the horse is to start with stuff that makes you happy and create small victories. Can’t wait to see more of this beautiful room! Btw, these are nice floors. They will look stunning when painted. Any idea on the paint color yet? Otherwise, I’m sure you’ll become a master-plaster-repair-guy (ahem, don’t know what’s the word in english) in no time. I just learned how to finish plaster joints in my house and I looooove it. It’s such a zen activity. Becoming a plaster guy has just made the cut as a back up career after becoming a cake patissière if I fail at being a lawyer. :)
I legit thought I was the only kid with masking tape walls in a century home. This makes me feel way, way better. Slash, worse, because I wasn’t thinking about it for a minute before.
You know if I was over there I would make you guys cookies or something while you pretended to be an extra in the AHS intro.
just move here already, you tease.
I was so hoping the little(st) room would be your next project! You’re right, it’s tiny, so it will be done sooner, you can try out techniques you will need to use elsewhere, and it will be little jewel of a retreat when it’s done. I had a friend who had a tiny “bonus room” in her apartment, with an equally tiny square window. No idea what it was for, but she resisted my idea of turning it into a little home office, and just kept a rolling clothes rack in it. Sighhh — what a waste!
This looks like it’ll be an awesome office!
Fibamesh rolls are the best thing ever for old house owners! I’m sure you will get good at skimming quickly. After four or five rooms, I’m finally to the point where I don’t have to do much sanding. Just don’t take huge breaks in between projects, or you’ll have to get the feel back again!
The top picture, you look like a Brunette, Boo Radley.
Hahahaha! I think that’s my new twitter bio?
:-)
I’d try to make some shelves above the desk in the corner where you are standing (for ordners etc.), it looks perfect for that. Happy to see that you crawled up again, “Onwards and upwards” as they say in Star Trek. Have a wonderful day.
Oh, I can totally relate to your masking tape repair woes. A previous owner of our house clearly had no knowledge of plaster repair at all. He solved problems with masking tape, bondo, and contact paper. Ugh.
I love your positive attitude! Can’t wait to see where you go with this little space.
I can provide some advice on skim coating! Our house has this horrible knock down texture in every room and we have been working our way through and skimming the walls smooth. The living room we actually hired someone to do and it turned out worse than the rooms I did myself. The job is a bitch, but I am too anal to let anyone else do it…Here are some tips:
USE A POWER SANDER. I REPEAT. USE A POWER SANDER. You may even want to buy a separate sander for this because it will probably trash the sander, but it is way better than sanding by hand. Seriously. My walls would not look normal without using the sander. I used a mid grid sand paper (100? 125?). Now for me, I had to do 3 coats of joint compound, but my walls were really bumpy. I did a quick sand first (key!) then coat 1, then sand, then coat 2, then sand then coat 3, which was a touch up coat. Then I spot spackled anywhere that was a problem area. And wear a mask (obviously) because the sanding is messy. But worth it. Good luck from a fellow skimmer :)
Thanks, Laura! Given the sheer number of walls I have to do all over the house, I’m really considering purchasing a “dust-free” power sander specifically for sanding joint compound. It’s kind of a fancy indulgence, but theoretically saves me from losing my mind and, in a moment of weakness, just deciding to hire it all out.
Ah, I saw the link to the fancy pants sander. I think I’m too cheap for that, but perhaps in a moment of weakness…when my insomnia kicks in and I am browsing Amazon at 2am and a purchase of this nature seems totally rational…I may indulge, as well (We still have two large rooms of knock down to tackle). If you do go the cheap route, though, know that a power sander works for small spaces pretty well. Can’t wait to see the results!
Nice! So glad you are starting on something that will be food for your soul again. Can’t wait to see progress! What will the little room outside the tiny room be?
I found a picture of your front entry!
http://georgianadesign.tumblr.com/post/55991918844/italianate-townhouse-in-greenwich-village-fairfax
Perfect!
Yes!
Our former owner stuffed plastic bread bags into all the cracks between the plaster and the wood work where caulk would go. We’ve been here four years and I haven’t removed them yet. I should probably get on that. As soon as I learn to use a caulk gun.
Oh, using a caulk gun is so easy!! You can do it!! Caulk is very forgiving, generally.
(Bread bags? Really??? People…)
I totally admire your ability to jump in on a project when you were just dealt a difficult blow on another. And so smart to practice in this small space. I tend to start projects in the most conspicuous place imaginable. I never get good until I’m almost done – which is usually near a hidden corner.
H*eck I love this room. And the tiny spooky ghost cupboard. Its perfect.
Would you do the white floor with black/deep blue gray walls?
A compact office is perfect. When we remodeled I tried to make my office like my largish cubicle at work. I love that I can get to everything just by rolling my chair.
Daniel, you like like you crawled out of the shining on that picture! It’s scary! It’s creepy! http://www.youtube.com/watch?v=wXMeZwO2qZ0
I am thoroughly enjoying your posts right now (except the roof one, that one was frightfully painful) as we are going through the exact same process in our own cribs. Thanks for the inspiration!
Good luck with the plaster repairs! My son and I tackled one of the bedrooms in his 1920s Craftsman last year. It is under a bathroom and had some major water damage to the ceiling, that had been covered over by that texture stuff. LOVE the plaster buttons – I <3 Alex for turning me on to them. I'm up for skim coat celebratory drinking – though honestly, my son should be the one there, since he did the ceiling.