
Things have been moving right along in the laundry room! So far, smooth sailing. Zero complaints. Looking good. PLUS I got to buy some new tools and try some new stuff and it was fun, which is mainly the subject of this post.
SO. MAJOR DEVELOPMENTS RECAP:
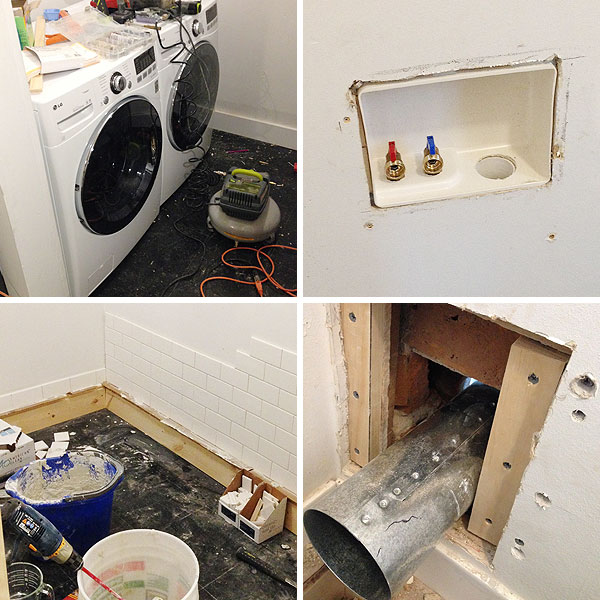
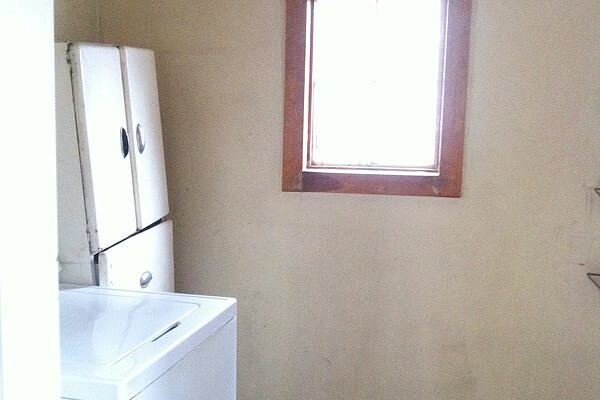
1. The washer and dryer were delivered and they are WONDERFUL. Backing up a bit: we picked out our machines online and ordered them from a sales associate (Frank) at our local Lowe’s store. Frank was truly a delight. Since we’ve never bought a washer and dryer before, Frank really took us through everything we’d need to know about installing and using our new machines, anything additional we needed to buy (dryer vent parts, which dryer plug to use, stainless steel supply lines, that kind of thing), what kind of detergents to use, etc. Since we wanted our dryer to vent out the side instead of the back (so that the machines could sit as close to the wall as possible), Frank also helped us locate the exact part number we needed to order from Lowe’s separately (which, incredibly, was delivered the day after I ordered it over the phone). We scheduled our free home delivery in the store, which was also great. The guys who came to deliver the machines were super nice and very knowledgable. Since we weren’t ready to put the machines in place yet, we opted to leave the shipping bolts in, and the delivery dude showed me where they were and how to remove them and all that. He also advised us to run the dryer empty for an hour to burn off any lingering shipping oils. These guys were excellent is what I’m saying—the whole experience, really. FYI—Lowe’s has not asked me to talk at all about any part of the buying experience or anything like that—I was just legitimately very impressed. Customer service! AND the machines themselves? They work SO WELL. I’m thrilled with them in every way. In case you’re curious, this is the washer and this is the dryer.
2. Both plumbing and electric have been installed. SO EXCITING. This is another one of those things that feels like a really big improvement to our house, and that makes me happy. This house has NEVER had a dryer, and the old plumbing for the washer was tooootttalllly not to code and really old and just no good at all. This also means that the second half of demo-ing the downstairs bathroom went well. Post coming up soon.
3. I started tiling. Then I almost finished tiling. Spoiler: looks great; I’m very good at subway tiling now.
4. I installed the dryer vent. This involved cutting a 4-inch circular hole through the house, which was moderately stressful because I had to go through drywall, plaster, lath, brick, clapboard, styrofoam insulation stuff, and vinyl siding to reach the outdoors. But I did it and then I used some spray-foam insulation around it before closing it back up on the inside with a piece of drywall. Success!
SO. ALL THAT HAPPENED. And that’s not even what I want to talk about.
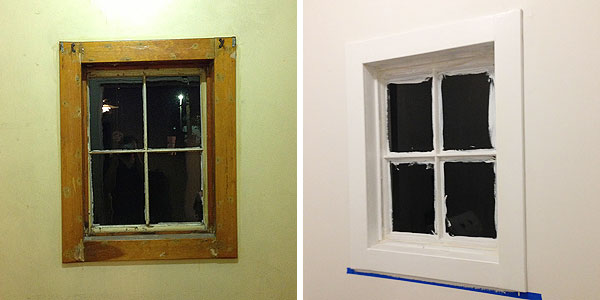
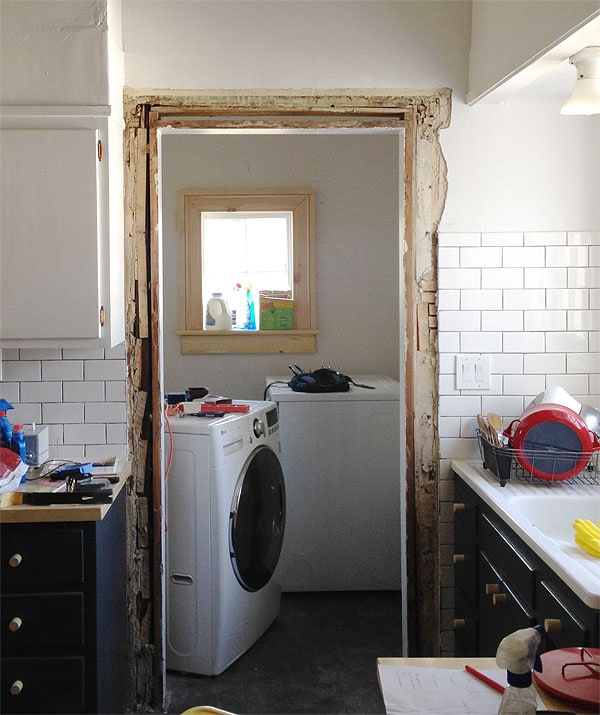
Remember that little window in the laundry room I talked about in my last post? Basically the deal is that the whole thing—window and surrounding casing—were installed very crooked and it drove me crazy. The rest of the room is surprisingly level, but this window sort of made everything look fun-house-y and sad and strange. The window is fairly small and doesn’t open, which is kind of a drag, but replacing it is just not at all in the budget, and trying to level the window itself seemed like potentially a HUGE project that would involve a lot of opening walls and causing general disaster and despair, and it really just didn’t seem worth it at all.
Back when we painted the room we also patched up and painted the casing, but now that we’re really renovating the room I started to have more ambitious ideas. The casing was obviously nothing special, so what about prying it off and trying to replicate the type of millwork that is original to this part of the house? And if I installed all of that level, maybe it would give the illusion of the window also being level.
Cool. Good Plan.
Here is the molding situation I wanted to try to copy. Fancy. From what I can tell, our house has three original different molding profiles, which are basically related to the fanciness of the room. This is the least fancy molding, used in the kitchen, the upstairs office, and adjacent original servant’s quarters which became the upstairs kitchen. It’s still pretty bulky and awesome, but the windows just have simple sills (instead of paneling detail to the floor) and the baseboards are this super simple shape.
Anyway. This door/window molding is basically 3 separate pieces: on the bottom there’s a 1×4 with that innermost detail routed out, then a fancy piece of trim molding, and the whole thing is encased in 1x2s. Seems simple enough.
The one complicating factor is that these moldings were made when lumber was still the actual listed dimensions (so a 1×2 is actually 1″ x 2″, not 3/4″ x 1.5″), so I had to get a little creative with my lumber selections. If I used the modern equivalents of the old lumber dimensions, things would looks sort of wimpy and wrong. Soooo…
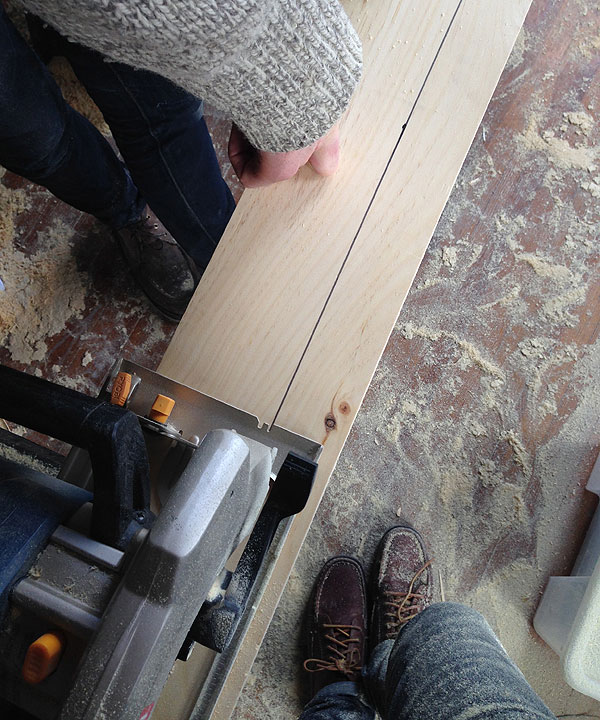
Luckily, Lowe’s sells a 5/4″ x 6″ board (actual dimensions = 1″ x 5.5″), which I could rip down to 2″ strips to make my dimensional 1 x 2. So that’s what I did.
Luckily, Lowe’s also sells these long pine stair treads for about $10, which are the perfect thickness for old school window sills, AND have the necessary bullnose edge to match the original one upstairs. Dope. So far so good.
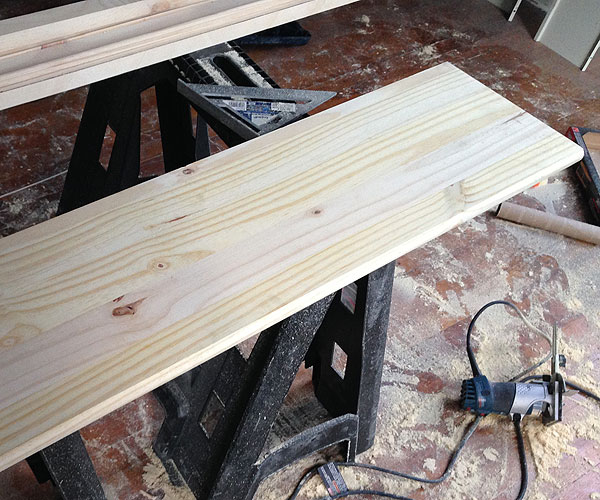
For the innermost piece, it wasn’t so hard to cut one of the 5/4″x6″ pieces of lumber down to an actual 1″ x 4″, but then there was the matter of the fancy routered detail on the inside edge.
I NEEDED NEW TOOLS. NEW TOOOOOLSSSSS!!!

BOOM hello router! You are lots and lots of fun and can do so many exciting things, like help me convincingly replicate old molding.
I’ve used a router maybe once or twice in my life, but its really a very easy tool to get the hang of. Along with my router (this one!), I also picked up a plethora of bits (these ones!). I basically just combined two bits to get the shape I needed. The first made the rounded edge, and the second cut a groove. Once it was all done and sanded, it looked pretty legit.
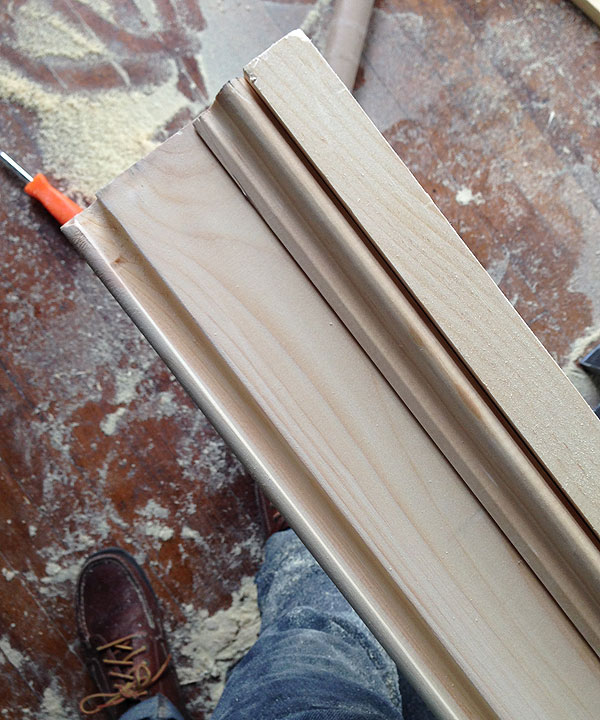
That little trim piece in the middle was just a stock piece I found at Lowe’s. I wish it was just a little more substantial and interesting, but it’s good enough. I can’t have EVERYTHING.
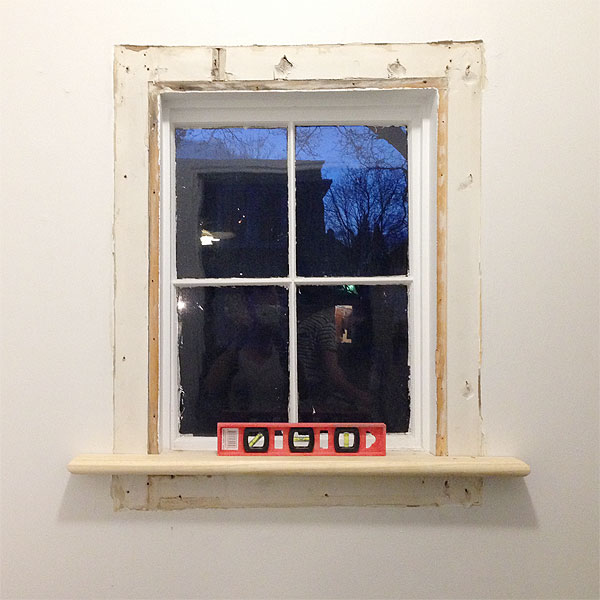
I’ll spare you all of the nitty gritty, but basically I wanted to install the sill first. This involved cutting down the stair tread, routing out part of the bottom, cutting away the sides, and using my router to chamfer the outer edges. Pretty fancy stuff. Then I installed it very level, using my handy level and lots of shimming magic. Then I installed everything else. It was relatively fun and relatively fast.
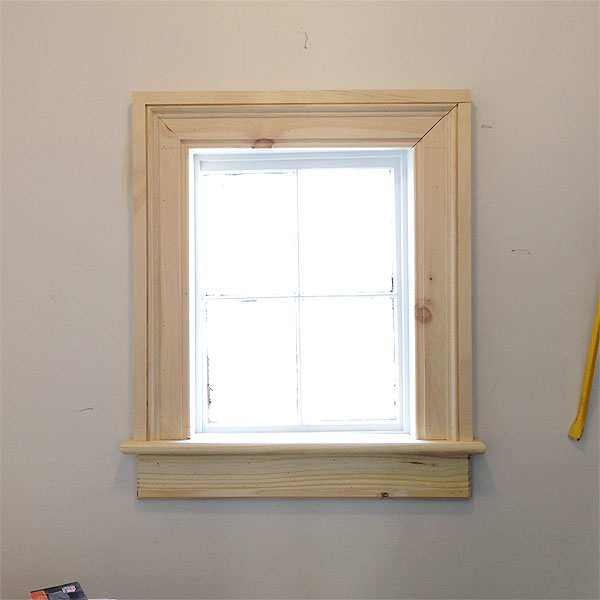
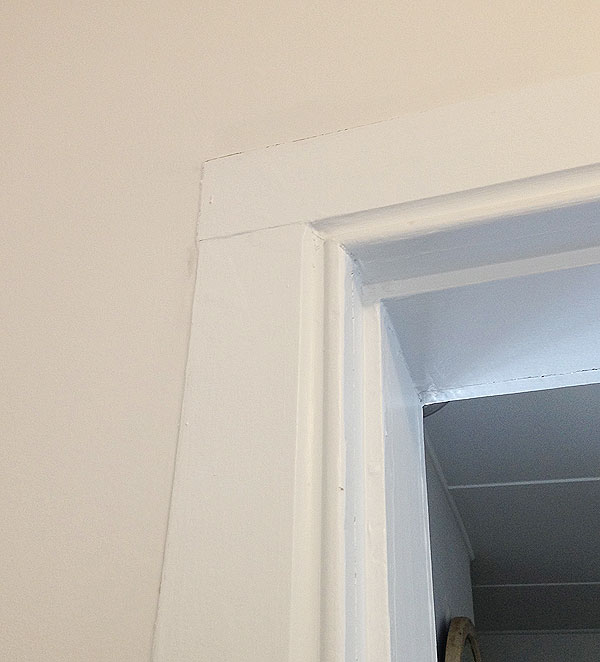
And there it is! I know it doesn’t look like much right now, but once it’s caulked up and painted, I think it’s going to be gooooood. I’m so happy with how it came out, and while the window itself is still crooked, the level casing really does completely distract from it in real life.
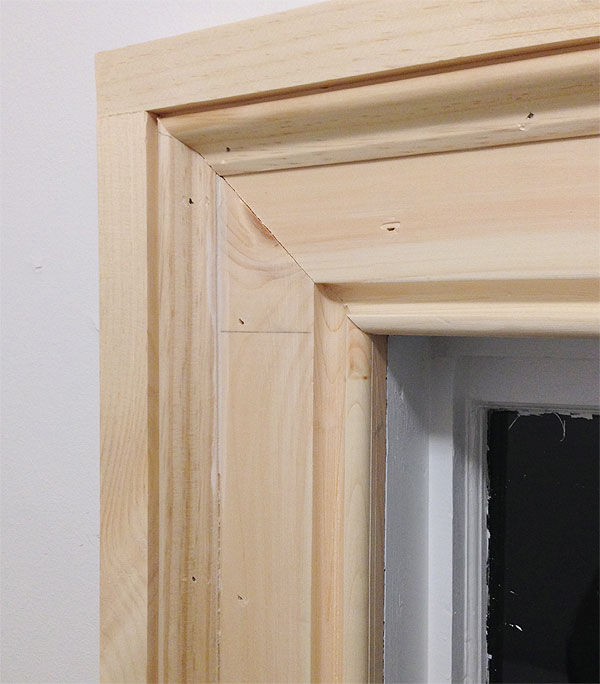
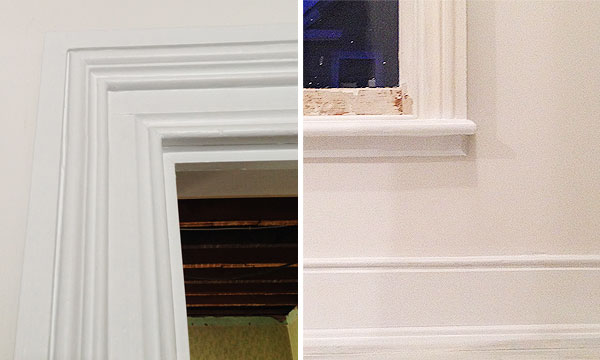
Glamor shot of the corner, just because it looks so damn profesh.
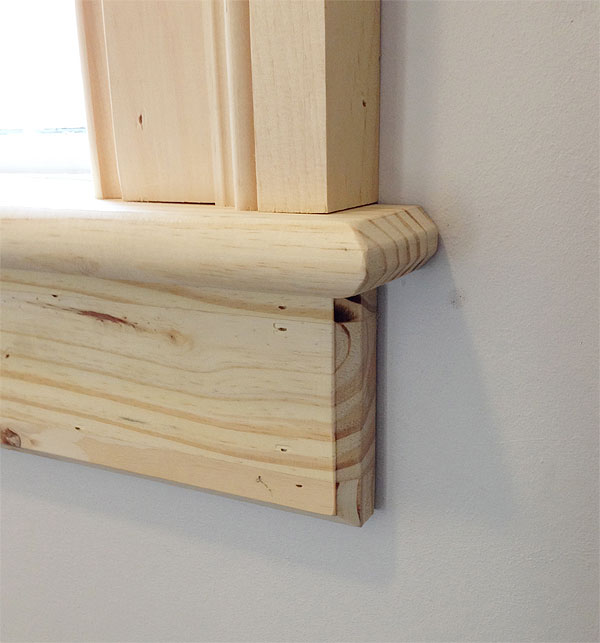
If you’re very observant, you might note that the apron on this window is quite a bit longer than the one on the original window upstairs. I originally made an apron that small but it looked silly, so I pried it off and just eyeballed the proportions. I chamfered the outer edges with my router, like the original apron, and it looks”¦really good. It’s the little things!
So woodworking is fun and exciting and the window victory made me feel like I wanted to work more wood. I started to get all ambitious and stuff.
Part of the fun of this room is that at some point, the previous owner drywalled right over the original plaster and didn’t remove the door casing—meaning that the edge of this casing was basically flush with the drywall. It wasn’t a great look, but it would be an especially BAD look once I started tiling the walls. Additionally, I had ideas about the doorway. What if we added a door?
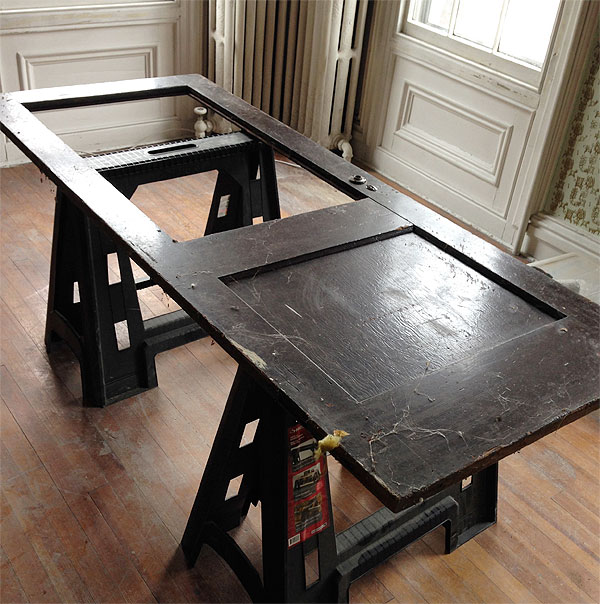
This door. I found it in the basement. It was covered in spiders. I braved spiders for this door.
I like this door because aside from being free, it has a big glass panel cut-out (no glass, though”¦so we’ll have to get something cut), which will still allow plenty of light to get through from the laundry room window into the kitchen but will still help the rooms feel like two separate places. The plan is to hang this door to swing in both directions (using this business from House of Antique Hardware).
This door is smaller than the opening between the kitchen and the laundry room. Rather than try to enlarge the door, I decided that the doorway between the two rooms was sort of big anyway and it made more sense to enclose it a little bit, thereby increasing the space for the machines.
Yeah. I made a doorway smaller. I’m so counterculture.
To do this, I had to pry off the molding on the inside of the laundry room (salvaged) and on the outside in the kitchen (plain new 1×6, not cute, not old). This was fun and exciting because the kitchen is basically renovated and nice and here I am destroying it again. WHY NOT, RIGHT?
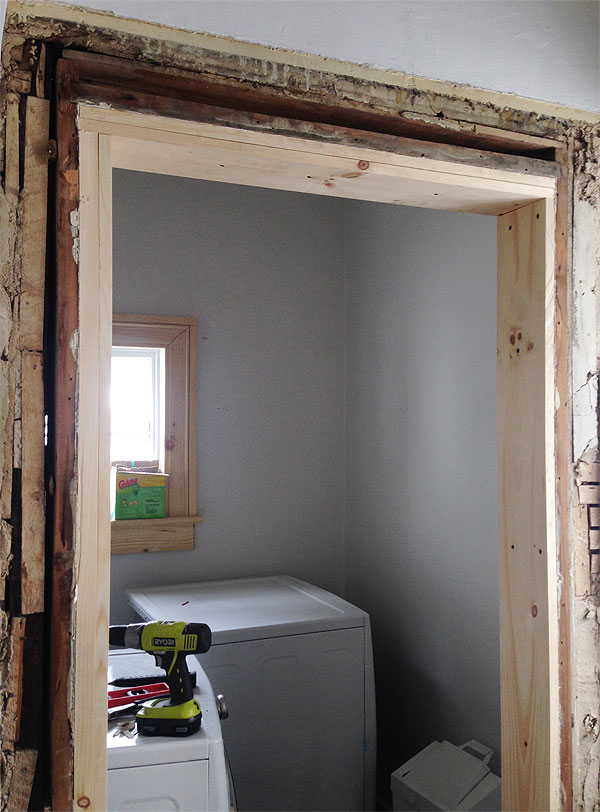
Then I added some pieces of wood to the inside of the jamb to make it smaller, like so. The right side lost .75″, the top lost 1.5″, and the left side lost 1.75″. Nothing too drastic, but now the door should fit AND the slightly smaller proportions of the doorway fit the kitchen better. I’m happy with it.
Then I just milled myself a TON more wood, just like for the window but on a larger scale. I made door frames. I made baseboards. I made a LOT of sawdust.

Here’s basically what the door frame looks like, but I still have to attach that middle piece of fancy trim molding to make it complete. Then patch, caulk, prime, and paint!
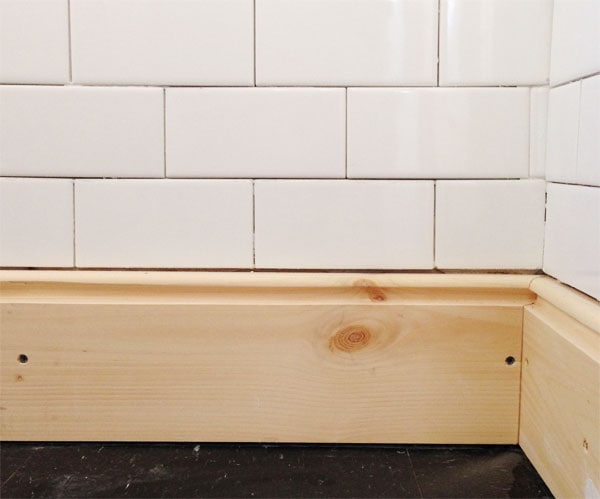
Here’s the deal with the baseboards. It’s a subtle difference from plain 1×6 boards, but I really think it makes a big difference in this case. The gap between the tile and the baseboard will get caulked and everything will get patched and painted.
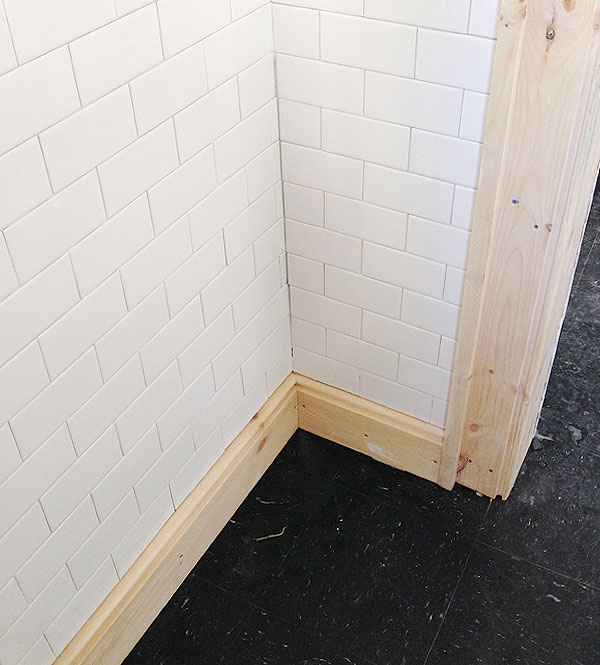
Here’s an idea of how it all kind of looks together! I think it was SO SO WORTH IT to take the extra time to really sort out the millwork situation in here before just slapping up the tile. Adding back some architectural detail to this space with moldings that look like part of the house is what’s going to really make it feel special and nice when it’s all done, and it makes me happy to make this room feel like it belongs.
Patching up the kitchen side of the doorway is a little more involved since I’m working around existing cabinets and tile and it entails some creative patchwork, but it’s going to look way better than it did before when it’s all finished.
It’s getting close! Next up is grout, caulk, paint, and some finishing details I’m pretty excited about, but right now we’re just THRILLED to have a working laundry set-up, even in a half-finished room. We’ve basically been washing things non-stop for days and it’s bliss.
This post is in partnership with Lowe’s!


Jealous of your skills quite honestly. ;)
You. Are. Amazing.
Oh, your skillz.
Can’t wait to see it finished! So inspiring.
You never cease to amaze me. Wow! That’s some incredible work. Be proud. :)
WHAT. So good. So so good.
Milling like a boss! Looks good.
THIS POST. This post makes up for the long wait, the daily checkin of the blog, to see an update on this room! I LOVE THIS.
Really amazed with what you’ve done with the millwork. And “having” to buy new tools to get things just right is a bonus. :) The windows in our 92-year-old house are crooked too (from settling over many decades, we think) but we’re choosing to view them with endearment rather than try and fix them. Plus the frames are original and in good condition, so it feels silly to replace them. Part of the charm of having an old house, right? :)
Oh, absolutely! My suspicion is that there may have been a door here or something at one time, and this little window was robbed from the garage and just installed badly to begin with—not an effect of settling. I wouldn’t really touch original trim work (crooked or otherwise!), but since this was nothing special and nothing fancy to begin with, I figured it would be a fun experiment to see what could be done to make it look better!
In terms of preservation and restoration I know this kind of thing is iffy behavior, but I guess I chose “faux original” over things just looking kind of half-baked and crappy. :)
Oh wow, the place is really coming together – looks great, and oh my, the skillz!
So, as I was reading the intro to this post I was hoping the entire time that it would end with you buying a router and ruling it like a bawse! Holy shit, you are like a real deal Tom Silva! I am super impressed, and very jealous. I want a router too! Everything is looking amazing, can’t wait to see it all come together.
I know I’ve said it before, but I love your attention to detail!
That is absolutely amazing. You never cease to thrill.
Ahhh all the millwork looks AMAZING. I love this post. What are you thinking for the glass in the door? If it were me (I know it’s not) I’d do like a frosted glass or an old chicken wire thing with some flyyyyy gold leaf typography that said Laundry or some such bullshit.
Again it looks fucking killer.
Thanks so much, Kate! I’m not totally sure yet about the glass! There are a couple of glass places in town and I just need to check out the selection, I think. I don’t think chicken wire glass is really produced anymore, unfortunately! Definitely something frosted/textured, but beyond that I’ll just have to see what my options are!
The Lettered Cottage just installed a salvaged door in their upstairs hallway and had chicken wire glass installed in it. Of course they’re in a totally different state than you, so… Your new laundry room door looks like it was an exterior storm door (judging by the remaining hardware). I think it’s a great choice for the space. I live in an old house, and we have doors between every room. They work really well for controlling noise, smells, heat, dogs, what have you.
Your window molding restoration is timely for me. I decided to tackle the return of the original bathroom cabinet (found in the basement) to our bathroom and after some noodling, realized the trim will take some reproduced mill work (since part of the sill was sawed off when it was moved from bathroom to basement.) The dimensional lumber issue was giving me some issues because the depth of the sill is deeper than standard 1 x whatevers.
Your amazing bathroom millwork has inspired me to keep on with the project.
So. Impressed. Just. Wow. Respect.
I have been reading your blog for a long time and I just have to say that I am thrilled for you that all these nice things are happening for you! You really work hard, have a great attitude, and you are fearless. Your funny posts bring so much joy to so many people, I am very glad for you that places like Lowe’s are recognizing your talent. You deserve it!!! Keep up the great work.
Thank you so much, Celene! I know that sponsored content can rub people the wrong way, but I really am very selective with who I’ll work with and under what terms. Lowe’s has been such a fabulous, supportive partner, and as a very long-standing happy customer of their business, it’s been a pleasure working with them on this project. I’m very lucky to have the opportunity, and I really appreciate that readers have been so supportive of it! :)
I’m going to chime in here and say that your sponsored posts don’t read like sponsored posts – just more of the same conversational tone and upbeat demeanor that you normally have. When I read your posts, it’s almost as though we’re standing in the room you’re talking about and you’re making lots of hand gestures. Yours is one of the few blogs that I read on a daily (well, regular since you don’t post daily) basis that hasn’t gone south the second you started with the sponsored posts, etc. Keep it up, Daniel.
I agree with Ginger. One nit: any sponsorship is worth disclosing at the start of the article, instead of or in addition to the end. Congrats on finding a way to make your site sustainable, too.
Thanks, Elisa—I appreciate the input! I’ve seen bloggers do it both ways (and I’ve done it both ways”¦), and it’s hard to decide what’s more appropriate. I think bottom of the post is much more typical, but that doesn’t make it right. While I obviously want to be honest and transparent about any sponsorship situation, I (and I’m guessing other bloggers) also have a fear of turning people away from posts simply because they see a disclosure at the top, even if the post has very little to do with the sponsor and has useful information, etc. I don’t agree to sponsorship deals that entail writing extended advertisements for anybody—in this case, Lowe’s provided funding for the room but really did not ask anything further from me in terms of promoting any products, brands, Lowe’s services, etc. In my mind, that makes any post about renovating the laundry room a sponsored post, and since this is the second post about the room and the first one was also sponsored (and disclosed as such), it feels to me a little redundant and unnecessary to disclose at the top of every subsequent post about the laundry room since they will all, technically, be sponsored. That could be misguided, though, and my fear of turning people away simply because of a disclosure might be unfounded.
ANYWAY. I really do think a LOT about the ethics of blogging (or instagraming, pinning, and whatever else people are doing these days”¦) for profit, and I’m always happy to hear and discuss input from others as I try to feel this stuff out and do what feels right for me and my blog. There’s a lot to consider.
That’s it, I’m off to buy a router! You amaze me again and again. To quote Bobby de Niro; “you…you…” (insert appropriate scowl/smile, nod of the head and wag of the finger).
Do some kind of hammered glass in the door? Please.
Noted!
I BOW DOWN. So good, my friend. So good. xx
You.Are.Amazing. Seriously. You really should be on TV!
wow. Wow. WOW. So impressed!!! Looks fantastic, you did an awesome job! Can’t wait to see the finished results!
I am in FULL SUPPORT of the swinging door. My grandparent’s home, which is not as old as yours, built in 1945 in Albany, had (and continues to have) a swinging door between the kitchen and Dining Room/rest of house. Granted it stayed open most of the time, it was one of the coolest parts of the house.
Wow, oh wow. Pictures are great but just had a chance to see it in real life. I literally stood in front of the molding for about five minutes in disbelief that Daniel could just stand in front of it and say I made that. SUPER PROUD MOM moment. He will tackle and learn anything and then just lay it out there for the world to see. BALLZ! Oh, and two things: 1. Max LOVES to do laundry and 2. What does the word “chamfer” mean and where did you learn this shit?
I’ve loved your blog through a house and 2 apartments. You’re seriously talented in many ways. But I have to say I always scroll the comments looking for a “Mom” post because they’re always my favorite. And this one made me laugh out loud. BALLZ to you too, Mom!
wow, that is some amazing woodworking! It seems very daunting, but it looks like you’ve already mastered it! can’t wait for the reveal on this!
You’re such a freaking hero!! I’m equal parts impressed by your attention to detail and jealous of your future majestic laundry room.
Oh, and someone’s prolly already said this but you’re going to love that swinging door when you are carrying 2.5 precariously full loads of laundry into the laundry room and all you have free is a hip.
This post should have been called “Chamfering at the Bit”
That is all.
Can’t control my massive grin from that pun.
Amazeballs!
Millwork looks amazing!! Go you!
I love that you “braved spiders for that door.” It is worth facing a few spiders for something like that.
I love the idea of glass in that door- i can envisage it being slightly frosted with writing on it.. i think i have seen something like it on pinterest. but not.cheesy. swear.
cant wait to see the demo progress on the downstairs bathroom
Millwork looks incredible. I’m so inspired by your dedication and fearlessness to try new things.
Perhaps a crazy suggestion but what about a stained glass panel for the door? I recently came across the work of Bespoke Glass in Brooklyn (they have a website but their etsy says they’re on vacation right now), and while some of their work is too colorful for this room, they have an aesthetic I think you might like.
Dood seriously! Frosted or milk glass hexagons? Sexy. Like the look of chicken wire glass but substantial. And probably one of the cheaper/smaller “stained” glass projects you’d ever pay for.
Daniel, the millwork looks incredible, it’s really the difference between making things functional and making the house shine. Keep on with your crazy self, it’s working :)
This house loves you so much. Look at how beautiful you’re making it!x
The one thing I ask myself over and over is: how does a nice Jewish boy know how to do all these things?
I just don’t understand it!
I don’t know what I like best, the new window casement or the rescued door. Also, that baseboard detail–perfect. This space is going to be super cute when you’re done.
Add me to those who don’t mind your sponsored posts – Lowes seems a very natural fit for your blog (and readership!) & I am delighted to see them partnering with you. Having kept up with your blog for awhile, I feel like you’ll be honest about your experiences, no matter who is paying.
PS – The best part of this whole post for me is that your MOM comments!! Love it.
I love that you aren’t afraid to learn things on the fly to get what you want in a project – need new millwork for a window? TIME TO LEARN.
There are lots of folks here saying how jealous they are of your skills, but really what they need to be jealous of is your willingness to learn.
The window millwork looks great!
Your window casing looks great! I’m really happy to see that you are adding a little decor to the trimwork; the flat trim just doesn’t wow me, plus it catches dust like crazy. Enjoy your router – it seems like you are putting it to good use!
Daaaaaaaamn, boy! Damn.
another AMAZING Adventure!
so inspiring – and so glad for you that all of this hard work is in your own home… its great to see this home blossom under your care – after all the energy and love you have given in the past to deserving and un apartments.
as always enjoying it (and jealous too!)
love the idea of stained glass – although pretty frosted glass would be nice !
Wow Daniel, this is seriously legit renovation! You should be so, so proud of yourself because it’s looking absolutely incredible. If I were you I’d just be dragging people in off the street and demanding they look at your window casements, like, I DON’T CARE IF YOU HAVE A PARCEL FOR ME, JUST LOOK AT THAT CORNER!
ok, feeling totally inspired to take on some of the less design-y more practical projects in my house now, THANKS.
Whoa. That’s impressive. Bravo :)
This looks great, and, like others, I am very impressed with your carpentry skills.
I would love more info about cutting the dryer vent- we are interested in installing a range hood and need to vent it to the outside. We have an old house (1920s) that we’re renovating ourselves, so hearing that you did this makes me think it’s possible for us. Could you please talk about the process and what tools you needed? We would need to cut through drywall, the plank siding of the house, and cedar shingle. Thanks so much.
Sure! It’s really much less scary than it sounds. I just traced the end of the vent that needed to go through the wall with a Sharpie and cut it out with an oscillating tool (this one!). You could probably also use a hole saw of the right size. I needed to cut a bigger section out of the wall on the interior to be able to access the brick and mortar insulation and remove enough of it for the vent to fit through, but if your house is uninsulated or insulated with something more conventional, it shouldn’t be as hard. Does that help? It might be the kind of thing where you just have to go for it”¦it’s not so different than just cutting a hole in anything else!
In addition to what Daniel said, it can also help to cut the hole from both directions. Especially if you want to prevent your shingle siding from splintering.
Mark your hold on the wall inside, (make sure you position your hole correctly so it isn’t overlapping a stud or any electrical!) then use a long drill bit to drill all the way through the drywall out through the siding. Use a hole saw to cut through just the drywall, then from the outside of your house, use the small hole you drilled all the way through the house earlier to line up your hole saw and cut through the siding.
Great work. I am envisioning a vintage chicken wire glass for that door or maybe a striated glass? I don’t know how that would work against the the subway tile. It could look charming or busy, honestly could go either way.
Showoff! What a great tie-in with Lowe’s!
DUDE!!! you are like, Jesus… a carpenter!!!! i am blown away impressed. dammmmmn
HAHAHA. Also a Jew.
Amazing! You make it all look so easy and professional. Very impressive!
Shut the front door! (err, the laundry room door–sorry, couldn’t resist) Of course you just bought a router and effing ruled it. You make it look so easy. So good. I feel like I could route things now too.
Daniel, you’ve excelled yourself. New tools (distinct envy over here), new skills, wonderful results.
I love your writing. I’m sure no other article about a laundry room window and door could make me laugh out loud.
If you weren’t already taken by Max, I’d propose marriage.
I. LIT. DIE. I also hate you (not really) (but kinda). You are amazing and I enjoying reading your blog and living vicariously through you. Maybe come help me with my projects? Keep up the amazing work!
Of corse I love it and am in awe and everything but I have to especially say that I love the window and what you did. What I mean is that I love the little crookedness of the window being allowed to stay.
I kind of like it now, too! It reminds me that everything doesn’t have to be perfect. I grew up in new construction and I’ll admit that as much as I LOVE old houses, I’ve noticed that my natural impulse is often to try to make things look perfect and brand new, which is funny because they don’t need to and I don’t want them to! I feel like this solution strikes a nice balance while still maintaining some weird old house charm. Also it was much easier than ripping apart the wall to attempt to straighten it out. :)
You are so cool.
Thumbs up!
you are a clever fella
I second (million?) everyone’s kudos. I also have a request. I notice that you have some plaster repair to do around the frame on the kitchen side. Can you talk about how you end up doing it? Also, how you managed to salvage the trim would be good to know, too. When I replaced my front door, I pulled off the trim and mangled it pretty well (as well as a couple parts of the plaster…thus the request). Thanks!!!
Thank you, Tisha! I did have some plaster repair to do, but I already did it and didn’t take pictures! Next time!! The basic steps were to wipe/vacuum away any loose plaster, fill it in with a thin layer of joint compound, and use fiberglass mesh tape and embed it with more joint compound. After that dries, I usually find that 2 more thin layers of joint compound provides enough coverage, and then it just gets sanded smooth, primed, and painted. The fiberglass mesh tape (you can also use screens or square patches sold for this”¦) are what keeps the joint compound strong and from shrinking and cracking as it dries and over time. It’s really not a very hard repair”¦it just takes a little finesse with the joint compound. I like to buy pre-mixed all-purpose joint compound for repairs of this size.
For the trim, I just used a pry bar and a hammer! It’s mostly about going kind of slow. I like to loosen the entire length of the molding bit by bit until it pulls free, rather than trying to force the top away before loosening the bottom or something. Sometimes old molding is just too mangled and brittle to salvage easily, but this wasn’t so bad. :)
Nice job there on this laundry room. Can’t wait to see it finally finished, at least enough to get by for the time being.
Love the quality of your work and you are inspiring me as I am in the home search phase for the perfect, but small specimen of my own to work on, once I find it that I can afford.
My hope is to find a post war older home, hopefully from the MCM era that is as original as possible, and just needs a little love to bring it back and then enjoy living there for the long haul.
Keep up the good work!
Very nice! We have a router and bits that have been collecting dust for some time. You just inspired me to do some experimentation. :)
It’s addictive!
I’m not your mom, just probably old enough to be, but I am SO PROUD OF YOU! I absolutely love how you just jump in and figure stuff out, and not in the cringe-worthy way, but well-researched and polished. You are willing to go that extra mile with prep, which is 99% of what makes a job look good and is not the fun part. Also, good job admitting your mistakes and starting over when needed. On top of that, every post is a fun read.
Thank you so much, Becky! So nice to hear :)
I’m also in awe of just how crooked the original window is. How in the world did the original installer manage that? Nice work making it look about a million times better.
I KNOW!! It’s so crazy! I’m guessing this was a sloppy DIY job, like a lot of things in the house and in this room. Kind of like how the drywall seams were taped and mudded”¦WITH MASKING TAPE. For real. It’s held up shockingly well, considering…
LE-GIT. I need a router now.
Whoa! That millwork is beautiful!
Wow nice work! That is some impressive casing. It’s going to look amazing after caulking and priming and painting. And I can totally empathize with the fact that routerting creates an unbelievable amount of sawdust ”“ I’m still finding little piles of it behind doors and under radiators weeks after trim was installed in my kitchen. By the way, now that it’s been reclaimed from the spiders, what’s the plan for the door? Painting? Refinishing?
Thanks, Dan! Plan for the door is painting! It needs a good sanding, but I think I’ll just paint it white. I want it to feel like it really belongs in the kitchen, so it’ll be kind of boring, but that’s OK.
WOW! This takes DIY to a whole new level. Congrats on all you’ve accomplished in this house. I love seeing and reading about your progress.
Ahhh…. You DO have EVERYTHING!! Beautiful,perfect,awesome!
In this whole wide big world, you are my favourite person I have never met!! I promise!
:)
This is epic. I now want to route everything in sight,
You are a renovating superhero! Bravo!!!!
love waking up to a new post from you! 40 years of buying and renovating old houses has left me with more tools than garage – when i retire i’m going to build my own house – small, with a giant shop – just a couple more years…..just a note – on the inside it’s called stool, on the outside it’s a sill. you are fearless!
Thank you! I didn’t realize the sill/stool distinction. I can make one, I just don’t know what it’s called! Ha!
I feel you on the more tools than garage thing”¦it’s getting out of hand! I really need to figure out an organization/storage situation PRONTO. There are tools everywhere.
What everyone else said! And then laugh out loud at MOMs comments. Go the 2 of you!
So impressive! Now I want a router! If you don’t find what you want at your local glass places, you might want to check out Bendheim Glass: http://www.bendheimcabinetglass.com
I ordered glass for my kitchen upper cabinets (horizontal river ice) and I love it! They do have the chicken wire glass among their many other options.
That’s so great to know about, thank you!
I’m am ridiculously excited to see the finished product – nice work!!!
ARE YOU KIDDING ME RIGHT NOW? You are so the bomb diggity of all the home diggities. This is so good. Bravo!
Whoa…impressive. Looks fabulous. If you ever need to scratch a rehab itch out west…I’m just saying. :)
You’re my DIY hero. I love how you jump in and come up with solutions that make so much sense. You’re so detailed oriented and your work is so nicely done. Always love these DIY posts. Happy laundering!
Can I just say I’m in love? Geez, I’m going to Lowe’s tomorrow and get somethin’ done. I’ve been wanting to add those cool inserts to my kitchen cabinets. I know I can do this!!!!
Daniel, how do we write to Lowe’s to demand that they make you their permanent spokesperson? You make everything seem possible. Great job!
Haha, I wish I knew! I’d be great at it, right? :)
Holy Frijoles! Forget my previous post suggesting re-installing the window. I am gobsmacked by your handcrafted millwork!! Now I see that is a much more practical skill for your needs and devices. That happy day last summer when I found Manhattan Nest on Apt. Therapy has changed my life! Your sassy saga of domestic adventure has inspired me no end!!! In my life before Manhattan Nest I really thought a home of my own was beyond my modest means. You have shown me that sweat equity is a pretty powerful asset. Now I’m in the process of buying the little shotgun shack of my dreams in the Louisville, KY neighborhood where I was born and bred. The Ol’ Gal has most of her good bones, chiefly the original hardwood floors, transoms over the front and interior doorways and intact exterior fancy trim. That said, there’s SCADS of work to be done, but your blog has de-mystified so many of the various scads for me! Your writing is so funny and charming and you highlight the project details so clearly. Furthermore the entire esthetic of your webby log is simply spot on. So crisp and clean! No cluttery frou-frou! So selective with the sponsored content! Senor Daniel, I salute your good ol’ fashioned “If I don’t know how I’ll learn how and share my learning while I’m at it” espirito! Viva La Manhattan Nest!!!
Wow, Kimbo, that’s so nice! Thank you so much for the kindness, and huge congrats on the house!! I’m basically legally obligated to say this, but you should start a blog! :)
Freaking amazing! So jealous of your talents!
You likely already know given your extensive painting experience, but that Zinsser Bin primer works well to block knots. We had a lit of bleed through on our trim… It hasn’t been painted long so no idea if it will continue to need touch ups.
Also thankful for the comment on how to cut the vent hole. Ours needs re-routing.
+1 on the knot blocking primer. Also, after initial primer coat, fill your knot gaps with a good sandable wood filler. This will also help prevent knot bleed.
Thanks, Krista! Yes—I’m using the Zinsser BIN shellac-based primer on everything before painting. I love that stuff!
Daniel, you have surpassed yourself. Yet again. This is becoming a habit of yours . . .
Absolutely awesome job on replicating the millwork. It really looks wonderful. It’s amazing what a few good tools and a little time/effort can do. As you do a bit more, you should check out the Rockler router table setup. You build the base and then put their table on top. It will make this and other type of custom work much easier.
One other thing to note. I’m super paranoid about water leaks, and even more since my parents’ washer malfunctioned and flooded their whole house for hours while not even running. The adjuster and salesman both said the same unsettling thing of “yeah, sometimes it just happens.”
I installed an automatic timer on our washer to protect from this sort of thing. Not expensive and very straight forward to install. http://www.oldtownhome.com/2013/7/16/Toolbox-Tuesday-TimeOut-to-Prevent-a-Washing-Machine-Disaster/
Anyhow, the trim and progress really does look great. Something to be quite proud of.
That’s interesting, thank you! Our plumber recommended replacing the standard supply hoses with stainless steel ones to mitigate the risk of leaks/floods, but I’ll look into the timer!
Look you guys! Someone else is doing the same thing! Can’t wait to check out the blog now that I’ve read this article! http://www.huffingtonpost.com/2014/04/26/abandoned-french-chateau_n_5208202.html?ncid=fcbklnkushpmg00000063
Haha, somebody sent me that a while ago—it’s a crazy project! I can’t even imagine tackling something that scale. It’s insanely, beautiful, though.
THOSE BASEBOARDS ARE SO SEXXXY.
This has to be the most exciting post so far :P I did gasp when i saw the beautiful molding.
Safe to say I need a router.
You’re a natural woodworker!
Ok, I have one more question/request for a future post. You mentioned that the existing door casing (and baseboard, too?) was almost exactly level with the wall – I assume for the door casing you just built the outside trim piece deeper than normal, but what about the baseboard? How did you manage to get that to bump out a reasonable amount? It might be that my house has the same problems everywhere and my solution was to figure out a way to tear out every wall…other options might be better!
Hmmm”¦I’m not sure I totally understand what you’re describing. In this case, it was just the door casing that was almost level with the wall, because the casing was originally installed over plaster and then the plaster was later covered with 1/2″ drywall. I actually didn’t make the new casing any deeper…since it’s 2 inches deep, the 1/2″ drywall doesn’t really make a difference to the overall appearance, and I didn’t want to lose more space in the room since the washer does come out a bit past the edge of the casing and I wanted to keep the washer as close to the wall as possible, if that makes sense. In your case, you might be able to just install new baseboards right in front of the old ones, or pry off the original ones, patch in the area, and reinstall on top of the patch (either new wood or drywall. Not sure if that’s a viable solution, but it sounds like it would work to me!
OHHH, sexy millwork! I have missmatched trim in my bathroom from a 1970s upgrade. I found the front (mirror) of the med cabinet stuck behind a shelf in the basement. Reproducing the plain kitchen millwork in the bathroom and remaking that cabinet – possible!
Looking forward to your finished laundry. It’s going to be wonderful.
(Mom and Max, you have every reason to be proud of this guy…..)
You’re killing me!
First off: amazing job!
Secondly, WTF? I mean seriously! W-T-F?
The kitchen was done, wasn’t it? Aren’t there other jobs in the house? You’re going: I’m gonna build a new window trim (so far, so sane…). And then – while I’m at it, why don’t I rip out this door?
I cannot even! Not even!
Does look great, though!
I know, it’s sort of dumb! But this was a good opportunity to do it, since I had to get all this millwork stuff sorted before the tile could be installed”¦so if we wanted the door to fit, this was kind of the only way! The kitchen will be OK, and hopefully this is something we WON’T have to do if/when we re-renovate the kitchen down the line.
Looks incredible. So impressed with you guys. I keep revisiting your blog and whenever there’s a new post I broadcast it to the world (my mum in particular, I think she’s very sad that I can’t just marry you. Both). HUGE inspiration!
Have a looverrllyy day
xx from Scotland.
Oh, the things we’re willing to do for an old house. Especially an old house with sexy millwork. I’m right there with you: I hand-scraped 600 linear feet of millwork to finish off my kitchen (http://www.sarahsbigidea.com/2014/03/ding-dong-the-trim-is-done/). It takes a special brand of OCD to dedicate that amount of time to window casings. :)
Oh yeah, and tearing into your newly-finished kitchen to make room for MORE sexy millwork? Totally the right call. No question.
xo
Sarah
I was just thinking that if that door had a twin, it would look awesome as the door to your new pantry.