
There’s this hip new dance in town called the Radiator Shuffle, which involves multiple strong plumber men removing century-old cast iron radiators. Then, once they’ve all left, a small nice Jewish boy pushes said radiators around into different rooms with all the strength in his arms and legs because he’s an anal weirdo.
It’s really fun.
So this is what happened.
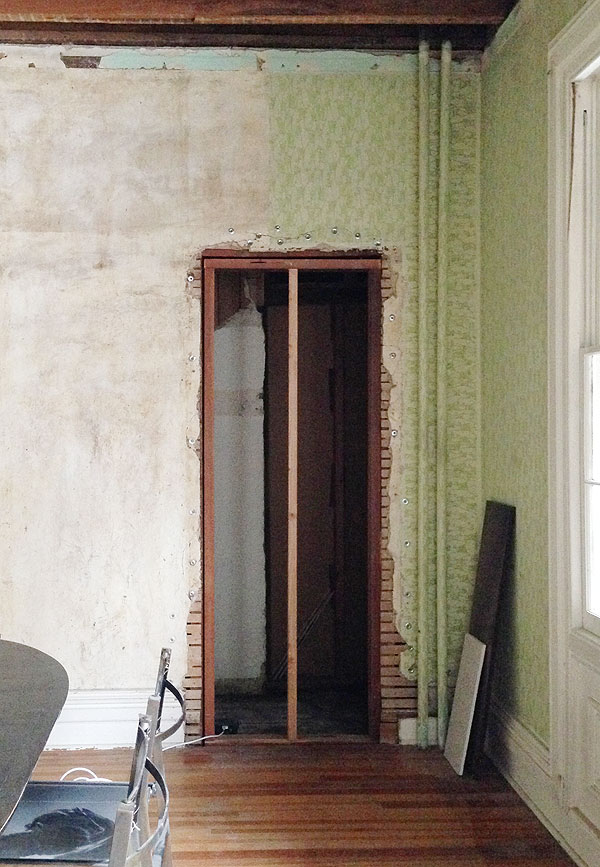
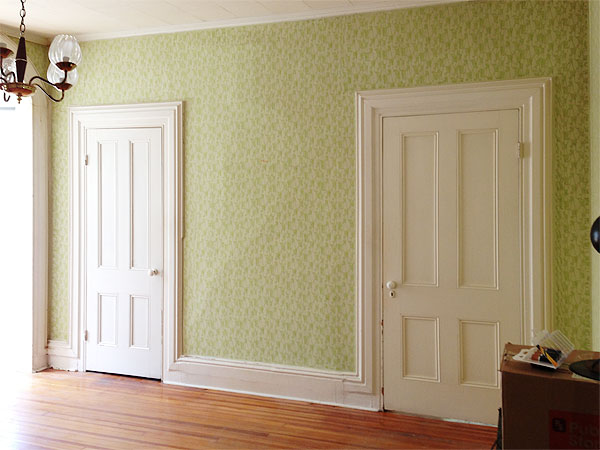
You might remember these heat pipes that went up the corner of our dining room, next to the now-removed non-original closet. You probably don’t. But you MIGHT because many (like, probably at least 3) commenters brought up that I should consider removing the pipes when they appeared in photographs in earlier posts. The long and short of it is that the radiators were probably installed around 1900, and our house was probably built around 1840, and so almost all of the radiator pipes serving second floor radiators are exposed throughout the house because the whole heat system was retrofitted. It doesn’t really bother me—it’s part of the history, and they’re not all that obtrusive—and these were particularly out of the way, so I kind of disregarded the idea of trying to get them removed. What a hassle. I hate hassle.
JK, I love hassle. My whole life is hassle, and finding ways to create more hassle. I thrive on it.
So when my plumber mentioned that while the pantry was gutted anyway (oh yeah, remember how I’m supposedly renovating a pantry, too? How’s that going? Shut your goddamned mouth. That’s how.), it would be pretty easy to remove the unsightly-ish pipes and have them buried in the wall.
I hemmed and hawed very slightly, but going ahead with this relatively simple and relatively inexpensive change affords multiple benefits.
1. The pipes aren’t terrible looking but the room would look better (and more historically accurate) without them. So there’s that.
2. The pipes had to be messed with anyway because one of the pipes actually branched off into two pipes above the ceiling level. One pipe fed the radiator above, and the other one went straight up to a big holding tank in the attic from when the system operated differently than it does now. The holding tank was removed when the boiler was replaced, but because we still had a dining room ceiling then, the pipe had to just be capped about a foot above the floor on the second floor. Not a cute look. So that pipe had to be disconnected and capped at the joint under the floor, which is easier said than done. I have no idea if this is making any sense. Bear with me.
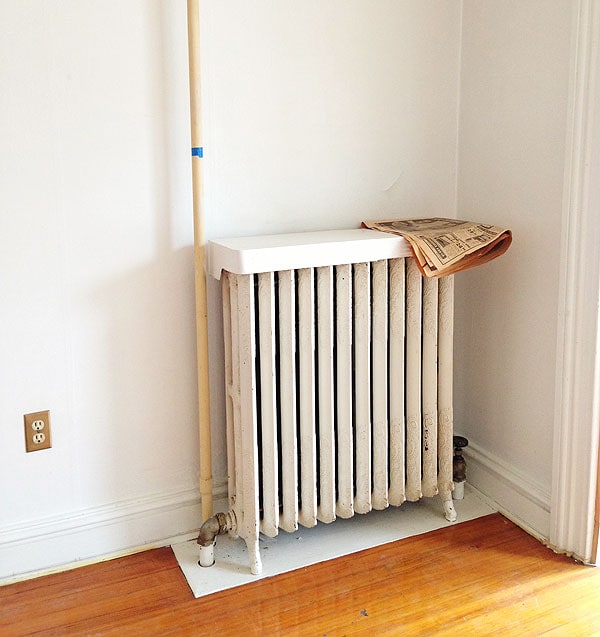
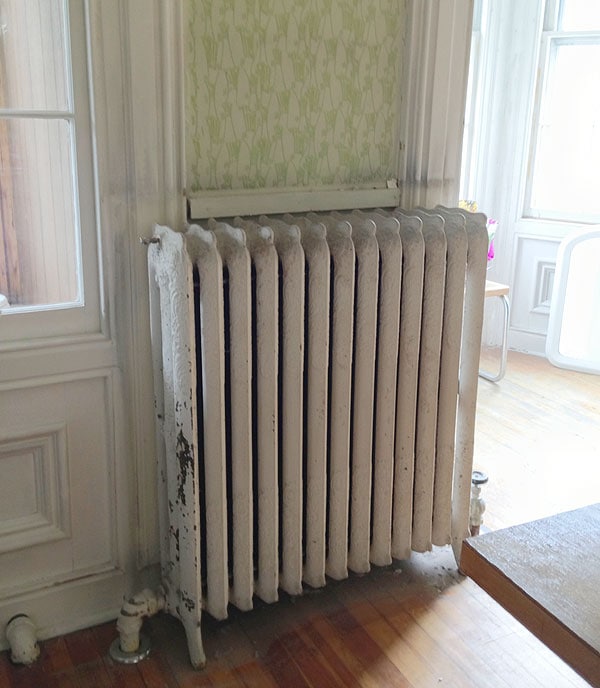
3. This is the radiator the pipes were feeding (the pipe that goes straight up is the one leading to the tank in the attic). Note how it is sitting on a weird white wood platform instead of on the floor. I really don’t know why this is. A leak might have rotted the floor boards at some point, leading to them getting cut out and this piece of wood artfully put in its place? I don’t know. I don’t really care. Removing the radiator would give me the opportunity to feather in new floor boards to cover this area, which was very appealing. It would also give me the opportunity to move the radiator over a few inches to center it on the wall (between the corner and the door to what used to be the upstairs kitchen, which is frustratingly right out of frame), which I like. I like centering things.
4. Our heat system originally relied on steam, and at some point it was converted to hot water. I’m glad this was done, whenever it was done—there are more options for hot water boilers, I believe it’s more efficient, quieter (steam radiators “knock” as the pipes heat and cool), and I find the heat a little nicer (steam radiators get hotter—ours are never too hot to touch but they work EXTREMELY well regardless). ANYWAY, steam radiators require quite large pipes, since they have to transport steam. Hot water radiators, by contrast, need much smaller pipes—I believe 3/4″ is standard. Since our system was converted but the pipes were never swapped out, this essentially means that we are wasting energy (and money) heating a bunch of hot water to fill these huge-ass pipes when we could be filling very small pipes and saving a lot of energy. Even though I’m really pleasantly surprised by how low our heat bills were this winter (especially when compared to our friends with oil-powered systems—YIKES YIKES), the idea that we could be doing better by exchanging some of the huge pipes for little pipes was appealing. The new pipes will be run with Pex, which is a relatively new type of flexible plastic piping that is much cheaper and easier to install than copper, but seems to be just as good (if not better, since copper pipes tend to corrode around the joints after many years, and burst easily if they freeze).
SO. DECISION MADE. LET’S DO IT.
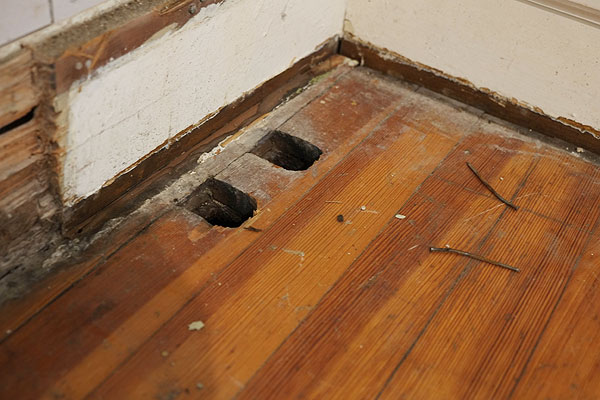
The pipes came out. The radiator was moved out of the way a couple of feet. I lifted up that little platform under the radiator so I could start thinking about how to repair the floor.
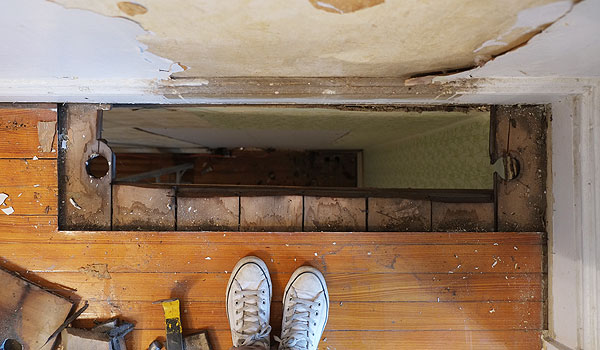
So, this is not so great, FYI. Because so much of the subfloor had been cut out, the plumbers were actually surprised and amazed that the radiator had never come crashing through the dining room ceiling. That would have been really bad, considering these things weigh several hundred pounds and I do NOT like surprises that weigh several hundred pounds.
Removing these pipes obviously means that I have to do some floor patching in this room, which got me thinking about moving the dining room radiator.
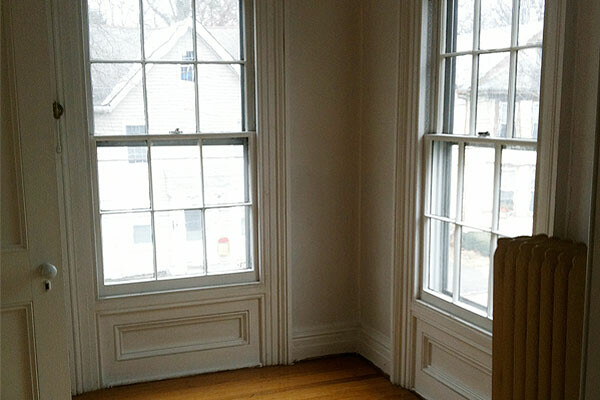
Here’s a bad picture of it in its original location. It was sort of an awkward spot because there’s already so much going on with this wall, between the window and the archway to the bay window. The radiator covered a lot of the molding, which just looked sort of bad and lame.
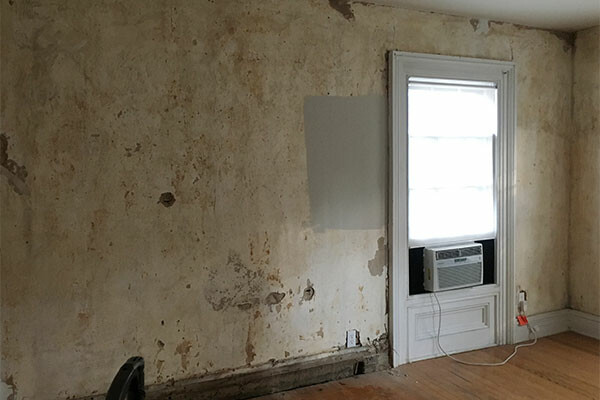
Lurking in the back of my mind for a while had been moving this radiator to this wall. This is the back of the wall where I’m installing the faux-fireplace in the library, and at some point in time I’m almost certain there was another mantel here with some kind of stove for heat. When the mantel was removed, the baseboard was patched in pretty poorly, and it just seemed like a good location for the radiator to live to hide that.
Typically radiators are installed under or at least near windows (for good reason—the radiator is supposed to warm the cool draft coming in from the window before it alters the temperature of the room), but my plumber assured me that moving the radiator to this wall wouldn’t make any appreciable difference for how our heat would disperse and that I should do whatever I wanted.
Nobody should ever tell me that, btw. “Whatever I want” is usually a recipe for disaster and devastation.
So out that awkwardly-positioned radiator went, out went the big pipes in the basement leading to it, and over I shimmied it to the opposite wall (on some furniture mover things, which are pretty amazing if you need to move heavy shit alone).
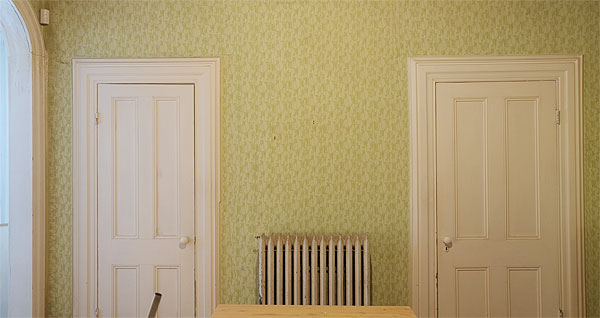
Here it is, freshly shimmied. I like this location for a radiator—after all, it’s the location of an original heat source, and I think it just looks nice. Anyway. Whatever.
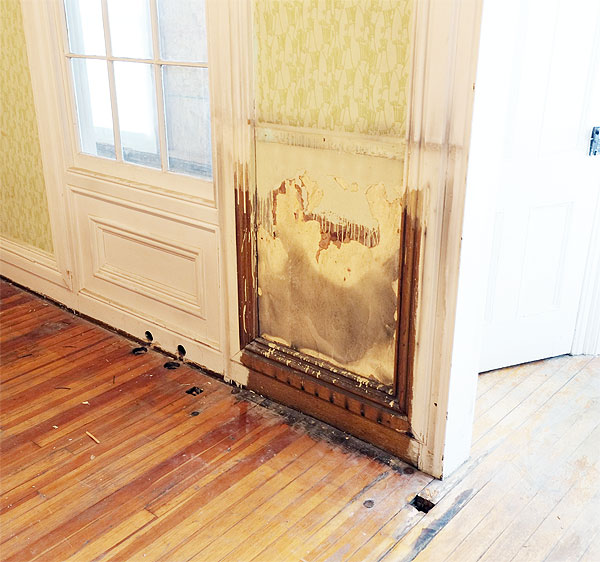
Removing the dining room radiator had the added benefit of revealing some interesting information about how the house was finished originally, or at least around the turn of the century when the radiator was presumably installed! That’s not wood (or poop) you’re seeing on the moldings—it’s actually faux-painted to look like wood. The moldings themselves are made out of wood, obviously, but often this was done in houses of this era to make the actual lower-grade wood look like nicer wood. I’ve never considered trying to strip the woodwork in this house (except occasionally when it’s really bad, but even then only to repaint it), but this pretty much confirms to me that the woodwork was never not painted—whether it was this faux-finish or various shades of white and beige.
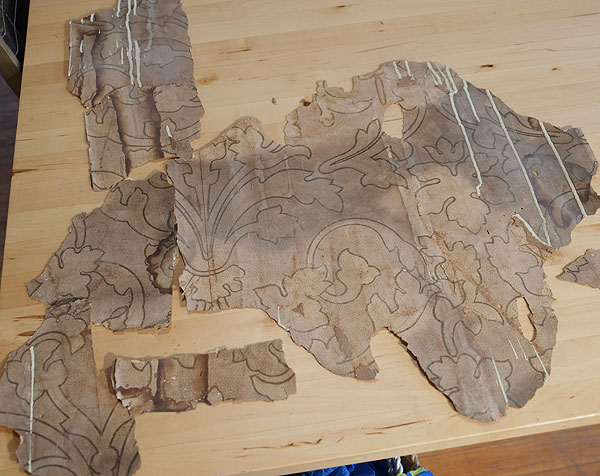
This wallpaper was also lurking behind the radiator, right over the original plaster. You can’t really tell, but the dark lines in the pattern are actually a gold metallic. Fancy!
ANYWAY.
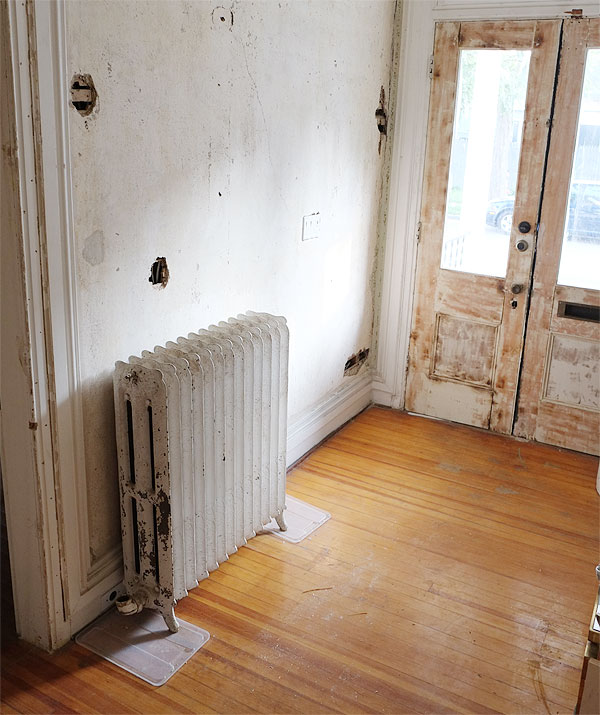
Moving that radiator in the dining room led, naturally, to me wanting to move another radiator—the one in the foyer. You know, while we’re having so much fun.
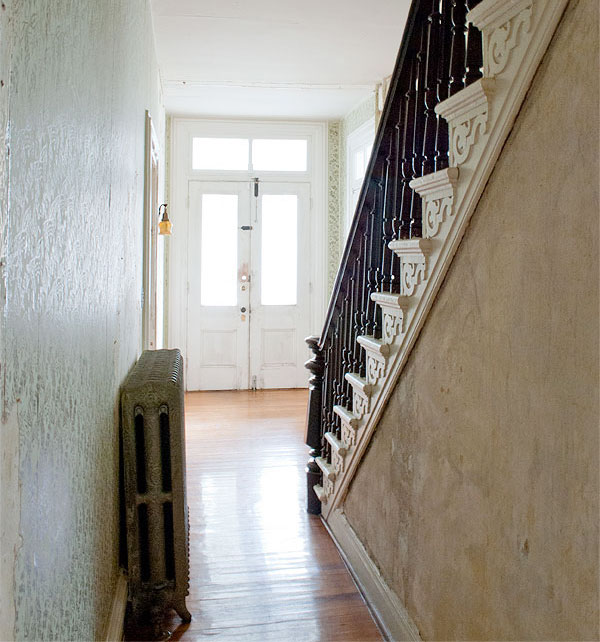
Maybe it looks OK in pictures, but this radiator, while beautiful, was also rather strangely located. It’s in the center-ish of the entire space, which makes a certain degree of sense, so as to diffuse throughout the entry/hallway evenly, but this space between the stairwell and the wall is only 3 feet wide. Add in a radiator that sticks out 10-11″ from the wall, and you’re left with a passageway just about 2 feet wide. It made the hallway feel unnecessarily cramped and strange, and impossible to move large objects through. Additionally, the area of the hallway/entryway that gets really cold in the winter is by the door. Even with more effective weather-stripping, I think this will pretty much always be the case, whereas the middle and back of the hallway seem to get enough heat from the surrounding rooms to be pretty comfy. My plumber concurred with all of this.
So out that radiator went, and moved closer to the door. The foyer space before the stairwell is really quite large (about 6′ wide), so it feels much less obstructive there, and it’s SO nice to have the hallway next to the stairwell restored to the right width.
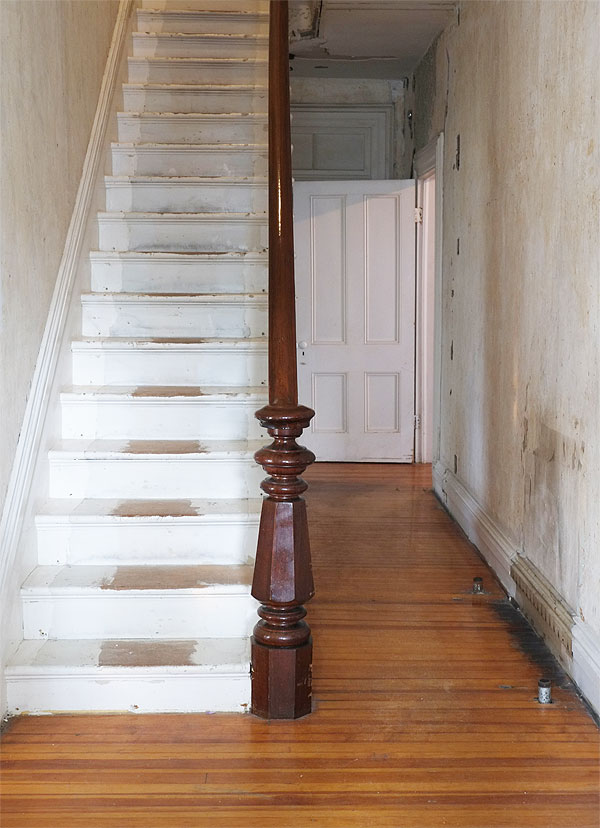
Once those pipes are gone and the floor is patched in, it’s going to be awesome. I love this change.
But then I had another idea. The radiator in the dining room, in its new location, looked a little small to me. The radiator in the entryway, in its new location, looked a bit large. Additionally, the dining room is a much bigger space that we actually live in, whereas the entryway is comparatively small and functions as a pass-through to the other rooms. And the plumbing needs to be re-run anyway, so what if I just swapped the two? It’s literally no extra work.
The radiator from the hallway? So. Fucking. Heavy. Even on furniture movers, it was almost impossible to budge. But I did it because I have a lot of determination and a lot of self-doubt and needed to just to see how it would look.
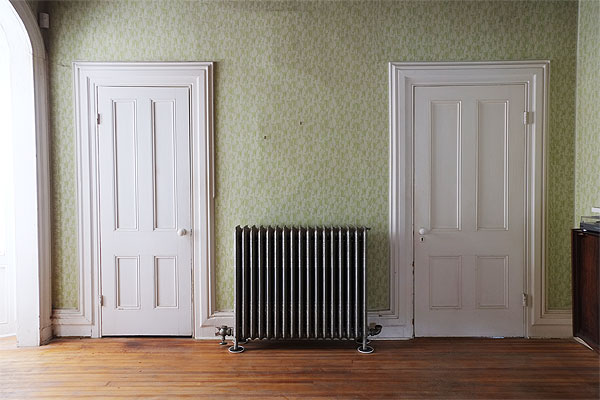
It looks awesome. I feel like the size is just right.
And the old dining room radiator works really well for the entryway, I think! My plumber actually wants me to move the radiator even closer to the entry door, but I’m stubborn and I like it where it’s sitting now—closer to the doorway to the library. I think closer to the front door would feel a little crowded and sort of take up the entire wall, whereas in this position we still have the option to add some coat hooks to the right of the radiator.
Oh yeah, I might have stripped down the front doors. The house looks more shanty than ever! Awesome.
I didn’t rush to have the new plumbing run and the radiators reinstalled because having them disconnected means it’s a pretty swell time to have them sandblasted to remove all the layers of old paint and caulk (yes, caulk) and garbage that has been layered on over the years. Cast iron radiators lose efficiency the more times they’re painted, so not only will stripping them down make them look super fancy and bring out the intricate patterns on them, but they should also work better. It was with this terrific plan in mind that I asked the plumbers to also disconnect the awesome corner radiator in the library (which is extra caulk-y) in the hopes that I can just get them all done at once (and by “all,” I really mean 4—there are 11 in the house).
Once the plumbers left, it suddenly felt like pressure was ON. I mean, ideally these rooms (hallway/foyer, library, and dining room) would be DONE by the time the radiators return and get re-installed, so they don’t get damaged during the ceiling installation and all of the wall repair and painting. Which means I really want these rooms done(ish) by”¦late September?
It’s the end of July, FYI. I might be overly ambitious. But I REALLY want those rooms to be functional and finished looking. It’s about time! I’m tired of having so many spaces under construction and actually living in so little of the house. I need to spread my wings and fly. And also get some of the furniture and art out of the upstairs kitchen, basement, and garage. It’s piling up and I feel like a crazed hoarder.
Bright-ish spots:
1. The sandblasters are currently BOOKED BOOKED BOOKED and said I couldn’t get any of my stuff in until late August-early September. That’s actually OK—it buys me some time to figure out what to do with the radiators, exactly. Which feels largely reliant on what we’re doing with the floors, which is the subject of the majority of my inner turmoil nowadays. Stay tuned for some whining about that another day. Anyway, it also gives me lots of time to consider renting a sandblaster and doing it myself in the backyard, which seems like a bad idea all around but one that I continue to think about. A lot. Someone talk me out of it. Or INTO IT.
2. Originally I thought that having the radiators out also meant that the pressure was on to refinish the floors before the radiators needed to be reinstalled. I met with a floor refinisher the other day, though, and he said this was not the case. Which makes a lot of sense, since obviously not everyone who has their floors refinished also removes all of their radiators in preparation. ANYWAY, he said that since they’re out already, he might as well rough-sand the area underneath where they’ll go, just to make things a little easier, and then we can refinish the floors for real when everything is done-done, but any pro floor refinisher should have the necessary equipment to sand and refinish around radiators. So that takes a little of the pressure off, I guess, although definitely makes the DIY floor refinishing idea seem even more complex and impossible. Anyway, even though I’m really excited to refinish at least some of the flooring (on the first floor, only the dining room, library, and hallway have hardwood, so it isn’t a big job), the more responsible move is to wait until more of the house is done so I don’t have to panic over every paint drip or scratch or joint compound puddle or whatever. Renovating is tough on floors, even if they’re protected with paper and dropcloths, so I definitely want the bulk of that stuff out of the way first. Floors might end up being a 2015 or 2016 or 2030 project. Sighs.
3. The electricians are DONE (for now) AND we passed electrical inspection yesterday! This is VERY exciting, since it means we can now drywall the ceilings! AHHHHH! Considering we took down the ceilings back in December and January, I’m SO ready to have ceilings again. The ceilings are pretty much holding up everything at this point—there’s no sense in doing a ton of wall repair when there’ll just be a ton more to fill in the crumbling areas between the old walls and the new ceilings. I want ceilings bad and I want them now. Or yesterday.
4. I’m still debating whether to do the ceilings myself or not. On one hand, I met a semi-sketchy dude who wants to help me with them and says he has lots of experience, and it wouldn’t cost a lot to enlist his second set of hands. On the other hand, this isn’t something I have any experience with, and because our house was built pre-industrial revolution, our beams are not at all level—meaning wonky drywall unless the beams are properly and carefully shimmed out. I met with a contractor (this is #4”¦all the others were either super pricey or I didn’t feel comfortable with them”¦) who I really liked, so I’m waiting for his bid”¦if we can afford it, this is one thing I’m inclined to hire out. After redoing the office I feel comfortable doing all the necessary wall repair and skim-coating—and there’s a lot of it—but the ceiling isn’t really something I want to gamble with. Also it sounds like the opposite of fun as a DIY.
I’ll stop rambling now.


Just rent the sand blaster…I say this purely based on the fact that my hubby has a sandblaster and uses it in the driveway and gets the sandy stuff all over but it doesn’t look hard.
But don’t blast beside a freshly painted anything. Like a friend did.
:)
Don’t tell me that! Maybe I should”¦it would definitely save some $. The radiators don’t seem like they’d be that hard to blast (it’s just paint and caulk), and I’d be OK with just spray painting them rather than powdercoating, even though powdercoating is nicer. It’s just a money thing, really”¦the radiators are supposed to cost about $150-200 each to sandblast/powdercoat, and I think they quoted $300 to come get them and bring them back”¦so all in, probably close to $1,000. It’s definitely a chunk of change that I’m not looking forward to saving/spending. So conflicted!
it’s not clear to me if a compressor needs to be rented separately, and what hazmat gear you have to invest in. $1000 would inspire me to be adventurous. but please be careful, sheesh.
Talk to Carrie of Brick City Love. She rented a sandblaster to get her front railing looking good since you can’t easily take it out. Worth looking into, if only to be that badass that sandblasts your own radiators. As you know, I lost hassle too.
Other stuff from this post, patching in the flooring shouldn’t be too difficult. Given the cuts that are already there, you’ll just need to cut back two of those cut boards (2nd and 3rd) to give more variability. Just use a plunge router and some chisels to get it back. Patch in a few new 2x8s between the joists below to better offer sub-floor support, put in a sub floor, and then wait until you have some extra heart pine flooring that you can use as a patch. If you don’t already have some, you will soon.
And finally, the faux wood finishing was all the rage in the 1860s-1890s (some earlier and later too). It was too expensive for most places before that. Our master bedroom is the only room in our house where I’ve found faux mahogany paint while stripping baseboards and molding. Everything else has always been painted a solid color. Part of me wishes I could have somehow stripped off only the top layers of paint to reveal this detail. Apparently, you can hire some sort of expensive bugs that you put uniformly on antiques that actually eat layer by layer of the paint away over the span of weeks until you have the layer you want. Obviously overkill for our houses, and sort of gross too, but you know…bugs as a tool is kind of cool.
FWIW my hubby’s 2 cents:
“Something like that is easy. But there are people who have huge mobile trucks that do blasting on site. He is better off just moving them outside blasting them right there and moving them back in. It will be alot cheaper and a resonable amount of work.”
Thanks, guys!! I think given the health hazard and possible lead nightmare situation, I think this is probably a place to hire it out. Another commenter also suggested chemical dipping below, so I’ll look into that, too! Alas”¦the sandblasting does sound fun!
A practical comment:
Maybe consider having 1-2 of the ceilings done by a professional, then reassess whether you want them to do all the ceilings or whether it seems like something you can handle yourself. There’s nothing worse than watching someone do work you feel like you could do with relative ease.
A not so practical comment:
Somehow it’s really cute that the wood moldings in this house were faux-painted. Just.. the idea of dressing up plainer wood to become fancier wood kind of reminded me of you – it’s aspirational. You’re always taking things that are kind of beat up and run down or generally, not the absolute best, and trying your hardest to make them work and make them what you *want* to be, which is exactly what was done with the moldings originally. There’s something kinda poetic about that detail that I liked. :)
Thanks, Celeste! I see what you mean, haha. I think maybe this whole house is like that! I think it likely started out as a very modest house and saw a few big additions over the years, and some details added (like the columns in the front) to make it fancier and closer to the more upscale styles of the times. The whole thing is a little faux, which makes it sort of charming and lovable to me. And less intimidating, since I don’t have to feel too much pressure to really strictly adhere to historic accuracy, since the house is kind of a hodgepodge of styles to begin with. I feel like it’s always been a place that people had fun with and put their own spin on.
We really only have two ceilings to do! There maybe be 2-3 more in the future, but right now it’s just those two rooms. I guess I’m inclined to hire those out, see how it goes, and then re-assess later on when we get to the other rooms that will need drywall work. I totally hear what you’re saying, though! I think I could do it myself (with some help), but I also feel like it would be SUPER draining and not fun at all and take FOREVER, whereas pros could knock it out in a few days and I could get on with the wall repair, painting”¦the stuff I know I can do and do well. It isn’t as though DIY is free—there’s still the materials cost, the inevitable “oops” budget, my time that I could be spending on paid projects—so all of that makes me just feel like it would be so worth it to hire it out and get it over with. Fingers crossed for this quote to come back with a number I can work with! :)
I love the way you write! Your blog is one I come to almost daily waiting for a new post. I can’t wait to see what you do with the floors!!
Thank you, but that must be so disappointing! I swear I try to post more often”¦I just can’t seem to hit the right stride! I’ve been working on this problem for 4 years, haha.
yes well we endure the pain because we love you ^_^
Exactly the same, I am always checking new posts!
Ditto. Ramble away, Daniel! You’re my hero!
Double ditto. I check my mail then check MN to see if anything new has been posted even though I know there is only 1 post per week on average – but totally worth it always!
same here… always excited to see a new post, especially on the updates around the apartment and house. :)
AW, YOU GUYZZZZ. *hearts*
I’ll try to step up the posting! Every week I’m like “next week, I’ll post TWICE. OR THRICE. And then”¦no. Between the photographing and the editing and the thinking and the writing, I still haven’t been able to figure out how to write posts quickly. I’ll keep trying, though! :)
I agree. I love Manhattan Nest for the same reason, and Daniel, these posts where you’ve made progress and you’re moving things around and there are new holes in the floors and there are pictures of things half-way through being done – these are my FAVOURITE posts. I love them. I love your cranky “everything is garbage” asides because they’re so funny and I have so much sympathy. You’re great.
just checking out DIY sandblaster/blasting in youtube, not very consoling. i was going to say rentablaster so you could cut yourself some slack and hire out the ceilings.
i would definitely bite the bullet and hire out both. nothing is better than radiator heat, thrilled you like it and are installing energy-saving narrower lines.
the house has such a beautiful vibe and presence. never looks shacky.
keep us posted.
It’s great to see more progress! Ceilings are hard to get right, especially in an old (wonky) space, if you can afford a pro, I think it will be money well spent.
As I prepare to renovate my century old apartment, I am loving your posts and look forward to whats next!
If I had access to a sandblaster, I would sandblast the world. Everything down to its skivvies.
I agree with attempting to renting it out – you have space! youth! patience! (ok maybe not the last part…)
In Montreal, our exterior fences and stairs leading to the upstairs apartment are rusty and the previous owners didn’t really do a great job in maintaining them… I’ve been considering just doing the sandblasting ourselves to get a clean slate, but then I might start finding excuses to use it elsewhere: sandblast away my worries, sandblast pesky neighbours…you know.
Ah, just saw Hanna’s post…those are good points :(
Don’t you love the piece of wallpaper you found behind the rad? The radiator shuffle was definitely a great idea!
I enjoy your blog a lot, so I feel like we’re (almost) friends, and I must say it: do NOT sandblast things yourself. Sandblasting uses (as the name suggests) sand. Sand is silica. Silica + lungs = silicosis and various types of cancer. (Not every time, but enough of the time that I wouldn’t roll the dice. Cancer sucks.) The only way to 100% keep the silica out of your lungs is to use an air-fed hood, which seems expensive and hard to use correctly. A respirator, even a fancy one, will not cut it.
There are lovely people in the world whose whole job is to sandblast things correctly and safely. Pay them.
You make a valid point! OK, OK. I don’t want cancer.
Thank you Hanna! Do NOT sandblast yourself. WTF are you thinking, Daniel? You are Superman sometimes but you don’t have to be ALL the time.
I love that your mom commented (is it really your mom?). Yes. Yes.
It is! She comments all the time! :)
And I love that she knows what “WTF” means and uses it talking to her son!! :)
Amazing. I just spat out my tea laughing at that.
I have to second your Mom, WTF!
I’m a museum objects conservator. I have to second that for all the reasons above, don’t sandblast the these yourself. Lead exposure and silicosis = bad for you ( and us). We want to keep reading your blog for a long, long time.
Great story, as always–you’re such an entertainer!–and great progress (electricians et al. and radiator brilliance). You do seem to jump ahead and Get Things Done when you light a fire under your bum. Congrats. Look forward to the next installment of Daniel’s House Renovation Adventures.
“(or poop)”
okay, you got me. i laughed out loud. not sure if it was the wry tone or just my 5th-grade poop laughter instincts kicking in, but well done.
Not exactly related, but I’m just now noticing the scroll-y detail on the sides of your front stairs! So beautiful. I hope you held onto that little lamp in the entry way, too. Was it original? Your shuffle made all the difference.
If it were me, I’d hire both out, (ceilings and radiators). Then again, you flawlessly tackle things I’d be scared to take on all the time.
Can’t wait to see it come together!
I did hold onto the little sconce! It was the ONLY light source in the entire hallway, so it really wasn’t cutting it function-wise, and the wiring was pretty iffy looking so we took it out when we installed the ceiling fixtures. I’m guessing it’s original to the house being electrified, which I actually think happened really late in this instance—like maybe 1920s? 30s? Before that, the house would have had gas fixtures.
I love your blog. And your writing. I have an old, old house in Mystic, CT and had the same dance of the radiators. When we redid the floors, I somehow convinced my heating company to send a few guys to disconnect and move six heavy-as-hell radiators outside and then come back and move them and reconnect them, all for a grand total of $150. Methinks he did not think that through before he gave me the quote. But, back to the matter at hand: if you were to consider building some radiator covers (we did. pretty!), then you could skip the sandblasting altogether. Just another idea to rattle your brain.
Wow, that is a bargain!! I also think he did not think that through”¦watching the guys disconnect ours was pretty insane!
A couple of the radiators actually came with covers (not so nice, but with a paint job they might be?), but I actually really like the look of them exposed! They’re just so ornate and beautiful.
I think both your DIY abilities and your self-awareness are outstanding, and I’d advise hiring out all three things: ceiling drywall, radiator sandblasting, and wood floor refinishing. I know it’s easy to spend someone else’s money (ha) but there’s a lot to be said for letting pros do these jobs — assuming you can find real competent people and check out their work beforehand.
My husband is old enough to be your grandpa and he is still agonizing over what parts of DIY projects we hire out vs. what he or he and I do ourselves. He really doesn’t like to not be able to say he did the whole thing! It’s a pride thing because he has a lot of skills, but can’t be as good as every craftsperson is in his or her specialty.
OMG. I feel like you need yourself a project manager to help map out all these details! I’d be loosing it! BUT. How exciting! That radiator in the entry is SO pretty!! Smart move snagging it for the dining room. And ceilings! That has GOT to feel good knowing those are going in soon :) I don’t have any advice or encouragement. I just love following along. Keep on keeping on?
my son and I redid the ceiling in one small bedroom (my granddaughter’s nursery) and we just did the plaster buttons and skim coat. It was very hard on backs and shoulders. Doing drywall installation would have to be even harder.
I would hire out both jobs – the ceiling for the expertise and the sandblasting for the safety.
PS, I was one of the ‘so do those pipes HAVE to stay?’ posters. I’m glad to see them tucked away into the wall!
you are an animal! but a testament to your foresight on doing all this stuff now. I think a lot of us are inclined to make things look pretty as quickly as possible without thinking about how much the pain in the ass things contribute to satisfaction down the road.
and love the revealing of the painted wood. all the doors upstairs in my childhood home (now on the market. tear.) were wood, painted faux grain. I was one of those kids – actually I guess I still am – who would rearrange or paint at 9pm on a Tuesday (including my million pound antique iron bed). And despite every other change I made to the room, I had a soft spot for those faux wood doors. I always imagined the lady of the house going into her brand new home and feeing so fancy with that faux wood finish on the second floor.
Daniel – love these old radiators. Your house is awesome – full of all sorts of little treasures! My husband and I looked at putting old radiators into a house that we bought last year that didn’t have a heating system and those suckers are pricey, not to mention the boiler. I’d love to hear about DIY sand-blasting if you try it – I’ve never heard of anything tackling that! And I second a lot of the comments, hiring out ceiling drywall is worth every penny.
I get misty when you do the right thing aesthetically even though it’s harder.
You crack me up. Hooray for the shanty house!
I agree with a lot of the above comments: sandblasting sounds scary and cancer-y, and ceiling-work sounds utterly exhausting and ripe for mistakes that you will stare at angrily everyday b/c a ceiling is so noticeable and uncovered and every imperfect seam will shout at you on a daily basis reminding you that you should’ve just hired a freaking ceiling guy already… *cough, cough, living in a home with poorly diy-ed ceilings*
Congratulations on all the great work you’re getting done! I would also say to hire out the sandblasting for your safety…would you really want all the paint dust in the backyard where the dogs play? I’m not sure if that’s actually a concern, but it seems like a soil contaminant and possible hazard for pets.
I think all your radiator placements look very nice, too. I think that if I didn’t center the one in the foyer, too, over time I would want them to be consistent with the other ones and it would bother me.
Looks great, can’t wait for more updates! Thanks :)
Oof, and speaking of paint dust, there’s a good chance it’s lead paint. That stuff is no joke. As much as I would want to casually mention “oh yeah, the other day when I was sandblasting stuff…,” that sounds like a job for the pros.
This does not look like fun! Let’s go back out to the garden, People!
Sandblasting makes a mess ‘o lead paint dust. I’d strip them. Or use respirators and go after them with a wire brush bit on a drill?
i have no useful feedback, just that i’m obsessed with your blog and i hope the renovation never ends (sorry!).
Sorry (not sorry), I agree with kim. Endless amusement and I look forward to every post.
I vote for the pro-sandblasting because of the heath reason. But before you get into the whole repainting or powder coating… you mentioned there was caulk on the radiators. Does that mean that they had leaks? Which won’t you have to fix and test before you put them back into use?
I second the people who said ceilings should be hired out, at least initially. If you do them yourself, I’m sure they would turn out passable, but we’re never great at something on a first pass, and ceilings are so noticeable. I would be obsessively ripping them down in a year or 18 months after one too many dinner parties spent glaring at the inevitable errant seam that just wouldn’t cooperate.
Also, like many of my fellow commenters, I’m inspired when you make hard choices for design integrity. Wish more people would follow your lead!
I would have totally been behind keeping the radiator pipe where they were however, since they’re over-sized for the type of radiator system you now have, that is a perfectly valid point for replacing the pipes (and rerouting the run while you’re at it). AND since the heating system isn’t original to the house – the architecture didn’t account for placing radiators – so moving them makes total sense. I love putting the radiator in the spot of the old heating stove.
I have so much trouble paying other people to do work i know i can do myself, but just yesterday called for a quote to scrape, repair and repaint the trim on my house. it’s been six years since i removed the aluminum cladding and i haven’t touched it. I also just paid a mason to repair a damaged brick column on my porch and rebuild my chimney. I could have attempted the porch repair, but the chimney needed some real masonry skill.
FYI, don’t tie your dog to a brick porch column. It seemed so sturdy, so secure. Until he decided to run down the front path and drag the column behind him landing 4 ft from the porch! He isn’t that big probably about the size of your Mekko. Probably the most expensive damage he’s wrecked so far on the house.
“That would have been really bad, considering these things weigh several hundred pounds and I do NOT like surprises that weigh several hundred pounds.” There’s a Grindr joke in here somewhere.
Ah, I know it’s crazy hard work, but I’m so envious sometimes of your endless projects and your gorgeous rambling old mansion. Every improvement must be so satisfying! Like you are restoring a patient to good health.
I vote outsource radiators and ceilings. And turn your sights on skim coating and floors. You will get a big return on your efforts there.
My favorite improvement here was the relocation of the hall rad. Instant elegance!
OMG, I think I love your Mom :)
Fun Read, as always. It’s amazing what shoving a few radiators around can do! They all look like they are in a better place. I DO think you could sandblast – prob. have some fun with it the first hour or so – then it’s just a drag. I’ve done small stuff, it’s a pain. Now if you go for the big guns, well that’s diff. But considerably more expensive to rent I’d guess. I also think it would be such a morale boost to get the ceilings done and the rads done while you are kicking &$*&# on the walls. Can’t wait to read all about it, whatever you decide to do!
I’m with the other comments–hire out both the sandblasting and the ceilings. As one of the other people pointed out, ceilings are really noticeable. Also, speaking from personal experience, my dad is a carpenter by trade and built our entire house by hand on evenings and weekends. He learned plumbing and electrical and did that too. Know what he hired out? Drywalling the ceilings and doing the carpets. Pros at those trades can accomplish 8x what you can in one day, and it’ll look better too. Plus, you’ll have guys on cool stilts stomping around your house!
I hate it when you stop rambling…KEEP rambling! You make me laugh and I love reading all about your home adventures. You are inspiring. So, daily ramblings please?!
As you know, I’ve hired out everything, sigh. But please hire out the ceilings. You don’t want to get into a big difficult mess while trying to work on a scaffolding with stuff falling in your eyes. No no. They work fast and are artists; I can’t believe the finish they got on the ceilings they did for us. (Though the owner didn’t warn the workers about the work over the landing and they showed up without a proper scaffolding for crazy stair work. Apparently after lots of colorful and creative swearing the rigged something totally dodgy out of painter’s ladders.)
Daniel, have them pro-sandblasted, save your superman powers for the walls or ceilings.
The faux wood painting is so interesting a nd weird at the same time.
Do like the rad switch up, makes me think they must have been that way round originally.
You are such a hero of mine!
Don’t rent a sandblaster! It will make a colossal mess and the dogs will be exposed to millions of paint shards. Wait until the people are available in Aug/Sept. It will only take a day to do. And it’s better to have the floors refinished when the heat is on, as they’ll dry faster. And if you can’t wait for the sandblasting, check with autobody refinishing shops. Only don’t let them do sinks or tubs, b/c their stuff isn’t waterproof for ongoing water exposure.
I just want to know what color you’re going to paint them!
The problem with putting radiators in prime wall locations is that furniture is impossible for that location.
Do you want to give up all these locations to radiators rather than furniture?
don’t forget to soundproof and insulate the ceilings while they are open!! best use of money you cant see for sure!! i am in the process of doing this exact same thing at my place! and i am foever taking on a new project before i finish another one!
I smiled when I read that the pipes were removed – I did comment on them in the original post.
I laughed when I read about your comment about the pantry – sorry about laughing at your pain
I bowed down in awe when I read the comment from your mum because clearly she is a superstar – unless she thinks WTF means well that’s fantastic. Nah, even then she’d still be a star
I am glad you have decided not to sandblast the radiators. The health issue for yourself (and potential health issues from paint flake contaminants for the fur babies) is the most compelling reason–another is that sand blasters can be powerful. If the radiators already have weaknesses (and the caulking makes it sound as if they do), you can sandblast a hole right through them. Even the pros sometimes do that–you will probably want to have the radiators all tested before they are reconnected–and have any weaknesses repaired (they probably will need some repairing) so that they will not leak all over your floors and cause rot. The ceiling is a similar issue–to get drywall up on the ceiling, you need a drywall lift (not cheap), and you still risk having something slip and hit you on the head. These are both safety issues (not cosmetic issues) that I would leave to experts. Learning to skim coat is well within the limits of something one can learn by doing–but some things one needs to learn by apprenticing with experts because of health and safety. I’m glad you will be safe.
Totally approve of the radiator shuffle (tha opening paragraph had me in fits), major improvement!
Per the radiator renovation: here in France old radiators are often given an ‘acid bath’ (totally a pro job) which stips them outside but also inside where they are often rusty. They are then checked and ‘verified’ for efficiency. An alternative to sandblasting?
Like yourself I look at something and think ‘I could do that’ and often do BUT I wouldn’t hesitate to pay a pro to do the drywall ceilings. (Says she who sits here covered in plaster dust from having painstakingly plastered (3 coats) the multiple cracks in my 18th century ceilings :)
I’d hire the ceiling work out, but be particular about it. We had drywall installed over plaster ceilings in two large rooms and they didn’t ensure the drywall was plane. The ceiling looks wavy in some spots and most of the joints cracked (despite the fact good professional painters did those). We even had to plaster some areas to make it appear more plane. I have since caulked all the cracks, but the smooth line of caulk visible through the matt paint drives me nuts. Although admittedly less than the cracks did.
This post was so pleasing! Radiators always feel like they are the one thing you can never do anything with. I can’t tell you how many times I’ve wanted to strip or move one I’ve seen either in my apartments or a friend’s house. Ugg, this post was so satisfying haha.
Sorry, I was laughing so hard when I saw the unfinished entry.
As for the ceilings – I’d hire it out. Sounds like an awfully time consuming and nerve wrecking job to diy.
On another note – a while back The Money Pit was on TV – aren’t you just a Tom Hanks doppelgänger. ;-)
Although I whole heartedly agree with the radiator swap in terms of visual scale, the doors at your entry way = massive heat loss. You might want to make sure the smaller one provides enough heat vs. overheating the other room with less openings.
A note on floor refinishers: worth it. They can get your whole house done in the fraction of the time. Also, you’ll want to be out if the house for that anyhow.
p.s. – not trying to be a killjoy… just make sure for all the changes you get the winter comfort level you want! Also, I’m adopting “shut your goddamned mouth” for everyone who asks when my reno will be “done”.
Pex is a great invention, I did (or will do) all my plumbing with it. It’s also very convenient for doing it yourself: all you need is a wrench and some kind of thread sealant (I used Loctite) and you’re good to go!
The sandblasting is something I’m really curious about, as it’s something we’ll have to do as well somewhere in the future. We also have a dozen to-be-blasted-and-painted radiators lingering around the house, waiting for some loving. Still not sure if I’d tackle that myself, just like you are now in doubt about.
I’ll be the one saying “go for it yourself” for the ceilings. It’s not hard, you just need to be willing to take your time. I did the ceiling in our kitchen, and I’m confident enough to claim that 99% of the people will find it perfectly done (the other 1% being obnoxious naggers). Take your time to get your beams shimmied level, use a drywall lift and take your time to fill the joints (don’t forget the tape). Time for 30m²: 2 weekends: one to get the frame up and running, all level, one to get all plates up and creating supports for light and extractor. And then 4 times an hour to layer up the joints, 4 evenings in a row (and that’s because I’m slightly perfectionist and a novice, twice should actually suffice if you’ve got the hang of it). My guess is that you should be able to do a standard bedroom in a weekend (if there aren’t a gazillion spots or so) and finish the joints in the week after. I can write it out more if you’d like (or maybe it’s come up on my blog by the time you’ve decided).
Like I’ve read here in the comments before mine, hiring it out is no guarantee for success. My parents-in-law had all their drywall done, and ended up with wallpaper over everything (including ceilings, where they put something paintable) because the joints were below par. Just my 0.02 tho :)
About ceilings…apparently quite do-able by one’s self with a drywall lift, even on a 13′ ceiling. Presumably you can rent one somewhere. Lots of videos on how at YouTube – which you probably have already watched. ^_^
About refinishing floors…This is the only huge DIY project my husband and I have done. Personally, I didn’t think it was that bad. Some tips:
1. Don’t skimp on buying the sandpaper, they take back any unused stuff. Fresh sandpaper makes everything easier.
2. Large rooms are easier than small rooms because of the steady run. Do those first.
3. It is really, really dusty. Taping off rooms with plastic helps…a bit. But, I figure you know all about dust because you must have your merit badge in dust making by now. ~_^ (Note: I picture the actual badge looking something like Pig-pen: top of head, bit of feet, joined by a dust cloud in the middle)
4. Contrary to what people normally do, practice first. You do this buy putting a fine grit sand paper on the the roller in order to get a feel for the weight of the machine and how fast and steady you need to go… and how to stop it. Then work your way up? down? to the coarsest grit you will use. By the time you get to the coarsest grit that will do your real stripping job, you will have trained your muscle memory a bit and be able to better avoid those deep gouges that amateurs often end up with. My husband did the heavy stripping and frankly, he is really not good at those kind of things at all. With this method, we did not have even one minor gouge – even in our tiny rooms. He did a wonderful job.
5. I did all the edging. Could Not Make That Rotary Edger Work. I just kept ending up with swirly patterns no matter what. (You might do better than me though, and it is supposed to be faster…) A belt sander really didn’t get close enough to the wall and had this annoying tendency to get away from me and bang into the baseboards. I used a palm sander instead. It took forever. I spent ages on my knees with a sore back and sweaty dust mask face. But it looks Great!
Also, I vote for possible cancer as being bad. :P
“Shut your goddamn mouth. That’s how.” – Hilarious! I’m with the commenters with concerns about lead paint. Scary to have a bunch of lead paint flakes in the yard.
I love this post! You have such an excellent tone as a writer.
I saw your instagram selfie comment after this and it made me wonder – have you ever considered instead of a written update, maybe doing video updates? Could be fun.
Go Daniel Go! Sounds like you are right on cusp of exciting progress (and updates for us)!
What about getting the radiators dipped to strip off the paint? Might be another option to consider?
Absolutely think you made the right decision moving them all around, it’s going to be so much more efficient not to mention better looking.
I love your blog so so much :)
Hi Daniel,
Just here to say that I’m a huge fan of yours and your entire blog makes me want to trade in all my skills and experience for your DIY abilities SO. BADLY. In the past couple of weeks alone, I have visited Lowe’s and bought a sewing machine. A SEWING MACHINE. My family no longer knows who I am. But that’s okay, crafting and I will forever be together thanks to you. YAY!
PS love your dogs and your house and one day when I’m a super millionaire I will hire you to design my house and it will be the most beautiful, non-beige, non-tropical, house in all of Florida.
Here’s a good NY Times article about it, you get much better detail definition which is what did it for me. http://www.nytimes.com/2004/02/19/garden/trade-secrets-new-life-and-luster-for-ornate-radiators.html
Daniel, I just read the NY Times article that Arianna linked. Stripping the radiators is definitely the way to go! Among other reasons it mentions, near the end, that sandblasting doesn’t always remove all the paint, and can also damage the details on the cast iron. At least look into it …. please?
Sandblasting is not hard, you could easily do it yourself but I’d recommend ski goggles, a full mouth/nose mask and earmuffs. Not because it’s dangerous but because the sand will get everywhere (and I mean EVERYWHERE on your person). It’s also good to have a source of free sand (i.e a beach), as long as it is bone dry and you’ve sieved out the crap.
I’ve never sand blasted a radiator (they aren’t common in NZ) but it is hard to screw it up. Unlike sanding, stripping etc, it is very very difficult to damage the surface. And if you already own an air compressor (or need an excuse to buy one) a sandblaster attachment should only be US$150 (a good quality one is NZ$200 or so)
Good luck!
I wouldn’t have thought it possible to be so entertained by a post about radiators. Ramble on Daniel, ramble on.
I hope you never do video updates.
Something about the written word that is timeless and you have a gift.
Also, I’m hard of hearing and would be seriously bummed.
I have sandblasted! I actually know something! One of my friends in college bought an old horse trailer (we showed jumpers) and rented a sandblaster to remove all the paint so she could repaint it. It is hard, dirty work. You have to completely cover your entire body, like head to toe. Long sleeves, gloves, scarf, hoody, big goggle eye protectors…everything tight because sand will get everywhere. You also have to have alot of space because…sand will get everywhere. We did it out in the country in a field next to a barn, so it was fine. But, it is do-able. It’s like pressure washing on steroids. And that feeling you get when pressure washing and the beautiful gleaming surface below the gunk is magically revealed? It’s multiplied by 1000 when using the sandblaster and making paint just disappear off of metal. But what a mess. Water disappears. Sand does not. Also, potentially much more dangerous than the pressure washer, but we managed not to kill or skin each other. You can do it if you have a good space for it. Love your blog.
and now after reading a few of the comments I hope that my sandblasting experience 20+ years ago in college did not give me cancer. So far so good.
Man, somebody in the history of this house—maybe many somebodies?—was seriously addicted to caulk. Caulk on the radiators? Sheesh.
Just wanted to echo a few others and say I love posts like these, when you ramble on about something that I would normally find deadly dull (radiators?) and completely make me fall in love with it (radiators!) You are such a great writer.
Definitely hire out the ceilings. I’ve been working on my 1890s Vic for over six years. I’ve skim coated lots of walls and ceilings, and drywalled both. I’ve gotten to be good enough that pros give me compliments. Here’s the deal: ceilings are much, much harder to do. It’s very likely that even if your finishing looks pretty good on walls, it will all go to hell when you start working overhead. Mine certainly did.
So, what ends up happening is when you’re trying to finish, you discover that every joint that you didn’t hang perfectly (because even with a lift, drywall is heavy, and you were in a rush to get it done, and did I mention that you’ll need 5/8″ drywall for old joint spacing?) will make itself known by being very visible through your new joints. You’ll fight and fight with it, doing far more coats that a pro would, with arms and shoulders aching, cursing yourself for not just hiring someone to do it because it still looks like an amateur did it.
Not that I know anything about it, sigh.
I love your plumber. He sounds very agreeable. I have a good plumber, but he just talks politics all the time. Politics that I don’t agree with but can’t argue about when he’s got his arm down my toilet.
Ha! Sometimes Carl sends one of his guys who is super into, like, Rush Limbaugh and stuff. He tells me all about how Obama is a communist.
Oh man. My parents have a plumber they always call who does fantastic work, but who is convinced that if you use credit cards you are giving your information to the antichrist. And it’s not nice to argue when he’s halfway inside your kitchen cabinet fixing the drain.
Between sandblasting, floor refinishing and ceilings, I’d vote for at least the attachment of the dryeall on the ceilings to be done professionally. Drywall is revoltingly heavy, and all that shimming… yuck. Spend the sandblasting money on drywalling.
I’ve skim coated 1300 feet of ceilings to cover knockdown texture, and the skim coating is not all that bad, but you need your joints to be good, and that’s going to be so much harder for an amateur.
re the hallway radiator, if you were super cunning you’d move it over a tad and make a cover with slotted top for glove drying, and incorporate it into the landing zone. Provided you use the front door, that is. If it’s just fir visitors there won’t be any call for glove drying.
On the front radiator, and suggestions that you install covers: we were told last fall by an inspector (renting a rowhouse in DC) that radiator covers actually make the radiators work harder, and are less efficient. The location looks really nice now, but I have a suspicion putting the coats between the front door and the radiator now would make for some very cold coats in winter. Would it be too ugly to put in hooks where you want the radiator now, and have the radiator closest to the door? Keep the coats less drafty?
Not sure what this says about me, but I could read you rant about your house all day long and twice on Sundays. I just love it. Even more than boys, shopping, and the mall (as @Hommemaker would say).
Also, hire out dem ceilings. Save your energy for stuff that can happen without having your arms above your head and your neck craned for like 8 hours at a time.
Absolutely nothing to do with Daniel’s post but I have to say you have a really cool name :)
Congratulations. It feels like you’re making a huge amount of progress. Re Greek Revival woodwork — I think they used to faux paint real mahogany wood to look like fancier mahogany wood! Check out the doors at the Newburgh Historical Society, at least in the upper rooms — I think they got this treatment. Oh wait, Big Old Houses says it’s pine. Whatever they look amazing. http://bigoldhouses.blogspot.com/2012/09/a-fine-survivor-in-gritty-town.html
We just switched from gas heat to hot water radiant heat (wall and toekick radiators, not old school though) a few years ago and we love it. The heating design conventional wisdom that they told us when they were installing is that the vents/fans/heat spewers are installed on INTERIOR walls now so the heat has more time to stick around in the house and not go out the windows. We did lose some furniture placement flexibility. The toekick ones are awesome and you could build a bookcase around one and just have the vent at the bottom, for future radiator replacement reference. After looking the hole in the floor underneath the radiator I am looking forward to a post where you have used a snaky spy camera to see if all your heating sources are in the same tenuous situation.
“JK, I love hassle. My whole life is hassle, and finding ways to create more hassle. I thrive on it.” Love this post – you make shuffling radiators a fun read!
A little late to the game – I’ve been on vacation – but it was cool to read about your trim discovery. All of the trim in our house was ‘faux-fancied’ – so even though in pictures it looked like dark stained wood, it really wasn’t. It was just pine. That helped us make the leap to painting the trim, and I’m glad we did. Plus, the house had been rented out for years, and there were five zillion holes in every piece of trim. In the instances where you’ve had to pull off trim, what have the nails been like? I thought the nails were so cool on the first baseboard piece we removed – handmade, slightly triangular in shape with a sharp, wedged point. They lost their appeal quickly when I was tasked with removing those nails from hundreds of board feet of trim – the heads broke off almost every time, and I felt like I was playing some sadistic version of the game Operation. That task was probably my least favorite in the whole process.
I thoroughly enjoy the posts because of the similarities in our houses. We had no radiators though. On most of the historic renovation projects I’ve worked on we’ve had the radiators dipped and that worked well. Good luck!
Phew! I woke up this morning and the first thing I did was bust out my iPad and finish reading everything you have written about this house. I’m a little sad that I can’t binge read your posts anymore but I’m happy to be caught up! Congratulations on all of the love and hard work you have put in. It really shows and it will feel that much better when you are done!
XO
You should totally frame a piece of that wallpaper to remind you what was “behind the wall” and preserve that little piece of history. It’s so pretty!
“How’s that going? Shut your goddamned mouth. That’s how” … laughing (and empathising) in Limerick, Ireland. Thanks as always Daniel.
Hi Daniel,
I have a question. We’ve moved from a super dry climate to East Coast, bought a house in Albany built in 1947 that has been vacant for 6 years. We’ve been working on some updates although since we had to move into the house without an option of waiting out until it is done and no budget to have it fixed by someone other than us, we’ve (us, 3 kids and a dog) lived through some pretty gross situations. We got it for half of going price around here but the house was never finished. Now that the house is livable- new gutted bathrooms, redone kitchen with original repainted metal cabinets, few new bedrooms upstairs, new windows, roof, heating etc, there is this terrible problem of all old houses out here where the humidity is high – the smell. Some rooms like dining room that we had only repainted is unbearable, same with living room – it could be the old windowsills that have never been repainted or floors that were polished and waxed but not varnished or built in shelves or the fireplace? Do you have a problem like that at your house? How do you get rid of the smell? This is really a big deal for me, I have a sensitive nose and migraines and although living in a nice brick house with character is a neat thing the smell at times is so overbearing that makes me question our choices and be bitchy more than I want to be. Thank you and good luck with your amazing work. Sitora
Oh no, I’m sorry to hear about that, Sitora!
Fortunately, we don’t really have that problem in our house. Our basement tends to get a little damp when it rains heavily in the summer months, but that’s about it. The solution that’s been recommended to us is to get a good dehumidifier, ideally attached to a pump that can empty it directly into the sewer system (otherwise we’d have to empty it every couple of days, more than likely). For some reason the issue was worse last summer, so I sort of forgot about it until now!
I know this is probably the last thing you want to hear, but what you’re describing sounds like cause for concern to me. If the smell is that strong, it sounds like a huge red flag for a serious moisture issue and, likely, mold. A powerful dehumidifier (or a few) would probably help, but it sounds to me like you might need to get an expert out to see if there’s an issue with waterproofing around the foundation, the way your downspouts are directing water, that kind of thing. It may actually be an easy fix, but you really want to address a mold issue ASAP—it’s a health hazard and, left unchecked, will keep getting worse (and ultimately you may end up having to rip out areas of your home you’ve already redone!). Unfortunately that’s all I can really tell you from here”¦I’m far from an expert on stuff like this and I haven’t seen/smelled the situation, but that’s my impression! Good luck!!
Great to see your progress, but what’s much better is, that I can finally see some REAL stuff around home improvement so I don’t feel like I’m the only one whose rooms look like these in your post instead of showing only the final result like this (well, maybe this is not the right example but I’m so tired of searching for some design inspiration and see all those flawless Scandinavian-modern-traditional-minimalistic-whatever houses that I don’t care…) On the other hand, I’m also tired of having such a mess and spending almost all my free time with working on my future “shelter” and hoping that one day it will be finished so I totally understand your frustration…
I love that old wallpaper. Beautiful. And holy shit, pushing those radiators around by yourself. I have funny mental pictures LOL.