
This post is a paid partnership with Lowe’s! Thank you for supporting my sponsors!
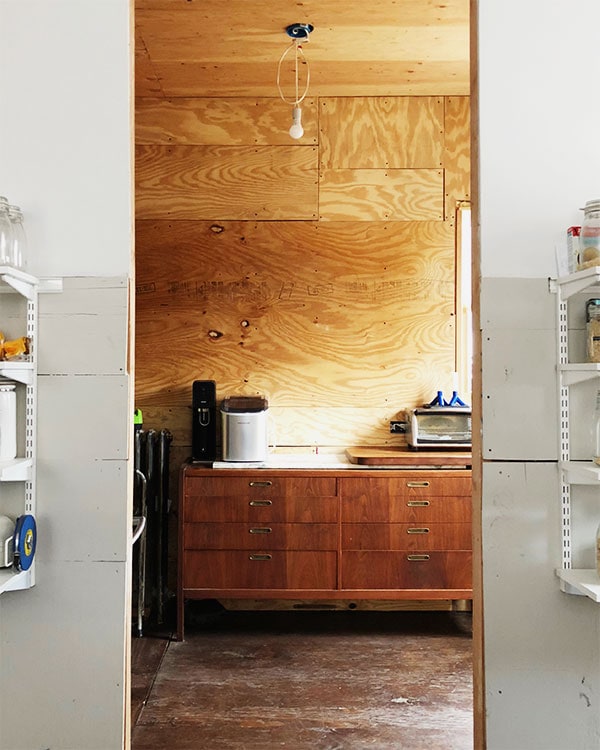
Let’s build some cabinets for my pantry! If you read my last post about the progress in the back of the house, you know what we’re starting with. A plywood box in need of ALL the finishing work!
Here’s the thing. As much as I love to learn new things, I’d always been a little overwhelmed when reading about building cabinetry. I’ve looked into it. I bought one of those books on display by the Lowe’s Pro Services desk a few years ago. Exhibit A:
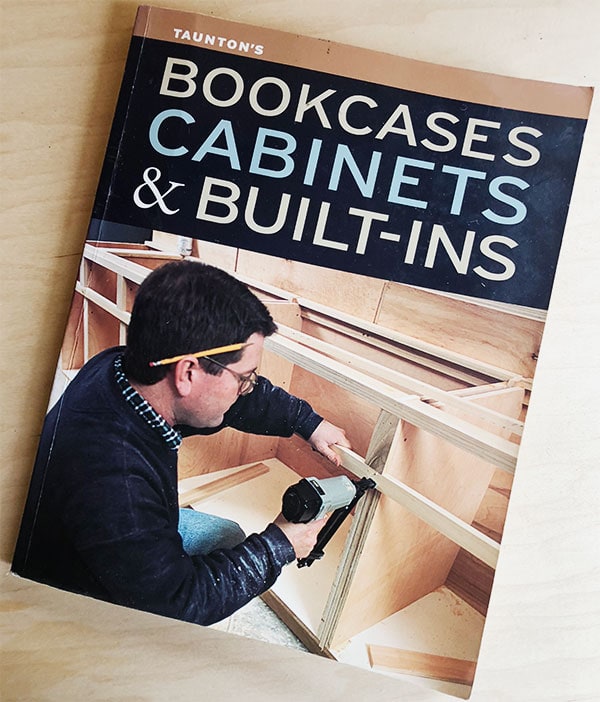
Once in a while I will look at this book and quickly become overwhelmed. Building cabinetry feels like that fine line where DIY becomes…woodworking. As in, I am a woodworker. I feel like a special kind of person gets to say that, and I am not that person.
Added to this, there are SO. MANY. WAYS. to build cabinets. Cabinets that look more or less the same can be constructed completely differently, from the materials to the way the joinery is accomplished to the construction of the shelves, doors, face frames, drawers, and on and on. Most of it looked really hard. Like, too hard. I have neither the tools, the skills, or the shop space for a lot of it. But then—enter the butler’s pantry, stage left. It really calls for custom, because the sizes are weird and I want it to look old. So I decided to brush off the fear and get to work devising a way to accomplish my cabinetry goals THE EASY WAY. Crawl before you can run, right? So I consulted various tutorials and how-to’s, and then combined them to form a process that felt achievable given my limitations.
OH RIGHT, I HAVE LIMITATIONS! For instance:
Number 1: I herniated a disc in my back, causing super intense sciatica! The physical pain of this is matched only by the psychological pain of knowing that my body has begun to degrade, and soon I will be dead. But more pertinent to this project is that lifting heavy things was a no-go, and I couldn’t be going up and down a million stairs. I had to keep it light, and my work within a limited amount of space.
Number 2: I have to transport plywood in a regular car, because I was too dumb to buy a pick-up.
Number 3: I don’t have a nice big shop space or an enormous variety of tools. I have some tools. But not all the tools.
So! You know what we’re dealing with. Let’s get into it.
STEP 1: PICK A STYLE!
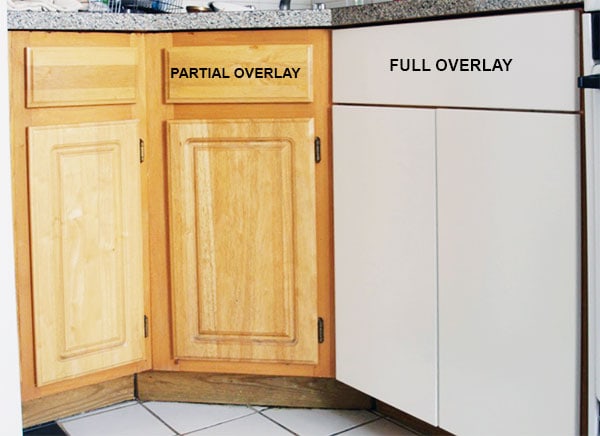
I assault you with this bummer picture from my old Brooklyn kitchen because it conveniently contains both of the most common styles: full overlay and partial overlay. Full overlay is where the doors cover the entire face of the cabinet—it’s what we probably see (at least in blogworld?) most in new kitchens. These are simple to assemble because they don’t have a face-frame, work well with soft-close hinges, and maximize interior space. These cabinets often come flat-packed and ready to assemble.
Partial-overlay style is a bit different: there’s a face frame and a door that covers part of it, leaving part of it visible. The backside of the door is typically rabbeted to fit within the rough opening created by the face frame. These are usually pre-assembled, ready to install, and inexpensive.
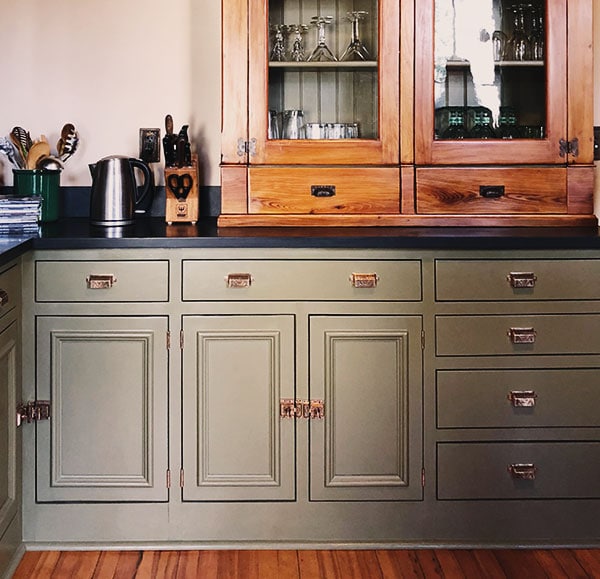
The third is the inset style, which is has a face-frame and doors and drawer fronts that sit flush with it. This example comes courtesy of some friends of mine in Kingston restoring a Victorian—how gorgeous, right? This is the style we probably associate most with pre-war cabinetry, or all those fancy trendy British kitchens from the likes of DeVol and Plain English. Nowadays it’s almost entirely reserved for custom cabinetry, at least in the States, which of course is the most expensive option, requires the most precision to build, and of course is exactly what I wanted! We’ll be building this style.
STEP 2: MATERIALS SELECTION!
A mistake I often see in the DIY world is getting the wrong materials—for instance, using 3/4″ plywood intended for subfloors where a paint or stain-grade surface is desired. Don’t do that! Luckily, there are multiple engineered options that are appropriate, including cabinet-grade plywood, MDF, MDF-core plywood, and particleboard-core plywood, to name a few! I prefer a good cabinet-grade plywood myself (it’s strong, stable, holds screws well, and is pretty easy to work with), so I selected this 3/4″ maple plywood from Lowe’s for my cabinet boxes—or the carcases, or the carcasses, if you want to get fancy. I’ve gone on a deep dive into the correct spelling and it appears carcase and carcass are both correct. Carcass is certainly the most fun to say over and over again, so we’ll go with that.
STEP 3: CUT LIST! AND IN-STORE CUTTING.
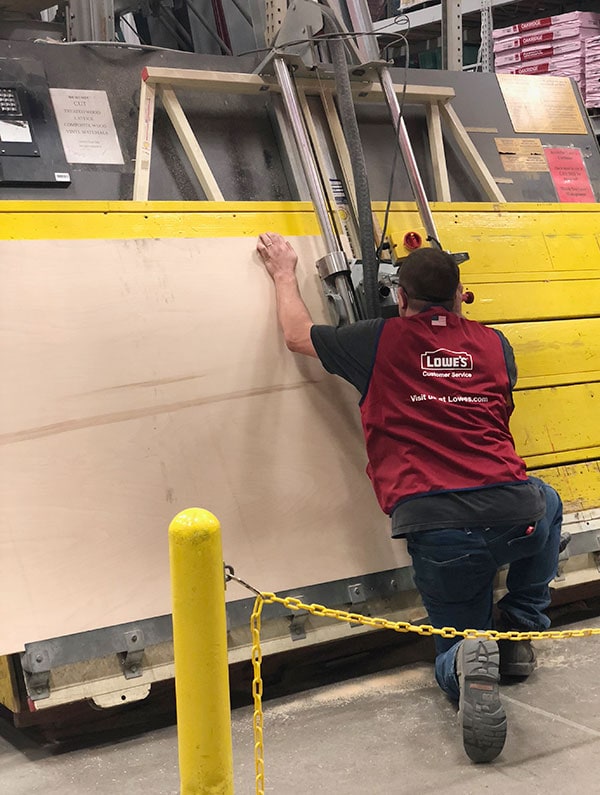
Prior to going to the store, I spent some time figuring out all of the individual pieces I’d need for the sides, tops, bottoms, and shelves of each cabinet. Using that cut list, I diagrammed the rip cuts needed for each sheet of plywood so that a store associate could take care of the bigger cuts for me. If you’re working alone, it can be very difficult and/or unsafe to manhandle a full sheet of plywood onto a table saw (it’s better to cross-cut into a more manageable size with a circular saw first) so this made the individual pieces easier to lift with my decrepit back and my impractical car, and the whole job easier. All in all, I needed 7 sheets of plywood, which left most of a sheet leftover for mistakes, extra shelves, or my next plywood project!
I like to give the store associate measurements a bit larger than I actually need, as I’ll refine them to exact dimensions at home. Their cuts tend to be a little inconsistent, and you may end up with pretty eaten up veneer along the cuts if the store hasn’t changed the saw blade recently.
STEP 4: PRIME!
Once home, it’s a good idea to pre-prime your panels. You may only need to do one side if the exterior of your cabinets won’t be visible. I skipped this, but it could save some time later on.
STEP 5: CUT YOUR PIECES TO EXACT SIZE!

Once home, it’s easy to run the pieces one after the other through my table saw, producing the identical, consistent pieces I need for construction. Label all your pieces with a pencil. I’ve had this Porter Cable table saw from Lowe’s for a number of years, by the way, and it’s been great even with heavy use and abuse. It doesn’t appear to still be available, although this Rockwell one looks to be very similar.
No table saw? No worries! Two products you might want to know about: the Kreg Rip-Cut and the Kreg Accu-Cut, both available at Lowe’s. They’re very similar products, although the Accu-Cut is likely a better value because it handles cuts up to 48″ rather than the 24″ limitation of the Rip-Cut. All you need is a circular saw (a lot cheaper and easier to store than a table saw!), and you’re off! I love it because if I need to be mobile for a job, I don’t have to lug a table saw around. I have an older version of this Hitachi circular saw, although I’d probably go cordless if I were buying new!
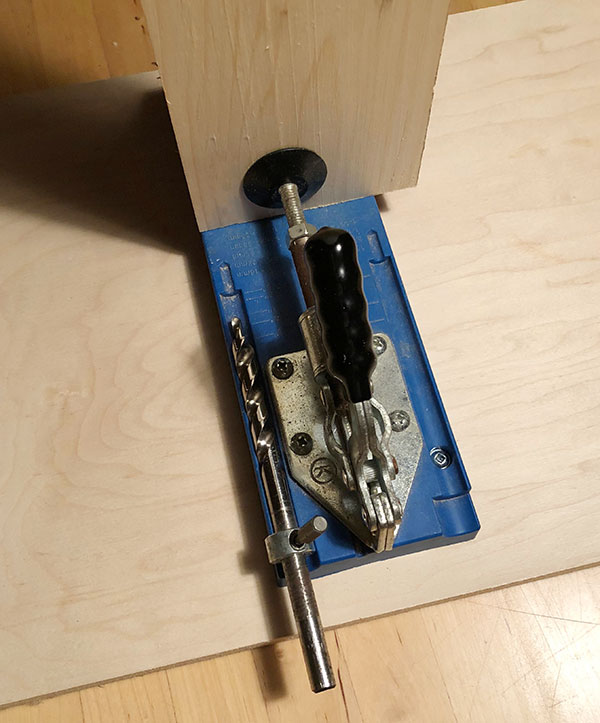
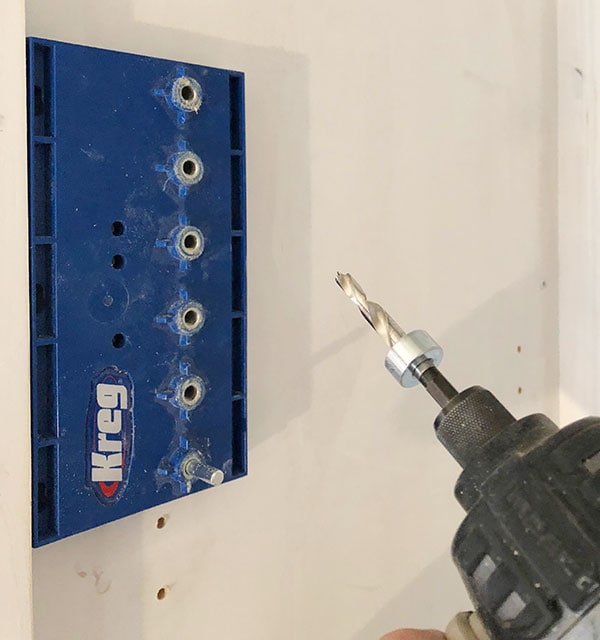
STEP 5: DRILL YOUR SHELF PIN HOLES
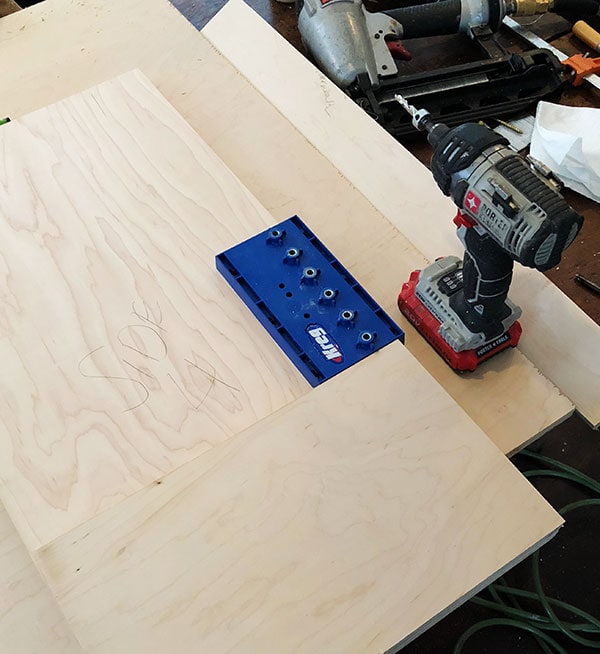
If you want adjustable shelves in your finished cabinets (highly recommended!), now is a good time to drill out the holes for the shelf pins! This might sound difficult. I promise it is not with the Kreg Adjustable Shelf Pin Drilling Jig. This thing makes it SO simple—using a special drill bit that will stop at the exact right depth with perfect spacing. I used an off-cut piece of plywood as a guide to where I should start drilling my pin holes—you generally don’t need a shelf to adjust lower than about a foot above the bottom of the cabinet, but of course you can customize to your heart’s content. The jig is designed to work equally well whether you drill the holes before assembly, or want to retrofit them into an existing and/or already assembled cabinet (hello, easy upgrade to cabinets with fixed shelves!). It’s a great little tool.
STEP 6: ASSEMBLE THE CARCASSES! (also the title of my memoir)
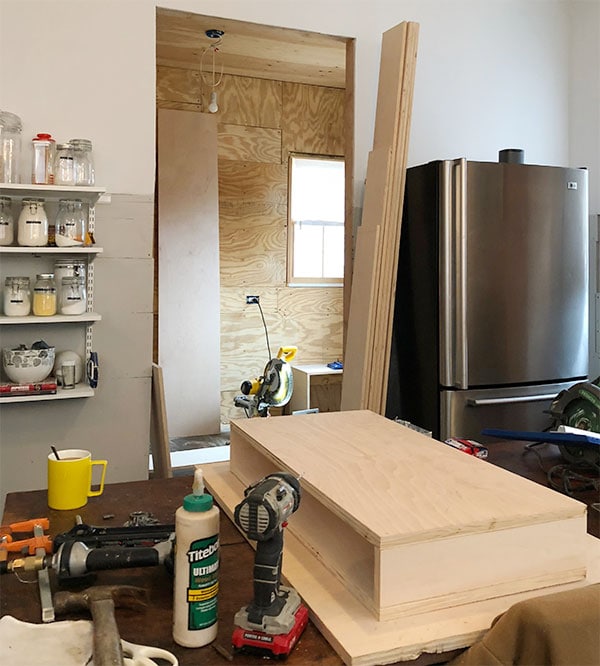
Like I said—a million ways to do it, and I chose the easiest of the easy. One of the guys in the book said it was OK so I ran with it. While I could have built a few really big cabinets rather than 11 individual carcasses, I also needed to be able to work in the limited space of my kitchen and be able to move the carcasses around by myself. So. READY FOR THIS? It’s literally just making a box. You can make a box. I can make a box. Boxes for all! Even within this so-easy-I-hesitate-to-call-it-a-method, you have lots of options for exactly how to do it. I’ve seen a lot of people use the Kreg pocket screw system for this, but I think this way is easier and just as good if you don’t really need hidden fasteners.
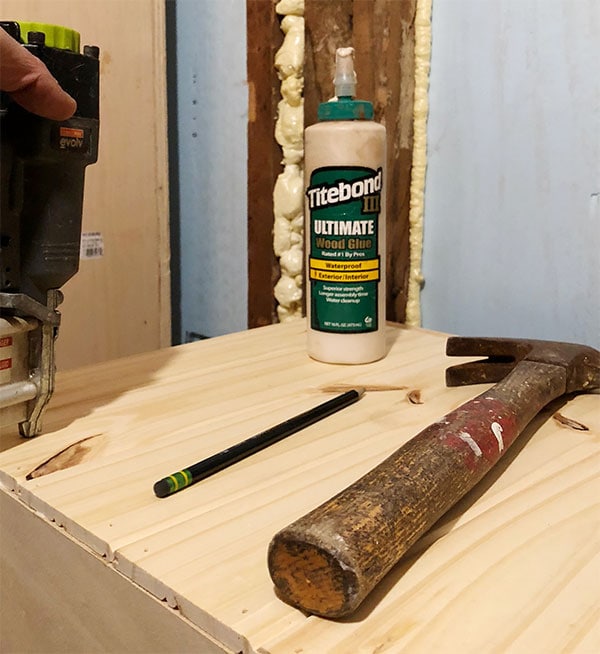
First, apply wood glue to the edges of plywood where joints will be. Be generous!
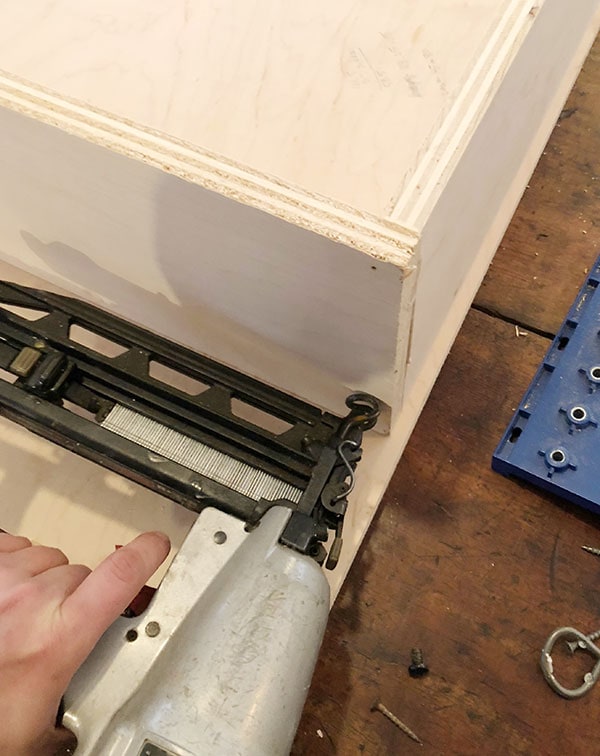
Using a finish or brad nailer fitted with nails around 1.25″ (you could adjust up or down if you have something else around, just as long as it’s at least 1″), tack your joints together. Maybe 2-3 nails on each joint. These are JUST to keep things in place temporarily while you construct your box. A pneumatic gun (mine is no longer available, but this one is similar!) is extremely easy to use and control, and quite precise, so you can keep things aligned properly with one hand and fasten with the other. Use a carpenter’s square to check for squareness.
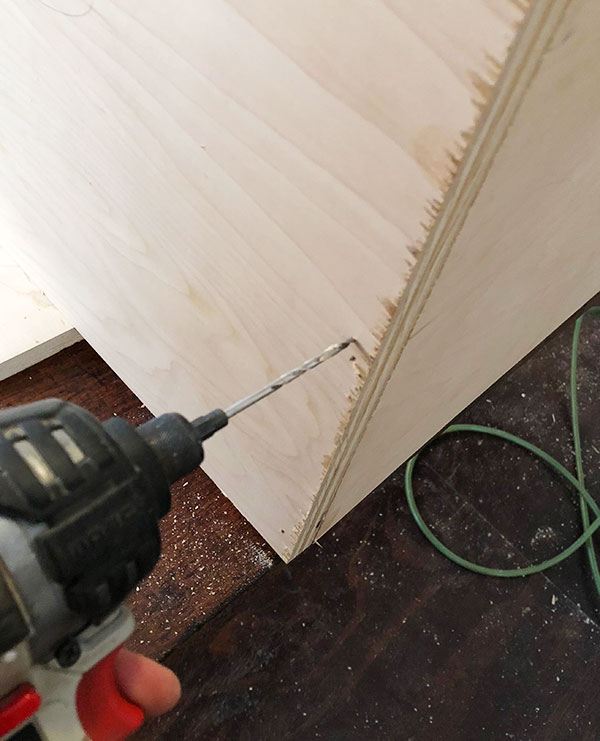
With the box assembled with glue and nails, use a 1/8″ drill bit to pre-drill a few holes along the joints, where you just nailed. Aim for every 8″ or so—you don’t have to be super exact.
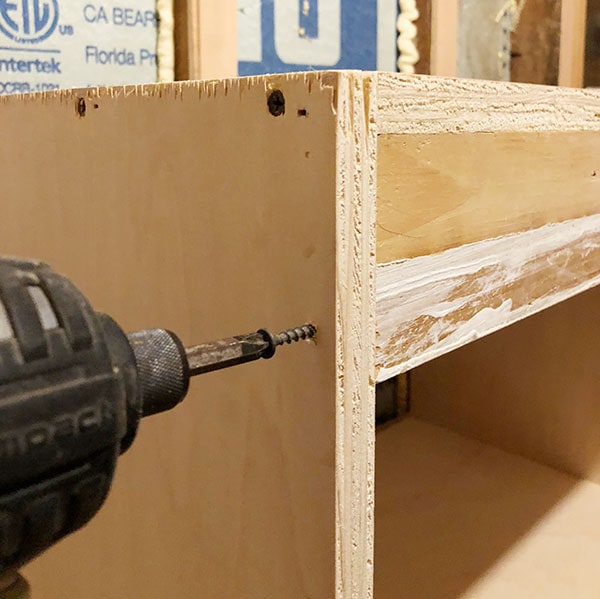
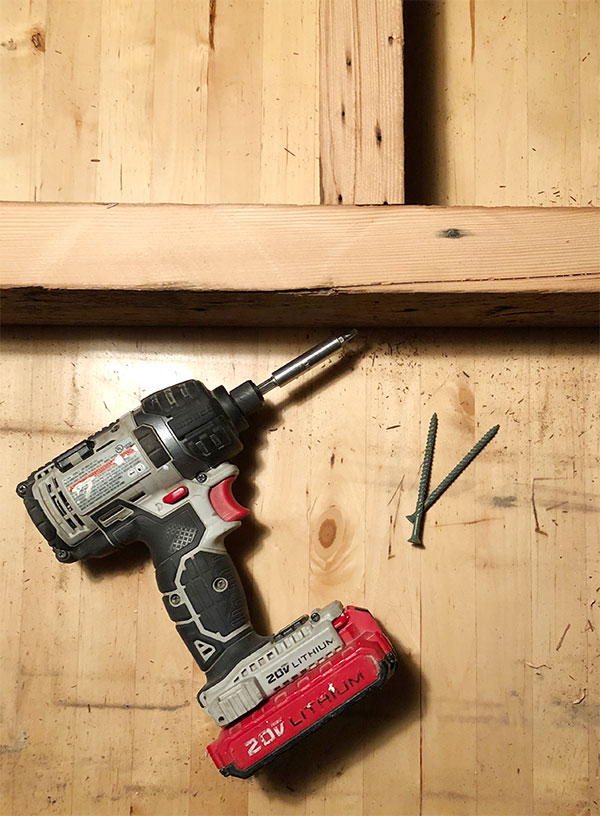
Using 1.5″ (again, you can adjust a little up or down—I have an enormous container of miscellaneous screws I mined for this special occasion!) #8 coarse-thread drywall screws, drive screws into your pre-drilled holes. You should be able to feel them catch and they will easily sink below the outer layer of veneer. If they don’t, swap for a longer screw and try again. You may notice the joints tighten a bit, squeezing glue out of the joint.
I love drywall screws for this. They’re very strong, very cheap, and don’t tend to strip like a wood screw does. Coarse thread is the key!
Using a damp cloth, wipe away any excess glue. Remember to check again in a few minutes to see if glue is dripping or pooling anywhere.
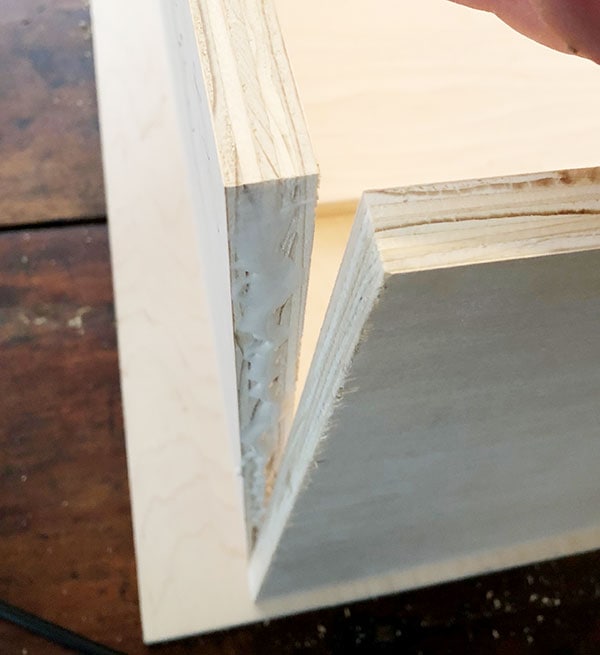
STEP 7: DRY FIT!
With the carcasses assembled, I did a dry fit just to make sure I hadn’t really screwed anything up. All good!
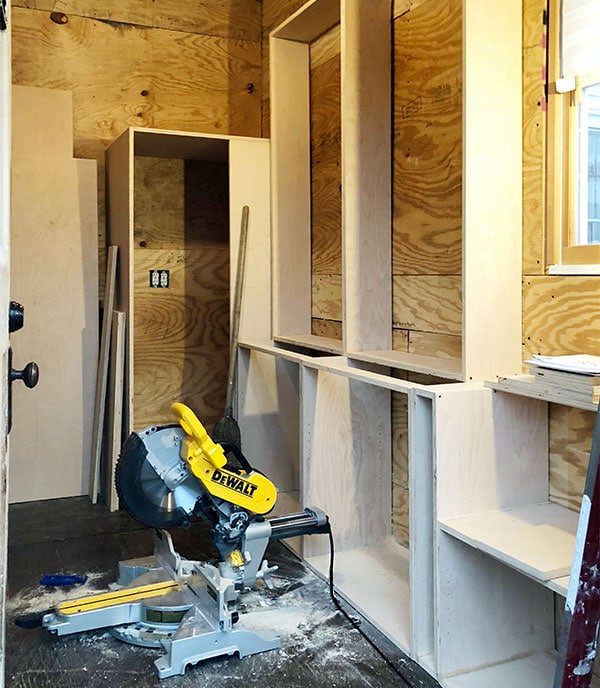
If I may, for a second. My new chop saw. It’s awesome. I really needed a new chop saw, and then mine broke, and then I really needed a new chop saw, and I (Lowe’s) stepped it all the way up with the DeWalt 12-in sliding compound miter saw, and it is a DREAM. I’ve never had a chop saw this large or powerful, but I’ve worked with them, and making larger cuts makes a huge difference particularly on miters. Even at 90 degrees, my busted chop saw made a crosscut of less than 6″, and this one can cut 14″! This was so helpful for parts of the frames, shelves, face-frames—oh man I’m so glad to have it. Now it needs a shop space to live in! I do have to transport tools around kind of a lot, though, so while this is overkill for a small job, it’s also not so bad to close down and throw in the trunk, weighing in at 56 pounds. I’ll stop going on about my new toy now; thank you for indulging me. Let me know if you have questions.
STEP 8: ASSEMBLE THE BACKING!
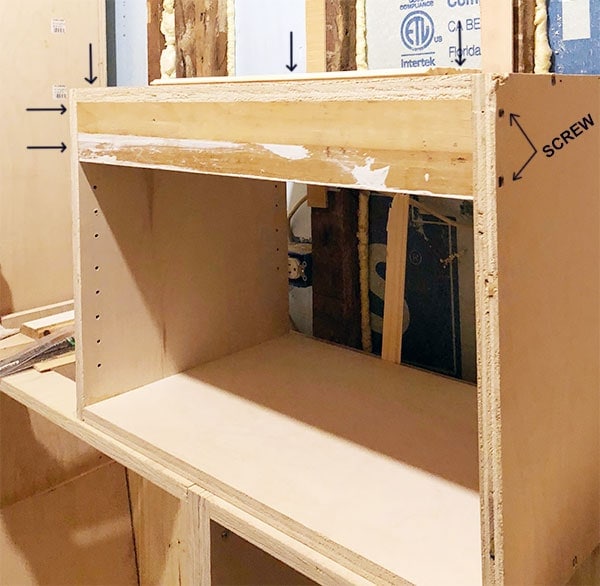
At the top of each cabinet in the back, I used a piece of 1×3 cut to the interior width of the carcass, glued/nailed/screwed from the sides and the top, just like the rest of the box. This helps keep the box square, and also provides a really easy way to hang the cabinets by just screwing that piece to the wall/framing members. For extra long cabinets, you may want to add an identical piece to the bottom and perhaps the middle. This is a great situation to use wood from the scrap pile. Renovation consumes so many materials and produces so much waste as it is, and it saves so much money when I can just run to the garage instead of to the store!

I chose traditional 2″ beadboard backing for my cabinets—one of those good old Victorian standbys that are, luckily, still readily available and affordable! For an even more affordable, simple solution, beaded plywood and beaded MDF made to mimic this is available, too! Personally I like the imperfections of using the real deal, but hey—you got options! You could also totally use 1/4″ or 1/2″ plywood for the backing which would be even easier. I think 1/4″ is more typical, but an actual woodworker friend of mine told me that he uses 1/2″—and builds his carcasses almost exactly like this, which made me feel very validated.
This beadboard from Lowe’s is sold in packs of 6 (covering about 14 square feet per pack), in either 8′ lengths or 32″, which is so convenient if you’re doing wainscoting under a chair rail! The quality is so-so—there tend to be a lot of knots, and it would be a good idea to pre-prime every board, which I skipped due to lack of self-control. I’m fine with painting it but I wouldn’t really consider it stain-grade, personally.
With your boards cut to size, apply wood glue around all the back edges of the carcass and secure the beadboard. I used 3/4″ brad nails (I have an old Craftsman brad nailer probably a lot like this one I bought forever ago that’s still going strong!), and because you’re fastening to the back of the carcass you can just face-nail the boards at the top and bottom rather than nail through the tongue as usual. The beadboard is only 5/16″ thick and very lightweight, so you don’t need to go nuts—a pneumatic stapler would likely do the trick, too. Glue and some brads—it’s like a craft project! Funsies!
You may need to rip the last piece to size, of course. The beadboard goes super fast. It’s very satisfying.
STEP 9: MAKE THE BASES!
Modern standard base cabinets have a 30-31″ high frame and a 4-5″ base to make the total height 36″ when accounting for the thickness of the countertop. I’m building mine to a finished height of 34″, simply because I can.
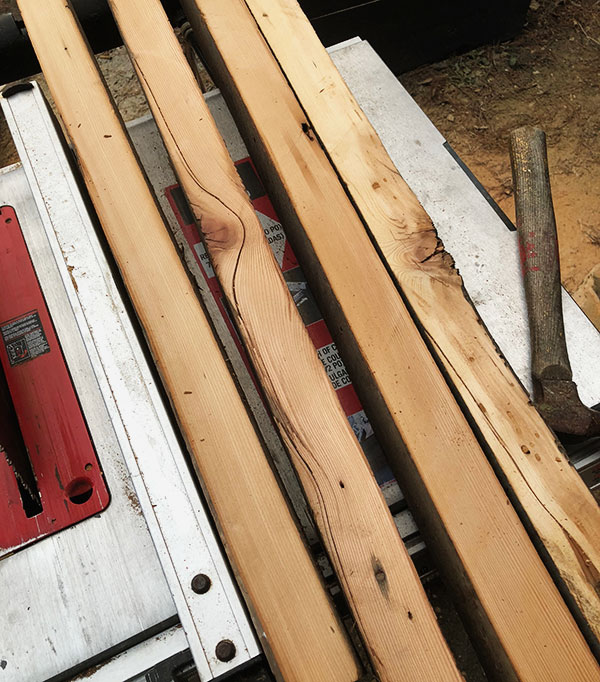
To assemble the bases, framing lumber is inexpensive and provides a nice stable base. Because I’m basically drowning in salvaged lumber from the house, I took the opportunity to yank some old studs out of the basement and use those. To account for uneven widths, I ripped them each on the table saw down to 3.5″—the actual measurement of the 4 in 2×4. Obviously skip this if you’re all FANCY and have brand new 2x4s like some kind of ARISTOCRAT.
I assembled the bases in 3 sections to make them easy to maneuver, and then screwed them together and to the walls once in place, shimming to account for the out-of-level floor. I used 3.5″ deck screws for the frames because I had them.
STEP 10: INSTALL THE BASE CABINETS
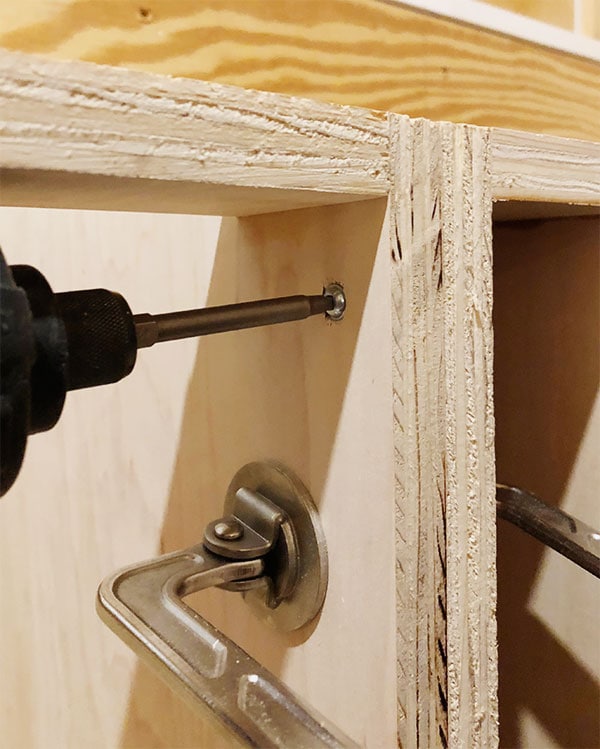
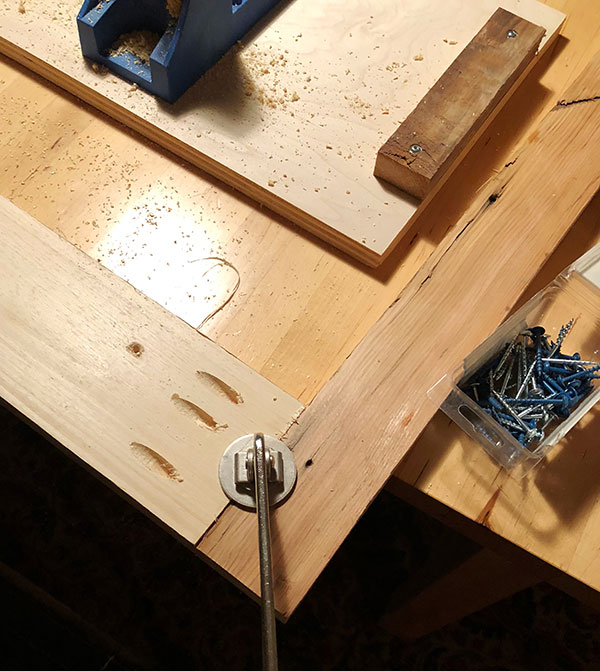
Set the carcasses on the bases and attach them to each other, using a set of Kreg clamps to keep the faces flush and caracasses level with each other. I used 1.25″ Kreg coarse-thread screws to fasten them together at the front and back of the frames—three in the front and three in the back. Keeping the screw toward the front of the frame will keep them out of sight once the face frame is installed.
I discovered that my room was hugely out of square, so I also had shim the backs of the base cabinets as I went along so that the finished floor space would be square. I have big tile ambitions that will require squareness. With shims in place, I fastened the cabinets to the wall through that top rail with drywall screws.
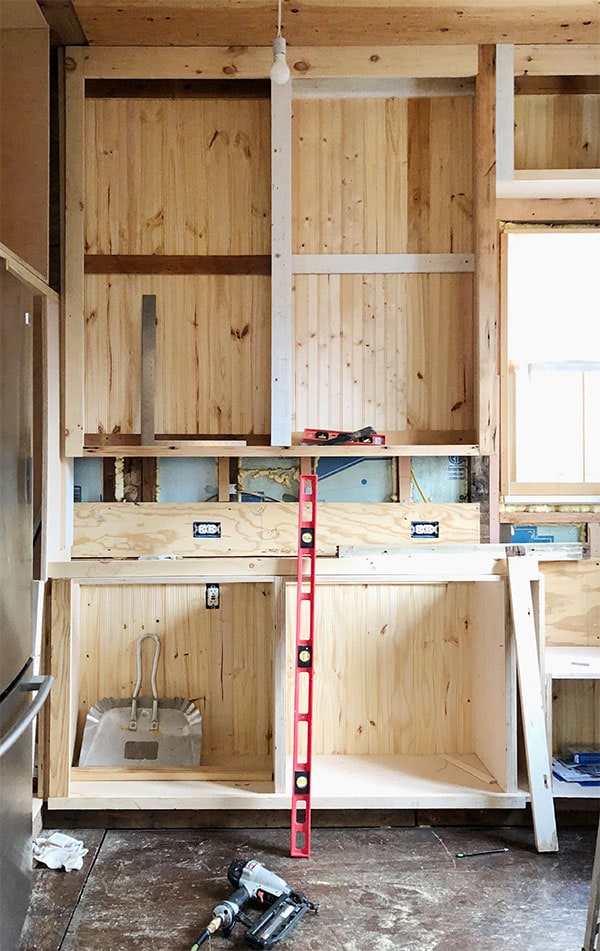
STEP 11: INSTALL THE UPPERS!

The uppers were physically more difficult to hang, but the plywood walls really helped here because I could shoot a few finish nails through the hanging rails to hold the cabinets in place briefly. The finish nails allow some flex, so it was easier to fasten the cabinets together with their frames nice and flush before screwing them securely into the wall.
So, see that big crazy gap at the top between the two tall cabinets? I MESSED UP. MY CABINET WAS NOT SQUARE. ALWAYS CHECK FOR SQUARE, DUMMY. Me, not you. You’re smart. You always check for square.
I decided to hang it anyway. The gap will get covered by the face frame, and I didn’t drill the shelf pin holes yet, so the shelves would still be level. I’m not necessarily endorsing it, but it’s the choice I made. These are the moments (some projects have a lot of these moments) where I like to claim wabi-sabi. Do you know about wabi-sabi? It’s Japanese. It has to do with the beauty of imperfection. Bloggers really liked to talk about it a few years ago. I say it jokingly to excuse my flaws. I think it’s endlessly funny; mostly it’s very annoying. But. I do it anyway.
Now we can move on and not speak of it again. Even at this early stage, I have to say—the room feels HUGE! It’s bigger than a Manhattan kitchen! It’s more cabinets than in my current kitchen! Tools like SketchUp are great and all, but they aren’t nearly as fun as the real thing.
Also, hi Mekko. Smooth photobomb.
STEP 12: ASSEMBLE THE FACE FRAMES
I have seen lots of old cabinets. I have seen a lot of varying face frame dimensions, which is sort of liberating, but you want to be mindful of keeping good proportions. In this case, I consulted the 1920s built-ins in the other room and landed on a really bulky face-frame. On the lowers, the verticals are 2.5″ wide and the top rail is 2″, and all the wood is a full inch thick, otherwise known as 5/4″ lumber (as opposed to 1x, which is actually 3/4″ thick). The 3/4″ vs. 1″ difference is, admittedly, a small thing, but I prefer 1″ in a lot of cases for old house stuff. The thinner modern 3/4″ boards just don’t look the same! 3/4″ boards are much more readily available, though, and ideally you want to be working with good, straight and knot-free lumber—poplar is nice for a painted finish, clear pine, or even oak for a stain-grade or just a very snazzy cabinet.
For this, too, I used salvaged wood. This was a pain but I did it anyway, because I have a thing for overcomplicating and I like using up my supply so I feel less nuts. Because the wood was a rag-tag pile of old, old-ish, and kinda-new-but-not-new-new, I had to run it all through the planer to get it to even thicknesses—essential for face frames. With new wood, you’re probably safe to skip this step.
There are multiple ways to go about a face frame, so I thought I’d try two of them. The first way is to pre-assembled it using some kind of joinery—in this case, the Kreg pocket hole system, which is easy to use and people love. From there, you can glue and face-nail to the carcasses, or attach it with pocket screws pre-drilled into the outside of the carcasses. I like the glue and face-nail approach because it’s easy.
Part of the goal here is to make the cabinets appear as one substantial unit rather than individual boxes, so a pre-assembled face frame can get rather large and unwieldy—getting the one for the two big uppers into position was actually kind of difficult, and I felt like maybe this approach wasn’t worth it.
So for the rest of the cabinets, I assembled the face-frames piece by piece, glueing and nailing them directly to the carcasses, being careful to maintain evenly sized (AND SQUARE) openings for the doors. With bulky stiles like this, you could also opt to make the carcasses a little smaller and use spacers between them, so that the face-frame only overlaps the interior of the cabinet by about a 1/4″. For a soft-close hidden hinge, that would definitely be the better approach, but my hinges will be attached to the face frame itself so it doesn’t really matter. I decided I’d rather keep the interior space in the cabinets.
If that top rail of the face frame up at the ceiling looks a little bulky, by the way, it’s because part of it will be covered with a simple crown—this one, I think!
The bottom rail, where the cabinet meets the floor, is going to be flush with the face-frames (like in my friend’s kitchen!), but I think it will be better to install that once the flooring is in, so I’m holding off. I’ll have to shim out the 2×4 bases for that, which isn’t such a big deal. Ideally they would be the same depth as the carcass already but I didn’t realize how far I’d be shimming the cabinets to make the room square. I’ll also finish off the big cabinet next to the fridge once the countertop goes in—I have to decide whether I want the backsplash to wrap the sides or just be more painted wood. Decisions!
STEP 13: BUILD AND INSTALL THE SHELVES!
I found it pretty equally easy to drill the shelf pin holes before assembly and after, but I think I prefer to do it after because seeing the cabinets installed gives me a better sense of where I’ll actually want adjustable shelving. Since the Kreg shelf pin drilling jig is only 6 holes, they include that chrome piece you see in the bottom hole, which allows you to just move the jig up, insert that pin into the top hole of the line you just drilled, and drill 5 more. And so on! Perfect spacing!
To construct the shelves, you can make this easy or you can make this complicated. I chose both.
One approach: For the tall upper cabinets, I planned for glass doors so it matters more what the shelves look like—and again, 3/4″ thickness just looks too flimsy for my pain-in-the-butt tastes. To save some time and energy, I bought pine stair treads, which are a full inch thick, from Lowe’s and just cut them to size, keeping the bullnose for the front-facing edge.
Another approach: Use regular 1x lumber for shallower shelves.
Another approach: Cut 3/4″ plywood to size and use iron-on edge banding to finish off the front edge. Stain or paint.
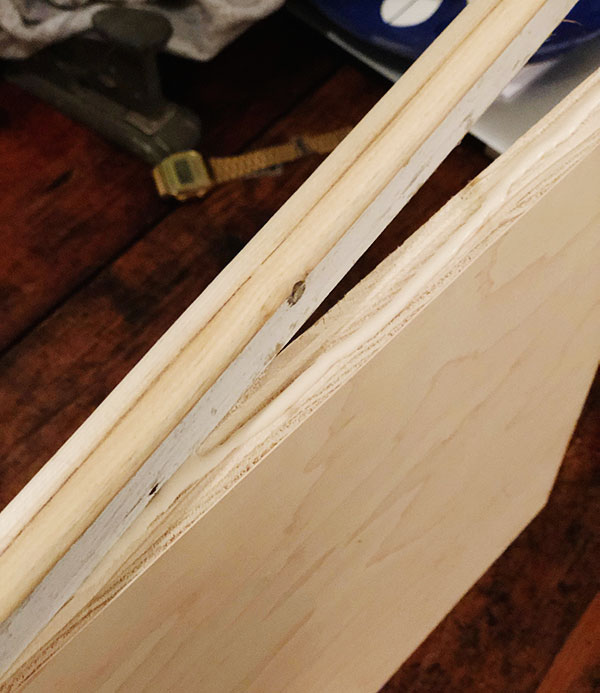
Another approach (above): Cut 3/4″ plywood to 1″ shy of your desired depth, and then glue and face-nail a bullnosed piece of 1x OR 5/4″ to the front. Using 5/4″ will give the illusion of a thicker shelf, but make sure it doesn’t interfere with your shelf pins. I made the bullnose on my router table using a 1/2″ roundover bit. You could also just use a regular square piece of trim to fake the thickness, too, if the bullnose lifestyle isn’t for you.
STEP 14: PRIME, SAND, AND PREP FOR FILLER AND CAULK!
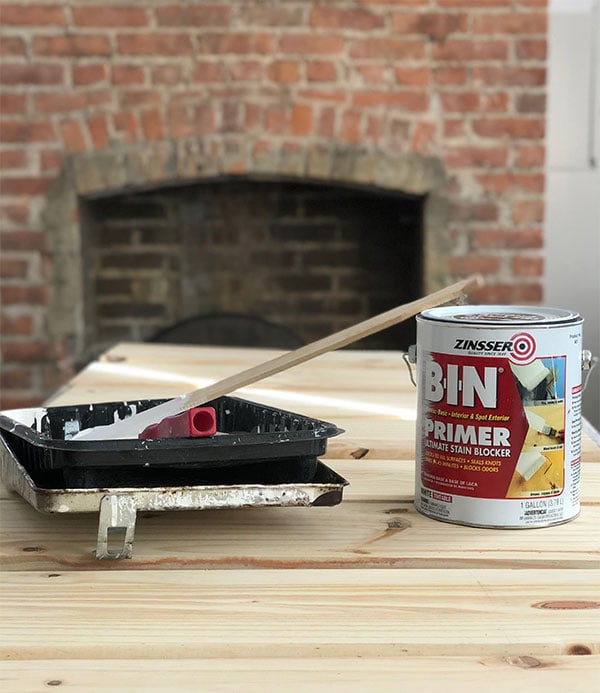
Because I was exceedingly lazy about pre-priming, I had to prime everything once assembled. There are a LOT of knots between the beadboard, the stair-treads-turned-shelves, and even the face-frames, so I opted to just prime EVERYTHING with Zinsser’s Shellac-base primer. I love this stuff. I find shellac primer by far the most effective for blocking bleed-through from the knots, and it goes on thin and dries VERY VERY fast, meaning I can get a lot done in a short period.
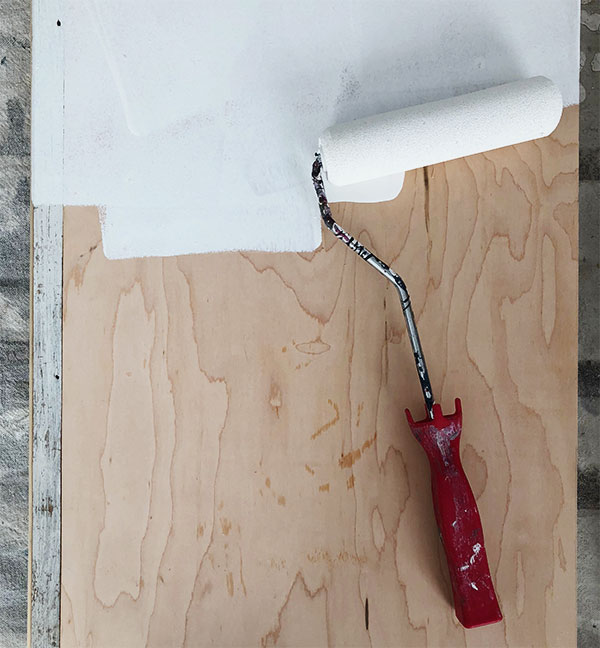
I like to prime and then give everything a light sanding—this, I think, is the key to a slick paint job. You know how sometimes, you can sand and sand and sand and the wood is still kind of…fuzzy? This takes care of that problem, because the primer will basically bind and harden all of the texture and fuzzies softer woods like pine have before painting, and then a light sanding takes it all off and leaves you with a silky smooth surface to accept your finish paint. It’s also best to pre-prime before applying caulk or fillers—both will hold up better when applied to a primed surface rather than raw wood.
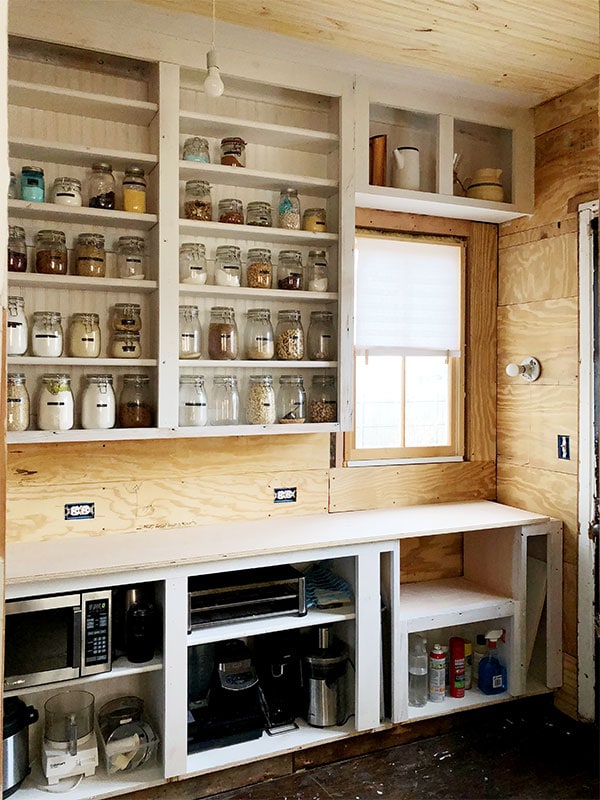
Also. I really want to have the sink/countertop in before I commit to the tile and/or the paint color for the cabinets, but I can’t possibly be expected to live with all these empty cabinets until that comes to pass. GIMME THAT STORAGE. There’s also no reason I need the doors installed right now, except that they would help keep the interior contents of the cabinets from gathering dust. But having everything primed at least means it’s all easy to wipe down in the meantime!
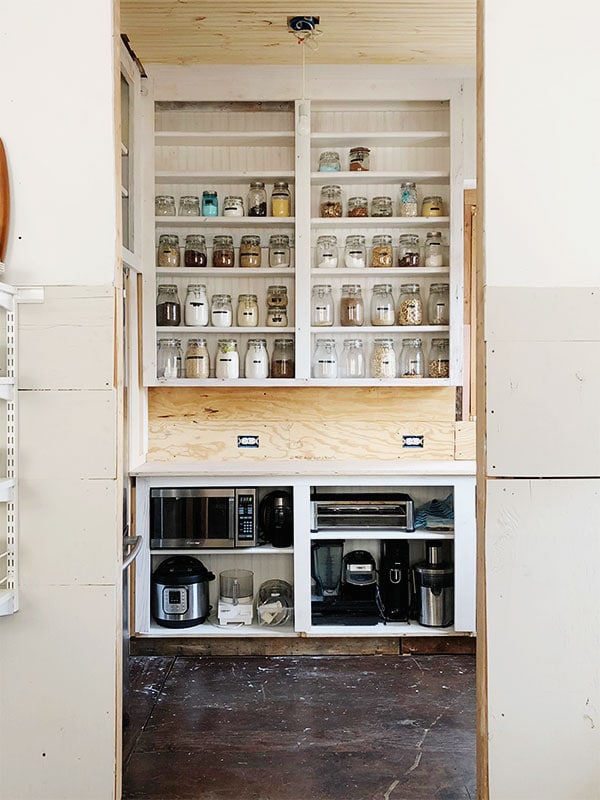
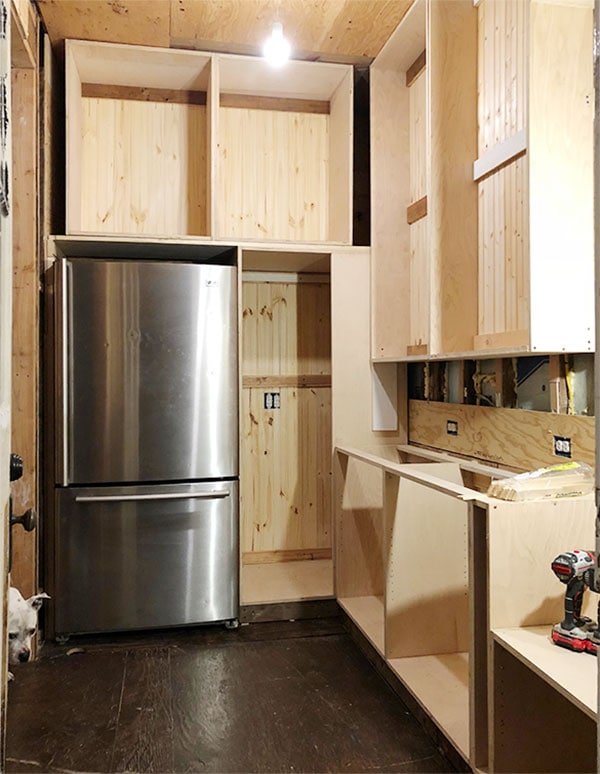
OBVIOUSLY AND VERY CLEARLY there’s still a ways to go with this room, but it’s still going to be quite a process for all the elements to really come together. But can you…see it?! I’m SO HAPPY. For the first time in YEARS I’m able to have all the kitchen stuff IN THE KITCHEN PART OF THE HOUSE and it just feels so very civilized.

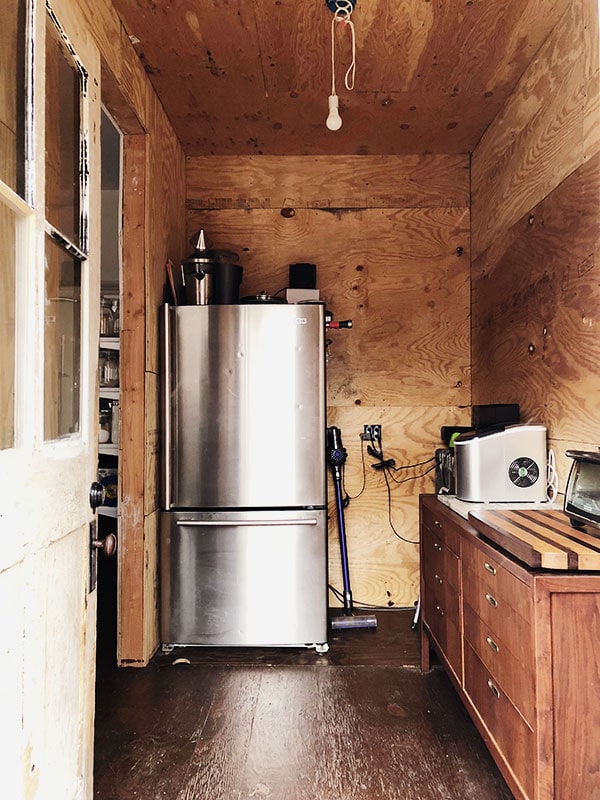
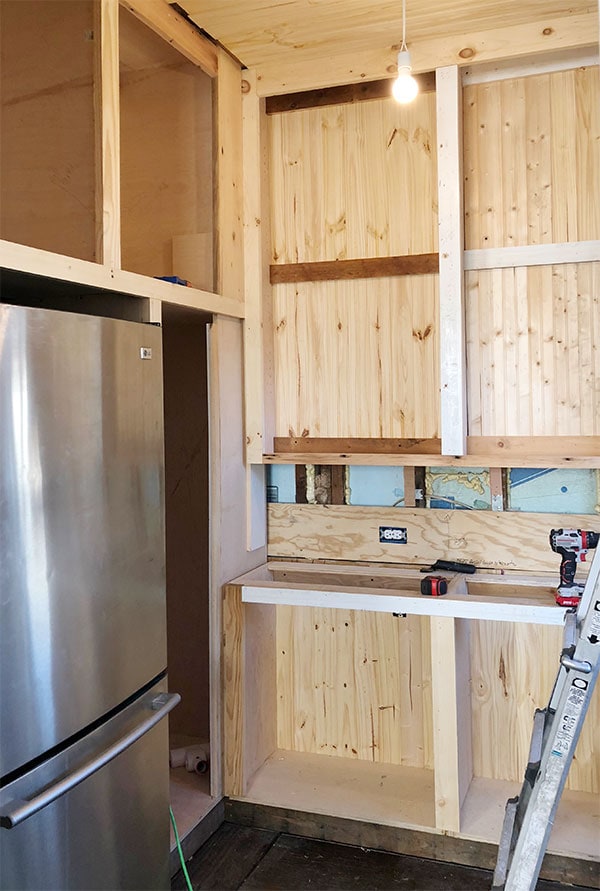
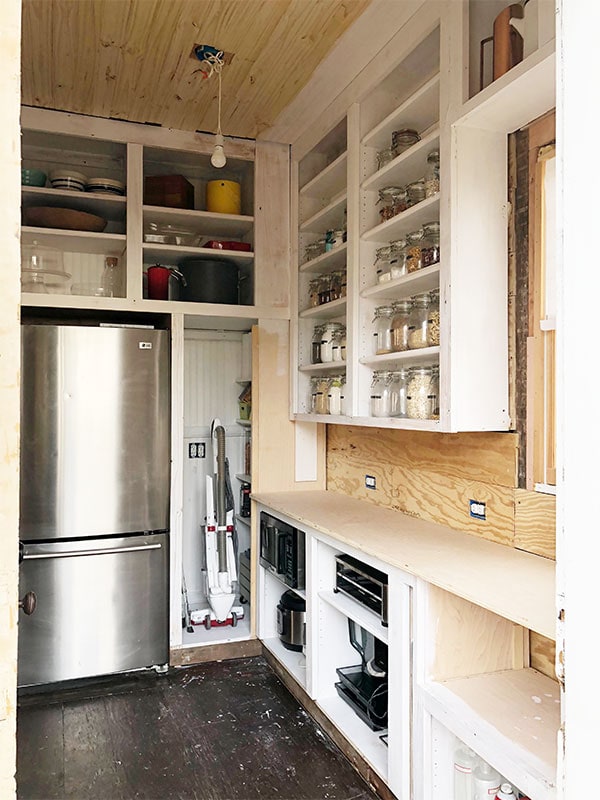
LOOK AT ALL MY STUFF! LOOK HOW THE VACUUM CLEANER HAS A HOME! MY CAKE STAND HAS A HOME! MY DENTED REFRIGERATOR HAS A HOME! I’m not completely sure how I want to arrange storage in that tall cabinet next to the fridge, so for now I hung some old track shelving in there which is a good start.
Hilariously, the microwave wound up being too deep for the cabinets I built specifically TO HOLD THE MICROWAVE. Doh! I realized it halfway through building the carcasses, and committed to just getting a new microwave when I’m ready to install the cabinet doors. For now, whatever. It’s a decade-old microwave I got from my friend Anna, so it’s OK. I’m a grown ass man. I can buy my own microwave I guess.
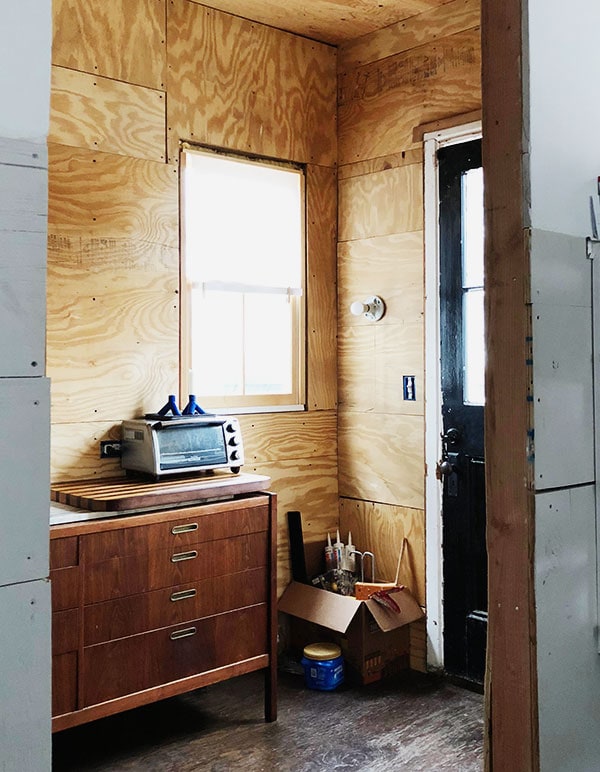
I’m sort of amazed by how much material is going into this room! The beadboard ceiling is installed but the walls aren’t, I need to install the crown, make all the doors, trim out the window and exterior doorway (the current door trim is 1 part of a 3 part built-up trim), trim out the entrance from the kitchen into the pantry (with a transom window!), install lighting, make a wood medallion for the ceiling fixture, have the sink and countertop fabricated and installed, figure out a backsplash, install the floor tile, paint everything…but getting to this place of basic functionality feels great. And did I mention huge?! I’m super pleased with how much function is getting packed into this less-than-60-square-foot space!
Oh, and by the way? This was also the last project at my house for 2018, and now we’re going to hop on over to…the cottage! It’s your moment, little house! So. Excited. I. Can’t. Even. We’ll circle back to this pantry when I have more to share!


ASSEMBLE THE CARCASSES! is the name of my next band. (Yes, that’s what I took away from this post.)
I really should have just made it the post title, hahaha!
Given your omnipotence where the blog is concerned, there is no reason you couldn’t make that edit. It is a GREAT title.
I thought I was ready for this but I was not ready for this and now I’m trying so hard not to scream in excitement at my desk so instead I’m making weird gaping fish noises and my cube mate has asked me twice if I’m choking. You have a pantry! Your kitchen stuff is in the kitchen! I’m so happy for you!!
i know right? i had to stiffle my laughs and glee. so exciting.
Thanks, you two! I’m pretty excited too!!
Ah what an exciting post! It looks beautiful.
Make sure you will not be using this counter as a prep-space at all if you’re going to build your toe kick flush with the face of the cabinetry. Your friends’ kitchen is gorgeous but there is literally no worse feeling than having to lean forward over the distance of your toes to your ankles while chopping vegetables. Ergonomics are important in the kitchen.
https://www.thoughtco.com/what-is-a-toe-kick-for-1206601
I can think of a few worse feelings!! Diarrhea! Broken bones! Haha. I’ve spent a truly obscene amount of time going back and forth on how necessary toe-kicks are (my friend’s kitchen aside, I see the same thing in a lot of new British kitchens it seems), and I’m not totally convinced they’re as ESSENTIAL as the modern American standard leads us to believe, but I do totally get it. I’ve never used a kitchen for any extended time that didn’t have toe kicks so I can’t say one way or the other. In this case, though, the base cabinets are only ~16″ deep and two inches shorter than standard, so I really think it’s fine! That being said, this is just the pantry—the counter will likely house a couple small appliances and provide a nice surface to set groceries and pantry items on, but all the real cooking is what the kitchen’s for!
Our kitchen was built with no toe kick (and matching repro cabinets are same) and have never felt that it is any different when prepping food to when I’m standing in my parents 1981 kitchen with a standard toe kick. And as tall people we also have long feet (size 11W and 13M).
I did make the cabinet 36″ tall (original was 34″) because leaning over a short counter is a pain.
I didn’t expect you to overlook it, but in the midst of all the hard work I could see how it might have gone over your radar so I thought I’d be safe mentioning it. You’re right, It isn’t necessary in that pantry, but I do still think they’re important for myself. Perhaps toe kicks are to short people what 36″ workbenches are to tall people haha.
One thing perhaps worth mentioning is that where you do have toe kicks they do not need to be the standard height. Mine are only 3″ high and work perfectly for me. (It’s a British kitchen but a functional one.)
I’m house hunting in the Catskills, only old and desperately in need of historical and practical renovation and your blog is so inspiring it is getting me over my hyperventilating anxiety when I sketch out all the work it will take! All your work is so impressive especially your wabi-sabi which I feel needs to be the name of my house! x
“and soon I will be dead.”… LOL You crack me up so much!!!!! I can’t wait to read more about you doing stuff with carcasses. :D
I’m not screaming, you’re screaming!!! AH! HOLY COW!! I was not expecting to basically see a fully formed pantry with real, live, custom-built cabinets in so quickly. I hope you are living THE life right now with this amazing space. Your are right about it being so satisfying to see the physical progress versus any type of drawing or rendering.
It’s pretty exciting!! I can’t wait to start getting the moldings and stuff in…right now it’s at that I-can-see-how-this-is-going-to-be-pretty stage, but that’s going to make it feel real!
How do you keep up motivation to finish? Honest question. I always lose it right at the I-can-see-how-this-will-be-pretty stage. Whenever I can picture really clearly the end result, the image is so vivid that it is like having the end result already. And then every bit of work after that feels like a lot of effort to make it look no different in my head.
I get that! I think partially it’s a matter of practice…doing this work professionally doesn’t leave flexibility for things to not get finished, and I’ve done enough projects to know that the difference between 90% done and 100% (well, let’s say 99.5%—there’s always something) is HUGE. And there’s kinda nothing better than being able to put away all the tools and not have the unfinished project looming over you (of which I have DOZENS—sometimes you just have to move on to something else because you’re out of time or out of money or whatever the case may be). I also get really into lists and trying to break down as many tasks as I can so I have a clear direction/order of work, and can see all the things that go into a project and take time! For instance, “Paint the pantry” would be such a bummer list item because it would take too long to cross off—prime the pantry, sand, clean, filler, sand, caulk, finish coat 1, finish coat 2…each of those tasks could take a day, but for me seeing things get moved to the finished column helps me remember that it’s all good progress even if it feels small in the moment. I don’t know if that’s helpful, but it helps me!
I thought I was going to be inspired to inspire my S.O. to someday tackle our own cabinets, but…nah. I’m not a cabinet maker, but looking at this process, it’s pretty damned impressive for a first go around. It could have gone bad, but I can really picture how awesome this space is going to look. Also, I thought Taunton’s were the snow camels from Star Wars.
I didn’t sleep well last night, so I have not a coherent thought in my head, but even if I did, this blog entry would have knocked it clean out. Hubba Wah! Incredible! I love watching other people tackle giant woodworking projects. Well done, sir. Assemble those Carcasses!
Thank you, Sara! Get some sleep!! :) :)
Ooooh, child!
You, my friend, are a woodworker. You may not be a professional woodworker, but you can work some damn wood.
It looks so great! I’m so weirdly excited for you.
DANIEL!! That looks amazing! You should be super proud.
OMG… i had expected to wait a week or so for the pantry update! Its obvious what you have done over the past fall/winter … such fun!
so courageous of you to dive deep into custom cabinets… and as per you aced it!
makes me want to buy all the saws and wood.. but sigh renting so no go on that!
COTTAGE NEWS? – the bluestone cottage right? CANT WAIT!!!
(back to work… and yes i was trying hard not to scream… such fun)
Yes, this fall/winter was a flurry of activity! And it ain’t stopping! That is the cottage of which I speak, yes!! Eek!
This is going to look amazing. Also very jealous of all that storage. My kitchen is so tiny, I have storage envy. Can’t wait to see what is going to happen with the cottage. It is such a cute building.
Wow, I am so impressed. I loved every single one of your choices.
Ok, I was loving every little cabinet building detail and then you dropped the COTTAGE bombshell and now I can think of nothing else. Its like the Cut to Black ending of the Sopranos! I’m screaming!
Yes. I have been very anxious to see the updates on my fantasy retirement home. Please, I must know what my future holds!!!!
This looks fantastic Daniel!
The struggle is real…. Full and partial overlay cabinets just didn’t cut it for me either. When I was working on the kitchen in our NY apartment a few years, I desperately wanted beautiful inset cabinets just like the Brits, and spent countless hours searching for a solution which I could afford. I could’t afford custom inset, but I did find very affordable custom full overlay (Barker) cabinets. To get the “look” of inset, I inserted vertical pieces between each cabinet, routed top and bottom trim (to hide under cabinet lighting), and used custom end panels to create the illusion of inset. http://halfclassicsix.com/the-kitchen-is-finished-finally/
Also…. Having a custom cabinet for the vacuum… Priceless.
I love what you did in your kitchen! So smart, and it turned out so great!!
Dear Daniel,
Thank you for this bewilderingly rich tutorial! I found myself glazing over several times. My brain simply said ‘C you can’t understand this, take a little nap’. NEVERTHELESS when I came to again, I found I actually could follow all of it, down to your brilliant clarity and friendly hand holding. Then after I stepped away from the Mac and back into ‘real life’ here at home, I found I had an different appreciation for my home. A greater respect for the amount of work and thought and creativity that must have gone into creating it. I’ve done a bit of decorating but nothing compared to the people who built it back in the 1700s. And then the people who put in the kitchen, and all the other things that make it function as a home. I realised that your blog often has this effect on me. It adds to my appreciation of my little piece of the world. How lovely that is. Most uplifting. I’m really grateful to you. Warmly, Catherine
Aw, what a lovely comment, Catherine! Thank you! xoxo
Many exclamation points to follow…This is so intriguing! When I read your blog on Feedly, it is full of mysterious symbols: &827 and &8230. They are everywhere throughout the text! I was anxious to discover their meaning! I had one clue- &827 seemed to reference your kitchen cabinets and &8230 seemed to reference your cottage. It was so exciting!
But now that I’m on your webpage to comment, none of these mysterious symbols appear. So disappointed after anticipating even more of a reveal than your awesome cabinetry! Or maybe it just deepens the mystery? Loved this entry and the progress you’ve made! All the best!
Hahaha, a secret code! Thank you for telling me…that’s super weird. I have no idea what’s going on!
Hi, just letting you know there is a glitch in this post when you read in Feedly, with randomn numbers everywhere
Thanks for letting me know! Super strange. I’ll look into it!
Dude! You are amazing. You are crazy, but amazing. I love all things about this post! Thank you for allowing me to get into your head and know how YOU would attack something so monumental. I have to say I’m relieved that your way of building cabinet carcasses is the same way I went about building one set of cabinets and drawers at the cabin. I did not feel like there was anything correct about how I approached my project though. Now at least I am comforted in knowing that I am not alone in building simple boxes that don’t seem very legit or woodworkeresque. Can’t wait to see more! I bet you’re going to build the cabinets in yer kitchen too, aren’t you? You crazy.
Thank you, my friend! I don’t know! Actually, honestly, I don’t want to. These pantry cabinets seem a lot simpler to me because they don’t have drawers, but in the kitchen I think I want mostly drawers…and I kinda just want them to be super new and super glide-y and wipeable and everything that’s nice about brand new modern cabinets? I also have a very strong feeling I would like them bought and done quickly, haha! Starting from raw materials takes a lot of time!
You can do drawers! Build the boxes yourself, and then buy pre-made dovetail drawers online, and then put your own fronts on them. We got ours online from Quickdrawers and found them to be good quality and they were super quick to replace one that had a pretty minor flaw. There are a lot of other places online too. We got some huge ones for mixing bowls and stuff, and they’re great. Installing the fancy drawer slides (we used MuV self-closing full extension slides) took some precise measuring and fiddling with tiny wood screws, but wasn’t too bad. OR, you can stock a salvage place for old drawers and custom size your boxes around them – we have a few salvaged drawers in our mix. Full disclosure, I have not yet put any fronts on our drawers and it has been…2 years?
Thanks for the tip, Rosie! It never occurred to me that you could buy the drawers online—doh! That does make it less intimidating. Still not sure I want to build an entire kitchen’s worth of cabs, but that does make it less overwhelming!
Hi Daniel,
Congratulations — your work is beautiful. May I ask how you did the bead board ceiling in the pantry? Individual planks same as the cabinet backers? I’m thinking of doing a similar ceiling in my very tiny laundry area and have heard myriad things about the T-n-G and bead board planks from Lowe’s. I’m interested in your perspective. Thanks! -J-Dub
I would definitely recommend that you pre-prime (with a primer like Zinsser BIN) the bead board and maype pre-paint with the first coat before you put it on the ceiling and fill knots if you want to. I only installed it as a wainscoting and it needed so many coats of paint. And after I primed/painted the knots were so much more visible and I didn’t like them as much as I thought I would.
J-Dub”“ Yes! Same beadboard. I needed a littttttle over 8′, but gaps at the end should be covered by trim. I mentioned in the post, but the wood is only OK—in my experience, expect lots of knots and some warped boards, which can usually be persuaded back into shape during install, or cut into smaller pieces if the project allows. Ryan is right—pre-priming and a finish coat is a good idea. I skipped it because I was impatient and it’s freezing outside and I didn’t want to set up a whole area to pre-prime all my beadboard indoors, but I’m sure I’ll have to paint it a few times for it to stop showing cracks at the joints over time. On a different project I sourced similar beadboard at a local lumberyard (we needed 12′ lengths, stained and sealed) that were southern yellow pine, and the quality was notably better. What’s available to you is probably regional, so you may want to call around and see what your options are!
I’ve also used the beaded ply and the beaded MDF linked to in the post, and those are good for a lot of stuff! We used the MDF on the ceiling of this kitchen, and we all really loved the result. The key is definitely to take your time and patch and paint it with a few coats, even if you want it white, so you lose that flat factory finish.
Thank you Daniel and Ryan for your thoughts on the Lowe’s bead board. I am going to check out my local lumberyard as yes, quality should be better for a ceiling project that will be very noticeable. Pine knots drive me bonkers.
Great work Daniel!
Such a great post – full of info but wrapped up in your humor. I will be starting a slow chant, “Cot-tage, cot-tage, cot-tage…” until your next post. Can’t wait!
I’ll have a more dignified reaction than high pitched glee & excited clapping & grabby hands once I can sit down & read through this post a few more times!
I am picking my jaw up off the floor. Wow. I didn’t expect this already. Total admiration. My daughter is going to actually scream when I show her the photo of all the jars lined up on the shelves.
A tall closet in/near the kitchen is great–not just for a vacuum but also for brooms and mops and one of those grabber things for getting stuff from high shelves, and a stepladder for the stuff that you can’t get with the grabber.
Now that you have all the tools, you can make custom cabinets all over the place.
Kitchen progress and upcoming Bluestone Cottage posts!!! Oh my, it’s like Christmas all over again.
Cabinets look awesome. I’m so excited for you!
” which of course is the most expensive option, requires the most precision to build, and of course is exactly what I wanted!”
of course, lol!
Daniel, I am SO IMPRESSED! Damn, you wood worker you. I thoroughly enjoyed watching you build your pantry. Thank you for making the scary and intimidating look doable. For someday. Maybe. LOL
I can’t decide if I love or hate this post. Because now I want to make custom cabinets for my house but at the same time that opens SO MANY POSSIBILITIES that I don’t know if my brain can handle it.
On the other hand, seeing as we were going to drive 4 hours, go to Ikea, buy a bunch of cabinets, build a custom toe kick (uneven floor lyfe) and semi custom doors….maybe this wouldn’t be too much harder. Plus, the custom part would solve a lot of our quirky problems.
Hmmm….
I can’t be responsible for what you do with this information! But I do want to hear all about it if you go for it!
but carcasses though.
and cadavers.
mona lisas and mad hatters.
If I didn’t already love you for your wordsmithing and talent and high human adorableness quotient (bonus: the pups), I’d love you for this reply.
Plus Bluestone Cottage updates coming soon? It’s like Chrismukkah all over again.
You continue to amaze me. What a huge accomplishment.
Bravo! I’m super jealous of all your great storage, and ADJUSTABLE SHELVES!
I’m sure you’ve seen ALLLLLL the Ana and Jacob White videos over the past 2+ years on their dream home build. But in case you haven’t (and in case any of your readers haven’t) here’s the one where they make/install the INSET drawers and doors for their giant kitchen: https://www.youtube.com/watch?v=4IQJk4X_1l8
Cheers!
Thanks! And oh wow, didn’t know about the White’s project! I’ll check it out!
This is wonderful amazing function progress and I am so looking forward to watching it come together…. but for me it is upstaged by your news at the end of the post that we get to hear more about the bluestone cottage!! That project was the first thing I ever read on your blog (Dana from House Tweaking has linked it) and that little cottage stole my heart. Can’t wait to hear all about it!
This was such a great post. I’m so jealous of those shallow upper cabinets to store all of the bulk dry goods. Perhaps the tile manufacturer of your coveted Victorian tile wants to sponsor a post too and you can have your dream tile floor and we can all see you install it. And Lowes can sponsor the underfloor heating? Your kitchen and pantry deserve all the best!
Also excitedly looking forward to the Bluestone update.
The cottage is still a thing? Well that’s exciting. But let me say this “thanks a whole lot for this article” now my daughter wants her husband to build her cabinets. The bad part of that? She’s going to have him practice on my kitchen first. So yeah good going David.
But what if he’s amazing at it and you end up with a kitchen of beautiful custom cabinetry?! Don’t despair!
This is amazing! You are truly a miracle worker — you have me thinking maybe I could build cabinets for my little place. Like Emily I’m thinking Well, by the time I tear my hair out a few times over the ikea software, drive to ikea, assemble the stuff, return to ikea for the inevitable missing stuff … maybe I just make them myself for the price of some cabinet-grade plywood.
BUT. The whole time I was reading this post I was thinking “Doors. I can’t wait to see how he’s gonna do the doors. TELL ME HOW TO DO THE DOORS DANIEL.” And now you are making me WAIT for THAT AND the cottage. You’re gonna kill me with suspense!
MY 4,500 WORD BLOG POST WAS NOT ENOUGH FOR YOU?! Hahaha. I’m trying!!!
TBH with the doors, I want to try a few different methods maybe? I was going to do a simple shaker door with the Kreg jig (there are lots of tutorials for this online, including a good youtube series created by Kreg!), but I kinda want to try my hand at some slightly more advanced joinery? See how it goes?? For the tall upper cabinets, I think those may be salvaged casement windows. There’s also a great piece of advice in that book—build the boxes, buy the doors! If you google around you can get custom size doors (pre-routed for hinges, if you want!) made and sent, and I’m not opposed to that option either!
It would look really nice if you do mortise and tenon joinery for the doors, but another option would be to get a biscuit joiner. I know it’s another tool to buy but you might be able to find one used at a pawn shop. I’ve used my dad’s and it’s easy to use and gives you such a professional finish. He also uses it to build the face frame for a cabinet and I think even to add wood edging (instead of the veneer banding he joins a 1″ strip of hardwood to the plywood) to plywood shelves or the top of a bookcase.
Far be it from me to say any blog post is not enough! Each one is a delight and an inspiration. I merely express my excitement for the next one!!!
And those are great ideas about the doors. I can’t imagine how to build shaker doors with a kreg jig but by golly I’m looking up those tutorials.
Daniel-I’m so happy you are posting again because you are amazing and talented. This is incredible! I know what it’s like to lose a bit of yourself and it seems like you got you back. Yay! No pressure to post more but yay for you sharing!
Thank you, Megan, I appreciate it! It’s nice to be back in a better blogging habit, for sure!
Wow Daniel. I’m so impressed with your efforts. That is going to be a dream Butlers pantry. Does this mean you will be building your own kitchen cabinets? Looking very much forward to Bluestone. Will we ever get to see the finished Olivebridge?
Undecided on the kitchen cabinets! I’m leaning strongly toward no (see my reply to Alison, above!), but it certainly wouldn’t be the first time I’ve changed my mind on a kitchen decision, haha! On the Olivebridge house, yes, just not completely sure when. Those posts take a VERY long time to put together, and I just haven’t had it…in part because that project itself took up such an enormous (unplanned) amount of time, and I’m truly still (still!) playing catch up on all the stuff I’d planned to do during that period that got sidelined. I’m trying to be more careful about overcommitting so I want to return to it when I can really dedicate the time rather than make a bunch of false starts and have months elapse between posts, since that makes diving back in more difficult each time. But I haven’t forgotten! You’ll see it again! :)
Wow. Just WOW! I was so sorry to see the laundry room gone. But this is EVEN BETTER!!! So impressed!
Well done….I mean, really, well done!
Holy wow!! So much work and so much beautiful detail already in there. It must have taken ages to do all that work. And the cottage teaser at the end has me very excited to see what’s next for that amazing little space. Also, digging your Instagram!
It’s getting kinda weird. Lately, nearly every idea/project I am dreaming of you accomplish! Looking at a bathroom linen closet insert and you explain each part of the process I wasn’t sure of. Yours, is a favorite blog. Thanks for taking the time and effort to compose.
Haha! I hope it helps!! Good luck!
Shit. You are a fucking genius.
Excellent work. I really admire how much your skill has grown! Excited to see what’s next.
Whatever happened to that house you bought down the street???
I spy an instant pot! I was one of many that chimed in a said you should buy one when you posted about your meager kitchen while renovating! I also signed up for Sun Basket because of that post!
Pantry looks great! I look forward to next year when you finish it, lol.
That’s the cottage I mentioned at the end of the post! It’s been an exceedingly challenging project for a number of reasons I’ll get into, but it’s still there and still a work in progress!
Thank you for the Instant pot rec!! I was wondering who would spot it, haha!! It’s totally great. And now I have half of my family members owning one, too! I’m a convert!
Ok, I posted above about drawers, but one more tip from when we built our cabinets (similar method, but we used a router to notch the edges of the box pieces to they had a little more gluing surface). For hanging your upper cabinets, splurge on a few GRK cabinet screws (Lowes has them…100 for $6.88 – so not that big a splurge!). Those have wider and stronger heads to hold the cabinet to the wall better. Sheetrock screws are wonderful and cheap, but the heads can pop off under lots of pressure, so save your crockery from a disastrous midnight crash and throw a few cabinet screws in there!
I agree, so many options out there for cabinet building! I found Ana White helpful, and so was a blog called Sawdust Girl. You can totally do the kitchen ones yourself!
There are some really easy “track saw” that I’ve made recently. I’ve got a 2′ and 4′ version that is a piece of 1x glued and flush screwed from behind onto a random 2′ and 4′ piece of 1/4″ plywood (6″ to 12″ wide). The 1x just needs to be absolutely straight. The motor side of a circular saw is 4″ to 6″ wide, so attach your 1x a little farther from the edge of the plywood. Make a practice cut which leaves the plywood exactly the width of the circular saw plate. Now, when you need to make a cut, just align the edge of the plywood up with your cut line and saw away (on the waste side of the cut).
You can easily make any “thickness: shelves by using the same face board approach that you used for the cabinet. Cut your shelf 3/4″ narrower than desired. Cut a 1x (3/4” thick) to whatever “thickness” you desire for your shelf. Rotate the 1x and attach it to the shelf. I like to use 1 x 4’s that I rip into 3 pieces with each being slightly more than 1″ wide for shelf that is slightly “thicker” than 1″.
A rule of thumb I read once for fasteners is to have 1″ of fastener (if possible) in the wood you are screwing/nailing to. If you’re screwing/nailing into a 1x, then limit the additional depth to 5/8″ to keep the fastener below the finished surface. If attaching cabinets through drywall to a stud wall, add an extra 1/2″ or whatever thickness is appropriate for the non-structural wall finishing like drywall. If your attaching 3/4″ plywood to each other with face screws as shown, use 1-3/4″ screws. I prefer decking screws with a star bit for generally non-stripping heads and structural strength. I’ve found drywall screws to be more brittle and sometimes break in the boards if twisted too tight. Decking screws, and similar are also self=tapping, so the suck the 2 pieces of wood together even with limited pre-drilling.
Kreg pocket hole jig and screws make cabinet making so so much easier. So much easier.
Hopefully you made and installed your uppers before installing your lowers. so much easier to not have to work over top of a 2′ deep obstacle.
A 2 x 4 attached level and at the height of the bottom of the uppers on the wall can make installing the uppers easier as well. Makes a nicer secure perch for the cabinets to sit on while being attached. Just a couple small nail/screw holes to fill at the end.
Bravo! Very brave to jump in on building the cabinets from scratch!
One small tip that I learned hanging cabinets (May come in handy on upcoming cabinet projects): start with hanging the upper cabinets first — that way you’re not leaning over the lowers to hang them.
No pressure to follow that rule, clearly you did great with these! Can’t wait to see it continue to shape up.
Smart, good tip! Thanks!
Did you know Amazon sells the Kreg KHCCC 90° Corner Clamp? It showed up in an ad on my Twitter feed. I believe this is because Twitter knows I read your last post. It looks very handy and keeps things square!
Ha! Lowe’s sells it too—I actually picked one up for this project!
HOLY SMOKES!!!! Daniel, you are amazing! Cabinets seem like something I could never, ever have the attention to detail to build but you’ve shown me I could MAYBE do it one day with the right tools. I’m so glad you’re back to blogging!
You really make this seem easy :) Love the finished look with all of the mason jars!
Looks wonderful. Very much looking forward to seeing the finished product.
And thanks for the cabinet tutorial. I’m a poor student and my kitchen is falling apart, so I might just follow your lead and assemble the carcasses.
And just like that … he built pantry cabinets! You make it look so easy. Your clear explanations make me think even I could do it. So much so that my plan, for if I ever renovate a kitchen, to use Ikea cabinets (which I had in one place and liked, but they were done by the previous owners) may be pushed aside for this painted plywood DIY version, as I like these even better. Can’t wait to see the them in their finished, painted version.
This is also is making me miss pantries – they are so useful. I had them in my two old building student apartments in Chicago years ago, and they were useful – to hold the not only the fridge, but all of the food, dishes, pots, silverware and appliances on the open shelves (especially in those cheap rental kitchens which had 0 and 1 actual kitchen cabinet, respectively.) But I haven’t thought about them much since, as I never had one in any of my NYC places. My mental dream kitchen renovation plan for the place I just moved to (which may actually happen some years down the line) is now going to take some thinking on where to put a pantry.
Daniel, I’ve read your blog since you were actually living in Manhattan and I think you’re totally right. You’re not a woodworker. You’re a craftsman.
You mentioned in your last post that you had already built the pantry cabinets, so I was expecting see them soon. But not this soon! Great work. But I still think it would be fun for you to not build your kitchen cabinets.
Hi Daniel, When you post a Lowe’s sponsored post, what does that mean? Do they just pay you like a reporter or do they actually provide tools and supplies? Your posts always seem so thorough and detailed as to the products that you used–I was just wondering.
Incredible. Absolutely incredible! I’m in awe of how much you’ve learned and all that you are doing to your charming home!
Daniel, I have a [n indecent] proposal for you: drive an hour north and come do the kitchen in my 1923 colonial. I will give you total creative freedom (and keep my trap closed except to provide sparkling humor and wit), pay you money, and you can use it on your blog for content! Because you totally have the time! Buckets of extra time! Boatloads of extra time! AND our dogs can play together!! SAY YES.
I love how your cabinets turned out! They look great even without the doors.
I don’t have too much in the way of tools or money, but I had a kitchen wall screaming out for storage. Thanks to your tutorial, I built 7′ of custom cabinets for my kitchen in a weekend. I’m a woman, I drive a Honda Fit, I only used a circular saw and a drill (sorry Kreg, no fancy pocket holes or saw track) and I got sh*t done! It wasn’t that hard! It looks like a million bucks but only cost about $400, including buying the saw. Way cheaper than any manufactured option (which wouldn’t have worked in my space anyway), and much better quality. And I shudder to think how much it would’ve cost to have someone else make custom cabinets with inset fronts and solid hardwood drawers.
Gotta give credit for two of your total clutch tips: have the store cut the plywood too big and do the final sizing yourself and build the base separately.
i LOVE hearing that, AJ! Thank you for telling me!! yay!! :) :) :)