

Here’s a crazy proposition for you: take five house-bloggers who’ve never worked together, plop them in a city far away from any of their homes, and give them a kitchen to renovate top to bottom in three days. Sit back, relax, and see if they all survive?
That’s pretty much what our friends at Lowe’s asked me, Kim and Scott, and Julia and Chris to do. HOW EXCITING AND ALSO TERRIFYING?! Sure, why not!
I’ll tell you why not.
Because renovations are hard, and usually take a while, and cost a lot of money, and it’s difficult enough to make decisions by yourself without adding four other opinions to the mix about every little thing that goes into creating a room—especially one with as many moving parts as a kitchen! Amplify that chorus of opinions and different approaches and methods when something unexpected comes up (newsflash—it always comes up) and you possibly have a recipe for five otherwise nice people who happily coexist on the internet to, I don’t know, murder each other. I might have said a resounding YASSSSSS to joining this Dream Team without fully appreciating the risks involved.
BUT! WE DID NOT KILL EACH OTHER! Quite the opposite, actually! All that stuff I said above, about the lack of time and slim budget and difficult decisions and unexpected surprises and multitude of opinions and methods? Actually made it a lot better. It was FUN, folks. Everybody brought many-somethings to the table, and it was truly a privilege to work alongside all these talented and kind and hardworking and awesome people. Here’s how it all went down!
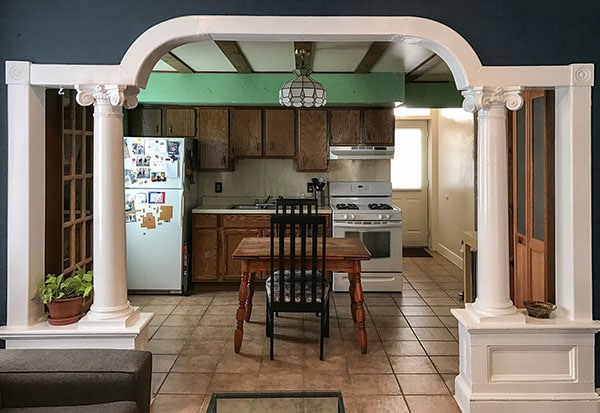
Chris and Julia were our brave team leaders, and the ones who had the pleasure/pain of sifting through over 2,500 applications that were submitted. Insanity! They narrowed to a top ten, at which point me and Kim and Scott weighed in, and then Chris and Julia duked it out some more (in literally the kindest way possible, I’m sure, because they are aggressively nice always, but most especially to each other), and that landed us in this 1900 Baltimore rowhouse owned by Aura and Nate, renovating this kitchen! Can you smell the potential from there? That’s one pretty dreamy project, I’d say!
Then Julia and Chris spent a few weeks going between the homeowners, each other, and our pals at Lowe’s to figure out a reasonable scope of work and, of course, a whole design plan! Obviously we had to be able to do it in 3 days, which was the first major requirement, but we also had to get it done for under 5K (including all new appliances!!) and create a kitchen that would complement the age of the home while balancing the homeowners’ more modern sensibilities. Easy, right? HA. HA. HA.
So Chris and Julia sent Kim and Scott and me the design plan, and one of the first notes was something to the effect of “we’re not really sure what to do about the columns.”
WHAT TO DO ABOUT THE COLUMNS?! SAY WHAT?! Then it emerged that the homeowners disliked the columns and were convinced that they couldn’t be original to the house, like maybe they were a hokey post-modern 1980s addition or something? Which I can totally understand because people did do some horrible stuff sort of meant to look like this in the 80s, but NO! This is not that! They’re wood, they have a thousand layers of paint on them…they’re the best part of the whole space! I thought that’s why we picked it! Ionic goodness! I will tie myself to those columns and take a sledgehammer to the gut before watching them get demolished! That or they will come back to New York with me and live in my basement until I figure out what to do with them! So immediately, Daniel Kanter is causing drama over old house stuff. I’m zero fun to work with; ask anyone.
But in classic Chris and Julia fashion, they were generous about hearing me out, quickly course-corrected, and I think implored the homeowners to trust us and let us work with the columns instead of against them. Thankfully they agreed and we could all proceed in a non-violent fashion.
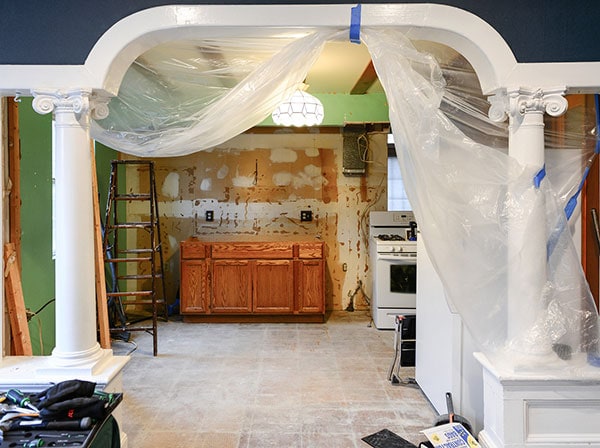
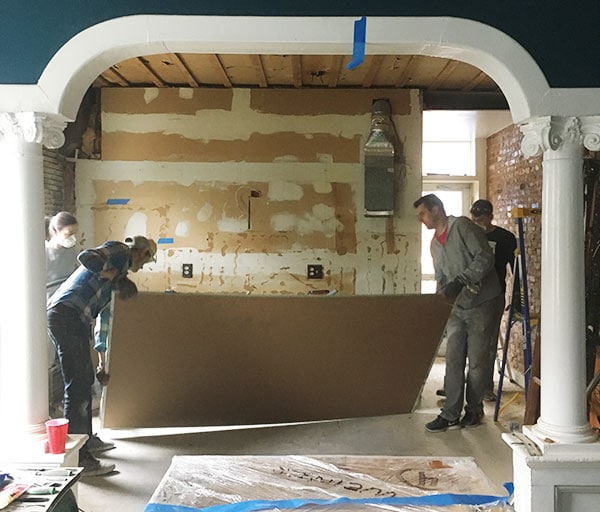
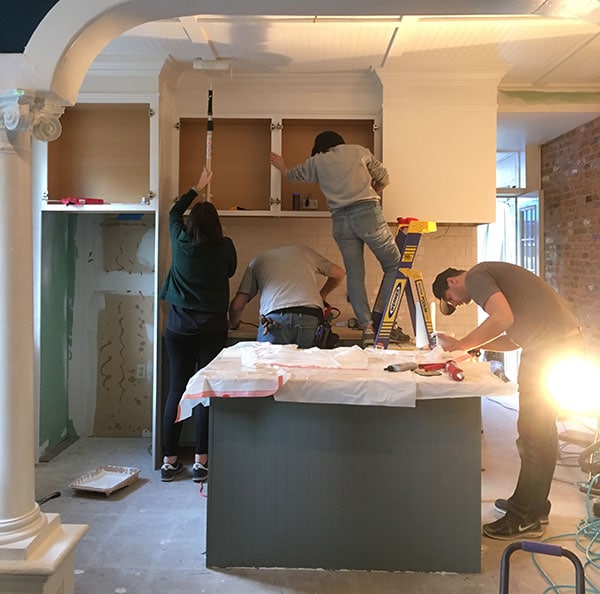
By the time we arrived Thursday evening, here’s where we were! Nate and Aura had been busy bees, ripping out the dingy tile floors and upper cabinets and formica backsplash. We knew, I think, that we were going to demo the old soffit, but…IMMEDIATE CURVEBALL, THAT CEILING IS FAKE! Nobody knew this. Haha!
It’s hard to appreciate in photos but was pretty dramatic in real life—that’s the actual ceiling height above the soffits…almost a foot and a half higher than the existing one! So we were working with, in order from top to bottom: ceiling joists at about 9.5 feet, lath, plaster, furring strips, acoustic tiles, and then a whole second ceiling shoddily framed at about 8 feet and sheetrocked. Those “beams” are completely decorative—just 1×6 pine boards stained brown and glued and nailed to the drywall. Of course the modern framing did not run beyond the soffits or over the pantry closet we removed, so Chris and Julia and I had an emergency team meeting (“Hi Chris, nice to meet you!”) before Kim and Scott’s plane even landed to discuss what to do!
The options were:
- Keep the existing ceiling, patch in where necessary, and somehow figure out how to remove the “beams” or extend them so it would all look continuous. This plan was problematic for several reasons (is it actually any easier or faster than just taking it out altogether? Because the “beams” were glued up, they’d take a lot of drywall with them on their way down. Also, lame! Who doesn’t want higher ceilings! Go big or go home!), so my solution was to get bossy and loud until that option was off the table. I DID IT FOR THE COMMON GOOD, OK?!
- Total demo, new sheetrock. OY VEY. Nobody wants to demo plaster, ever, and that’s a HUGE extra amount of mess and waste to squeeze into in an already extremely packed order of work. Then I innocently asked if anybody was particularly good at drywall work, because hanging is the easy part but mudding and taping typically takes three days alone and is very difficult to do well, especially on a ceiling! Nobody seemed all that confident so it seemed like maybe testing our underdeveloped drywall skills on a stranger’s ceiling that had to be done in a matter of hours was not the best place to take a gamble.
- Something else! So I suggested leaving the plaster and lath intact and furring strips in place, and affixing our new ceiling material to that. But what material? Beadboard, duhz! But actual tongue-and-groove beadboard would have also been a big time-suck and pretty expensive for the square footage we needed, so I suggested those inexpensive 4×8 MDF panels that look like beadboard, with some nice simple molding treatment to cover the seams. Easy and fast, I told everyone! I promise!*
*never listen to me if I claim anything will be easy and fast. it never is.
But after looking at a couple inspiration images, Chris and Julia were on board and so we walked into Day 1 with a reasonably solid plan and tried to project confidence about it to two increasingly wary homeowners who were probably beginning to regret signing onto this madness while watching us immediately dive in to just wrecking their house. It felt exactly like that scene from The Money Pit. You know the one.

Let. The. Games. Begin.
Can I just say that watching Kim and Scott work together in real life just warmed every cockle of my cold jaded heart? Scott has the enthusiasm of a camp counselor and Kim has the patience of a saint and they’re both so good at just doing it right. It’s a jealousy-inducing pleasure to witness. Jerks.

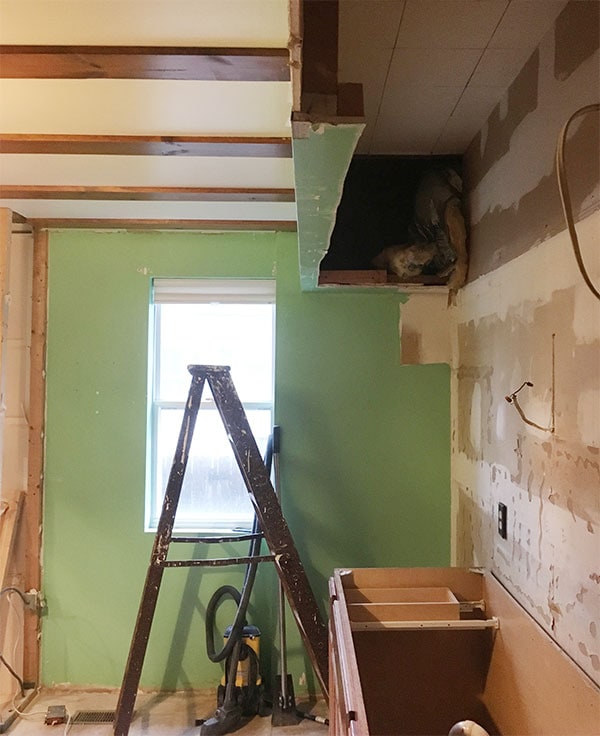
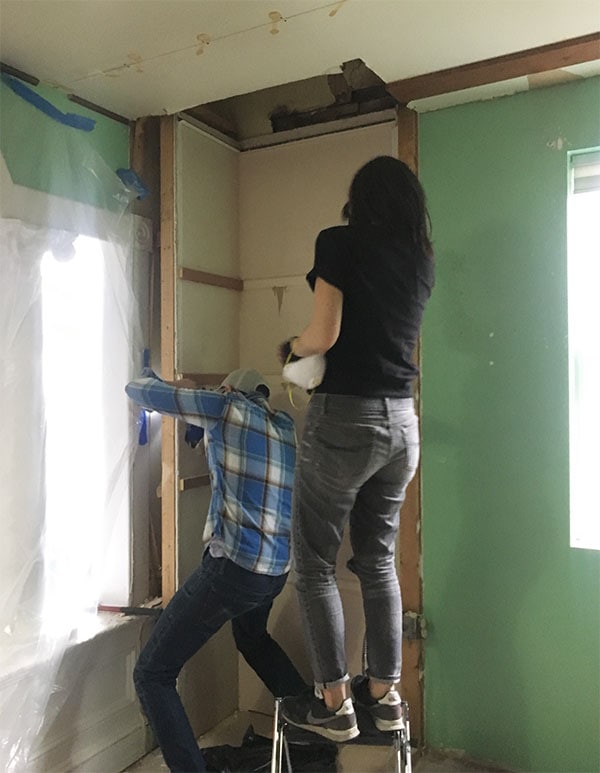
Here’s a classic when-one-thing-leads-to-another moment—we did not plan on demoing this whole wall, but it was sheetrock over 2×3 furring strips over plaster over lath, but the drywall and furring strips didn’t run all the way up to our new ceiling height! Added to that, we needed to get them some outlets and a sconce on this wall, and the wall to the right of the window was inexplicably bumped out a few inches, so once again I was like “HEY GUYS LET’S JUST RIP IT ALL OUT!” and for some reason they listened to me. Suckerrsssss.
Check it out though—you can see where there was once a window! We momentarily considered using the void, at Aura’s brilliant suggestion, to do little recessed shelves for spices and stuff, but then again we already had a more functional shelving plan and it probably was not the best plan to leave that big space uninsulated for the sake of cuteness. I love that idea though—slightly different circumstances and it would have been SO GOOD.

UGH, KIMMY MY LOVE! Obsessed with this one. POSSIBLY my favorite part of this whole experience was when Kim shocked and delighted me with a stiff slap on the ass while I was bending down to do something, and then we spent three days waiting for various opportunities to get back at each other. CAN YOU BLAME ME.
I’ll stop objectifying Kim now.
ALSO JULIA. SIT DOWN, LADY! She was the only one among us simultaneously growing another human being inside her body, and she’s still an beast! She was appropriately cautious and safe and all that, but good lord if anyone had an excuse to sit out of some physical work, it was her! Serious. Badass. If that baby isn’t tiling walls with the best of them by the time she’s in preschool, I will be shocked.
Just to give you a small sense of the pace of all this, it was insaneeeeee. My house would be done in a week if I had all these amazing people around! OFFER STANDS, YOU GUYS.
Literally before the dust from demo had settled, Chris and Scott and Chris’s brother Brandon were following behind with sheetrock! Scott ran mesh tape and Chris and Brandon tag-teamed the first coat of mud. Seriously, blink and everything changes.
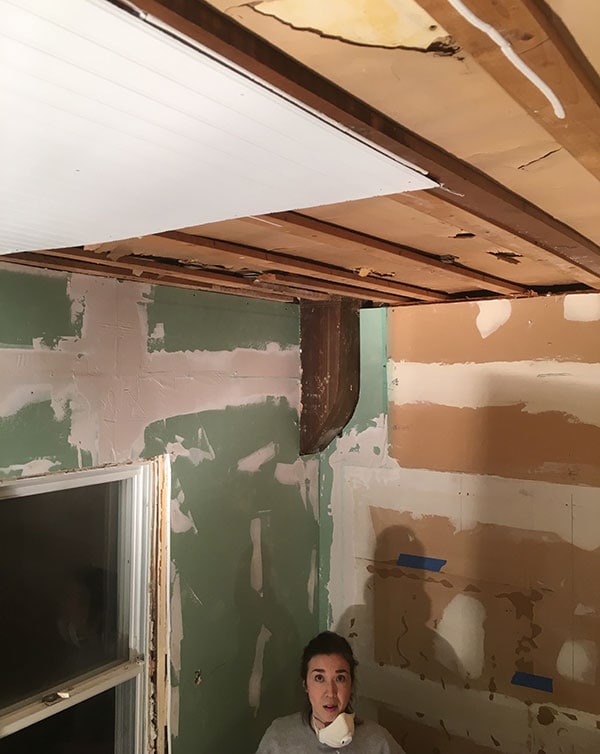
While the joint compound dried, Chris and Brandon started cutting our faux-beadboard panels to size (we didn’t use full sheets so that we could arrange things in a more visually pleasing grid) and Scott and I worked together hanging them up! We ran construction adhesive across the furring strips and attached the panels with 16 gauge finish nails from a pneumatic nail gun. Pow, pow! It was a little tricky to get the hang of because the nail depth had to be set jusssstttt right to hold the panels instead of going right through them. The homeowners followed behind with a nail-set to sink any stubborn nails, and then covered each hole with a little dab of spackling compound to be sanded smooth later.
At this point the ceiling looked like total garbage and even I was privately a little nervous about it. Without anything covering the seams and a bunch of nail holes, it just looked really flimsy and not attractive at all. DON’T WORRY!

I’ve said it before and I’ll say it again…I do not enjoy skim-coating. But you guys, practice pays off!! Since we hung sheetrock over a 120 year old brick wall with 120 year old furring strips and 120 year old lath, things were not exactly even—easily a recipe for seeing every seam and having a drywall job that would look terrrrrible. I mean, we could blow it out enough in photos to look nice for you guys, but that ain’t our game! So I took on the second and third finish coats of joint compound, and guys…crushed it. I wouldn’t normally gloat like this (maybe I would? maybe self-awareness is not my strong suit?) but I was using fast-setting 45-minute joint compound, so you have to work fast, and I couldn’t sand much because people were painting and tiling and stuff so I had to burnish the walls with a spray bottle and a trowel, plaster-style…anyway, I’m proud of that there drywall work! After paint it looked totally pro.
Also, window trim! I pushed to match the moldings to the ones around the columns, which were just simple 1-by lumber with rosettes in the corners, and Lowe’s carries a near-perfect match! I made a quick windowsill out of a standard pine stair tread, chamfered the apron on the table saw because we didn’t have a router…ya know, special little details. Fun times!
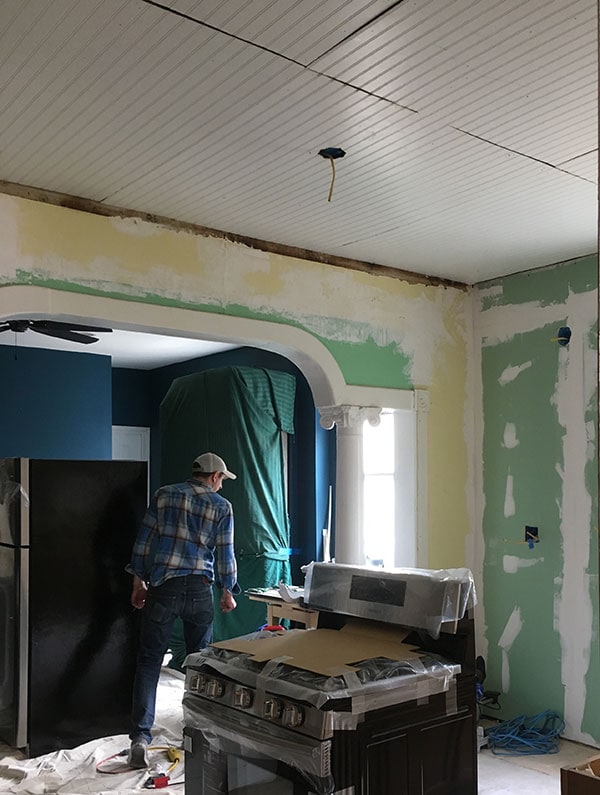
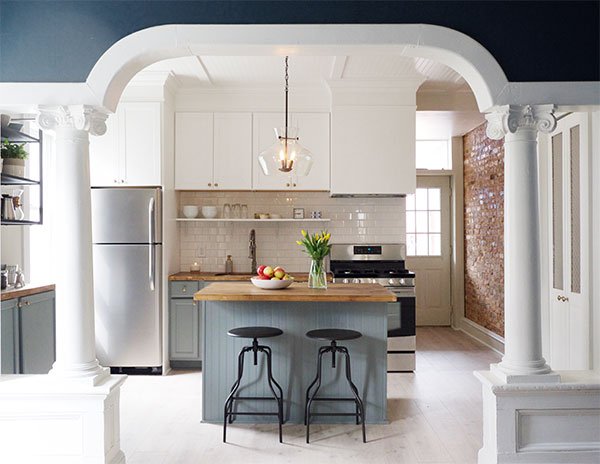
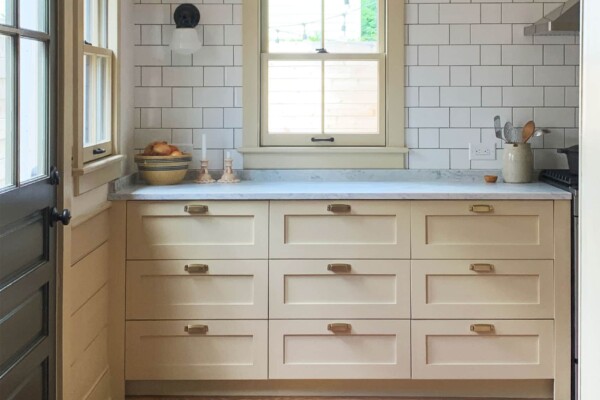
While cabinets were going up and getting painted, Scott and I worked away on finishing up the ceiling install! Originally we thought we’d maybe use little lattice strips to cover the seams and a more traditional crown molding around the room, but I LOVE what we landed on! We used 1×4 (pre-primed boards to save time) to cover the seams, and as a super minimal crown treatment around the whole room! I love how substantial it looks without feeling overdone.
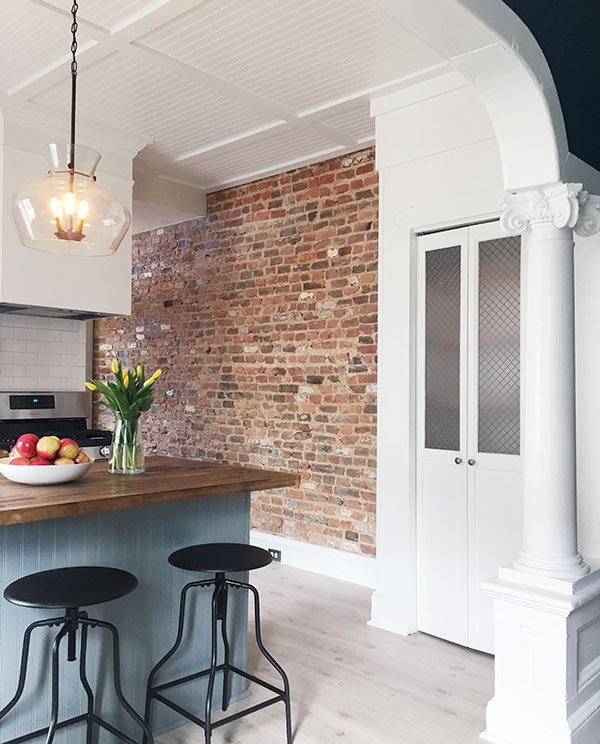
The home stretch was an absolute flurry of activity. Everyone trying to get their projects checked off the list while also staying out of each other’s way…madness! When exactly nobody volunteered to do the crown molding around the tops of the cabinets (we’re wimpy about some stuff, I guess!), Chris jumped in and banged it out in like half an hour! Awesome. Kim, Aura, Nate, and Julia took on tiling the backsplash, which is just simple and budget friendly 3×6 white subway tile—just 22 cents a tile! Can’t beat that, and of course it’s a clean, classic choice that allows other features like the exposed brick wall to really shine instead of competing.
Scott had to get back to Chicago on Sunday afternoon (I do NOT envy that he then had to wake up Monday morning and go to his super serious grown-up job…this was EXHAUSTING!), Julia and Kim and I worked until about 2 in the morning before turning in, and Chris and Brandon stayed all night laying the flooring! Then on Monday morning there was a mad dash to the finish, adding extra coats of poly to the countertops and installing baseboards and shoe molding, and caulking and touch-up painting everything in sight. But we got her done. And she looks goooood!
From this…
To this!
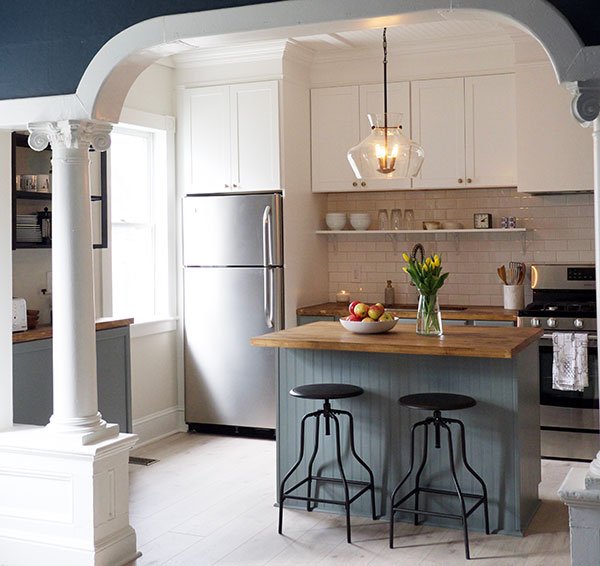
THREE DAYS, PEOPLE! There wasn’t nearly the time to throw a full column restoration into the mix, but we did give them a fresh coat of paint in satin finish to match the rest of the moldings. Just knocking down the super high gloss paint that was there before made a huge difference in making them look like the beautiful and grand antiques that they are instead of a kind of misplaced vestige from another time. You go, columns!
AND GUESS WHAT? Aura said, without prompting or persuasion, that the columns fit in now! They work! And that, to me, was the best. Learning to love what makes their house unique and special is kind of the best possible outcome, right?
Let’s take a walk around!
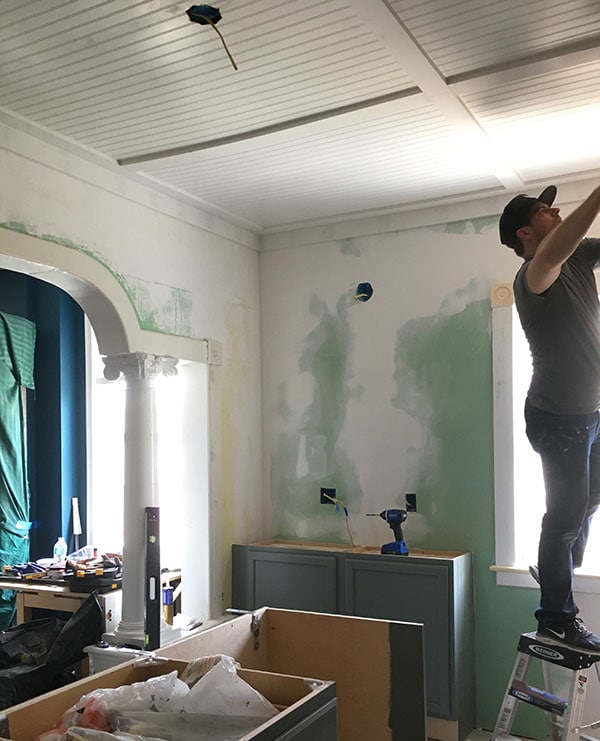
Even though the window molding butts right up to the fridge surround, it just feels so…right, I think! The windowsill almost got nixed in favor of a more simple casing, but I really think it’s that kind of detail that makes it feel authentic to the age of the house. It’s really not a lot of extra work to just do it up right!
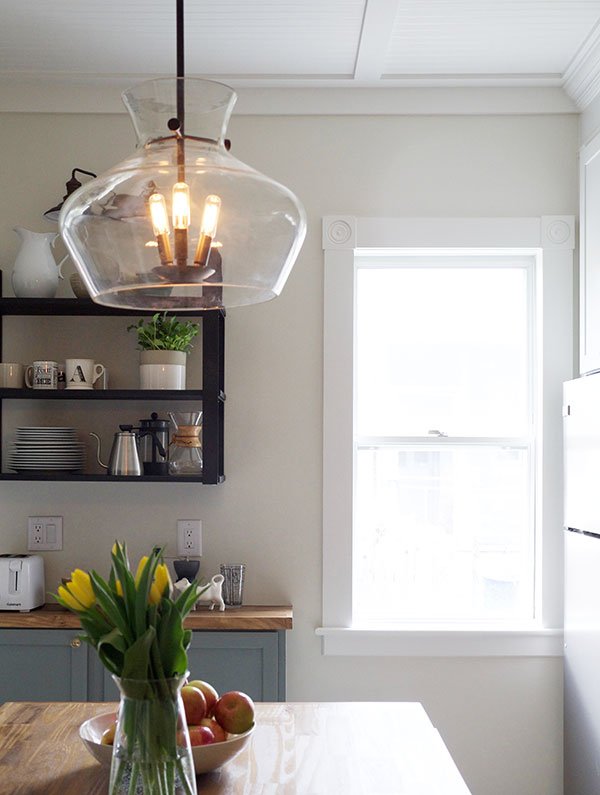
Also, check out those shelves! Such a good idea, Miss Julia! I guess the brackets are meant to be table legs, but Chris drilled pilot holes through the backs so they could be mounted to the walls and used as shelving brackets. Fun!
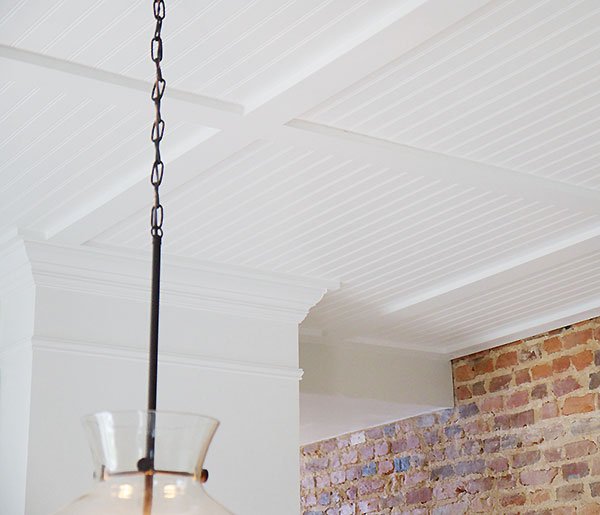
The ceiling! The ceiling! I really really do love the way it came out. I wouldn’t typically use those MDF panels because I like to make things as painful as possible and use the real deal (also available at Lowe’s, of course!), but they really look great after the requisite patching and caulking and painting. Everyone was pretty into it, and—joking aside—it really was very uncomplicated to do and looks way fancier than the price tag would indicate at just 63 cents per square foot!
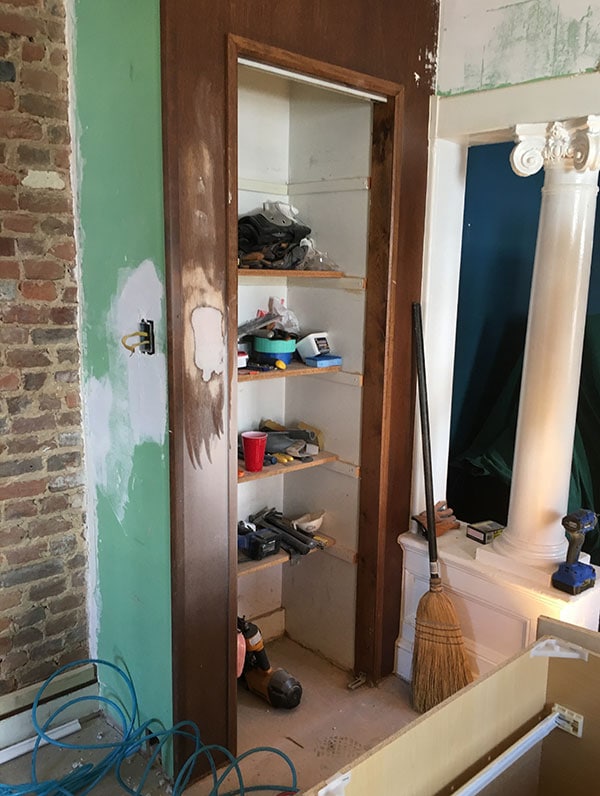
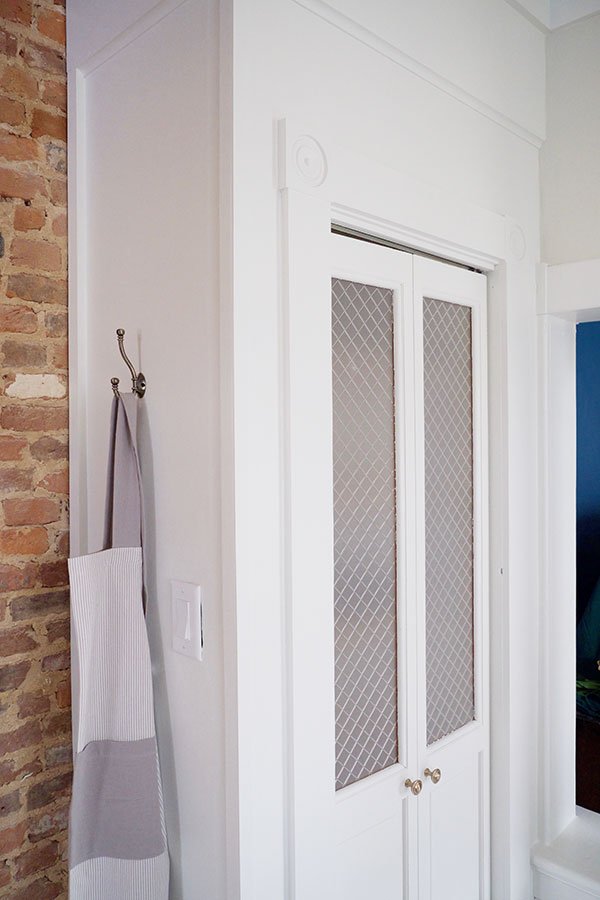
Even the little existing pantry closet got a lot of attention, and actually fits in now! I wish it was just a few inches shallower and didn’t overlap the original moldings, but in terms of working with what you’ve got…it’s a huge improvement! The bifolds got painted and new hardware, and I added another simple casing to match the window and original moldings with a simple 1×6 baseboard with a stock base cap to finish it off. I had to play dirty to get those moldings…Dad (Chris) said no because he was worried about time so, ya know, I had to go ask Mom (Julia) who gave me the go-ahead. I’m the worst! Scotty built out the top with a few pieces of framing lumber, 3/4″ plywood, and cove molding to bring the height up to the ceiling.
Funnily enough, I had no idea that the plan for the countertops was exactly what I did for my countertops in my now-demolished kitchen a few years ago! They look kind of like butcherblock but are really just 3/4″ pine project panels (small pieces of finger-jointed pine, essentially), with a 1×2 pine board face-nailed to the front to give the impression of a normal countertop thickness. These got stained with Minwax “Provincial” and three coats of water-based poly.
To be totally honest, since I feel I bear some responsibility here—the countertops aren’t something I’d recommend for a long-term remodel. Mine held up OK for the couple of years that they were in use, but not amazing, and real butcherblock is a more expensive but still very affordable (and classic!) choice. Given the budget these were a good answer, though, and they’ll be really easy to swap out down the line should the homeowners choose. Conveniently, Lowe’s happens to sell really beautiful and good quality (not to mention affordable!) butcherblock in a few different sizes (which of course can be easily cut to size), which is something I’m considering for my own remodeled kitchen! So, ya know, proceed with caution—there’s a reason for that difference in price and I’d recommend spending the little extra money for the real deal if you’re renovating for the long haul.
Oh! That brick!!! Isn’t it great? It was just hiding under the plaster. I’m not always a fan of exposed brick, actually, but it works so well here. The homeowners had already exposed it by the time we got there (THANK YOU, GUYS!!) and it’s just so perfectly-imperfect in a way that a new brick veneered wall or something wouldn’t be. It’s sealed to keep any dust and stuff contained.
So there it is, I guess! A kitchen in three days, with five bloggers and a handy blogger-brother too! And want to hear something that even shocked me, even though I was literally there the whole time? The budget came in at right around $4,500—and that includes all materials, cabinets, a new fridge, stove, range hood fan, dishwasher, sink, faucet, lighting…I MEAN, COME ON.
I love that the final product isn’t something any one of us would have done independently—it really does have a piece of everybody represented, and it’s so much better for it!
Now come to Kingston, you guys! Mine next! I GUESS we could even give ourselves a whole week or something crazy. Plus a spa day at the end. Definitely a spa day.
If you want to read more about this renovation, don’t miss Kim and Scott’s recap over at Yellow Brick Home and, of course, our fearless leaders’ take over at Chris Loves Julia! I’m off to go do that myself, ha! Chris, Julia, Brandon, Kim, and Scott (and Nate and Aura, of course!)—thank you thank you thank you for being the best teammates ever and bringing me in on the fun. I had a blast and can’t wait to do it again. Hint, hint, Lowe’s PR. :)
This post is in partnership with my long-time sponsors and pals over at Lowe’s! Thank you for your support, friends!


I’m glad you mentioned the countertops being budget. I was little surprised when I read the reveal and saw what you used. It’s okay for short term, but those aren’t kitchen counters, those are something you put in place until you can afford kitchen counters. Especially since Lowes now carries butcherblock(!), which as someone who lives many, many hours from IKEA I’m very, very excited about.
Yup, exactly right! Unfortunately butcherblock was special order at the stores we had at our disposal, so there just wasn’t time to change the plan…I tried! But the way I think about it is that these counters look good now, and it’s probably the easiest thing to change about the whole space. Butcherblock also isn’t everyone’s preference, so the homeowners can always live with these a while and then swap for something else entirely like a natural or composite stone, and then we didn’t waste perfectly good butcherblock!
(Have you seen the Lowe’s stuff in person? It’s stock at my store and is sooooo nice.)
So good to know the Lowe’s butcher block is good stuff! I’ll be really curious what you end up doing in your own kitchen. I’ve come THIS CLOSE to doing butcher block counters a couple of times, but I’ve never been able to pull the trigger because I’m afraid of potential water issues around sinks — wood turning black, lots of maintenance I don’t have time for, etc. Keep us posted!
I know, I worry about the same stuff! I’ve lived with butcherblock before and loved it, but never around a sink. Marble or soapstone would be the ultimate dream, but the price difference is obviously huge and I don’t know if I can swing it. But we’ll see—I’ve yet to really formalize a budget for the kitchen so many I can make it work.
Wow. This is gorgeous! Simple and elegant. Yes, the columns absolutely had to stay, and yes to that ceiling! But for all the actual hard work, for me it’s those stools and that light over the island that really finish it off in style.
Thanks Bonnie! The stools are Target and the light was just $119 at Lowe’s (Allen + Roth)! I hung it up myself and the quality is GREAT and the scale of it is so nice and substantial. The original plan was something else, but this light ended up being one of everyone’s favorite things in the space—and I think less than half the cost of what was originally planned!
Oh my gosh. I love this post. I have read all three now. There are so many things that I enjoyed about this post, but what you wrote here might be my favorite:
“Learning to love what makes their house unique and special is kind of the best possible outcome, right?”
I got a little teary reading that. Thank you for standing up for that #corinthiangoodness. #savethecolumns
You don’t strike me as the kind of guy who sleeps for a week after this type of weekend, but hopefully, you got some down time.
Haha! I had a couple days of downtime and then it was off to Saskatchewan, Canada! Getting there is kind of a hassle but I was just visiting friends who thankfully did not put me to work! :)
You’re a hero, the ceiling is my favorite part!
OMG, OMG, OMG, I’m obsessed. Please come to Tulsa, all of you, and fix everything about my house in an incredibly short time span!!! That end result is nothing short of amazing! The ceiling looks AWESOME!
“They’re wood, they have a thousand layers of paint on them”¦they’re the best part of the whole space! I thought that’s why we picked it!” Hahaha, that’s what I thought too! “What a great project… Such an awful kitchen, in what looks like such an amazing house! Those columns!”
Haha, deal! But I’m not sure this pace was sustainable for much longer! We were all BEAT by the end. I kinda couldn’t face the thought of driving 5 hours back home afterwards so I drove an hour down to DC instead to crash with my parents…and CRASH I did! But we had so much fun. :)
What a fantastic job. What did each one of you teach the others/what lessons did you come away with? When we work alone we sometimes miss out on the wisdom of others. Which is why I like reading blogs like this, to learn from your mistakes ;)
So glad you saved #corinthiangoodness.
The brick wall is just the right amount.
The crown molding and the niche feel between the fridge and stove balance that wall so well and make for a nice view from the living room.
Good work!
Thank you! Yes—the whole learning from each other thing was such a treat!! Let’s see…two off the top of my head are actually both from Kim. We used this 3M Spackling Patch Plus Primer for filling nail holes and stuff all over the place, which I’d never used and admittedly gave serious side-eye but it’s AMAZING! It dries SUPER fast, doesn’t shrink or crack (like Ready Patch, my typical go-to), and sands perfectly smooth without any grittiness. It’s amazing! I took the leftovers home with me, haha! The other thing was getting some caulking lessons from Kim, because I use tons of caulk in my life but find it tricky and my results are sometimes mediocre, and it turns out that I think I was cutting too much off the top of the tube! Kim does a teeny tiny little snip for a much smaller bead than I’m used to, but it works MUCH better you don’t end up with a huge glob on your finger after smoothing. This seems so obvious now, but my technique has been flawed for years, haha! I’m certain there’s more, but that’s something! :)
Hmm that caulking tip is a good one, I always feel like I end up with the huge-glob-on-the-finger problem. I’ll have to try that next time! Sometimes the simplest, most obvious-seeming things are actually… not that obvious?
OMG! This is just so incredible. I love this transformation. Great job, all of you!
As much as I’d love for the crew to makeover a room in my house, I think we’d have more fun sitting on my patio drinking cocktails. So if y’all are ever in DC, invitation stands!
DEAL! Although only 3 of us drink—more for us! haha!
Holy smokes this is beautiful! Your idea with the ceiling was so spot on–we see bead board ceilings + exposed brick in buildings here in Charleston all the time. The mix of textures and the natural light in this kitchen are so outstanding. Amazing work, y’all!
Long time reader, never commented yet — just wanted to say that this kitchen is beautiful (enough that reading three reveals posts on different blogs didn’t even get boring — and I enjoyed reading your reveal most of all the three)!
Ditto! : )
:)
Wow good job all of you! That was damn risky to redo the ceiling but came out great and all the details going well together even exposed brick wall and columns. WELL DONE!
I thought the columns were the whole POINT of picking this house too! This turned out SO AMAZING. I can’t believe this only took 3 days. What couldn’t you guys accomplish together in a week?!
Daniel, your blog is always so funny and inspirational at the same time! One thing though: can it say “Ionic”?
OMG, THE SHAME! Internal conversation while writing this post:
“Do I have to google this? Seems maybe wrong.”
“No dummy, you know the orders. Relax, you got this.”
I’m embarrassed. This is how I know I’m getting old, I think?
My girls have this little thing they do with their hands. Doric is simple and square, thumbs curl up for Ionic, fingers splay upward and wiggle for Corinthian. Can’t see how to post a video of this but it’s very entertaining to us classical architecture goons.
Sounds like you’re raising them right!! :)
I teach the column orders in my ancient history class. Doric are the simplest and the word Doric sounds like “dork.” Ionic looks like its got “eyes on it.” And Corinthian has the fanciest name and it is the fanciest capital!
Daniel, Although previously noted, I really appreciate your clarifying the countertop situation. The moment I read what it was, I remembered your experience, and thought about how pine being a soft wood, would not hold up for very long.
The kitchen looks terrific! I am generally not a fan of the mdf “beadboard” but you all pulled it out nicely. I am familiar with pre-primed 1×4’s and they are very helpful. I also appreciate how beautiful the filler trim-work above the cabinets turned out. I know this is picky, but it would have been nice if the underside of the uppers were painted white to hide the “wood” finish. I’ll admit, it is one of those things that always stands out to me (just like when refrigerator doors are hinged on the wrong side).
Thank you, Devyn! Yeah, I typically try to avoid MDF and I prefer unprimed boards for my own projects, since the pre-primed ones are really much shorter lengths finger-jointed together, and I’d rather take the extra time for a solid board. But in this case, they were both absolutely the right call for time and cost-savings, and I legitimately do love the ceiling even though the idea came mostly out of the need for practicality, speed, and low cost!
And yes, if we’d had just a little more time, cabinet undersides would have been painted! And/or we would have added under-cab lighting and a small trim piece to finish off that bottom edge (we did give the homeowners a switched outlet inside one of the uppers, if they want to add undercab lights!). Seeing that peek of the wood makes me laugh a little—the reason you see it is because the cabinets are mounted quite a bit higher than they normally would be, which is why there’s space for that open shelf, but Chris and Julia are both REALLY TALL so from their perspectives, they couldn’t see the undersides! Kim and Scott and I are all pretty little, so to us it was much more noticeable. Anyway—easy thing to change. :)
Thank you, on behalf of all that is historically just and also my Type A, for preserving the columns and not half-assing that window! Is it possible that the wall niche was for a fold-out ironing board rather than a window?
My pleasure! That’s a good guess, but the window jamb was actually pretty intact in the wall, including the old sash weights still in the pockets! We took them out and the homeowners mentioned maybe doing something fun with them. :)
Omg, it is beautiful! I read all stories and yours is the best recap! I think the counters are a great idea.. some of us can not buy everything right away but need an update..I am always surprised when people always get the most expensive choice. My taste can change.. every update doesn’t have to last forever.. I think the kitchen is stunning! And your story is riveting! At least informative and funny..
What a great kitchen! I love you talked about the decision making process and the options you guys considered. That makes the after that much more interesting :D
Thank you, thank you, thank you for “causing drama over old house stuff” and insisting the unique features of the space remained intact! <3
Amazing job, congrats!
It looks wonderful. So much work, so many details plus 6 expert DIY’ers. I am starting to understand why not too much gets done around my house. I love the columns, but what do you think inspired the original builders to add them in the first place? Does it reflect the outside of the house at all–or the neighborhood?
It’s a bit hard to say—the house is circa 1900 brick Victorian rowhouse like all the houses on the block, and I think it’s pretty common for details like this to be similar but varied between houses (like others may have had different style columns, that kind of thing). No idea what’s going on with the rest of the street, but I’d imagine some of the houses have something similar at least! The rest of the house has definitely undergone a lot of renovations over the years, but somehow these remained! Possibly because someone always assumed they were structural? They don’t appear to be, but nobody needs to know that. :)
Love and and especially loved reading the other two points of view on the project. (yours was by far the best, of course). Thank god you saved the columns. I have a question about the dishwasher in the island…..how did you get water and a drain line to it? is it a portable unit that attaches to the sink?
I agree with the above folks who said yours is the best writeup of the three – I love the unfolding drama of the uncovered surprises and negotiated compromises while working with a group – no one else shared that storyline aspect or so effectively communicated how much work and creativity this took (and fun!).
I realize it’s nitpicking but I would have loved it if the beadboard ceiling framework was centered on that archway instead of asymmetrical. Probably anyone who mentioned that idea would really have been murdered though, given the time pressure.
And I also had Pat’s question about the plumbing for the island dishwasher, which none of the three blog posts talked about…
Thanks guys! All our blogs are really different I think—no need to compare! :)
The dishwasher was kind of a head-scratcher! Luckily this is on the ground level and the basement was unfinished, so accessing water and waste lines was easy. We broke the hot line, tied in with new pex, and ran that the 5′ or so to the new dishwasher location under the floor. Tying into the waste was a bit more challenging, but most of it had already been replaced with PVC over the years so it wasn’t too difficult to tie into the existing waste line and add an air admittance valve to vent it and prevent back-up. We used SharkBite (aka push-fittings) to make our connections and add shut-off valves and stuff, which are perfect for smaller projects like this and pretty fool proof!
I am stunned!!!
Bravo to all :)
OK. Your account is, by far, my favorite. I could totally relate to your point of view the entire time ”“ when we renovate, I’m always the person that’s like, “Yes, it’s not the most convenient, BUT IT’S THE RIGHT THING TO DO!” That’s my rationale behind everything.
I realize it’s beyond the scope of the project, but I would’ve loved to see how the kitchen fits in with the overall style of the house, especially what I assume is the living room right next to it.
I would too, haha! The homeowners were VERY smart and had covered/moved out all their furniture and stuff prior to our arrival, so I don’t have a great sense of their overall style! I do know that they loved the kitchen, though, so hopefully that means it fits in nicely when their rooms are put back together. :)
I don’t believe a kitchen would be open to another room in 1900, there would have been a swinging door to the dining room, so I believe this was not the original kitchen. Might it have been the dining room? Then where was the original kitchen? Otherwise, the columns and the other detailing might not be original, although they look original to me. I can’t imagine adding the large opening and the columns, decreasing storage space along that wall.
Agreed, I doubt this room was the original kitchen! The original room would have also been somewhat bigger—the wall that the stove and fridge and stuff is on was added later to create a full bathroom back there. I think an original kitchen might have been either in the basement (which is now unfinished, but the joists are riddled with lath nails suggesting that it was originally—or at least at one time, pre-drywall—a finished space. Otherwise I think it’s actually somewhat common for kitchens to have been on the second floor, with the ground level reserved for formal spaces. I’ve seen a couple of larger Brooklyn brownstones arranged that way, but I’m not sure how common it would have been in a more modest Baltimore rowhouse.
What an awesome job, and it sounds like an amazing experience! And such a stunning transformation! YAY TEAMWORK!
But seriously, the world is probably fortunate that I never went into interior design. I’d have taken one look at those columns and gone to town on that space with the vaporwave aesthetic (pink and purple on the walls, white marble-look tile, neon lighting, palm trees, marble busts, and probably a framed print of a Fiji water bottle somewhere for good measure!)
Haha!
OMG those columns. Thank god you were there to save them! When we renovated our 1925 double living room the original arch was boxed in with bad 1980s panelling and we found indications of the original bottom boxes under the panelling but the columns were long gone. If only we we had those columns!
That’s what salvage shops are for! ;)
Loved everything about this post! Fascinating, and you’re hilarious!
The ceiling transformation is my favorite. The old ceiling blocked the view of the transom above the back door. Now the hall looks like part of the kitchen. And the ceiling has great detail without being overwhelming. Is it just the perspective or are the upper cabinets really high up. I’m 5’4″ and figure I’d be hauling a step stool every time I needed something. And what happens if they have to replace the frig and can’t find one that fits the opening. But’s it beautiful. My next favorite part is the coffee station. Great storage in a small space. I don’t usually like these makeovers but with your detailed behind the scenes explanations I feel that it wasn’t slapped together just for the camera, only to all fall apart after the crew leaves.
Raising the ceiling made a huge difference! So much brighter and grander. The hall ceiling would ideally have been raised to the same height (always an option should they choose!) but that fell a little outside our scope.
It’s not your perspective—the open shelf above the sink is about the height of where a standard upper cabinet’s bottom would fall, so the uppers are mounted about a foot above normal height. You’d be OK reaching stuff on the bottom shelf, but definitely need some extra height for anything above that. Organized properly, though, I think that’s actually OK since less frequently used items can be stored there. Replacing the fridge (which hopefully wouldn’t happen for a very long time!) shouldn’t be that big of a deal…this is a totally standard size, but they have a few inches of play to the left with that filler piece. The height would be more of a challenge.
And thank you! There really aren’t any smoke and mirrors here, I promise! Just a lot of hard work, and talented renovators! :)
Maybe the homeowners will take care of the hall ceiling but it already makes a difference. Good work, Daniel!
It looks so good. The ceiling! And the columns. I’m so glad you persuaded the owners to keep them. It’s surprising the difference between the old high gloss finish of the columns and the new satin finish. They look so much better.
How did you get on with so many working in a comparatively short space at one time? A lot of: “excuse me… mind your backs, coming through”?
And, given your own kitchen plans, what did you think of the sink against the wall with the shelf above it?
Pretty much, yeah! We had a back alley space outside to run saws and stuff, and the homeowners generously emptied most of the adjacent living room to use as a staging area for materials and supplies while we were working. It wasn’t the most organized job site of all time, but we managed it OK! No injuries or fights! :)
I love it when people I like on the internet like each other in real life. I already knew that Kim is an unbelievable sweetheart (I bought prints from her print shop, and Canada post lost my order, and she was the very very very very best about it and someday I will own more of her work!) but…it just makes me so happy that you all got along doing something so stressful. And the kitchen is gorgeous.
Ah, that warms my heart! Kim is the best! I’m so lucky to know her. :)
Wow! What a difference. They are so lucky to have had you all. It all looks great, but I think the ceiling solution was my favorite part. It was an unexpected problem that ended up making the whole room more beautiful. Great job!
Ahhhhh you guys (and door sixteen) are MY dream team! I will say I also thought the columns were awful but now they look like they were meant to be there. You guys have such vision.
Also! Reading the comments above about learning from each other, I 100% think you should do a joint vlog series about how to do basic diy work (eg caulking, laying tiles). Just a thought ;)
Haha! It WOULD be a good excuse to all be back in the same place together!
Well, if the homeowners have you to thank for keeping their columns, raising the ceiling, and matching the window trim to the columns trim AND getting a windowsill, I’d say it was a really good thing you were there! Having lived in old houses, it is clear to me that people who don’t often don’t know what they are looking at, and do the damnest things to old houses.
I’d be really curious to know, by looking at other neighborhood homes, whether the columns were actually original (row houses in neighborhoods were usually built with similar interiors, so it is pretty easy to figure out from a few house tours and scanning some real estate listings. Even if they were a long ago addition (which I suspect), I’m glad they were kept – I didn’t like them in the original photos, and I’m glad they now look like they belong there with the new kitchen.
I’m surprised you didn’t insist they demolish the second pantry as well, to show off the archway and moldings on both side, and for balance – I don’t like it there at all. I think a freestanding piece of furniture, even if basic, say with some doors on the bottom and glass paned doors on the top would look great on that wall, and hold just as much, and do while looking beautiful. I usually don’t like exposed brick in residences, but since this is out of the way, basically on the way to the back door, I like it fine here.
I know you would have done drywall or real wood on the ceiling, but I think for something you can’t look up close, this budget option works just fine here and looks good from where you can view it from average height. I don’t think the countertops do though – whether it was the artificial short time or limited spending amount that caused it, I’d also rather see butcher block here (even Ikea) or even a nice formica (which I don’t hate) than these pine boards. You’re right, though, they can change them – but I hate short-term solutions.
I’m curious why the need for crown molding above the cabinets – I’d have thought you’d have wanted the more simple 1 x 4 treatment around the room for consistency.
And what, if anything, is in that box of lowered ceiling in front of the back door, and why wan’t it removed for a consistent ceiling height?
Amazing job really, and I’m glad you had fun with each other, even if it does sound like a killing pace.
Haha! I suggested removing that pantry several times, and then I shut up about it. Same goes for the counters. But as the Stones say, you can’t always get what you want. :)
I like the crown above the cabinets—particularly because we added filler to bring them up to ceiling height, I think the chunkier molding treatment keeps the filler from looking disproportionately large, if that makes sense. I didn’t have the final say on that stuff, though—I’d just call out suggestions until something stuck! I do think it’s a very nice detail, though, and that particular crown profile is really pretty—I’m actually glad to know Lowe’s carries it, since stock molding options are often so blah.
I don’t think anything’s in the ceiling in front of the back door, but it was primarily a time issue. Ideally it would have been removed too, but that’s always an option now that the bulk of the work has been completed.
Thanks for your reply. So the crown balances out the bulk of the cabinets, vent cover, and filler above – that makes sense, and it does work to do that here – learned something new, I did (as I thought crown only made corners look fancy.)
I’m guessing you were also itching to replace the removed window, if more time were there, and restore the height to the existing one, which looks like the top was shortened to go with the lowered ceiling treatment. The more windows in a kitchen, the better, as I like cooking and cleaning up in natural light whenever possible. I like tall windows, and would have left them to original length if I redid them. You’d probably have shorted them at the bottom so as to be above counter height as in your house – I like tall windows (too many years of brownstone living) and have no problem with seeing counters running in front of windows that go lower behind them – I’ve seen that look a lot in old houses.
I like how all the upper cabinets are all aligned (though I could never reach anything in any of them without a ladder.) Why wasn’t the plywood box over the vent aligned with the cabinets – was it a choice, or just dictated by where the vent had to connect?
Also, as I’m insanely curious about old homes, what was the pipe or chase in the corner above the refrigerator for? Do you think someone lowered the ceiling just to hide it at some point (obviously before someone else installed a cabinet over the fridge that would have hidden it as you guy did.
Since this is a brick house and that removed window had been (seamlessly!) bricked over at some point on the exterior, trying to change that was just definitelyyyyy not an option at least for this. Even if it were my own house, that would be a tough trigger to pull! I will say the kitchen is VERY bright now, so it really doesn’t feel like it’s lacking a window that ought to be there.
I don’t know about the vent cover!
None of us could figure out quite what that curved chase thing was for! it seemed to be plastered over brick, but we didn’t do a lot of investigation since it was solid and, yes, would get covered.
I didn’t think about how much harder it must be to add a window to a bricked-up space – you made it look so easy on you clapboard house!
Wow! Terrific job!
I am SO happy you stood up for those columns. I have those exact same columns in my house except they are floor to ceiling, and they are the reason I bought the house in the first place. Whoever painted theirs deserves a noogie, but at least they are still there and can be appreciated with their new but timeless kitchen. :)
What a beautiful end product – and the ceiling is EPIC.
Also, it sounds like so much fun – exhausting etc. – but fun.
This space turned out so well. It may have been a bit stressful but at least you have a great story to tell from it and man do I love reading your blog. Always telling it as it is, my favorite!
Wonderful redo and wonderful post! That kitchen is absolutely lovely, now. The ceiling is inspired! Perfect solution. I really like the color of the floors, as well. And your writeup had me laughing out loud several times, as per the uzh!
I’m surprised you haven’t gotten more comments. This was a fantastic post!