
This post is in partnership with Lowe’s! Thank you for supporting my sponsors!

As we well know by now, I love a makeover. Always have; always will. I expect this information to shock exactly nobody. But even if all my past and present projects hold special places in my heart (and, maybe, ulcers in my stomach), frankly some makeovers are less exciting than others. Some projects involve more grunt work than creativity, or the balance is tipped more heavily toward practicality and function than aesthetics, or the space just isn’t especially inspiring and you kinda have to force it. Ya know?
This? IS BASICALLY EVERYTHING I LOVE IN A PROJECT. I MEAN LOOK AT ALL THAT HIDEOUSNESS.
HOW.
MUCH.
FUN.
Allow me to elaborate.

Over time, I’ve worked on a few projects over at my friend John’s house in Kingston, which I have named Burgevin Gardens—not because John is a Burgevin, but the original owners were. The Burgevins were a fascinating family—florists by trade—who appear to have built the original house in the 1880s and then did a major renovation around 1920 that doubled the size of the house and reworked the original 1880s structure. They built the house in an area of Kingston that wasn’t really developed at the time, and owned and operated the Burgevin Florist Shop in Uptown Kingston for close to 100 years—it was actually still open when I moved here (it’s currently being beaaautttiffullly renovated and restored as part of a new hotel project)! When the Burgevins built the house, they also had something like 50,000 square feet of greenhouse space erected on adjacent land, which kept the florist in operation year-round in the days long before fresh flowers could be easily shipped across the world.
Based on all this, I’m gonna go ahead and say they were a family of means, and they built one helluva house to show for it! Here it is around 1950, still largely intact (although already missing its shutters, and after rectangular storm windows obscured the arched tops on the upper sashes!):

It is fabulous, and huge, and full of huge projects. It’s been updated and messed with over the years in generally extremely bummer ways, and John has spent the last few years slowly chipping away at restoring it to some version of its original glory as time and money allow. It’s a truly massive undertaking and he’s doing a great job of it.
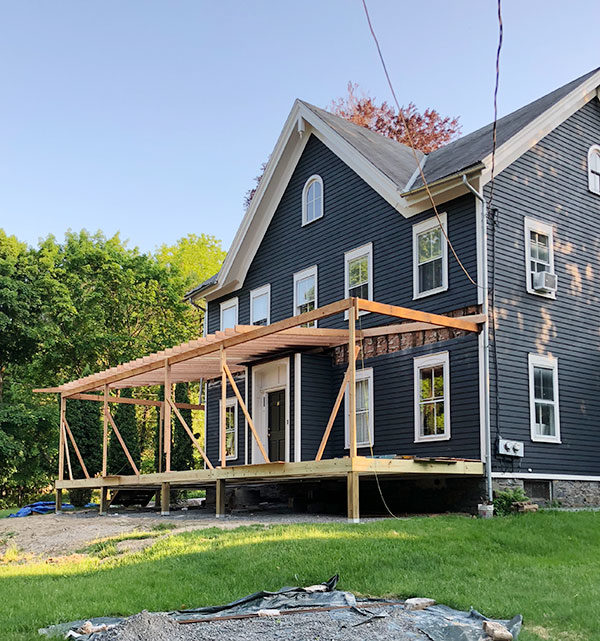
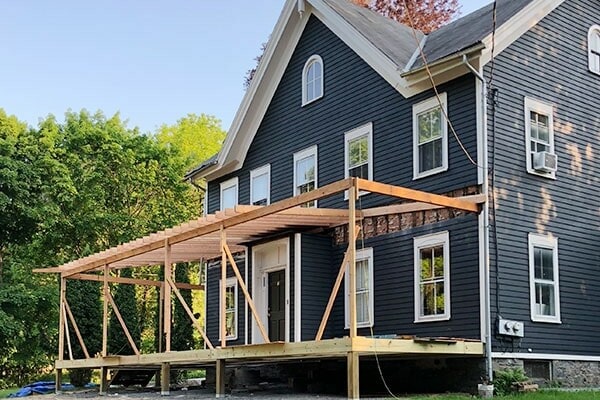
Last year, he enlisted me to design and rebuild the original 800 square foot wraparound front porch (indeed, that is bigger than my entire Brooklyn apartment!)—I shared a lot of that process over on Instagram stories as it was unfolding (the good bits are saved to highlights!).
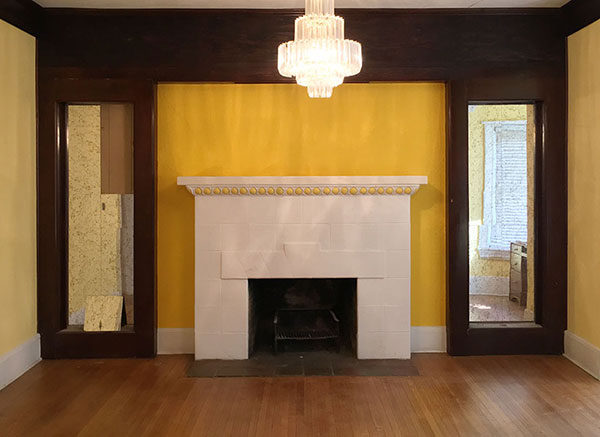
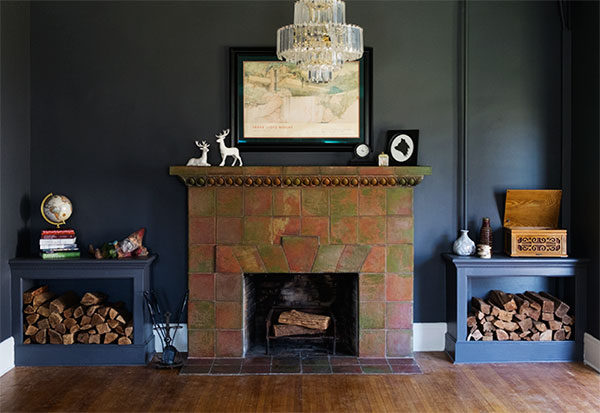
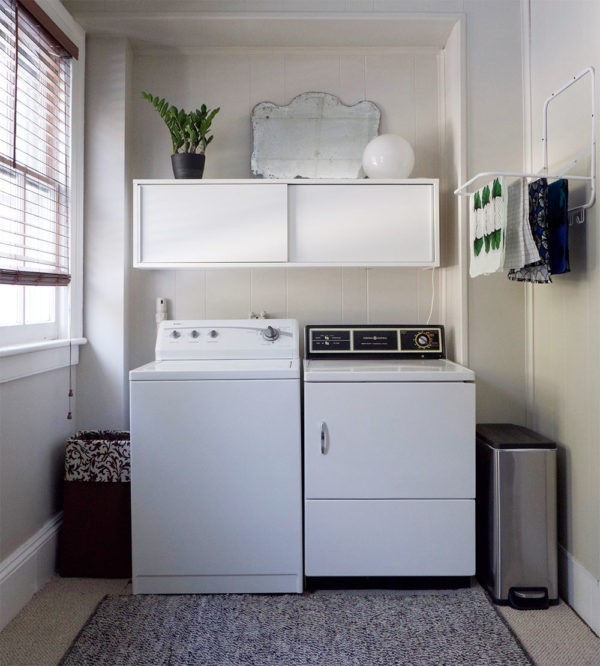
Before that we restored the fireplace mantel in the sprawling living room (I think it’s 32 feet long??), and a little later I did a quick n’ dirty laundry room makeover because friends don’t let friends have terrible laundry spaces, right?

(For those curious about the porch project, you didn’t miss anything! Unfortunately it’s still not quite complete, and I’m hesitant to share it until it is…but I’m really hoping that can happen this fall because I’m so excited to show you!! Also, even though it’s not mine, I’d really love to close the book on that particular project because I’m really very proud of it. So standby on that.)
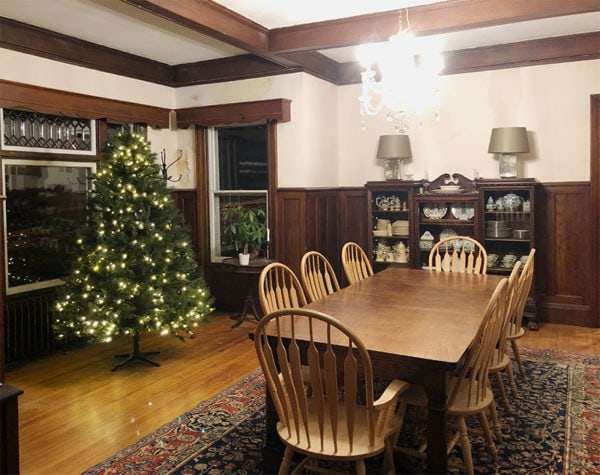
SO ANYWAY. The house is a center hall layout, meaning the entryway and staircase are in the center with rooms on either side. Turn right and you enter the ENORMOUS living room. Turn left and there’s a small foyer sort of space, followed by a massive dining room with beautiful oak panel details on the walls and a beamed ceiling. I somehow managed to never take a good picture of this room, so I made John dig one up…shockingly most normal people don’t obsessively take naturally-lit photos of rooms in their house all the time, so give the guy a break:
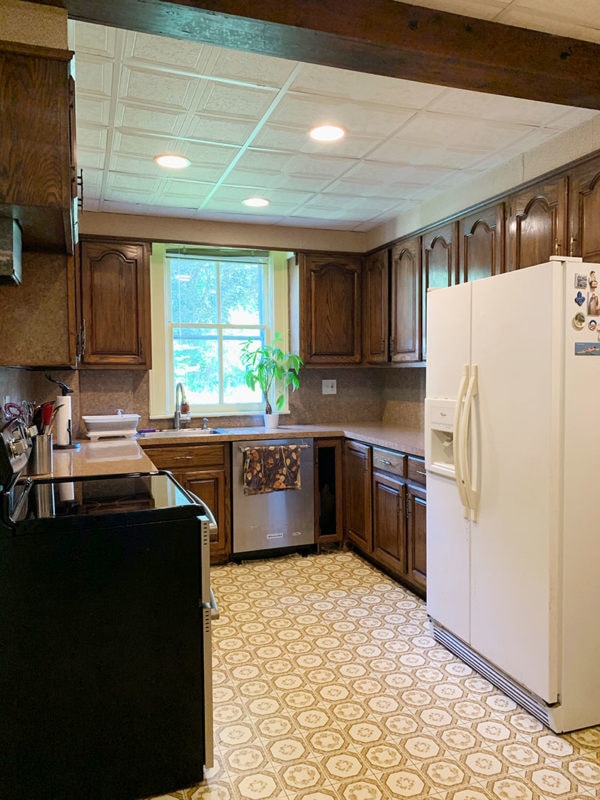
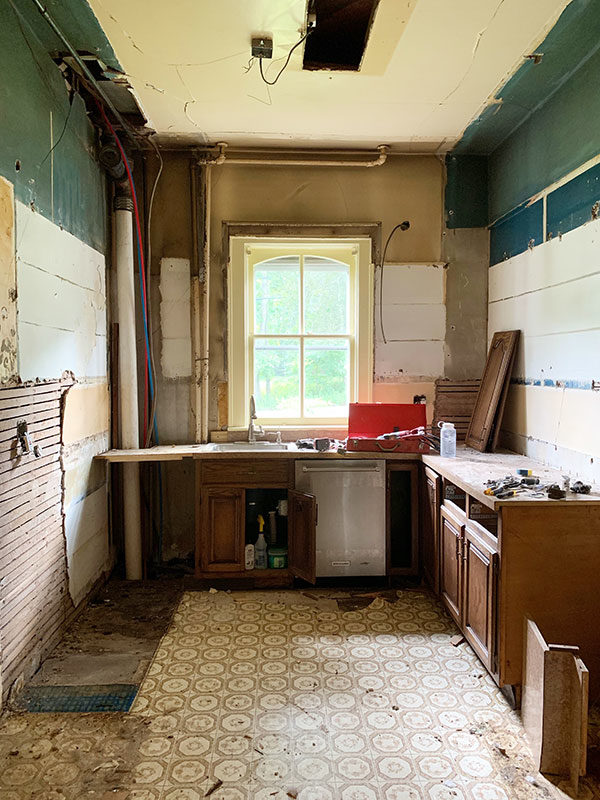
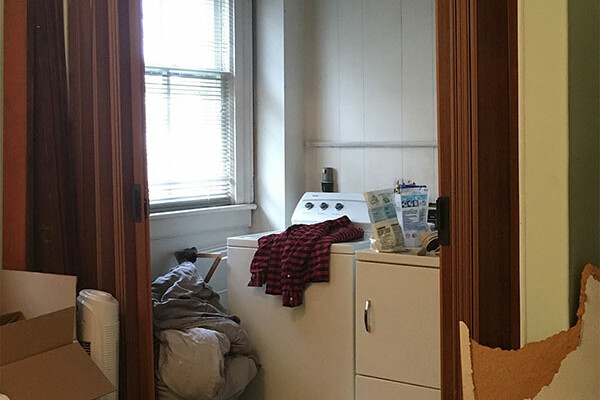
And then there’s a doorway from the dining room into the kitchen (out of frame, far right—see the edge of the door casing?), and it’s kind of like entering a different world? Based on the grand scale and relative intactness of these other spaces, the kitchen reads almost like a bad joke. BEHOLD:
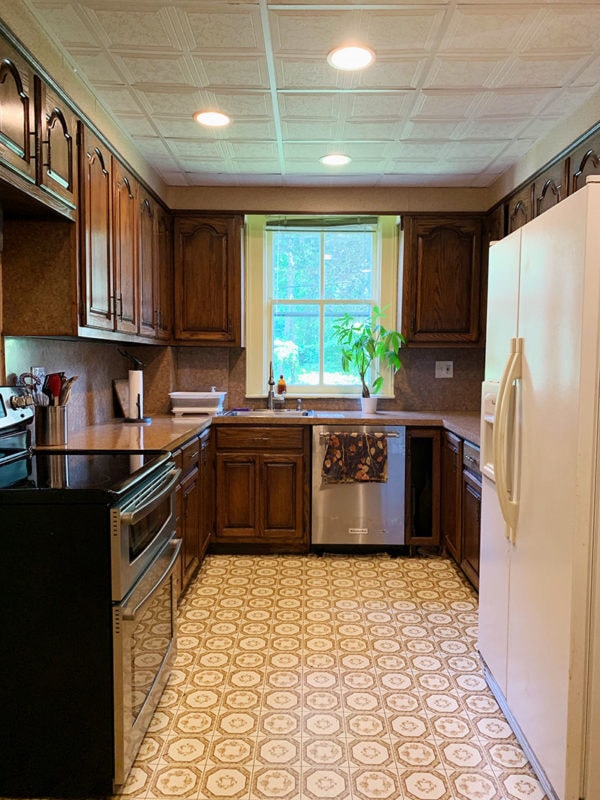
I think part of me was excited when John bought this house just so I could have the honor of tearing out this mess. It’s so ugly, you guys. Should we count the ways?
From what I’ve been able to deduce, here we have an early-80s special of basically all the things people hate nowadays in a kitchen. Outdated dark oak cabinetry. Sheet linoleum covering the hardwoods. Laminate faux-granite (I guess? that seems generous.) countertops. Matching laminate backsplashes, which mysteriously stop short of the stove (you know, where one might functionally want a backsplash??). Granny wallpaper. Small upper cabinets with big huge soffits, which look not-so-big only because the top TWO FEET of them are obscured by the dropped ceiling. Bizarrely placed recessed can lights. Florescent box over the sink. A cheap metal venetian blind obscuring a beautiful arched original window. Have I missed anything? It’s truly a brown-town masterpiece of bad decisions.
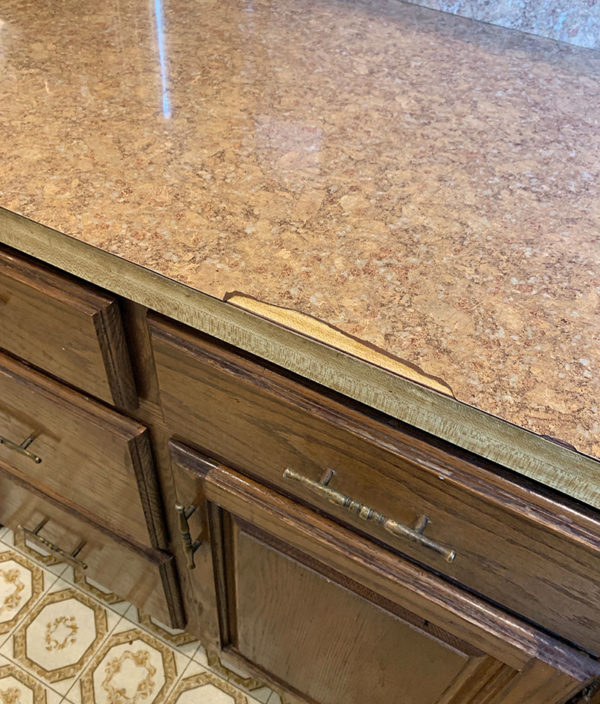
I guess the faux-granite laminate was supposed to be an improvement over the faux-butcherblock laminate?! The mind boggles.

AND THEN IT GETS WORSE! Because the whole room is only about 9’x16′, but only about half of it is currently being used for the kitchen! Presumably because a prior owner wanted an eat-in kitchen, so left half the room empty—leaving a crowded U-shaped kitchen on one side and a bunch of wasted space on the other. Obviously it’s not being used as an eat-in kitchen now, and neither John nor I understand why anyone would waste their time eating in here with that GLORIOUS dining room just steps away. (I know actual dining rooms are out of fashion for many people. Those people are wrong. End of story; don’t @ me.)
The problem is, John doesn’t have the cash to renovate this kitchen (did I mention the enormous old house with endless projects that still has to be maintained and heated in the winter?), and that’s unlikely to really change any time soon. There are bigger priorities and even though it’s ugly as hell and no fun to cook in, it does function, more or less. So he bravely perseveres.
But with holidays around the corner (I CAN’T BELIEVE I’M WRITING THOSE WORDS) and plans to host family for both Thanksgiving and Christmas, he asked me if I thought there was something that could be done to makeover this space on a budget. Don’t tempt me with a good time!
CHALLENGE ACCEPTED. Gimme it.
So, in turn, I approached my friends at Lowe’s to see if they would be interested in partnering up on this project, and they generously agreed! But there’s a catch. I have like…$2,500 to turn this thing around. That number is not missing a zero. That’s basically pocket change in the world of kitchen renovations that involve more than a little paint and maybe some tile. For some reason I am still convinced a total overhaul is possible.
How, you may be asking? Because we have three things going for us:
- Unfounded optimism and a healthy dose of good old-fashioned delusion. This is my main fuel source and I’ve learned to embrace it up until the point that I start hating myself.
- Underneath all this disaster, there are good bones. There’s gotta be, because this is a good old house! There have got to be hardwoods under that linoleum, right? We know there’s a beautiful original window, half-covered by nonsense. A peek above the drop ceiling confirms a TEN FOOT actual ceiling height. And there’s more space to work with than is currently being utilized, so we can play a little with the existing layout. We can and we WILL!
- We have a wonderful and free renewable resource: ELBOW GREASE. Rather than rip it all out, send it to a landfill, and throw money at the problem, we’re going to approach this very carefully, working what we’re working with and making some strategic decisions to maximize the impact of our budget. Luckily, Lowe’s has allllll the products we could possibly need to do just that, which is why I love working with them so much. High-end looks for budget-friendly prices! (they don’t tell me to say these things; I just have a lot of enthusiasm.)

Current financial constraints and impending family arrivals aside, why do a more budget-friendly renovation of this space? Because a) nothing will happen otherwise and b) I’d wager this is the last renovation this kitchen will ever see. Ideally, I’d love to see this house returned to a single-family someday (currently there’s a whole apartment upstairs, but it would be easily converted back), and the wall behind the refrigerator is just a non-load-bearing wall into a room 2-3x the size of this one. Which is to say, in another reality, I can totally see somebody ripping this whole thing out, knocking down the wall between this room and the next one, and putting in a big big kitchen to match the big big house. Old houses generally don’t have big kitchens like that, and while I’m usually not one to tear out walls in old houses, I actually think it would be a good approach for this particular house. The existing layout isn’t all that nice and it would be more suited to modern living. It wouldn’t be a crime here, and this is coming from someone who considers most decisions about old houses to be crimes against them. Ha!
But the reality is, that could easily be a $100,000+ project and, short of a new owner moving in or John winning the lottery, there’s just no way. So let’s make this kitchen as nice as we can without going insane so John can enjoy his big Jersey family and, maybe, someday sell the house to someone who will see this space as totally workable at least for however long they want/need it to be.
NOW. THE HOW. HOW WILL WE DO THIS. Here are a few strategies that I think are helpful to think about if you, too, are considering upgrades but not equipped for the type of FULL, EVERYTHING MUST GO remodels we tend to mostly see on TV and online and stuff.
- Have appliances? KEEP THEM. Even if they don’t match. Even if you don’t love them. If they work, save your money and upgrade down the line if you want, and throw those not-ideal but still-functioning appliances back in there. Your dishwasher will still be 24″ when you go to replace it. This kitchen is going to have a KitchenAid stainless dishwasher, a stainless Kenmore stove, and a white Whirlpool fridge and I truly do not care. If you want a bigger fridge or something down the line, just leave enough space for it and use your smaller one in the meantime. You aren’t the queen of England. (Unless you are! In which case, a warm welcome, Your Majesty. Thank you for dropping by.)
- Have cabinets? CONSIDER KEEPING THEM TOO. You can often change a layout without scrapping all the cabinets, and I’ll be showing you some strategies to upgrade their looks and their function. These are NOT NICE cabinets by any means, but even your most basic cabinets can still often benefit from a few upgrades and strategic hackery.
- Embrace negative thinking. What I mean by this is: identify what you DON’T need or want, and strip that stuff out. In this case, that includes wallpaper, the drop ceiling, the recessed lighting, the linoleum floor…there’s a lot we can accomplish just by simply stripping out the bad and giving some TLC to what’s left behind. That’s basically free!
- Fill in the gaps with budget-friendly new and vintage. This is another not-so-subtle plug for Lowe’s because S E R I O U S L Y even if you feel kind of “meh” about your in-store displays, they have THOUSANDS of products online that might be more your speed. I’ve noticed they’ve also been making incremental improvements to their website which makes online shopping and sorting through products a lot easier, and so far I haven’t felt limited by options and this is coming from someone who literally hates everything.
- Consider less fitted. As Americans we are conditioned to think of kitchens as long continuous runs of matching cabinets punctuated by appliances, but there are so many more ways to kitchen! Consider freestanding vintage or antique furniture pieces like armoires, dressers, dry sinks, side tables…these things can often be bought CHEAP CHEAP CHEAP and provide TONS of storage and a totally unique look.
OHHHHHHH BOY HERE WE GO! John and I did a couple days of initial/exploratory demo just to really figure out what we were working with and so I could get to designing and figuring out how to make this budget work, and CAN YOU SEE IT ALREADY?! Am I the only one that would run screaming from the kitchen in the first picture but be completely thrilled about the kitchen in the second one? This is a fun one. I think it’s going to be really cool.
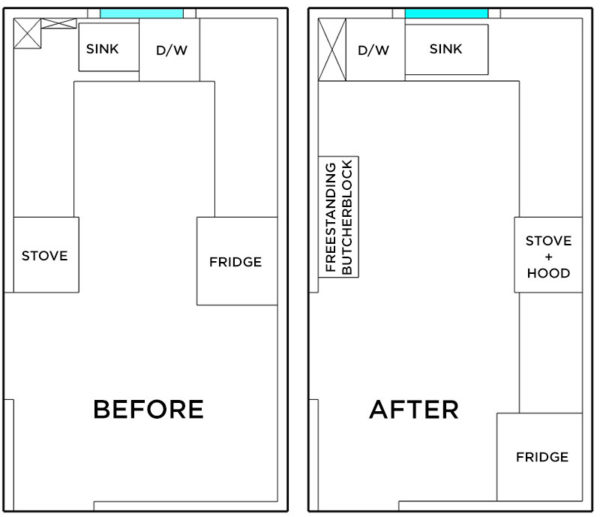
Here’s the basic layout plan! My goal is to really use the whole space, go from two awkward corners to just one, and allow for two people to comfortably prep and cook in here since currently I’d call it a one-butt kitchen. I think prep space on both sides of the stove will be a game-changer, and increased floor space and ceiling height will give the illusion of more space. Plus centering the sink under the window will just bring everyone joy and I aim to please.
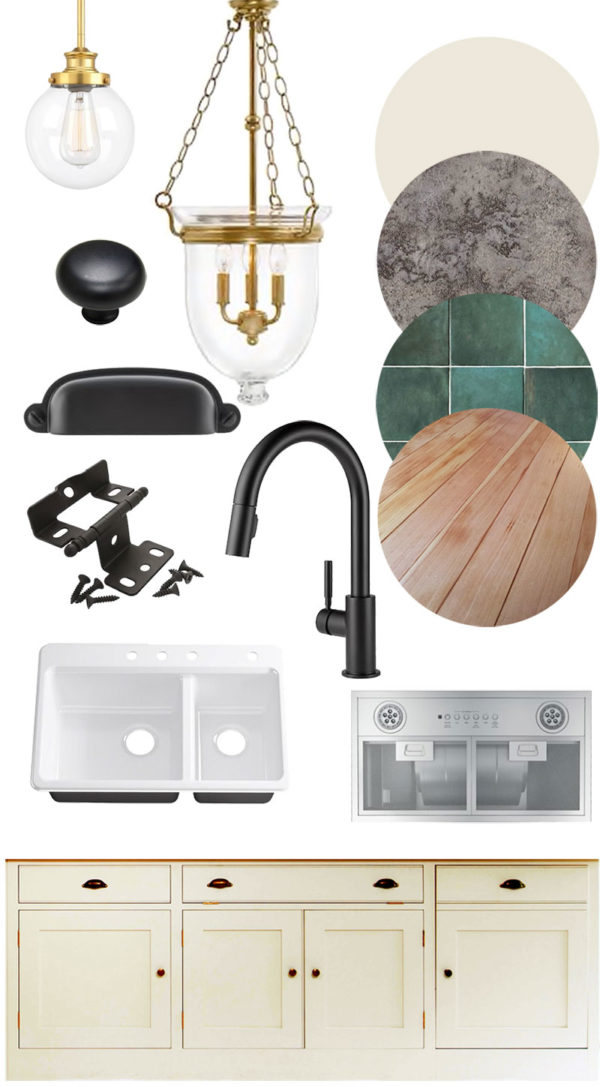
OK so this is a pretty basic mood board but check it out. These are my thoughts.
- LIGHTING! I want two big-ish pendants for the main lighting and one small one over the sink. No recessed. John doesn’t like under cabinet lighting so we’re not doing that. I found this little pendant and these larger more impactful ones that both have a turn-of-the-century vibe I can get down with. The prices and reviews are GREAT so I’m waiting with anxious anticipation to see them in real life!
- WALLS! I think a nice warm white on the walls and ceiling will look best. I have my eye on Valspar’s “Hint of Cream” but have to grab a sample.
- BACKSPLASH! It’s the tile du jour for bloggers everywhere, except green! And square! This Cloe Bedrosians tile is really beautiful in real life, with a lot of variation in the glaze and a handmade look. At $7.85/square foot, the price point is great considering that it looks like a much more expensive handmade tile from a more boutique source. Anyway John LOVED it so I made it my business to include it in the budget and design a kitchen that’ll pull it off. I think I can, I think I can! (It also comes in white, gray, black, blue, and this SO SO CUTE pink that I am dying to use somewhere, sometime. All in both square and subway formats!)
- COUNTERS! My initial instinct/plan was butcherblock, which John was OK with but not thrilled. Unlike me, he will not cut directly on a counter which kind of defeats the purpose of butcherblock in my opinion. This left laminate (nope) or stone (no $) or composite (also no $) but guess what’s cheap? CONCRETE. So we’re going to try to make our own. May or may not pigment them darker. I think they’ll read much like a natural stone, but it should cost about $350 to countertop the whole kitchen. Not bad! I have 15 bags of this concrete countertop mix waiting and ready to go because I’m ON IT.
- FLOORS! Y’all know I’m refinishing that wood come hell or high water; don’t play. They’re douglas fir.
- CABINETRY! I want to rework the existing cabinets with a little strategic carpentry and, of course, paint. I’m thinking beige-y. I’ve been real into a beige-y cabinet for a few years. I can’t help it! I’ll probably end up building some cabinets from scratch but I really want to reuse what we have already because $ and time.
- HARDWARE! I’m thinking simple and traditional? Simple black knobs on the cabinet doors and traditional bin pulls on the drawers. I really like the shape of these bin pulls—a little different than the norm but still totally classic. Oh also! I’m going to attempt to make these partial-overlay cabinets into inset cabinets, so I will need new hinges and I *think* these ones are just the ticket. I’ve ordered a couple as a test.
- SINK! FAUCET! We are debating a new sink. Which is my way of saying we’re getting a new sink (maybe this guy??! although that will blow the budget, pretty sure). Or maybe a vintage sink, if the price is right and the condition is good and the size works? Either way, I’d like it to be charming, and white, with a new faucet. To be honest, I like having a simple practical single-lever pull-down-hose modern faucet and don’t think that we need to perform plumbing cosplay to make this kitchen feel appropriate for this house. My approach to that is to go fully the other direction, totally mod, and keep it inconspicuous which I think black does. Brass would be too matchy in a bad way, I think.
- HOOD VENT! I generally do not like hood vents. But I think I will like this hood vent! It’s an insert, so we can build whatever we want around it, and I’m thinking just keep it VERY VERY VERY simple and try to avoid being able to see the actual device inside the enclosure. I’m weirdly excited, John is weirdly excited, and this is a real functional improvement since this space hasn’t had a vent as long as John’s been here.
Golly that post took a long time to write. But this’ll be fun! I’m trying to update Instagram stories (@DanielKanter) on the daily as we move through this renovation EVENT, so check that out! You can listen to my terrible vocal fry and watch my chaotic job site filming for entire minutes as this all unfolds! Yay!


Hi Dan, I love budget reno’s, and looking forward to this one, big time.
One thing: that’s not linoleum, that’s vinyl flooring. Linoleum is an actual thing, and can be quite pretty :-)
Very true! I do actually know that, haha. I didn’t mean to malign linoleum—a fabulous material in certain contexts! :)
I have this kitchen currently. Can’t wait to see your transformation!
Oh Em Gee. LOVE that you have a new project!
It’s Thanksgiving Weekend here in Canada and I am so thankful that you make this blog and share your work so we can all follow along and be inspired and know that there are people out there undoing the devil’s renos and making things gorgeous again.
Aw, thanks Andrea! Happy Thanksgiving! <3
I am so excited! This is exactly the kind of project I love. Ugly room? Check. Super small budget? Check. Also, I hate u-shaped kitchens with the fire of a thousand suns (all the light and energy just get trapped in there like an eddy) so changing this to an L makes me extremely happy. I cannot wait to see you work your magic in here!
I love the way you re-use as much as possible and blend modern and antique styles. I can’t wait to see what you do with this one!
I see that you have blocked off space for the pipe in the corner, but I am curious – what are you going to do about the pipes running over and down the side of the window?
Oh! So those are radiator lines for an upstairs radiator, so I’m having the plumber re-route them into the chase with the rest of the pipes so they can all be contained in that corner. That’s how we get the dishwasher moved! A few hundred bucks I didn’t anticipate, but I think will be well worth it in the end. There will still be exposed pipes coming out the top of the chase and up into the ceiling, but I think that’ll read as kinda charming when all’s said and done. :)
I love this. I am a huge fan of the cloe tile as well! I cant Wait to see when your done.
Can’t wait to see how this turns out! The new layout is going to make such a difference, and this budget challenge is the quality content you always deliver on ;) Good luck!!
Here’s a new kohler sink for $200 https://www.facebook.com/marketplace/item/2396036473948899/ only 1 hour from you. Good luck can’t wait to see the progress!
Yes, go get that damn sink!!!
oh wow, nice! Thank you!
Already seen your progress on instagram stories. I like that new kitchen layout, look a lot better in both appearance and practical. Look forward to finished kitchen :)
“Unfounded optimism and a healthy dose of good old-fashioned delusion” – my new life tag line!
<3 this, can't wait to see the progress/results!
I literally cheer whenever I see a new post from you! What a great way to make my friday!
(can’t wait to see this one. I am currently living with a very odd kitchen in a house built in 1926. I daydream daily about how to improve it in the short term, while the long-term goal involves our furnace dying so we can replace it, so we can take the chimney out of the house, so we have a more strategic place to put the fridge, and then we can get crazy!)
Haha, I know that cycle well! I hope this project is helpful!! :)
Like the ambition, but aren’t you throwing some foundations of kitchen design out the window?
The good old kitchen work triangle…
Thought the rule of thumb for that was anything over 25 feet ended up with a lot of inefficiency.
I like the idea of using the entire space. But it almost seems like getting the ability for two people to work in there makes it demand that two people must work in there. I would recommend one of two things to improve your design:
-putting in a small sink next to the fridge to make it a more functional prep between the stove and the fridge -slide the fridge closer to the stove and put in a large pantry in that corner.
If you’re keeping an eye on potential resale, either of those would make the kitchen more appealing even if it is just for a “temporary” kitchen to the next owner’s major reno.
I noticed that fridge distance too, but I have to say, as a long-time cook I have found that my experience is improved a lot by taking everything I need out of the fridge before I even start. As a result, the distance would be fine as long as there’s enough non-staining counter space to put my various bottles of soy sauce and packages of meat etc. on, also if the owner has multiple cutting boards;).
The kitchen is only 9×16!
But he said the room is 16 feet long? That’s really not very long. I think it will be fine.
Whoops, didn’t see Daniel’s response.
Can’t wait to see how this turns out! I believe in you! Love that tile. I want to say I agree with John re: under cabinet lighting. It’s often really harsh, and I’ve never seen the need!
Oh man, I nearly started hyperventilating at that second picture of the kitchen after the demo, I was so excited. The ceiling height, that window … I can just see all the amazing things that could happen in that space. And then as you started listing all your plans, and that mood board! I’m dying. I can’t wait for this. GAH. You live my best life, sir.
Aw yay! I’m glad you’re excited! ME TOO!
Is there a way to move the fridge all the way to the bottom of layout and continue the cabinetry all the way to the end and then turn it to meet the fridge? Does that make the space awkward or complicated or things banging into things? Just wondering… to get more storage!
Like everyone else ^, I can’t wait to see how this goes! Amazing as usual.
Thanks Diana! I thought about that, but I think it just makes things too crowded with the doorways. But thank you!!
Not of caution!! Make sure you’ve got a slim cabinet (9-12″ wide) to the right of the fridge, so the fridge isn’t sitting right against that wall. Fridge doors nearly always need to be able to swing open past 90 degrees in order for you to be able to pull out the drawers inside the fridge. When you stick fridges directly in corners as you have thr fridge drawn above, the door can’t swing open wider than 90 degrees.
Also, the work triangle thing people are concerned in the comments about has a lot of caveats. Mostly you don’t want the sink and stove to be wildly far apart because no one likes to carry pots of boiling water on a whole voyage before dumping them in the sink. But the fridge isn’t a big deal to walk a bit farther to. Plus if you have a lot of people in your kitchen often, it can be actively nice to have the fridge placed a bit beyind the main work areas of the kitchen. That way, people rummaging for snacks are and the fridge door swing are all well out of the cook’s way. In a set-up like that, the cook just gets into the habit of getting everything they need from the fridge in one go before they cook. And I can attest from experience that that is no trouble.
Aside from the issue of the fridge door sing, I actually like your kitchen layout. You are ticking off the major boxes for functional design:
1) Enough walkway room for adult humans to pass each other easily. You have this.
2) A good primary work area — ideally 3-5 feet of counter between the sink and stove. That is enough space to work, handy to both sink and stove, but not so much space that the sink and stove are leagues apart. You have this.
3) If you have set up #2, then also making sure the dishwasher is not between the sink and stove. That way the dishwasher can be loaded/unloaded and generally open at the same time someone is using the main work counter without getting in their way. You have this.
Honestly, if you tick off those three, you are already miles ahead of most kitchens.
Yep yep, yep yep yep! Pantry cabinet in the works! I was planning a small filler piece next to the fridge but, indeed, underestimated how much space the door actually needs to swing. Why do fridges have to be such a pain?! And thank you! I think this is the most practical way to do this without making any big changes to the structure or plumbing or other things that would significantly drive up costs. Trying to stay reasonable. :)
My first thought too.. the fridge is too far from the sink and the stove… (love a triangle placement) and thought of the same thing… move the fridge to the bottom wall from the sink and then you have the triangle.
i am moving into a house (rent hope to buy) that wont have a triangle and there is no way to fix… the fridge lives in a small cubby and the stove is next to it and then the sink is further along. sigh. oh well i can dream of what i would do if i can buy it.
also BROWN CABINETS (i hate brown cabinets) and not fun handles… at least i can change the cabinets down the road… but i sigh about the brown (dont think this LL will let me paint them white or a nice dark color).
freudian slip… at least i can change the HANDLES …
OK, so I tried that layout to scale and it just doesn’t work! If the room were a foot or two wider, totally, but I don’t think it improves the design here unfortunately. But maybe I should have put dimensions on the layout? The stove is like 3 feet from the fridge. The sink is 6 feet from the stove. This is not a big space! :)
Love your ideas just see one little problem. You are going to need to leave quite a lot of space to the right of the refrigerator in order for the door to open fully and be able to use the bins. You may want to bump it over and “plan” a tall pantry to the right of it to give the right door the amount of room it will need.
I second this idea, but mostly so that John could use the blank wall for a beautifully curated pegboard wall for hanging stuff, a la one Miss Julia Childs. I have one in my pantry and it is beyond useful. I even used an old Martha trick of painting the outlines of all my items in a slightly contrasting color, so other people know where to put them back. Sounds like your kind of OCD. A narrow tall shelf unit like your old bathroom might leave space for the hanging stuff without the fridge bumping it.
Unrelated question: as a lover of Bondo, have you ever tried using it (or something) to fill in the ugly arched detailing on old cabinet fronts like these, to turn them into slab fronts? Partial overlay is still a bummer, so I can see how it’s a lot of work for maybe not a great outcome, but it intrigues me.
Meredith—Love the pegboard idea! I was thinking possibly over the butcher block piece, but I think we might do shelving there. Decisions!
I haven’t used Bondo for that! I’d guess it would work? Although it would be a TON of Bondo and i’m not sure how it’d hold up…I’d probably just try to replace the doors altogether, unfortunately. There are lots of retailers online that do custom cabinet doors for this very purpose of refacing rather than replacing, or making the doors if people want to build their own boxes! Might be worth pricing out!
Linda—you’re right! I gotta figure out how much clearance I really need to the right of the fridge for the doors to open fully and bins/shelves to be fully accessible. Homeowner also dropped the (small, no biggie) bomb last night that he might cough up for a new (used) fridge—plenty to do before the cabinet install so we have a *little* time to figure it out, but not much!!
This already looks so much better, and I love your new floorplan. Also delighted that you are Nancy Reaganiing the recessed lighting (“just saying No”), I absolutely hate it in all circumstances. Can’t wait to see the finished result – and the steps from here to there.
Yessssss, another recessed lighting hater! We should form a club and print tshirts. I don’t hate it as much in new construction, but I loooooooathe it in old houses. It completely ruins the vibe! There are more creative ways to light a space than resorting to ugly ass cans.
*whispers* I’m with you and I will buy a shirt ;)
OMG! I can’t wait to see the finished project. The cabinetry, lighting, flooring and everything else will be beautiful in that kitchen, keeping with the style of that spectacular house.
so many responses! I literally this summer removed/replaced counter tops with that same laminate. No, not the faux granite laminate… the faux butcherblock laminate underneath it. hid-e-ous. you can do a lot just refinishing or removing old stuff. For me, I would want that freestanding butcher block away from the wall more like a faux island (which is how I have my kitchen, un-coincidentally)…. that way I don’t have to have my back to the room when I’m prepping. losing the dropped ceiling is A_MAZ_ING in impact. And I love the progress lighting pendant. They make so many pieces that I like (been shopping lighting lately) things with just enough vintagy flavor that you can convince yourself some one might have made a light like that back in the day… maybe. Can’t wait for the finished project.
I hear ya on the island! I think the space is just too narrow though…9 feet across minus 2 feet for cabinets minus ~18″ for an island divided by two…2’8″ of clearance around it. I think anything under 3′ is cramped…preferably more like 4! (and I know right?! They have so much great lighting…I knew that, but really diving into the selection for this project I was honestly surprised how much of it I really love!)
Oh wow, I’m super excited to watch this unfold. This is pretty much my kitchen situation, 100 year house, odd small kitchen, I especially have the strangely off centered sink window combo that must be made right soon. I am so tempted to throw a little money at it and see how much more peaceful it could become. ****Taking notes!****
Well I hope this helps! :)
The! Green! Backsplash! You promised and you delivered! I’m so excited to see this come together.
Me too! I hope it was the right call!! :)
same here, with the lighter cabinets and the brass pendant lights… that backsplash is going to look so cool
This is the kind of project I love and that you are so, so good at. Can’t wait!!
Thank you! I hope it’s up to snuff! :)
After a post like this, I always want to respond with something equally witty and amazing but, alas, not my skill set. So I shall just say I freaking love you and snorted tea out of my nose because I laughed so hard. It hurt, but this post was worth it.
Ah! Apologies to your nasal passages!! Thank you for the kind words! :)
The before photos of the kitchen are soul-crumbling. Every single detail is horrific.
The bottom cabinets aren’t so bad, especially if painted–just simple rectangle doors. The top ones, though, with what we call “chapeau de gendarme” (cop’s hat…in France, in an earlier epoch), are more dated. I LOVE that you are going to keep a max of what’s there. So much more of a challenge.
We scored sinks on the local version of craigslist (bathroom, kitchen, garden…who doesn’t love an old stone sink to wash their hands out in the yard). Cost almost nothing, all retro style but in perfect condition, except for the stone sink, which we wanted to be old.
If you cook a lot, a vent is very helpful.
Can’t wait to see more and to hear the tale in your inimitable style.
I’ve never heard that! I can’t pronounce it but I’m also desperate to repeat it as much as possible, haha! I hate those doors so much…but yes I agree the lowers are workable.
Definitely keeping an eye on Craigslist, etc! Maybe a new fridge will materialize after all! The sink *might* be figured out…eep!
Trying to get you some help with pronouncing it:
”žTcha“ as in ”ždon”˜t cha…“ ,
”žPoe“ as in poem,
”žDe“ as in delivery,
”žShaun“ just like shaun the sheep,
”žD”˜harm“ as if Dharma lost the last a.
Tcha-Poe de Shaun-D”˜harm
(Mind this was a German trying to help an American pronouncing French :-) )
Oh my lord this is going to be GORGEOUS!
And such intelligent usage of what the economists call “factors of production,” i.e. using your sponsor relationship, and your elbow grease, and your fantastic eye, all to get maximum design (aesthetics and functionality) for the buck. I cannot wait to see more, having of course been following along on your stories already.
Factors of Production! That sounds so much smarter than being a scrappy cheap-o. I like it!
Going to be so worth it! Does John’s Jersey family know about this project in their honor? All the achy muscles will be worth having that floor back!
I’m hosting Thanksgiving this year and managed to squeak out a new dining room – the “selfless” things we do for family.
Ya know, I don’t know if they know! BUT THEY BETTER APPRECIATE IT! OR ELSE! ;)
I think the beige-y cabinets are going to look fabulous with the rich green tile. Looking forward to the after photos.
Oh I am so looking forward to watching this one! I’m building a house on a super tiny budget and plan on the kitchen cabinets being salvage – waiting anxiously for tutorials on making cabinet doors pretty and inset. Desperately need inset due to ease of dog opening on the regular kind. Do you have that problem?
Oh man, no! My dogs aren’t that smart apparently, haha! I will do my best—this is kinda uncharted territory for me but I think it’s a solid plan SO WHAT COULD GO WRONG?! :)
Yesssss yess yes yes yes yessssssss!!!
Our kitchen is basically the little brother of this kitchen, and I will be filing all future blog posts as evidence to my partner to convince him that we can do something on a similar budget! You are a true hero <3.
Haha, thank you! I hope it’s helpful! Sad kitchens are no fun. :)
I’m so excited for this project! And for that green tile, hubba hubba.
I want to hear about the progress on your house before winter, too! (Unless you didn’t make it that far, in which case, dude, that is fair. You did so many other things this year.)
Oh man, fits and spurts. Little tiny ones. Things have been so busy I’m mostly just trying to maintain some level of decency at this point. But I’m sure I have a couple little things to share!
This is going to be fun!
SO PUMPED! Your stories on this have been amazing and the layout makes me so excited. I don’t think the walk is awful at all (my fridge is in a back porch off my kitchen and you get so used to pulling things out for prep it’s no big deal). I wonder if you could put in a slice of tall cabinet to the right of the fridge to give you the opening clearance needed that someone mentioned above? Just a slice of pantry for canned goods or things that you don’t want to highlight. For uppers, are you keeping? Not doing? Open shelving? (Did I just totally miss a note on these???) I’m trying to envision how the tile will look with everything and am just so, so pumped! Love the butcher block. Love the thought of the peg board somewhere. Getting a ton of inspiration for little tweaks I’d like to do in my space. This is going to be just as good as the Antarctica basement, I can feel it.
Pressureeeee! I think you’re right on the little pantry thing for clearance, yes! And I didn’t say on the uppers because I’m not *entirely* sure but I do want to reuse the old cabinets, but refaced and improved, annnndddddd…up to the ceiling? So a mix of reuse and probably custom-built to match. (this plan just keeps getting bigger, can you tell?! ha!)
I HEAR YOU on the love of ugly spaces. ALL the heart eyes for this space! I can’t wait to see what you do with it!
I am so f’ing excited about this reno that I had to retype this twice so it wasn’t all caps with like 12 exclamation points between each word. This whole situation with a super limited budget is totally my jam. I keep pricing out the inset cabinetry I want and despairing, then eyeing my shitty falling apart cheap 1978 cabinets and wondering whether I’m capable of converting to inset with drawers without making everyone hate me in the process (or failing completely) and then making them strong enough to put a heavy countertop on top. (As much as I want stone, I’m 98% sure I’m gonna go the dyed concrete route, so I am super curious to see what your experience is like since every DIY I’ve read has made it look just easy enough to make me suspicious and if it’s really that easy, then why isn’t everyone doing it?)
The cabinetry style/backsplash tile color/dyed concrete countertop combo reminds me of Alice Waters’ kitchen. It’s got that perfect hard working old world vibe. https://www.remodelista.com/posts/kitchen-tour-with-alice-waters-and-fanny-singer/
Anyway, cheering you on from afar!
P.S. Really digging the blues and greens that demo uncovered on the walls in there.
Haha! I LIKE THE ENTHUSIASM THANK YOU! And oh man, that’s a beautiful little kitchen! Thank you for linking!
Fabulous kitchen Ms. Waters has! Thanks so much for the link.
Such a fun post! I cannot wait to see what you do with this brown-town masterpiece!
I love your dedication to reusing stuff. We just did an tight budget kitchen renovation, and we kept our white appliances. They all work and they’re free and I was able to buy gorgeous tile instead.
PS: what do you think are worse: soffits or drop ceilings? I can’t decide.
That’s the way to do it! Tough call but I’m definitely gonna go with drop ceilings…sometimes soffits aren’t so bad…but drop ceilings are always bad. Right?
Always look forward to your posts…. this one is spectacular. Best of luck and can’t wait to see the results. That kitchen vent….. brilliant. We have had ours for 17 years (yes, that’s right!). We had our kitchen re-done 2 years ago, and just took the vent down, cleaned it up and re-installed. They are BRILLIANT! and so easy to clean, just take out the filters and give them a go round in the dishwasher. Our kichen ceiling is very low, so we have a cupboard above the hob and the vent fits below it, with it’s gubbins in the cupboard.
Wow, 17 years! Good job, vent! I’ve never actually had one except in the house I grew up in, so this feels like oddly new territory considering how many kitchens I’ve done, haha!
Okay, I will never figure this out. The same people who gush over an old house with its original (brown) woodwork then turn around and gripe about “dark oak cabinets” and all that BROWN. And, then, they want beige cabinets, instead. I could understand if the issue was that the cabinets were in the wrong style (which they are) for the house, but it’s wood and the same brown tone–beige (unless I’m mistaken) is also brown. Oh, well, some of this stuff just does not compute for me.
The bizarre thing is that your “after” kitchen is very, very close to the redesigned kitchen in my new house (the old version had terra-cotta-colored painted walls, fake tin on the ceiling and front of a few cabinets, and [I think–it’s vague] green laminate countertops–perhaps worse than what you are seeing here). The only difference is that you put the refrigerator way on the far end of the kitchen. We went with a counter-depth (not deep, but very wide) refrigerator where you have your free-standing butcher block. It’s a lot more convenient. Otherwise, yes, we also centered the sink on the window and put the dishwasher on the (very inconvenient) left. But, we went with “outdated” dark cherry cabinets–so far, we have survived the disapproval of our on-trend family members. Feel free to scoff, though.
We went with a Lowes Fresnel Lens Pendant–because it kind of looked Edwardian (and, at the time, was on sale, and we found some smaller ones elsewhere that matched for the island). But, yours are pretty too. I just thought it was fun that the layout of our kitchen looked so much like your plan. I will look forward to seeing how this works out.
Thanks? Haha. So to clarify here, yes I will gladly admit to gushing over original 100 year old quartersawn oak wainscoting built and installed by skilled craftsmen, that still looks great a century later, and somehow is untouched by paint in spite of everything this house has been through. And yes, I will also cop to not seeing the same value in cheap mass-produced kitchen cabinetry from the 1980s, even if the wood tones are somewhat similar. There is a very big difference between the two. If that doesn’t compute, I can’t help ya!
Enjoy your new kitchen, I’m sure it’s lovely! :)
Yes, that makes sense. The cabinets are the wrong style for the house–they don’t go at all. But, I don’t think that it’s the brown tone–it’s the style and the quality.
Sadly, I have seen too many people dismissing wood lately because it is too “brown” (as in the phrase “brown furniture”) and junking things that are made of solid wood even when they are lovely, natural materials. So, it does bother me to see things dismissed as “brown”–as if that is self-evident.
Our kitchen is half-way done. We are still waiting for the pump for the well, and then the finish plumbing can go in. And, then, we have to get the certificate of occupancy–so that will be another amusing adventure none of us are looking forward to.
But, I don’t disagree that the cabinets were completely wrong for this house–that’s clear (I still think they’d look fine in someone’s tiny home, though, if painted black–or restructured with new doors, or if the current doors were rehabbed with glass insets). I mean, they’re blah–but they seem sturdy-ish and functional.
I hear ya! I’ve had a couple of conversations with auctioneers who are amazed by how inexpensively gorgeous antique wood furniture sells for nowadays, especially compared to like 10 years ago. Even though I guess I should be paying attention to this stuff (blogger, guilty as charged), I feel like I don’t have a ton of insight into trends like that. But I have heard about it, and it’s a bummer. I’m sure it’ll come back around though—these things always do!
But yeah, these cabinets are nothing special (ply/particleboard boxes…upon closer inspection, I actually think the boxes were built for this kitchen and doors/drawer fronts were factory-produced and ordered…so semi-custom? but the only solid wood is on the face), but we’re reusing them! I’ll show you what I did once I figure it out myself, haha!
Fabulous new layout, and it’s nice to see how some of those old projects belong to a house. I can’t remember where I saw it but recently someone was talking about the obsession with kitchen efficiency and how people are always, “but, kitchen triangle!” but at the same time we’re all, “got to get my steps in for the day…” Besides, your major prep area is between the range and the fridge so that’s not so far.
I’ve been following along on Stories (and don’t mind all the racket that Edwin makes in the background while you’re talking, shit’s getting done) and excited to see how you retrofit what’s already there like the existing cabinets. Not to make things more complicated, but in that new boxed in pluming chase it looks like there’s enough deadspace in front of the drain pipe, since you’re extending it the depth of the counter, to add a recessed nook+shelves for some additional pantry storage or cook books or a spot for a sonos speaker. I’m trying to find a small space to put a speaker because I’m tired of the portable one cluttering up the counter but the other person in my house likes to listen to shows or music in the kitchen so it’s always in there with some random change cable draped over the blender.
Haha, that’s a hilarious point! I mean, I banished my own refrigerator to another room, so ya know…I’ll take a good-looking kitchen over a maximally “efficient” kitchen any day! (but seriously if you can’t manage the 12-14 feet between the fridge and the sink in this plan, there might be a medical issue that needs addressing? life must be very very challenging?)
I thought about recessing something in the chase! Ultimately though it just felt too narrow for it to really work, but with a little more space it woulda been nice.
I am SO EXCITED for this!
Love it, as usual! I hope you can find some type of vintage piece to fit between the stove and the fridge, given that (I think) it’s the view you’ll see from sitting in the dining room. Great cabinets are awesome, but imagine looking up from your carved turkey to a beautiful old piece that keeps you in the 1900’s of the dining room. Swoon!
So psyched to see this in my inbox today. You did such a great job on a low budget with your bathroom, I’m sure we’ll see good things here.
If it were my kitchen, I’d reverse the color scheme and go with green cabinets and cream tiles – mostly because I am in LOVE with a Farrow and Ball green smoke, which I’d love to use but also because I think the concrete counters will have more depth against a darker cabinet color.
So, I renovated my parents kitchen on a budget (under $1,000). I inherited an L-shape with two runs of cheapo wood cabinets (one run was actually fake wood!) plus, the face styles didn’t even match! (United in color, now they do.) I actually used a Lowes kit—Rustoleum Cabinet Transformations in “Cabernet”—and it was AMAZING. I left off the final coat, which was a sort of stiple that was supposed to texturize the look, and I wasn’t sorry. Six years later, the cabinets still look great. I checked Lowes’ site and it says the kit isn’t available anymore, but maybe there’s a newer version:
https://www.lowes.com/pd/Rust-Oleum-Cabinet-Transformations-Dark-Base-Satin-Cabinet-Resurfacing-Kit-Actual-Net-Contents-132-fl-oz/3358244
Everything’s always subject to change! We might end up with a dark cabinet after all. I think I have to see a few more things come together before I can make the call!
Interesting, thanks for the product rec! I was planning to probably use Valspar’s cabinet enamel—I’m not sure I even knew something like this existed! (or maybe it doesn’t anymore, haha!)
Home Depot actually still sells some of the kits, but not the cabernet version.
I’m so looking forward to this, but I have to admit I had a weird nostalgic feeling when I first saw the before. It’s like a grandma kitchen or something. Where everything’s nice, but old. (I did see how awful the counter is later.) I love budget makeovers!
Nice! You are doing what is the SMART thing here, removing what needs to go, keep what’s usable and rework it all into a more functional, and less brown and dated room.
That is, unless you find hidden issues as you deconstruct the space, it should be doable on a budget and look good. I did the exact thing, though I have not remodeled my kitchen one whit, but simply added what the kitchen needed, replace the mismatched but older fridge for a newer one (the same vintage as my stove, both are within 6 months of manufacture as the fridge is from late 2008, stove somewhere in ’09 I think and both black and from GE and the current fridge has an ice maker, the original one lacked one). The stove is similar to this one, but all black, but the super basic model sans self cleaning and I’m OK with that, though it’s is overdue a good cleaning, but not THIS weekend though!
That said, I did add an island with a bamboo top (the Rimforsa island frim IKEA) to put next to the stove for a work surface, added the Mossby/Ekby stainless shelf above and used a Grundahl shelf with S hooks as a pot rack, works a treat for storage and prepping.
The rest of the space is all mid 20’s non discript kitchen with peel and stick tiles in sad shape for the floor.
I even added a dishwasher! Bought both the fridge and dishwasher (in black, but made by KitchenAid and older as it’s from 2005) from an architectural salvage place not far from my house. Had to rework the home brewed lower cabinet that houses the kitchen sink as it’s janky and there is NO love for it, but is needed, for now, so gained a vertical storage for sheet pans etc next to the DW.
THIS KITCHEN IS SO FUNCTIONAL I CAN’T STAND IT AS IS. ;-p But as my best buddy says, it’s a “working” kitchen as it’s purpose is to be functional, rather than rather than conform to form, ya know what I mean? Besides it also doubles as my dining area cause my house is SMALL, like 836SqFt small and 3 bedrooms…
This is one project I’m keenly interested in as to how you two go about it and so far so good!
I’ll be following you on Instagram as I finally signed up as I will use it to advertise my YT channel that I’m slowly getting going, now to solve editing issues (rendering/encoding) so YT can accept my videos. :-(
Anywhoo, keep it up Daniel!
Check out the 7th photo here (fireplace tile in a historic home): https://www.houzz.com/magazine/cincinnati-couple-honor-their-1897-homes-history-stsetivw-vs~124213927 It’s a ringer for the backsplash tile you and John chose.
Like others, my favorite makeovers are done with a shoestring budget, creativity, and sweat equity. Can’t wait for the final reveal–the kitchen itself and how you’ll write about it.
Wow, it really is! Cool! Thanks for sharing!
I love those knobs. For what it’s worth, when I repainted my kitchen a couple of years ago I was on a super-tight budget, so I just bought these knobs – https://www.lowes.com/pd/allen-roth-1-52-in-Wood-Round-Transitional-Cabinet-Knob-2-Pack/1064763 – and spraypainted them matte black before installing. They’ve held up great so far, and though they only saved me $60 or so, it was definitely worth the extra 20 minutes it took to paint them.
Nice! I was thinking about doing something like that too! $60 is nothing to shake a stick at—everything adds up, especially with kitchens!!
One thing I haven’t seen mentioned is some sort of task lighting for the butcher block work station. My mature eyes need direct lighting in my work area, especially if I am wielding knives. I’m just assuming others may need good lighting for such tasks too.
I see how old fashioned the kitchen is but I am impressed how gleaming clean it looks.
Hope it stays that way, clean, after you make it fabulous.
Haha! It’s *possible* I warned the homeowner I was coming to take before pictures and then the kitchen was spotless when I arrived. Maybe. ;)
I read how new laminate counters were a no-go in favor of the concrete, but didn’t see the reasoning. Looks? Old-house anti-crime principle?
If it’s just looks, I think you would save both $$ and time (esp. if this is your first concrete countertop attempt) by using a high-end laminate from Formica or Wilsonart. I think Lowes sells both? Anyway, both companies have a faux-slate or faux-soapstone (and even a faux-marble) that looks remarkably good, from close up and from afar. If John is never going to cut on the countertop anyway, the only function you’d lose over concrete is not being able to put very hot pots on the countertop.
Even if you’ve never DIY’d laminate tops before, I’m sure you have the needed skills.
Also, Daniel, let me encourage you to learn to cut slate-type and soap stone yourself. With a helper, though. Not suggesting marble, however, to begin with. I bet you can find slabs of the other stones for cheap/free in your neck of the woods that you could turn into luxury counter- or table-tops for the right client space, or for space in your own house.
It is a first concrete countertop attempt! But we both kinda want to try it out. I hear you on the laminate, though—which I like! I’ve put formica in a kitchen before and really liked it. But John liked the concrete idea best so we’re gonna try it. :)
I like that you don’t have principled aversion to the laminate. Hope i didn’t sound discouraging. I am all for your trying the concrete counters, if you’ve got the time and inclination. I hope to have the occasion to try doing them myself at some point in the not too distant future and I always learn something from your posts ”“ even though I would probably read them for sheer entertainment value. In bocca al lupo!
(It’s the closest Roman equivalent to “break a leg”. Enjoying the international flavor of your comment community, too.)
I cannot wait to see your progress and finished photos! We will be remodeling our kitchen in the next year or so, so I am watching this with special interest — already decided on the tile backsplash I want after perusing the Lowe’s selections. One nit to pick: those old-fashioned draw pulls are fine for men or for women with short fingernails, but they are truly a PIA for anyone with even moderately long nails. I urge you to instead consider pulls that are open top and bottom.
This is my favorite kind of renovation! Mostly because I will never have money and I have to figure out what I want to do and can do with fewer dollars.
I wish you had a like feature every paragraph or so. I got very excited reading this and could only like it by myself.
Why does the kitchen look smaller after you demoed it? Clearly I have no eye for this sort of thing? Love watching you work.
Haha! Just pictures, I guess! It looked HUGE to both of us in real life after demoing out all the excess!
It looks like a lot of fun for you–just jump right in to the fun stuff! The mood board is great. I have some black items in my kitchen and I like it, it always feels neutral in there. Your new instagram stories are fun, too.
plumbing cosplay lel XD
Another wild ride. Oh, boy!
I haven’t been this excited about a blog post in a while! My kitchen is equally as ugly so I can’t wait to see how you transform it on a budget. Also, who in their right mind would cover that beautiful window?
I think having a long narrow butcher block on the empty wall is genius. I hope you put casters on the legs of the butcher block so it can be angled into the center of the room for long prep sessions or whatever, then rolled back into place. I think that would add to its versatility without much cost.
Great plans and can’t wait to see the result!
Casters are a great idea!
I’ve been watching on stories and loving it. I’ve always loved your projects but after your bathroom reno, I’m SOOOooooooo excited to see what you do on a budget here! I predict amazing!
Aw thanks!
Daniel,
Please, please, please move the fridge over 15 inches and put a full height pantry cabinet in. It doesn’t have to be deep, anything more than 12 inches and you can’t find the stuff in the back anyway. It’s just such a godsend to have all the canned goods and the five pounds of flour shelved right where they are easiest to reach instead of in the back of the lower cabinets or out of reach in the upper ones.
And after you move the fridge, please, please move it 15 inches *more* and put in an Effing Broom Closet. Having some place to put the broom where it’s out of sight and still handy is the absolute bomb. It might be even better than a pantry.
Done! Didn’t quite have 15″ but it’ll be a pull-out to avoid the whole things-lost-in-the-back issue which I hate more than…anything.
No on the broom closet (no space!), but there’s a very spacious hall closet a few steps away. With a bigger budget I would have maybe divided the closet in two and busted a doorway into the kitchen to use as a pantry/broom closet situation, but it’s just not practical with the budget/time constraints.
I am sure you have your Craiglist alerts ready to go but in case you don’t… https://hudsonvalley.craigslist.org/hsh/d/goshen-kohler-brand-new-porcelain-cast/6973862464.html
I can’t wait to see what you do with the cabinets. I have some 1980s doozies in my own kitchen now and dream of someday having inset cabinets that fit the period of my house better. Since the cabinet boxes are good plywood in moments of insanity I think about building my own new doors. So be warned, my future sanity may lay in your hands! :) I really like your blog – both for your honesty and your wit.
Hi Daniel.
Thanks for putting in time to create this blog post. I actually need your help.I and my wife began renovating our lovely house. One week ago we bought new granite countertops. The company mounted them, dark grey granite looks attractive. Unfortunately countertops are hardly sealed. After renovating we’ve got not enought money to afford resealing by installing company. I decided to seal granite by myself, I’m sure it isn’t brain surgery. Actually all I need is good granite sealer. Can you suggest any? Many internet resources say that Tuff Duck or StoneTech are trusted brand names. Looking forward to your reply!
This isn’t something I have a ton of personal experience with, but my mom used to use this stuff on our granite counters every few years or so. Worked great!
Daniel–
I think we are going to use that pink cloe tile for our shower! thank you for posting about it! i just wish the trim pieces were cheaper!!!!!
We have a 60s era house with a shower that needs to be redone. after searching way longer than we wanted to, we decided on a totally vintage looking floor tile, but couldn’t find a good field tile. and i think the pink cloe is it. it looks great and coordinates really well with the floor tile.
have you installed it yet for the backsplash? any tips?
I love these ideas! I have that Kohler sink from Lowes and just a word of caution: it doesn’t chip, but it does stain immediately. I’ve tried cleaning it with lots of different product and they take the scratches on the bottom from brown to light brown but nothing really takes them away. And I can’t be bothered to baby my sink so it’s just getting worse. The sides are fine, just the bottom is scratched. Just be aware going in.
I really love and appreciate this kind of budget and use-what-you-have renovation. It inspires me to do a budget kitchen reno in my house! I’m excited to watch the process.