
This post is in partnership with Lowe’s! Thank you for supporting my sponsors!
GUYS, I MADE BACKYARD! AT BLUESTONE COTTAGE!
If you missed my earlier posts where I showed you the “before” space, or how I laid concrete and built my super nice fence, or how I cobbled together a little storage shed, go check those out first! A lot of work has gone into this 500-ish square foot outdoor space and I gotta say, I’m pretty proud of the results.
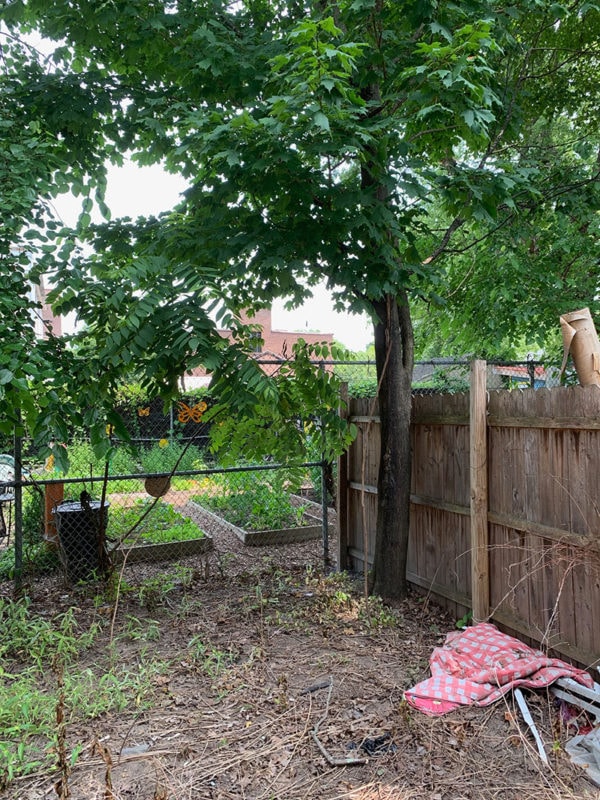
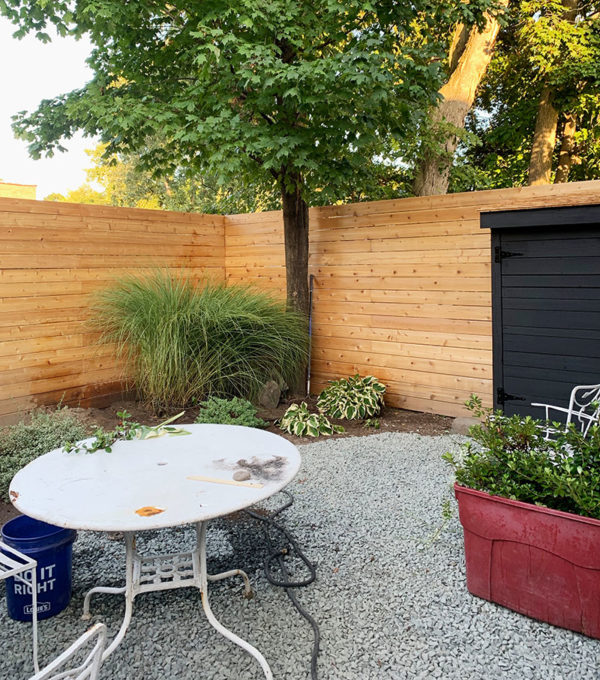
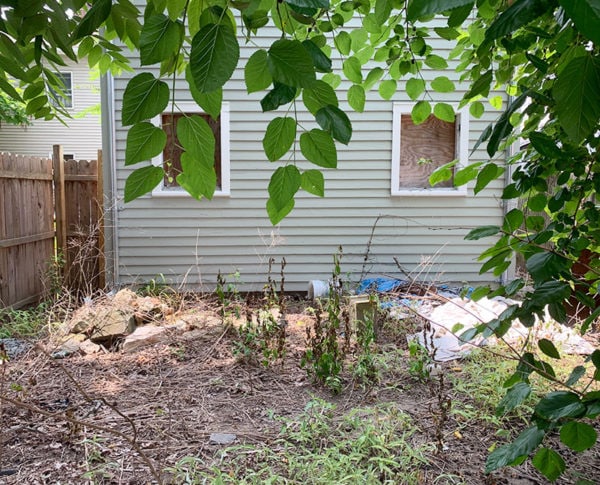
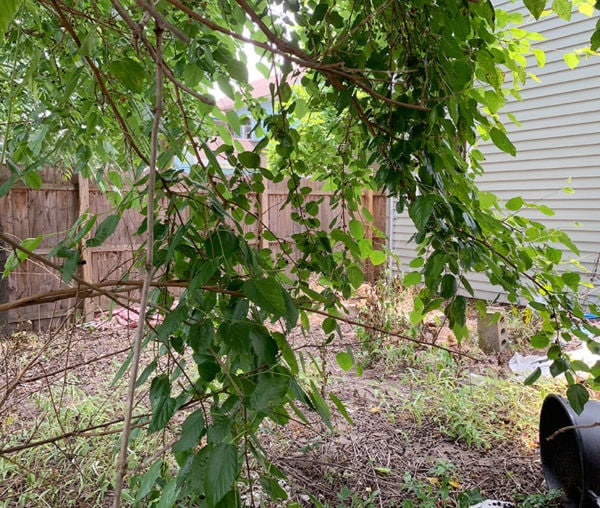
WANT A TOUR?! OK. Let’s go back to a couple of months ago…remember this view?
Once in a while, I actually get a little frustrated that I can’t invite all my blog people over to see something in person, and this is one of those times. I hope it looks good in pictures because this space is SO CUTE in real life. Not even my own house has a backyard that feels like a private sanctuary, but this one totally does. It’s so peaceful! I see the appeal!
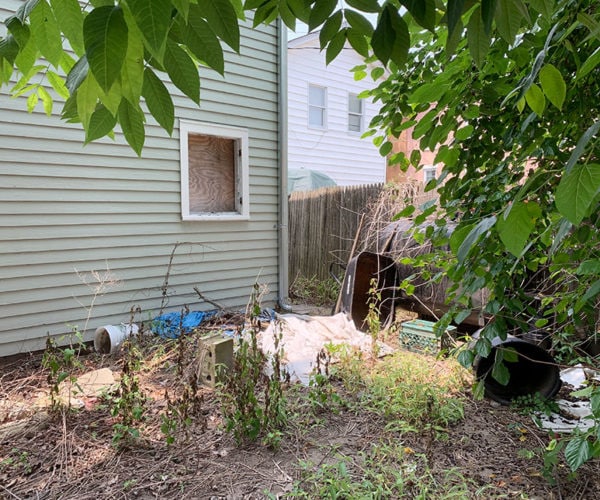
Man. It was so bleak.
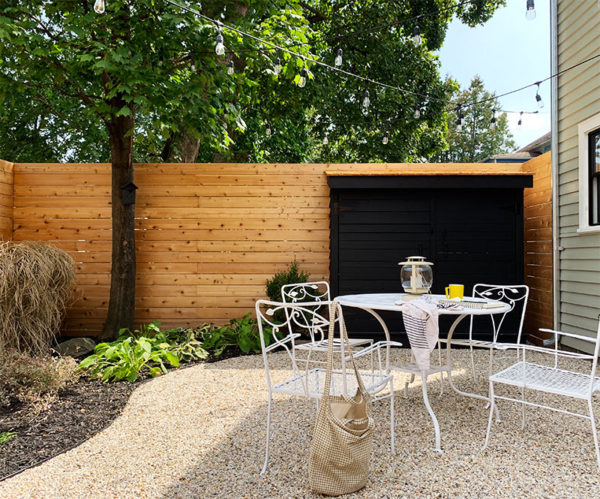
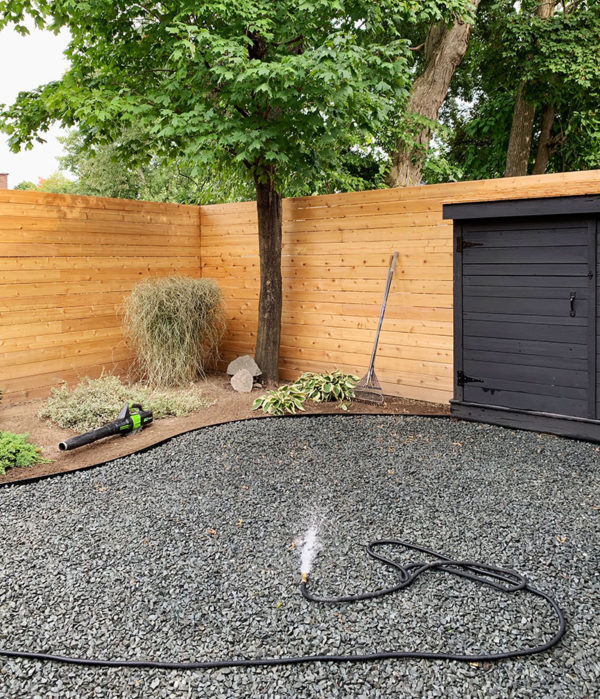
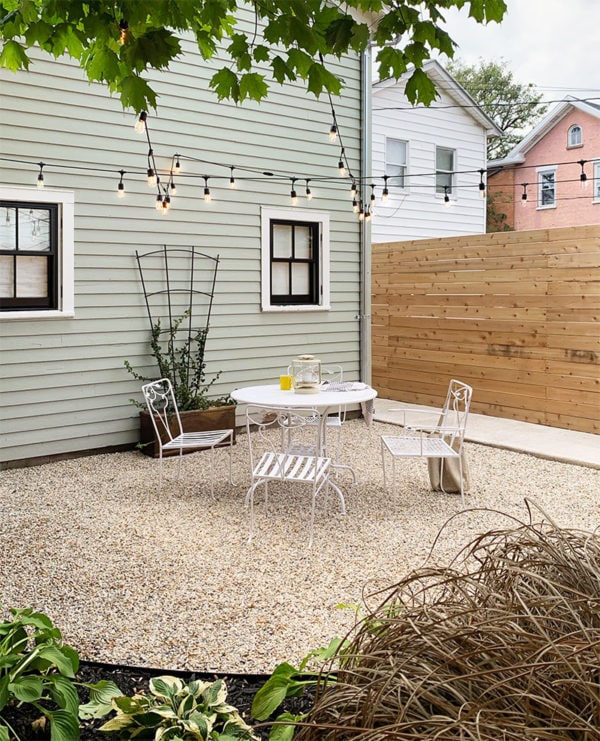
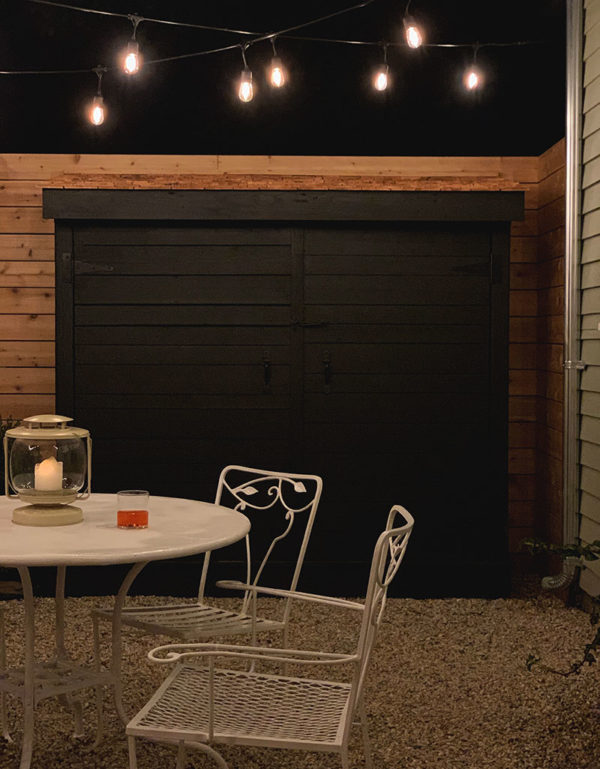
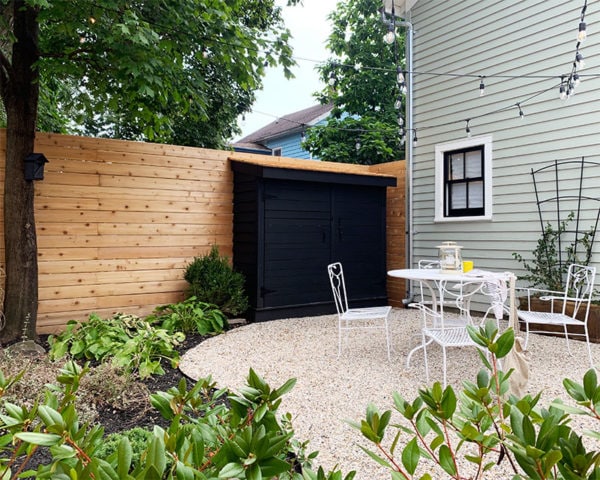
New fence! Shed! Plants! Pea gravel! String lights! I ended up really liking my funny shed more than I realized I would, and it’s so functional. Just having a place outdoors to put outdoor-related items is so nice, and really makes the whole renovation feel a little more manageable to have that stuff out of the way, particularly as cold weather approaches. I don’t need all that stuff in the way and floating around the house while I’m trying to renovate it! I love you, scrappy shed thing.
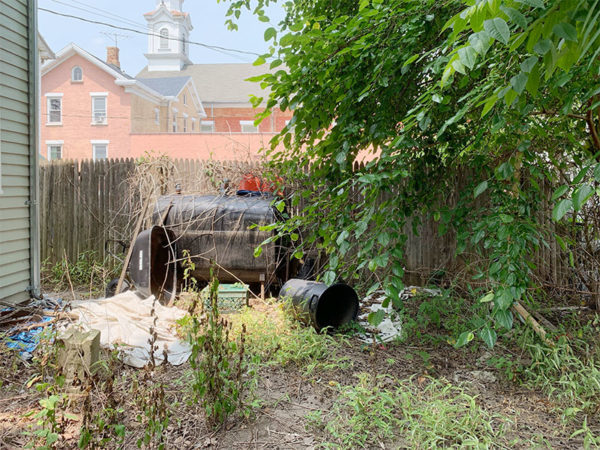
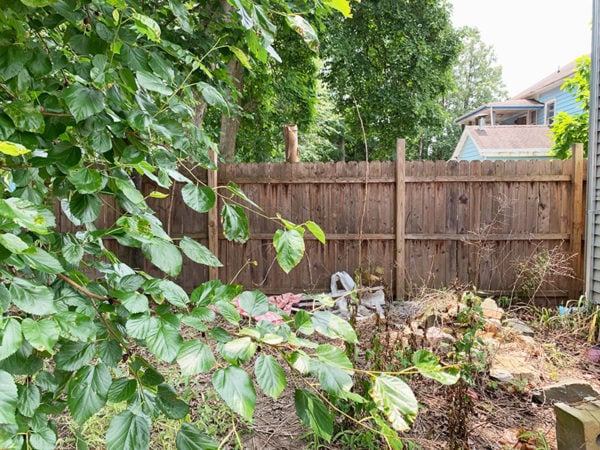
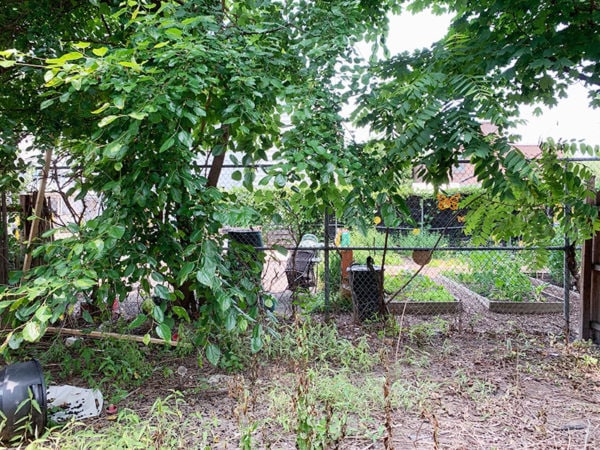
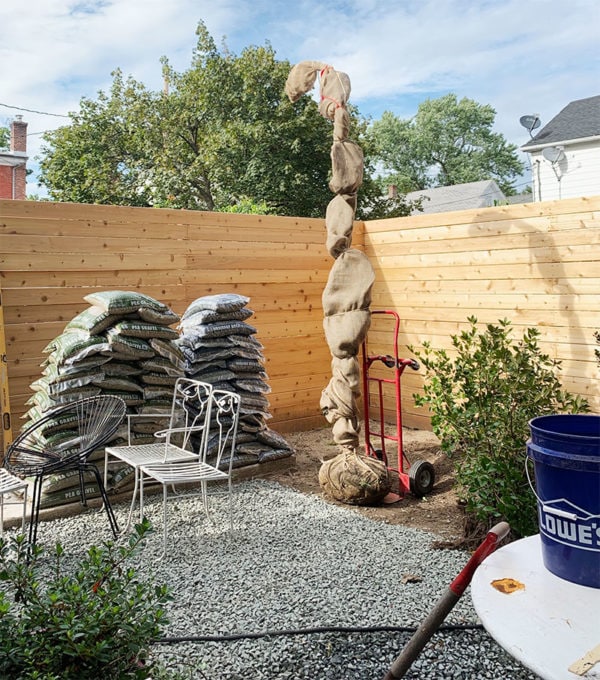
REMEMBER THE HUGE (defunct) OIL TANK?! The falling-down fence on the north side? That unruly Mulberry tree?!
I felt a little immediate tinge of OH NO WHAT DID I DO when Edwin and I took down the Mulberry tree, but I’m so glad I did. Sometimes a blank slate (except for the Maple tree, which stayed!) is really the best strategy, and now that there are new plants I don’t miss it AT ALL. Speaking of plants…
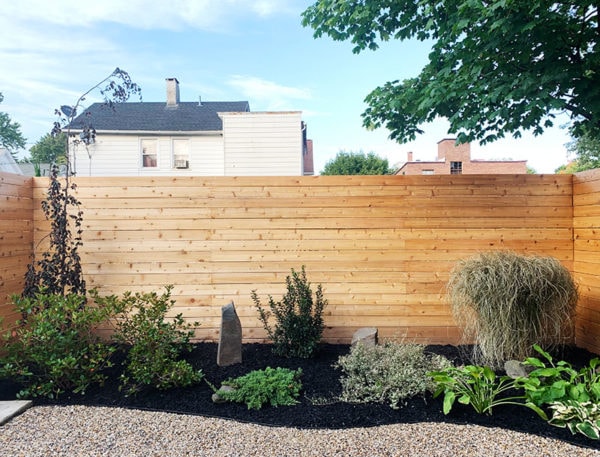
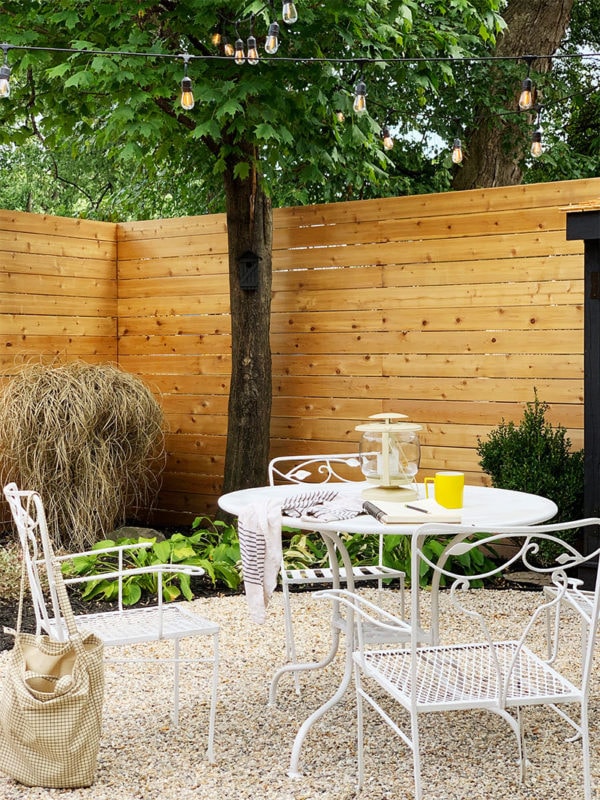
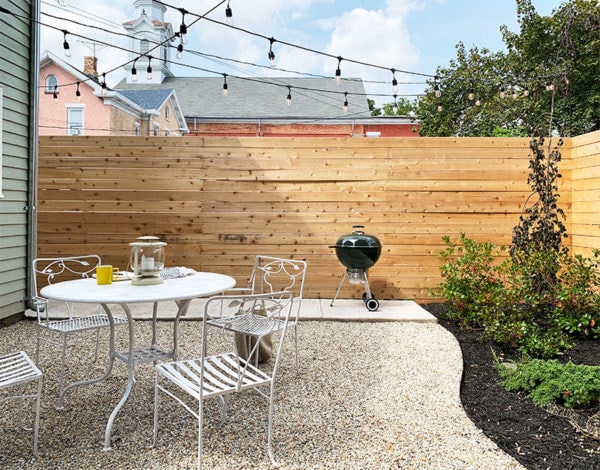
I promise, that IS the same view! Just everything about it is different!
Not really knowing if this house is going to be sold or rented, I wanted to keep the backyard simple, low-maintenance, flexible, and functional, and I think this accomplishes that! Let’s talk about it!
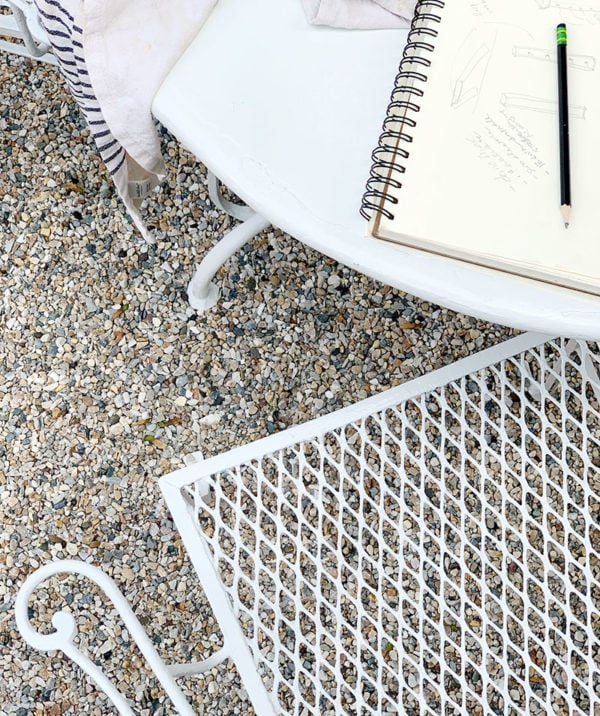
Allow me to first address my favorite recurring controversy: PEA GRAVEL. You guys have strong feelings about pea gravel and I respect strong feelings. Many of you like pea gravel. Many of you REALLY do not like pea gravel. So let me tell you about pea gravel and why I chose it for here.
- I really just love it. To me it’s classic, pretty, and has that nice crunchy sound underfoot.
- It’s cheap! And fast! I know there are inexpensive paver solutions available (I’ve always loved these from Lowe’s!), but my budget was maxed out and pea gravel is a really inexpensive way to cover a big area—cheaper than anything else I could find, really. How inexpensive depends: if you need to cover a HUGE space, you’ll likely spend less money getting a bulk delivery of pea gravel from a stone yard than using the individual bags that you can get from Lowe’s. But for a space this size, and the sake of convenience, the bags worked out PERFECTLY. To calculate how much you’d need for a given project, just use a cubic yards calculator!
- Not all pea gravel installations are the same! If you do a search for how exactly to install a pea gravel path or patio, you will be met with an astonishing variety of different installation instructions. Some people put down landscape cloth and a few inches of pea gravel and call it done. Some people do landscape cloth, a layer of crushed stone, and then a thinner layer of pea gravel. Some people put the pea gravel right on the dirt! The point is that everyone thinks their method is best and will tell you as much, but a better installation should lead to a better result that maybe avoids some of the issues people talk about with pea gravel.
- It’s no big deal if it doesn’t work out. If weeds or something else become a major issue, OK! I have myself a nice level stone base for pavers, and it didn’t cost me so much time or money that this would cause major personal upset.
So anyway. Here’s what I took away from my mess of gravel-related confusion.
Hot take #1: Less is more. One of the major complaints I hear about pea gravel is that it feels unstable, like your foot digs down a few inches into it with every step. This happens when the pea gravel is too deep (3-4 inches maybe) and not supported by a more stable base. It’s hard to keep the pea gravel looking nice and even, so it can make things look sort of sloppy. Over time, the edges of the landscape fabric gets kicked up and exposed, and the whole thing looks a mess. It doesn’t have to be this way!
Hot take #2: Hello my name is Daniel Kanter, and I do not like landscaping cloth. I get what it’s for. I get how to install it. I get that it’s not a material you want to penny-pinch on because you get what you pay for quality-wise. But in my (admittedly somewhat limited, because I do not like it) experience, it inevitably ends up getting exposed, looking ratty, and actually growing the weeds it’s meant to prevent? And then it has to be redone until it happens again? I think it’s just not for me. I do not want to be told otherwise. I would rather pick weeds and treat areas with vinegar than battle landscape fabric.
So anyway. I phoned a friend! Named Lori! Who I don’t actually know, but she’s a gardening guru who reads this blog and had shared her perspective on pea gravel best practices before, so this felt like a trusted source. Then I only kind of did what she told me, because I’m not a good student and there is something wrong with my brain.
It was basically a 7 step process:
- Mark out the area! There are so many right angles in this yard that I thought a kinda curvy border would look best. I used a garden hose to get the general shape.
- Edge! Pea gravel likes to travel so needs to be contained with an edging material. This could be pressure-treated lumber, brick, stone, plastic, steel, or something else! I had planned to use recycled chimney bricks, but it felt like…too much? Instead I used a black aluminum edging from Lowe’s that I actually bought for the front yard HALF A DECADE AGO and have been storing in my garage since. At least I’m prepared?
- Base rock: With the edging in place, I saturated the ground with water and spread about 2 inches of this drainage rock from Lowe’s, which is a lot like what we call Item #4 regionally. It’s a larger angular rock that makes a stable base for paving, footings, frost walls, that kind of thing. The major difference I would say is that Item #4 generally comes with a lot of stone dust, whereas this bagged drainage rock is very clean and uniform in size.
- Tamp! I used this hand tamper from Lowe’s, but for a large area it might be worth renting a gas-powered compactor. The goal is to sink the angular stone into the wet soil and compact to create a solid, stable base that doesn’t move when you walk around on it.
5. If I were doing it over again, I think at this stage I would have added some stone dust to really “glue” this base layer together. Where you live, stone dust might be decomposed granite—we don’t seem to have that here.
6. With the base prepped and compacted, spread about 1/2″-1″ of pea gravel. Spread it and tamp it again to really work the pea gravel into the base layer—the small round pea stones will kind of lock into the angular stone base and keep things nice and solid.
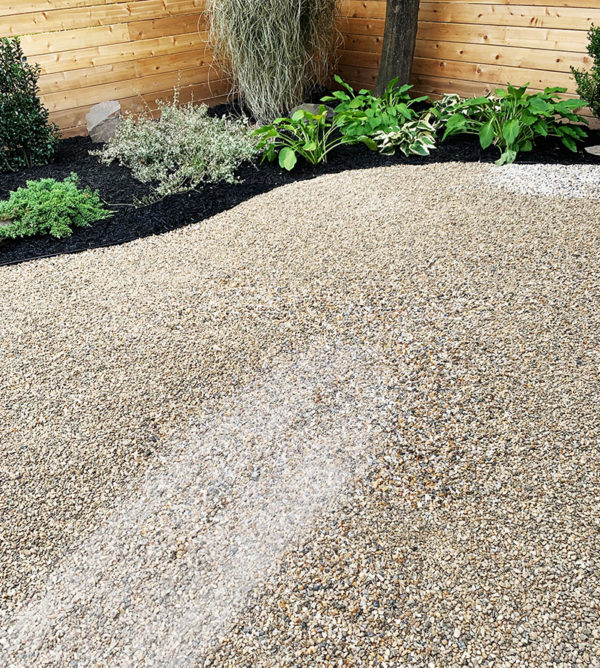
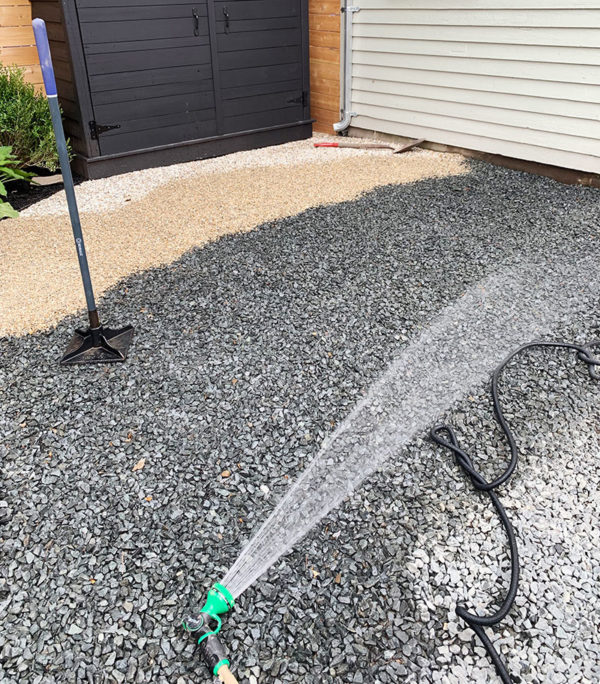
7. Finally, water it all! There’s a fair amount of sand in the bag with the pea stone, but a quick watering washes all of that down into the gravel and the base and reveals the real color variation in the stone, which is so pretty!! This is another reason I love this bagged gravel from Lowe’s—I love the beige-y tone of the pea stone as opposed to the more flat grey pea gravel that’s available locally in my land of bluestone.
And there ya go! It will be better to treat weeds than try to pull them, because you don’t want to disturb that layer of base rock and let it come to the surface. Obviously I can’t tell you how this will hold up over time, but I have high hopes! It looks great and feels amazing underfoot—no sinking or sliding around, which also helps keep the stone contained to where it’s supposed to be. I also tested it out barefoot and it’s totally comfy to walk on! And I have not had a single stone embed itself in the sole of my shoes. I AM CALLING IT A PEA GRAVEL SUCCESS!
Let’s talk plants! While I think it’s safe to say the renovation of this house has had its share of difficulties and failures, one thing seemingly immune to this trend has been the stuff I planted in the front yard shortly after I bought it! This is hardly a brag because I can’t take much credit—five years ago I got a bunch of plants from Lowe’s, stuck ’em in the ground, and pretty much let nature take its course between infrequent efforts at maintenance. Amazingly, almost everything I planted has not only survived but THRIVED, meaning I had an actual excess of fairly mature plants at my disposal to transplant back here! And as a bonus, I already know they’re hardy and don’t need much in the way of maintenance or care. So I dug up plants from the front that had gotten overcrowded and then spent a while just moving them around until I settled on placements that felt nice. This way, I could identify what I’d need to really fill out the space and keep my new purchases minimal and strategic. I get overwhelmed at garden centers, so I like to have a general idea of what I’m looking for before I venture out.
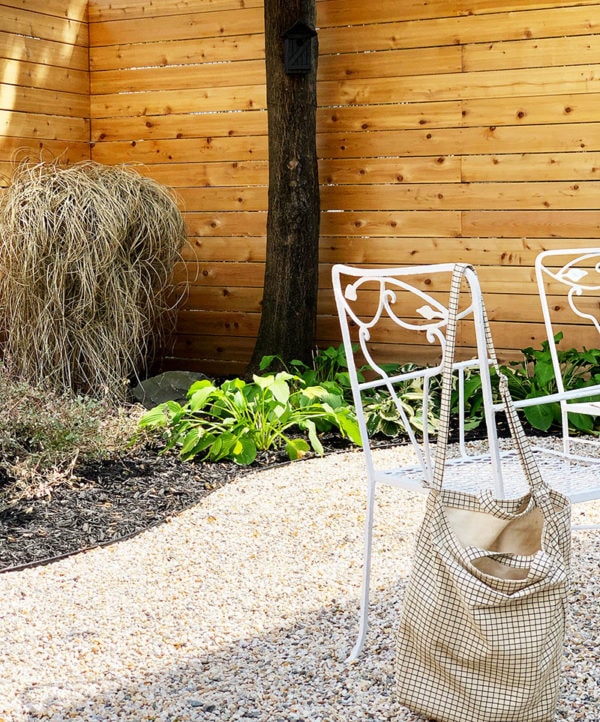
BTW, I would just like to note that ornamental grass (pretty sure it’s Maiden Grass) back there—it crisped up and died within a couple days after I transplanted it, but it SHOULD BE green and lush and pretty, kinda like how it looks in the photo above. Hopefully it survives and comes back next year! We’ll all find out together! For now I’lll cut it back to about 6″ from the ground and wait. I’m not entirely confident this corner is sunny enough for it.
My Lowe’s garden center was admittedly a little sparse the day I went plant shopping, so I went over to a local nursery and kinda fell in love with this enormous Dr. Seuss-y tree for the back corner, which is a Purple Fountain Beech! Of course with my new pick-up truck lifestyle, getting it home was no biggie. I’m telling ya…I love having a truck.
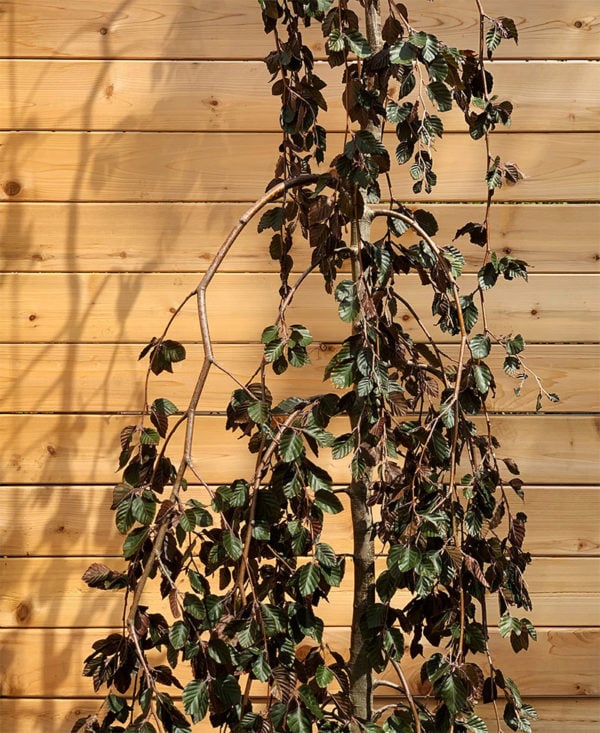
It should eventually grow to about 25 feet tall but maintain a kind of compact columnar shape so it won’t take up too much space. I love purple foliage! And the tree is so sculptural and cool.
In front of the tree are 3 small Olga Mezitt Rhododendrons from Lowe’s, which might get a bit bigger but are pretty matured at this point. They have pretty pink flowers in the spring, and should tolerate the part sun conditions in this corner of the yard!
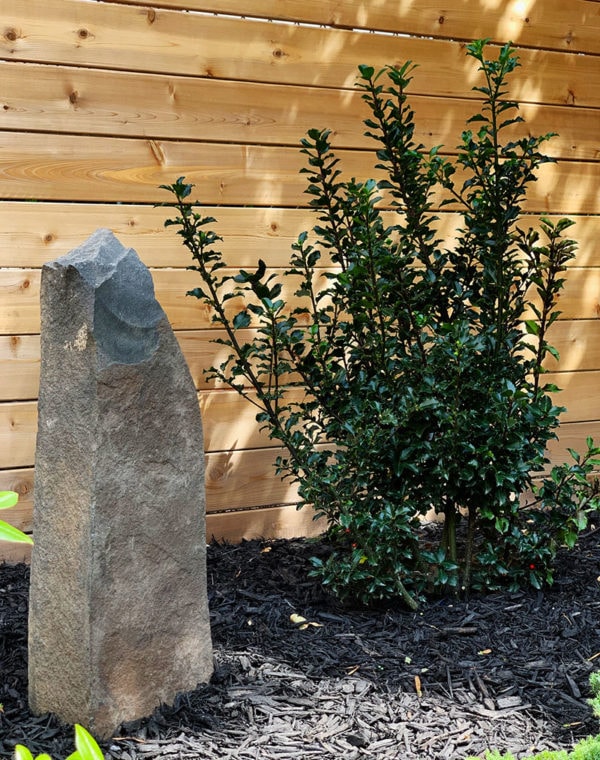
Toward the center of the garden bed, I put a Holly shrub! It should fill out and grow a little higher the the fence, and keep some nice evergreen interest in the winter (it’s planted further from the fence than it looks in this photo). I grew up with Holly trees in the backyard and have always had a soft spot for them.
I also got real into randomly placing stones?? I like them?? The house is named Bluestone Cottage after all, and these (blue)stones were just hanging around the property waiting for a use. I love this little monolith situation, which is buried a down a few inches below the mulch to stay upright. I dunno!
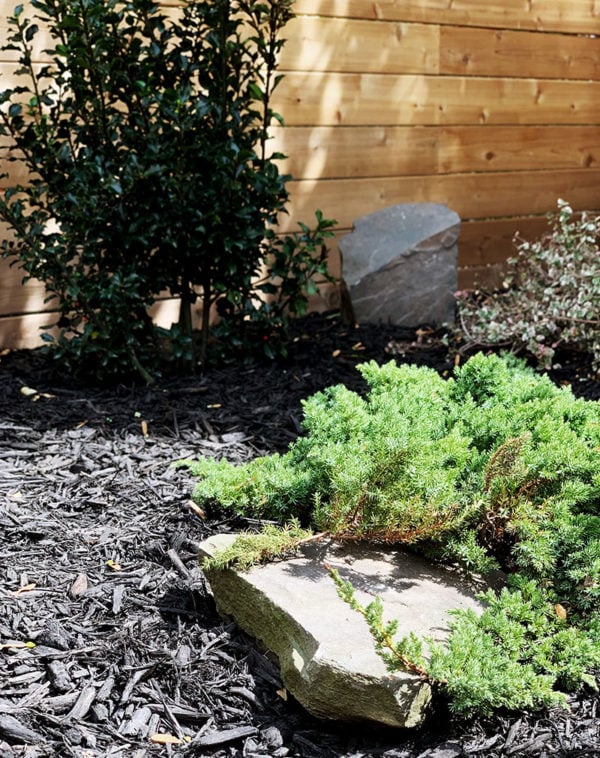
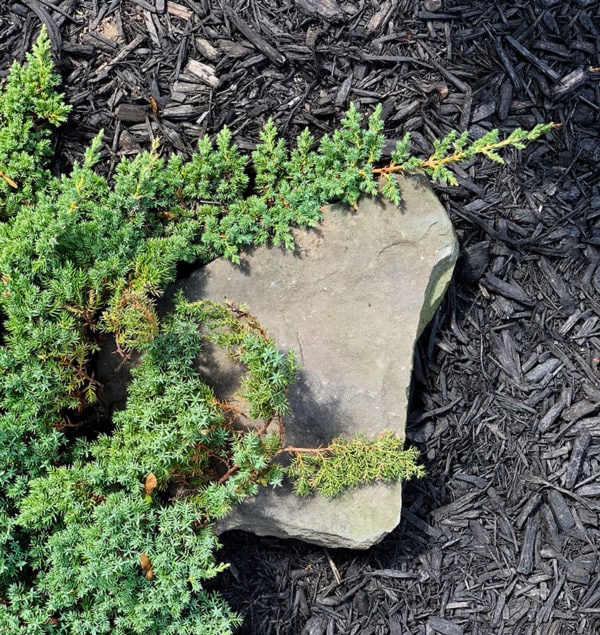
Toward the front of the planting bed, I transplanted a dwarf Japanese Juniper from the front and put a big rock underneath part of it to creep over. Why not!
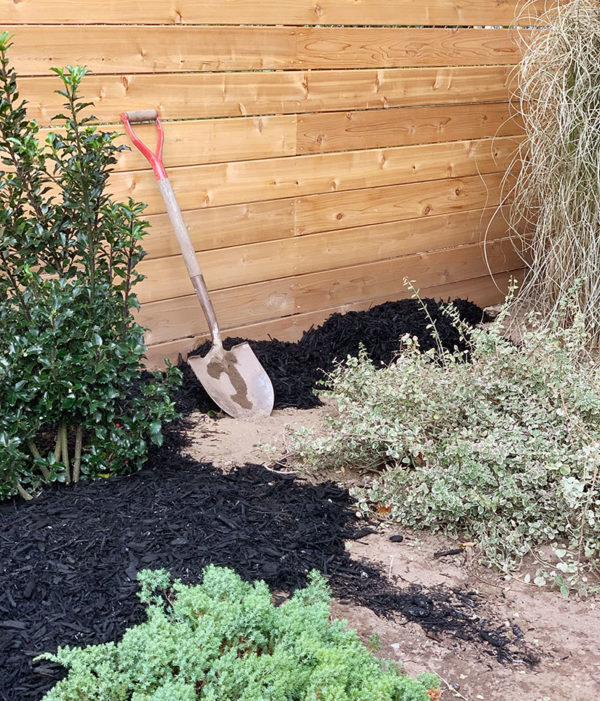
That variegated plant on the right is an Emerald Gaiety Euonymus from Lowe’s, but transplanted from the front yard. I planted a couple of these and they’ve really spread out quickly into this nice dense plant that’s somewhere between a ground cover and a shrub. I may move another one to my house.
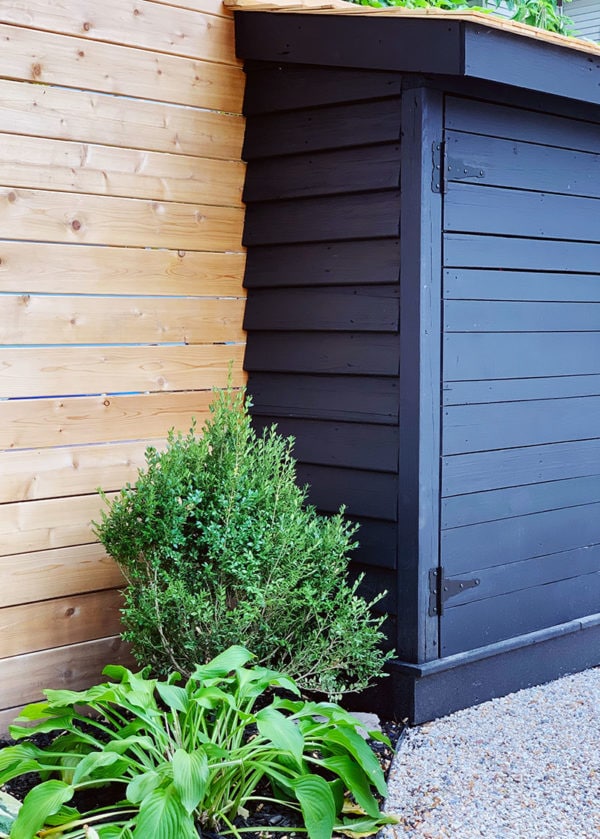
By the way! I used my old faithful black mulch in the planting bed, which always makes things look sharp immediately! Keep an eye out for sales on this stuff—this mulch was $2/bag when I got it!! As things fill in, hopefully the garden will require less mulch and I’ll probably switch to something more natural since it won’t be so visible.
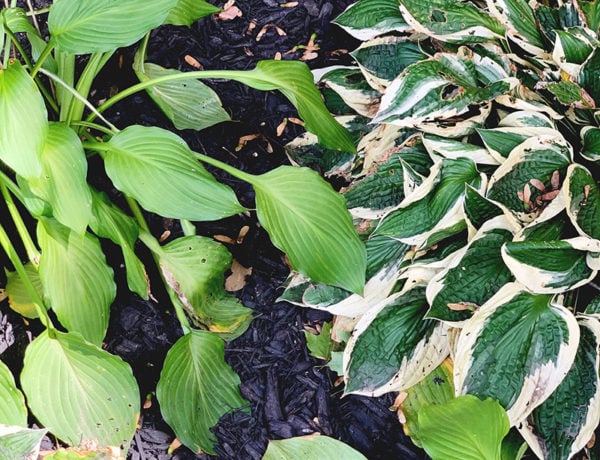
Toward the base of the maple tree, it’s Hosta City! The variegated ones (Minuteman Plantain Lily) were from Lowe’s and transplanted from the front yard, and the solid green ones are from MY house, where there is a never-ending supply of hosta to split and move. Hosta just needs to be cut back once in the fall and split every few years, but otherwise is no maintenance and does well in low light.
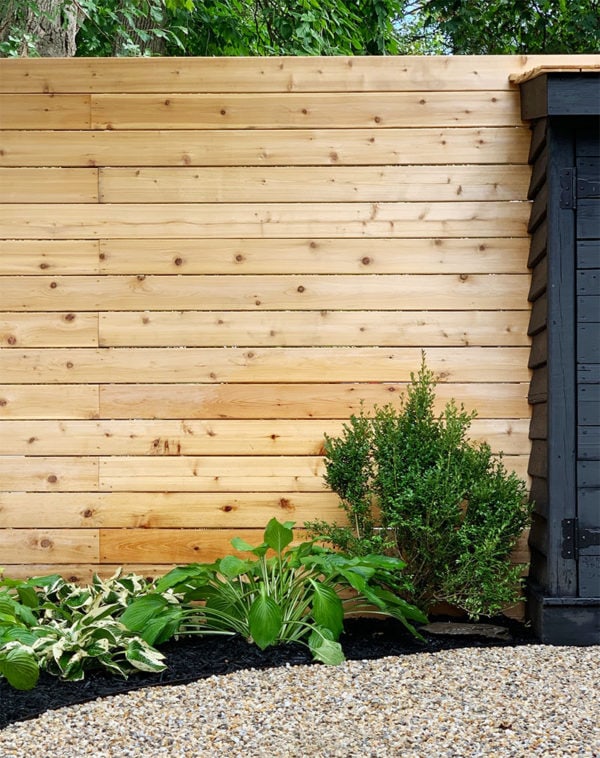
Over by the shed, I stuck a Green Velvet Boxwood! Boxwoods are such troopers—this one has now been transplanted from the front yard of Olivebridge Cottage (where it spent almost a year out of the ground on the edge of a construction site!), to the front yard of Bluestone, and now to the back. It’s been through a lot but seems healthy! I hope it grows and fills out.
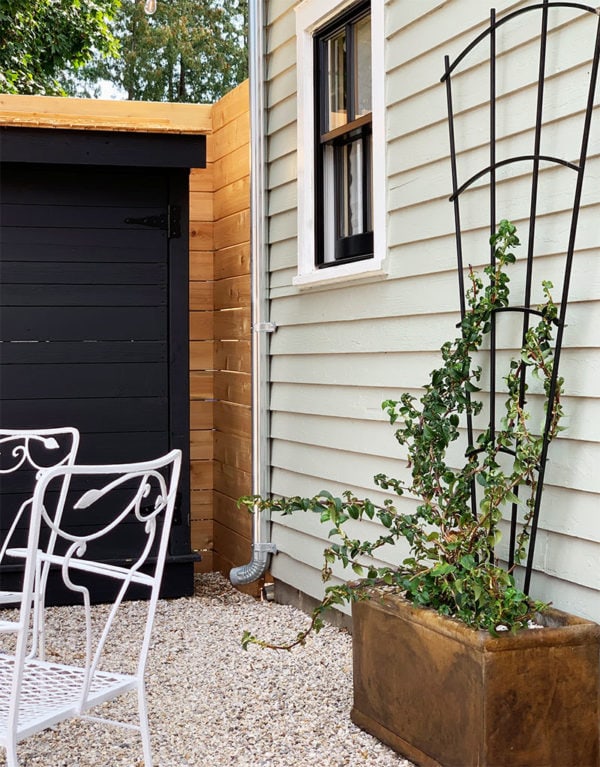
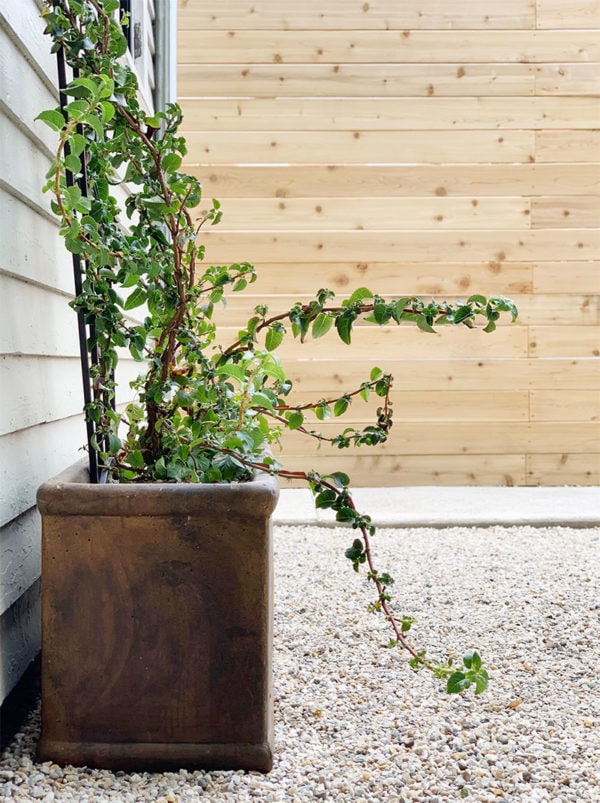
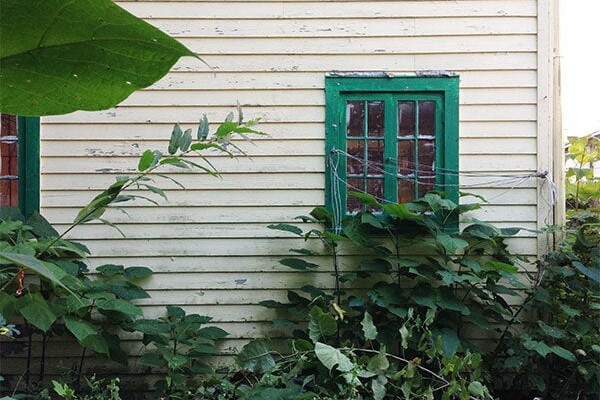
Finally, I wanted to put SOMETHING between the two kitchen windows on the back of the house, so I picked up a climbing hydrangea! I really hope it does well—this area appears to never really get direct sun, so selecting a plant that would survive was tricky. Climbing hydrangeas are so beautiful though, and should do well in low light! We shall see!
Real quick shout-out to that amazing trough-style planter! I found it at Lowe’s and thought it would be perfect here, and then I tried to put it in my cart. HOLY COW. The thing is solid concrete and weighs 160 pounds!!! Especially for $80, I honestly think it’s a beautiful piece and super versatile for all sorts of situations and styles. This is the “espresso” color, but it also comes in this really beautiful soft white/beige tone that I considered as well.
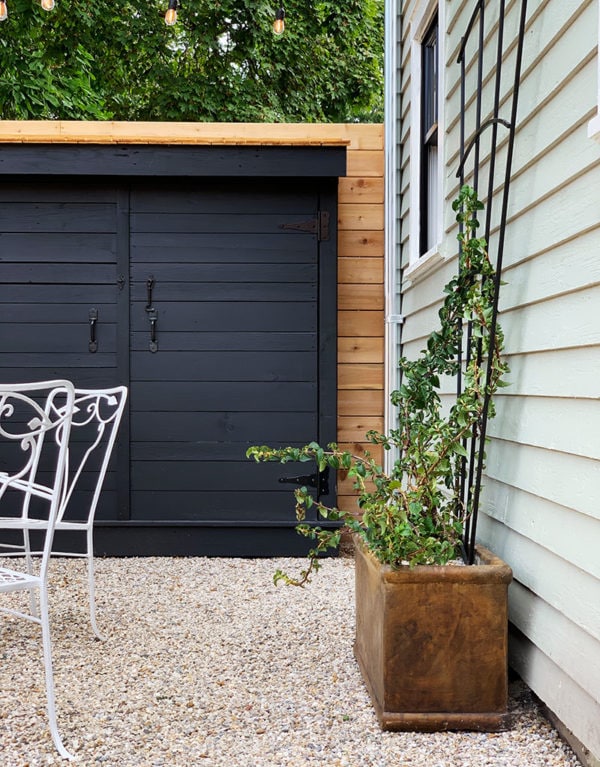
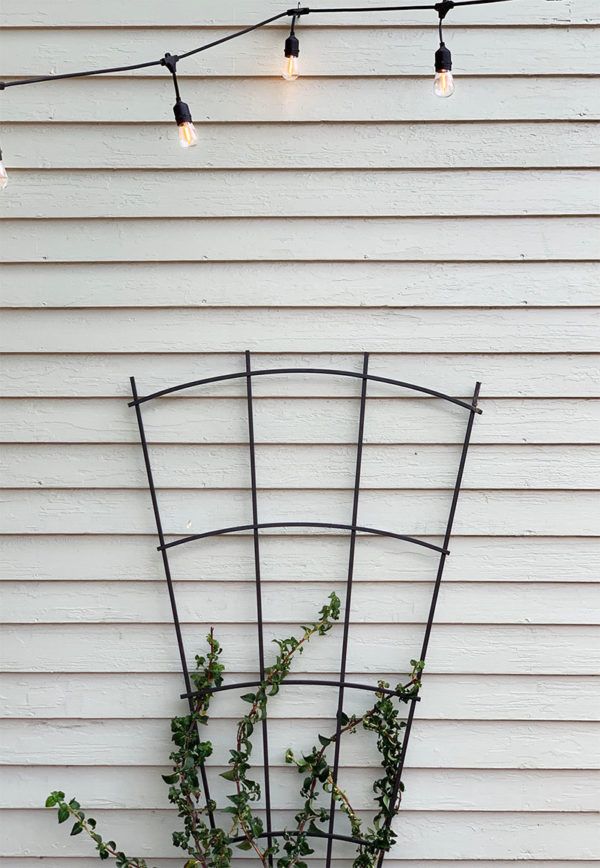
The rust-resistant metal trellis is also from Lowe’s, and I love how simple and clean it is. And the price was great too—under $40!
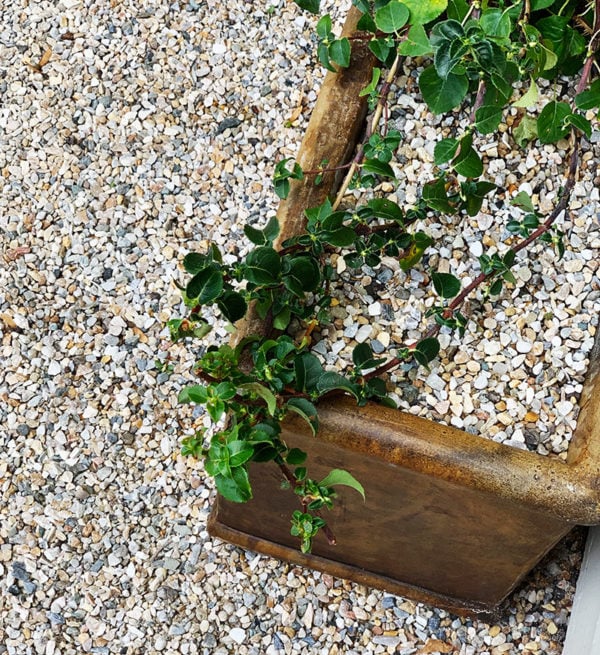
Pls pray for my climbing hydrangea. I love this whole set-up and do not want it to fail.
In terms of space planning, I tried to keep things flexible and multi-functional, while also taking light conditions for the plants into consideration. Strangely difficult! Which is to say that I intentionally didn’t go all-out with built-in seating or dining or raised beds. I wanted to maintain some flexibility in the plan for a future owner/renter to use the space how they want to!
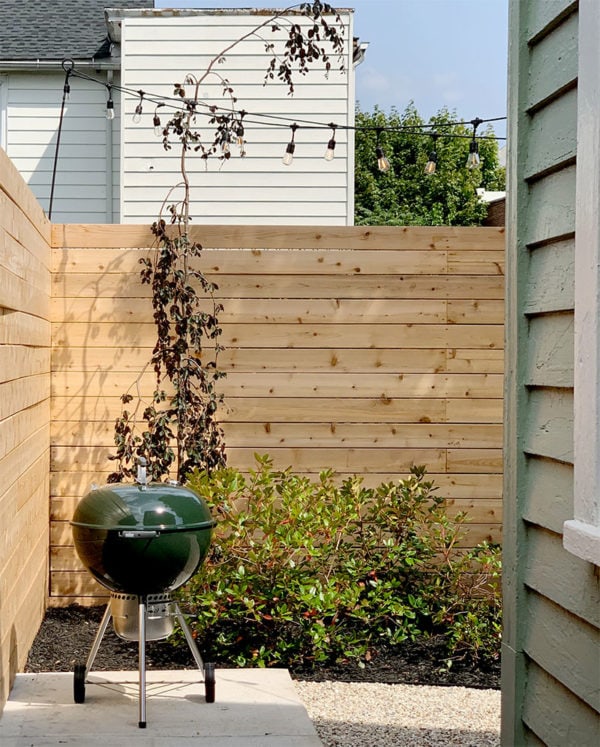
When you’re looking at the front of the house, access to the backyard is via a 4-ft walkway on the left side. This path was a big mess—lots of nice bluestone slabs in need of leveling and re-setting, with invasive weeds growing up through all the cracks and over the old fence. I think the original bluestone can be put to much better use in the front of the house, so we pulled it up and laid a concrete path in that space instead, which so far is working out GREAT. It’s not especially charming or beautiful but it is very practical and easy to maintain, which is nice in an area that’s really just a passage from one area to another rather than a space you hang out in. I decided to extend the path about 12′ past the back wall of the house, which creates a small “zone” where there could easily be benches, a couple lounge chairs, potted plants, additional enclosed storage, a couple deck boxes, bar seating…lots of options! If I were living here, I think I’d want a small grill and some kind of outdoor kitchen cart next to it with some countertop and storage space for the grilling utensils and whatnot.
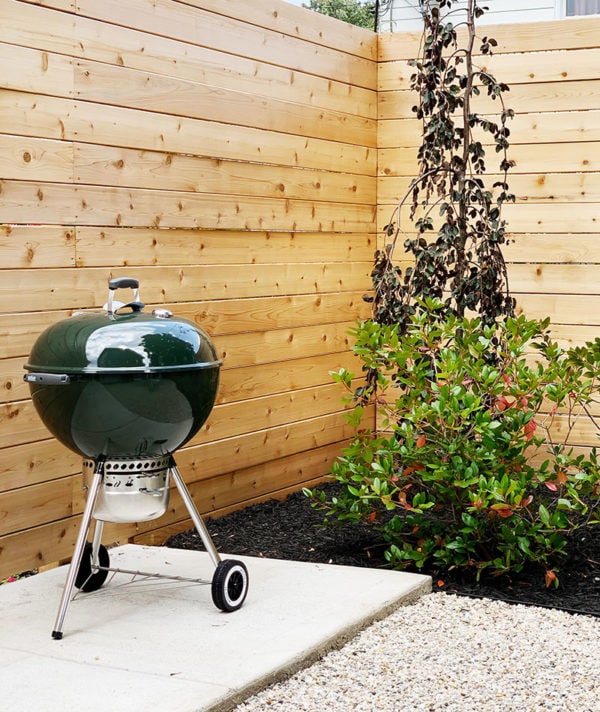
Speaking of, HOW CUTE is that hunter green Weber grill? I recently watched a movie where they had one in this fabulous hot orange-red, and I would like to submit a request for a re-issue of that color too. I love a classic Weber grill. Of course, pretty much any grill would be fine here as long as it’s a safe distance from the fence. Even a propane or gas one, although I’m team charcoal all the way.
COME AT ME.
(But please don’t; I don’t like violence.)
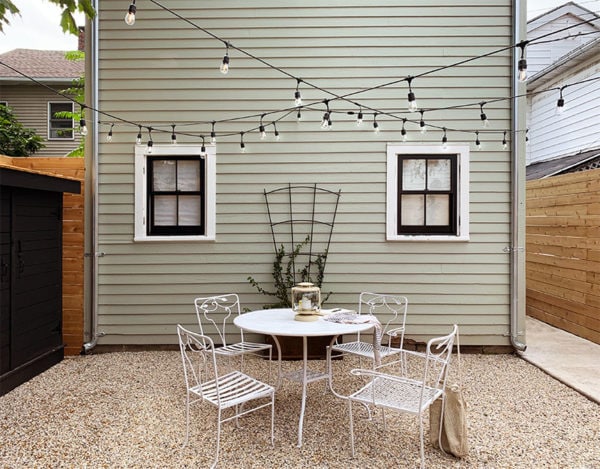
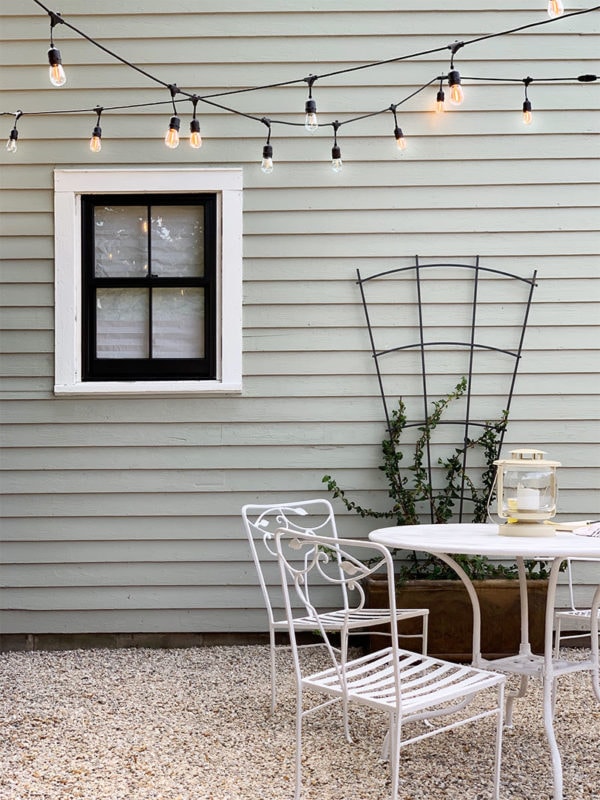
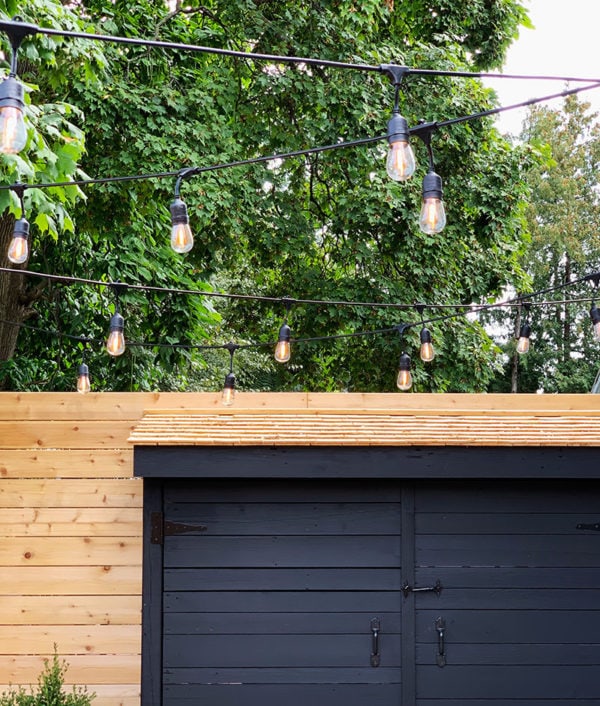
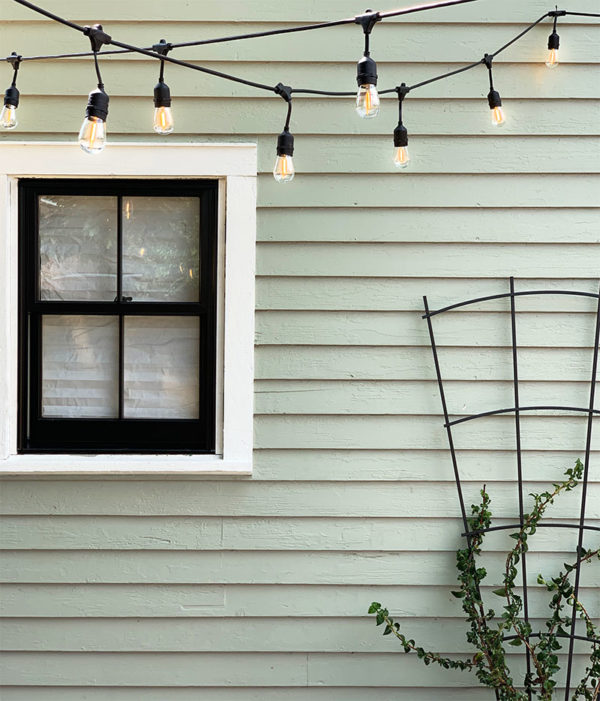
Of course, the REAL star of the show here is STRING LIGHTS. God, I love a string light. Like more than most things on this earth.
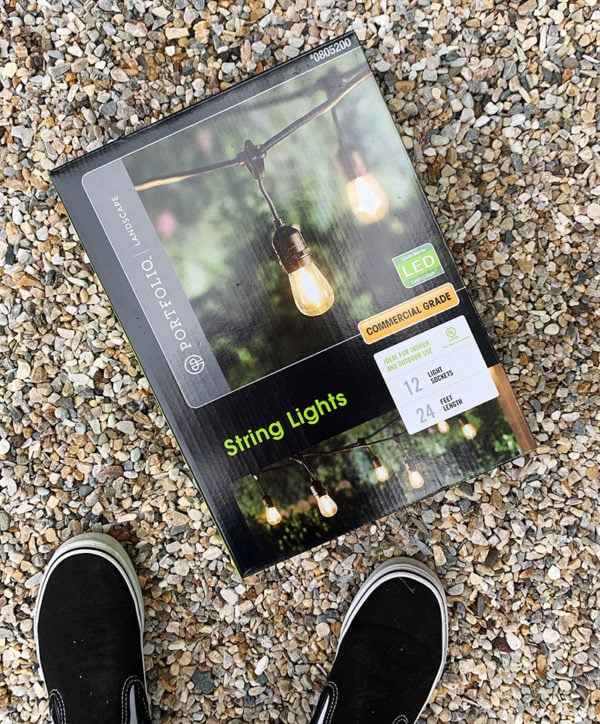
Specifically, these are the commercial-grade Portfolio LED string lights from Lowe’s, and they are NICE. You pay a premium for LED bulbs instead of traditional incandescents, but the LED bulbs are super efficient and should last BASICALLY forever which is perfect for a property I’m not living in. I can happily report that the bulbs themselves are cute (no weird white band around the base, perfect shape and size) and the light they put off is perfectly warm. I love them. I’m mad that they’re here instead of my house, haha. I used four strands of lights in all!
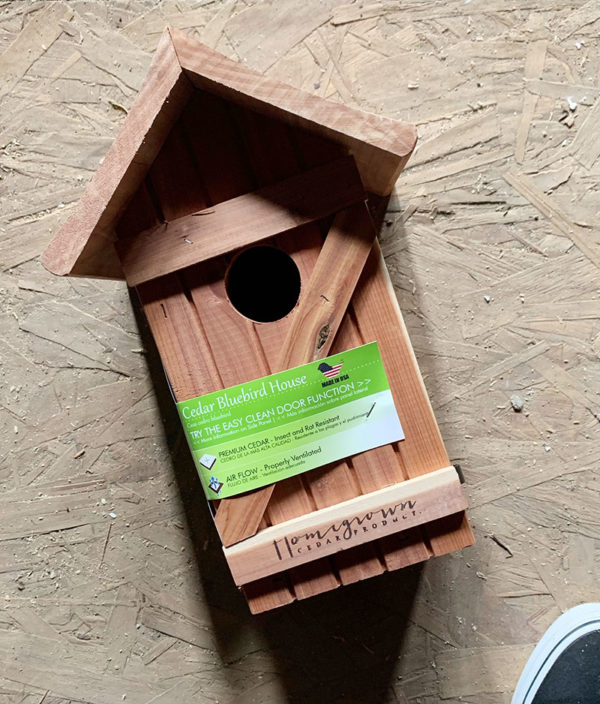
Other little details! I was going to build a little birdhouse out of scrap, but then I saw this one at Lowe’s and it was cute and affordable and took a project off my list, so therefore it had to be mine.
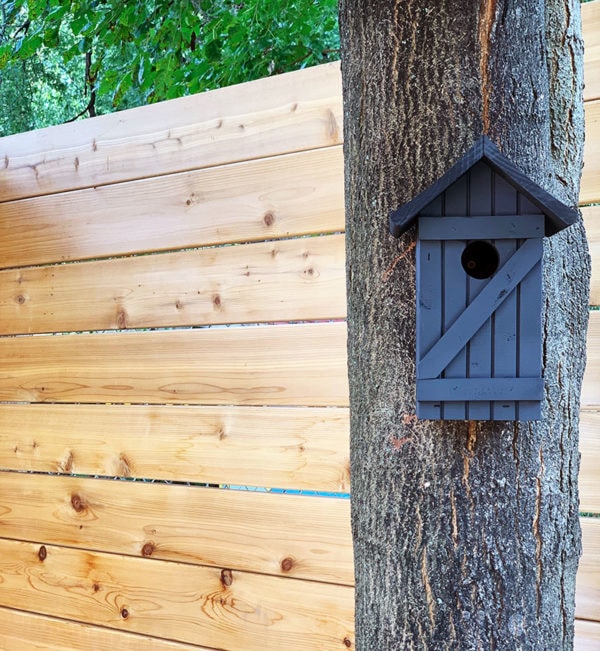
I stained it black with the same Cabot opaque stain I used on the shed, and it’s so cute. You don’t necessarily see it immediately so it’s like a nice little surprise! I hope a birdy moves in and raises a family of goth baby birds in there.
Oh by the way: yes, the windows are new. They are replacement windows. As you can imagine, I am full of FEELINGS and we will need to talk about this another time when I am emotionally prepared to take you through my window journey. They are by Pella and admittedly are extremely nice.
So. If I were living in this house, I think I’d nix the dining table altogether and get an outdoor sofa, two chairs, and a propane fire pit kinda thing because I LOVE FIRE and also lounging. That would have been a big budget-buster, though, so I’ll leave that to future occupants to figure out.
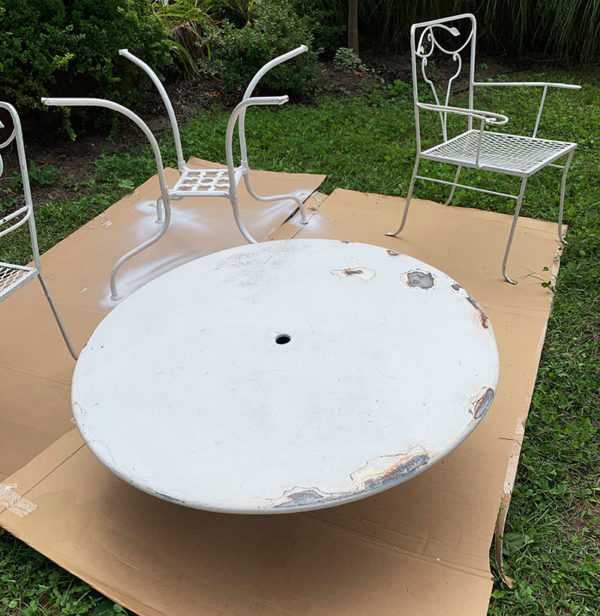
Because I’m not living in this house and I’m a cheap lil’ bastard, I liberated this cute vintage outdoor set from the scrap metal pile of a local hotel, ha! It’s not in the greatest shape, but still serviceable, so I cleaned it up, sanded down the tabletop a bit, and hit it with a couple coats of this amazing Rust-Oleum gloss white spray paint. So fresh and so clean!
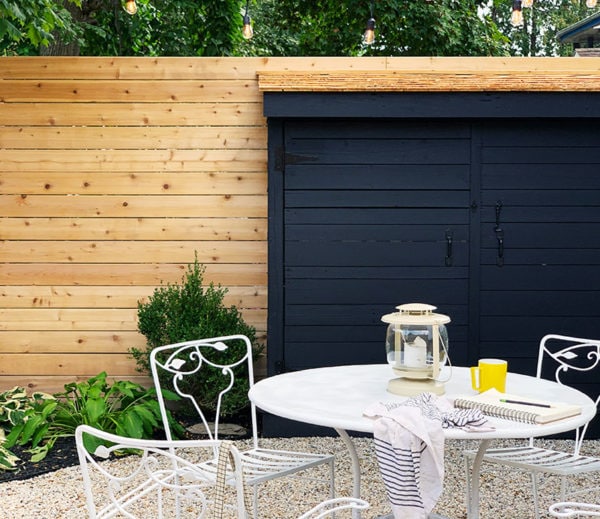
Now it’s a perfect place to enjoy an empty mug and a casually-yet-strategically-placed tea towel!!! Two of my favorite Sunday morning rituals. :) <3
WHAT. ELSE. I *may* have taken more photos of this space than I really have words to say about it.
You know what I love even more than this backyard? This backyard…AT NIGHT.
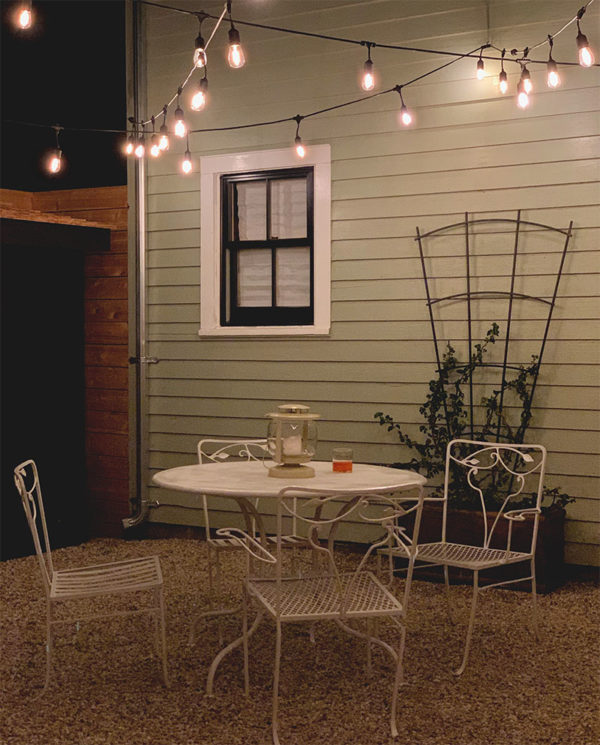
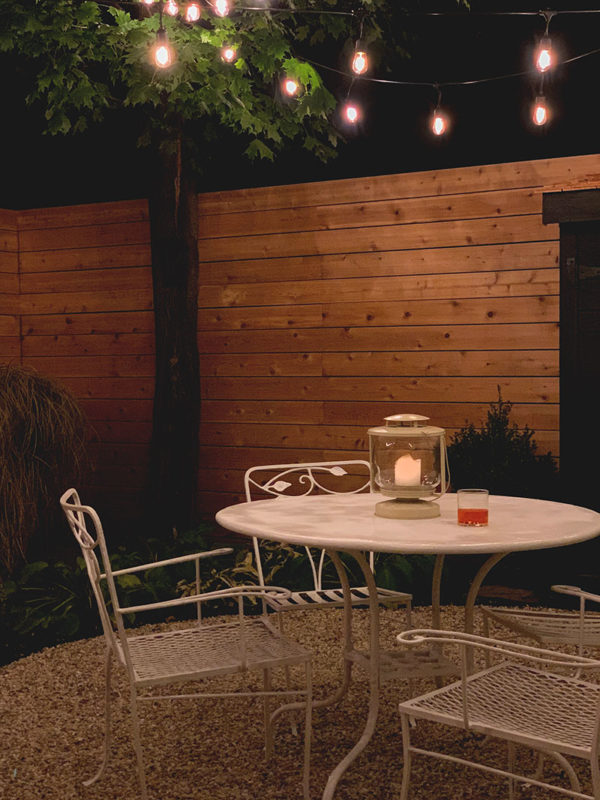
Here I have traded the empty coffee mug for a very real cocktail and tried to capture the night vibe. I really should own a better camera than my iPhone for situations such as this. IT. IS. LUXURY.
SO COZY. I’ve been going over there just to hang out at night because it’s just so lovely during these crisp fall evenings.
Does that about wrap it up?! I couldn’t be happier to have this part of this house’s renovation off my plate, and I can’t wait to see how it all comes back in the spring! Who else is trying to wrap up exterior work before the winter? I can’t be the only one that always gets a little crazed around this time of year trying to beat the cold!


It looks beautiful! I’m now totally encouraged about pea gravel and could not agree more about the dark side of landscaping fabric. Never again…I use old news paper as weed blocker. Enjoy your new space:)
Thank you, Siobhan! Newspaper is smart—I’ve used cardboard under mulched beds and it worked great!
I have to admit, I get ridiculously excited when I see that you have a new blog post up! This makeover is amazing :-) if I didn’t live in Delaware, I’d come over to see to it in person…great job!
Thanks Diane! :)
This is such an amazing transformation! I am in love! I’m with you, if I were living here, I’d also rock more of an outdoor lounge area with comfy seating and a fire pit. And I’m sad to know there’s not a ton of sun against the house because I would love to set a row of raised planters along that wall under the windows for a small garden.
I’m also with you on landscape cloth. I’m not a fan, for all the reasons you mentioned. I think my parents also disliked it so I might have inherited the aversion? I also feel like it can’t be the best option in terms of being more environmentally friendly, but I haven’t really researched it in too much depth. (I currently live in an apartment with a concrete patio and a garden in containers so the subject is moot to me at the moment *shrug*).
Gah – I just can’t get over it, I love this so much. I keep scrolling back to look at all the pretty pictures again and again. I can’t wait to see more Bluestone transformations, though really, I can never wait to see anything you post so it doesn’t really matter what it’s about lol. Just keep ALL THE CONTENT coming and I’m a happy girl.
Thanks Krystal!! I will try!! Good additional point on the landscape cloth—I have no idea how long it takes that stuff to degrade but it’s gotta be a long time, and it’s not like it can be reused or recycled. I’ve had good success with using cardboard instead, and it just degrades into the dirt after a year or two!
A+!
Super cute.
My only issue would be privacy. I would have planted some kind of tall hedge around the whole place because I cannot bear to admit to myself that I live near other people.
Thanks Lisa! I would have liked that too, but I was concerned it would just take up way too much space given the overall dimensions of the yard. That said, it really does feel very private back there! The fence is taller than average so you don’t feel exposed, I promise!
Awesome job! I actually have the same lights but have been procrastinating on hanging them. What did you use to hang them from the house?
Screw hooks! Not sure of the exact size, I just grabbed them from my basement. Just a pilot hole, hand-tighten the hook, and you’re good to go!
Omg love it! You’re a genius! Also, “strategically placed tea towel / ritual” bit – lol!
;)
It looks beautiful! All of the elements come together so nicely and your hard work really paid off. Hostas, black mulch, and string lights for the win!
In terms of removing weeds from gravel, can I recommend a flame weeder?
I mean, sure, you can use roundup or some chemical to kill the plants, but then the runoff water going into the garden always makes me feel like I’m being horrible to the plants that are meant to be there. OR you get to basically wander around with a small-scale flame-thrower feeling like you just came out of Mad Max (bonus points for costume), and isn’t that more appealing?
Vinegar in a spray bottle….. no need for chemicals.
We love our flame weeder! Just got it this spring and it’s been a game-changer. The only downside is how heavy it is to lug the propane tank around the yard. I need to work up some sort of little cart to drag it around with me.
We also use a DIY vinegar & Dawn soap weed killer, but the weeds come back so fast. We use the flame weeder around our metal fence and use the DIY weed killer in areas where we can’t use fire to kill the weeds.
Thanks guys! YESSSSS gimme that flame weeder!!
Kimberly—if you don’t have a HUGE space, maybe you could use a hand torch cylinder (like plumbers use to sweat copper pipe) instead of the huge propane tank?? They’re small but last a shockingly long time. I was thinking of getting this flame weeder from Lowe’s!
That is a terrible idea. Daniel does NOT need to learn how to use or own a flame weeder. But a BIG NO TO ROUNDUP TOO.
MOM! Lol lol lol. Don’t embarrass me in front of my friends!!
This is seriously lovely! So excited to see the final result!
Thanks Christy!
Love, love, love it! But oh Daniel, beware the climbing hydrangea – it has those little sucker feet like ivy that attach to the wall and are almost impossible to remove. I had one on a wall of my cement block shed – that I just painted a dark charcoal like your little shed, by the way – and when I pulled it off I was pretty dismayed. That is the last wall of my shed to paint so I’ll be going out there with a scrub brush and keeping my fingers crossed that I can get them off. It’s been years since I pulled it off so hopefully it will work.
Thanks for this, Barbara! I wasn’t actually sure if that’s how these climbed or not. This house was COVERED in Boston ivy when I bought it, so I know the little sucker feet stubbornness well!! I guess I was hoping it might behave and stick to the trellis rather than onto the clapboard, but that may be delusional. I’ll keep an eye on it for sure!
Wow Daniel, such an amazing transformation!! You did such a great job and whoever does end up living here will adore this I’m sure.
I sure hope so! :)
WOW… miraculous – and of course TONS of hard work… which you dont really give yourself credit for in your posts… really amazing
and WHEN are you getting a show!? HGTV … really you need this guy!
Aw, thanks friend! It was a lot of hard work!! But I also got to spend a good part of my summer outside fiddling with this backyard, so I’m not whining! :)
This is gorgeous! I’ve really enjoyed watching this whole backyard process! I have a question on how you attached the lights. I recently built a platform deck that comes off the back of my house, but don’t have a good corner piece to attach string lights to. I see one metal piece on the corner of your fence, but wondering if you could touch on that in a future post. I don’t necessarily want to put in a big 4×4 as an anchor at each deck corner but also don’t think tall metal piece like a shepards hook would be sturdy enough at that height? Anyway, beautiful! Can’t wait to see more!
Thanks Rachael! That’s a tricky situation (which I have to figure out for my own backyard, too!). I think something like this is maybe the most elegant solution…I agree that a normal shepard’s hook doesn’t seem sturdy enough for the application you’re describing. That metal piece I used was just another piece of junk that was in this backyard when I started, which ended up coming in handy! I don’t how what it was originally, haha. I spray painted it black, screwed a hole down into the top of the fence post about 6″, and tapped it in with a mallet. I think the trick is to keep whatever it is as slim as possible (which to me means metal rather than wood) and black, and it’ll kinda disappear.
Hi! You can totally DIY an attachment point without having a fence, pergola, etc, with electrical conduit, and it looks swanky and not cheap. If you scroll down here, you can see it in the front garden: https://www.penick.net/digging/?p=47155
Here’s a DIY: http://brightjuly.blogspot.com/2012/09/diy-outdoor-string-lights.html If you you want the option of only having the lights up sometimes, sink PVC pieces into the ground at least 2′ deep and sink the conduit into those.
I’ve also found that stretching coated cable between whatever you are stringing from and then draping the light strings around it keeps them from sagging (and in my mind helps prevent the wires inside from breaking)
This is absolutely gorgeous. I am 100% in love with the random stones placed in the garden, and I’m now committed to replacing my red/orange mulch with black mulch all over my property!
Thanks Sara! Random stones for the win! :)
I love string lights.
I love pea gravel.
But above all, I love the idea of goth baby birds.
You’re a miracle worker! This little yard is cuter than it has any right to be. Can’t wait to see how the house comes together – if the yard is any indication, it’s going to be incredible! (But do keep us posted on the goth baby bird situation, okay?)
WILL DO! Thinking about it more, I feel like all baby birds are a little goth? I mean just look at them? Will research and report back.
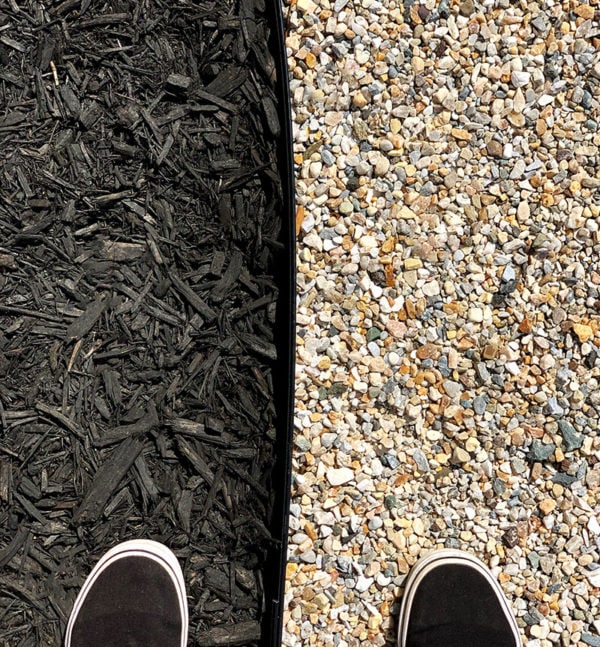
Love , love, love what you did here . Everything is efficient, well designed and so very tasteful. Love the layout, the colors and even the textural contrast of the pea gravel and black mulch together with your black “Vans” toe tips. And isn’t staging so much fun!? “…Now it’s a perfect place to enjoy an empty mug and a casually-yet-strategically-placed tea towel!!! Two of my favorite Sunday morning rituals.”
Thank you Adrienne! Staging is so much fun!! I won’t claim to be any good at it, but there’s something very cathartic about wearing normal cloths while throwing in little bits and bobs and arranging a tea towel JUST SO after weeks or months of sweat and sawdust and debris and moving heavy stuff around and lookin’ a mess. ;)
This is so great! And yeah if I lived there I’d go for an outdoor sectional and one of those fancy fire table things and like, idk, one of those big ass patio umbrellas or something, but this is cute enough for staging purposes. Or even like, to leave for renters. I sure as hell didn’t have the money to spare on a little table and chairs for the patio when I moved into my first apartment and would’ve been so stoked if this was in the backyard already. And then I would’ve called the landlord and been like hi did you forget your table….? And cried when they said I could use it. IT’S THE LITTLE THINGS, OKAY??
ALSO. That grill. I LOVE that green. I’m considering it for kitchen backsplash tiles. I just bought a house and I am taking so many notes from your blog. Please never stop posting, I will be so sad.
Thanks Kathy! AND OHHHH HEYYYYY, green backsplash tiles are in the very near future on this very blog! Watch this space!! ;)
WHAT. I need details, immediately. Are they every bit as magical as I think they will be. Omg. ARE THEY THE CLOE TILES, WITH THEIR BEAUTIFUL VARIANCE AND SHIMMERY WONDERFULNESS.
Whoaaa that mulch is cheap! grabbing some of that for myself!
Can’t wait to see the goth baby birds hahaha
I got a whole pallet, haha! I’ve also learned that bags that are slightly torn or opened are 50% off, at least at my local store. Pro tip!
I’m a pea gravel fan! This is a great yard!! You make it all look so easy but I know it wasn’t.
Thank you, Laura! Correct, it was not easy, haha! But also a nice way to spend a good chunk of the summer, and the size made it manageable. I had fun!
That’s an amazing achievement! You might want to leave that grass plant for now, though. Use the Piet Oudolf approach (https://oudolf.com) – plants should look interesting year-round, even when they’re dry, or dry and covered by ice or snow. As he says, “brown is also a color.” It’s a longer story, because not all plants look good year-round, but many do and that is his approach. I used it in plantings this year, and am looking forward to year-round interest. So you can leave the grass until April or so, and cut it back then. But look up his approach because it’s really inspiring.
Love that! Yes!! I think I read that I should cut the grass like 6″ from the ground after transplanting, I think so it can focus on root development? Normally I leave these grasses until spring—they get big fluffy cat tails in the fall and I think look nice over the winter. Just want to give this one the best shot at survival since it was rudely ripped from its home in the front yard!
I’ve been following your blog for years, but never commented until now. Not only are you talented but you’ve got a great eye for design. Bravo!
Thank you, Elaine! <3
Gorgeous as usual! I would definitely sit at the table with an empty mug and a tea towel.
Nothing more refreshing!! ;)
This yard is a complete success! So stylish and simple, the ultimate combination — yet so much work and thought into every detail. You have a multi level talent.
Thanks so much, Greta!
Wow, just gorgeous. I think you’ve even won me over to gravel!
It looks AMAZING!!! So much hard work! Very nice materials from Lowes but the magic is all yours! :)
I spy a Ticonderoga Black. My preferred pencil as well.
This whole project turned out really nice. Landscape cloth is never worth the effort. I feel like it should be labeled like those As Seen On TV products that also never work. I presume the windows were a cost/benefit analysis, but we all know you’re a OG window stan, so something else must have been going on…inquiring minds want to know.
Ha! Best pencils!
The window thing is a whole S A G A with a lot of elements, I really need to just write a post about it. I’m coming to terms with it! But as you can imagine it was a difficult decision that I still feel only kinda OK about. Your questions will be answered!
I love you. You use too many words and get way too excited about everything and you are an insane perfectionist (despite excuses and scrap sheds) and I am HERE FOR ALL OF IT.
Thank you.
Haha, thanks Korin! TOO EXCITED?! I HAVEN’T THE FOGGIEST IDEA WHAT YOU MEAN. :)
This is so cute!
It makes me feel inspired to do something about our garden situation, but also despondent because our garden is huge and overwhelming.
I get that!! My own backyard feels that way. My friend gave me a great piece of advice, which was to stop worrying so much about having a whole MASTER PLAN and just focus on one area at a time. Pick whatever you feel most confident you’ll like/use/enjoy, and the rest of the plan will reveal itself as you get out there and use the space more and more. It’s really helped me feel better about my slow incremental progress and more comfortable about getting things done even though I’m still tossing around ideas constantly. It will continue to evolve over time, and that’s OK!
I love the pea gravel and might even steal it for the small front “yard” of my Chicago walk-up. Currently, it is 100% poured concrete and very sterile/sad looking. I am curious if in any of your pea gravel research you came across any issues with raking leaves out of pea gravel? I feel like that could get messy, but maybe it’s not that bad?
Yes and no! The issue with raking I came across mostly had to do with the tines catching on the landscaping fabric (not an issue here!) or on the bigger base stones and pulling them to the surface (potentially an issue here?). But I’ve found that a sort of gentle hand with a normal metal rake is really fine, the rake filters out the stones so you aren’t dragging a big pile of pea gravel around with the leaves. The leaf blower also works pretty well. I’m not sure what all the fuss is about, it really seems like no big deal to me!
(btw, my friend Anna covered an area of poured concrete with pea gravel, and it was great! and was fine to walk on! all that stuff! I’ve read it shouldn’t be done for various reasons but…I mean…she did it…and everything was fine…sooooooo!)
Charming! LOVE your blog! I did a wee stone monolith too and 8 years later it’s still my favorite part of that planting bed.
It’s like night and day! You’ve done great making strategic choices for max impact on a budget… If you want to do something like this in Texas, I have just the yard for you. ;)
p.s. I’m also waiting for updates on the goth birds. Hope they don’t start producing maudlin poetry
Haha! WILL KEEP YOU UPDATED.
Wowowowow! I mean, holy crap WOW! It looks AMAZING! ADORABLE! FANTASTIC! Love the string lights, the mulch, the fence, the pea gravel…the climbing hydrangea (which I did not know existed)! I don’t even like outside much, but I love this space.
“I don’t even like outside much” PUT THIS ON A T-SHIRT FOR ME, NOW! :) Thank you, Kim!
IT
LOOKS
FABULOUS
THANK
YOU
SO
MUCH!
The before and after of this is just amazing! It went from something that honestly looked nothing short of disaster scene to looking like something out of a decorating magazine. I love how it turned out. Thanks for the tips on using the pea gravel, I will take advantage of those
Google “bluebird trail” to find out to attract bluebirds to your birdhouse. The New York Bluebird Society and the Cornell Extension have lots of facts about that. You can start a bluebird trail if you place a series of boxes in a line 100 yards apart. You could have two boxes at your other house and place a few boxes with the neighbors. Bluebirds used to be one of the most common birds on the east coast. Not anymore.
Love your progress. Please, have some work parties to fix up Bluestone. I will be there!
Interesting! I will read up! I remember a lot of bluebirds growing up in northern Virginia, but I rarely see them now—I didn’t realize there was actual data behind that!
I am having a moment of raw envy. Don’t get me wrong, that’s a lovely little hidden space, but as I sit here rejoicing that this week the highs are only around 88, what I really envy is your “crisp fall nights.” My “preparing for winter” plans are to plant more flowers so that I can have more zinnias at Christmas. I might prepare beds to plant lettuce and radishes in November.
If you get goth bird babies, I want pics!
Ahhhh, sorry to rub it in!!! Where do you live? Aside from the pre-winter project stress, this is my favorite time of year on the east coast. Like a reward for surviving the muggy summer.
Great job Daniel! I’d love to see a post about how you hung the string lights and what you attached them to. Also, where that adorable lantern on the table came from?
Maybe I should write one! Simple simple! Just some screw hooks attached to the house and the tree—pre-drill, hand-tighten, and you’re good to go! The lantern was from IKEA years ago…no idea if they still make it!
I love this transformation and can’t wait to see it takeover the interior as well. I just want to applaud this work loud and clear. This property has gone from the eyesore of the neighborhood to amazing and it’s not Daniel and some fancy ass crew. It’s 95% DANIEL. Just Daniel. WOW! You continue to amaze me and I’m not at all worried about those iffy looking plants. You have such a green thumb and always have. Love you to the moon and back.
â¤ï¸
Thanks, Mommy! Love you! The interior is gonna be diggity dope! <3
Great job, that’s quite the miraculous transformation! It’s a serene and inviting space now, a lovely refuge. Love it.
I love what you’ve done and I love that you have a mom who says “fancy ass”. I see now where you get your way with words. Can’t wait to see what you do next!
Bloody hell, you’re a genius.
Wow- what an amazing transformation! I am worried about the climbing hydrangea surviving in the pot over our northeast winters though. I think you might need to ask someone about ways to protect it from the freeze thaw cycles that happen in the northeast, especially in the spring. I have some luck with perennials in pots coming back, but I cover them with a tarp for most to the winter and push them under my deck so that the dirt does not get wet and constantly freeze and thaw. There is probably information out there on the inter webs, or perhaps someone at a local garden center might have some advice for you to pass on to future owners. Maybe even putting the pot in the shed?
Yeah, we’ll see what happens! Moving the pot would be pretty impossible I think…it’s 160 pounds EMPTY, so it’s gotta be like 200 pounds now. I have some raised timber beds that perennials have had no problem surviving the winter in (including at least one REALLLLLY harsh winter, so I’m hoping the same holds true for this! I worry more about the pot itself staying in one piece with the freeze-thaw cycles…I’m not sure!
Like a few others have mentioned I’d love to hear how you attached the lights. I have a large deck but no corner posts so I could attach two strands to the house but would need something for the outer corners.
Check out my response to Rachael, above! :)
You are truly a magician… amazing job!! I want to transplant it to my backyard.
Love it all! And it sings at night! Can’t wait to see the inside!
Oh la la, c’est superbe !! It is a lovely, adorable backyard. Thank you soooo much for sharing :-)
Beautifully done, Daniel. Your pea gravel installation makes for a much more stable surface than I’ve seen in the past, so maybe I’ll become a fan of pea gravel. My concrete patio needs to be replaced, and pea gravel is something I’ll consider, so thanks for that. Do keep an eye on the maple tree, since it’s too close to the fence, it WILL at some point start to lift up the fence. So think about taking it down in a year or two, if you still own the property by then.
You will not be disappointed by the climbing hydrangea I can promise you. They seemingly have zero needs and wants that I’ve ever noticed and mine grew like a weed in a dark, mainly sunless corner of the yard. In the winter when the leaves drop, the bark is a reddish brown and it peels – very attractive. It pretty much does everything except make tea. I love this plant!
Let us hope!! I love when they get real big and crazy. This makes me feel better, thank you!
Congratulations! The transformation of this space is amazing! At the beginning I honestly harbored thoughts that there wasn’t much that could be done with a small space, but of course you made it spectacular. I don’t know why I ever doubt you!
I harbored those same thoughts! I doubt me all the time, don’t worry about it. Ha! :)
Perfection.
Please, next time, investigate Crusher Fines/Crusher Run/Breeze! All you do is dump it down and that’s it. Doesn’t need any base stone, or decomposed granite, or to be tamped down, or watered down. Its just this amazing material that settles down, locks in, and is solid and stable. Its not round and won’t eventually loosen up. It comes in a slue of different color tones. Its perfect.
I have never heard any of these terms! But I think that’s what we call stone dust here? And decomposed granite out west? I’ve looked and looked but have only found stone dust, and only in one color, which is just a sad dark flat grey. Sigh! I have used it for certain things though, and it does compact beautifully…it just doesn’t look beautiful! I suspect this is just a regional thing, but I don’t totally know.
great job! I like the pea gravel. what recipe of vinegar do you use for weeds, and how do you store it? I ask because I was storing mine in a gallon tank sprayer, but the mix corroded parts of the spray nozzle and I had to replace it. emptying / rinsing out my tank every single time is getting old. I’m hoping there’s an easier way!
1 gal vinegar, about a cup of salt, and about a tablespoon of dish soap! I’ve never had that problem with the tank sprayer, though, so I’m not really sure!! Maybe somebody else has a suggestion? Sorry I can’t be of more help!
Wow! Your work here is Ah-May-Zing!
Oh, if only you could transport this whole house to Portland! I would move in immediately.
You might want walls first!! :)
Wow Daniel, great job!
Again, you hit this out of the ballpark and with style and class too!
I think since the house will either become a rental, or sold, doing what you did I think was smart and it’s amazing just how a little sprucing of old things like that table and chairs you found with some paint makes such a difference and allows you to make a charming space without spending a ton of money to do so and yet, it’s flexible for whomever ends up with the house, especially if purchased to then do their own thing and have a nice little backyard upon move in to enjoy!
Not done much to my yard since spring, grass that went all brown is now mostly green again, thanks to periodic early rains throughout much of Sept and now need to get out there to do a few fall yard chores, like split my Iris’ and set the unwanted bulbs out for others to take if they want via Nextdoor. It’s cool here, low 60’s and soon it’ll be in the upper 50’s for the most part.
I also need to do the final mowing of the season, drain and refill the oil in the mower and put sta-bil in both it and the weed eater and bed them down for the fall/winter months but do have all my outdoor furniture put away, and the window AC unit as of this past weekend though!
Anyhow, can’t wait for more on Bluestone!
Thanks mister! Good luck with your fall/winter prep—sounds like you’ve gotten a great start! I’ve been dreading dealing with the window AC units…2 down, 1 to go…
Wow! Daniel this is amazing! It’s absolutely stunning. I completely agree with you about spaces like these being so wonderful. I had a tiny little front yard at my house in Berkeley, CA; it was just enough room for a picnic table, but it had pea gravel and string lights and just felt so wonderfully cozy in the evenings! I loved that so much. I can imagine your place feels the same!
That sounds so lovely!! It does feel like that!
This is so pretty! Small, cozy urban gardens are my favorite sort of outdoor space. There’s something so romantic about them—like the surprise birdhouse, the randomly placed stones, the string lighting. All of those things create ambiance that’s easily digestible, like all you have to do is look around and you’re immediately charmed. Nicely done!
Thank you, Kate!
A beautiful transformation! I love how you share all of the details about every step along the way- and I’ve really enjoyed seeing the backyard come together! The colors in the yard all complement that light green siding so much, and the white dining set and black shed really coordinate with the contrast at the windows and trim. I had to scroll back to check that the color of the siding hadn’t changed…it’s amazing how bringing in complementing colors can brighten up what’s already there. Well done!
I looooovvvve pea gravel! What a groovy sanctuary you have made. A small suggestion/tip… When laying out your planter beds in a modest space one gentle curve is is very pleasing. The more serpentine line is a little busy. Although, the line will wind up being hidden by the plant growth. Give your pups a kiss and a hug from me! Cheers!
That’s what I was figuring! I tried one gentle curve originally, but it felt a little…idk, too…tidy or something? I do hope the plants creep and soften the lines a little over time. Thank you for the suggestion!
It looks so good and I ain’t even mad about the lack of stone dust! ;)
But just FYI, we installed with the stone dust and then pea gravel at a client’s, and they got a cute metal midcentury set like this, but the kids kept dragging the chairs around and completely destroyed the base in that area. So I’m with you– a sofa or something chunkier at the ground is probably a better fit with this kind of patio. But you can’t beat free!
Thank you Lori, and for all your generous help!! I’m so lucky. I have the same concern about the chair-dragging, although so far it’s been fine but obviously hasn’t been used a ton. But yeah, long term I think different furniture would be preferable for that reason as well.
Oh I hope some of your neighbors have seen this. You felt bad that you weren’t doing enough for Bluestone and the neighborhood. I think the yard is beautiful and might encourage others. It is uplifting to see how a small space can be warm and inviting. You have done a great job!
Thanks Rose! Various neighbors have, and have been so kind—both with the backyard and the whole rest of it! The neighbors on either side of the house have been amazing, even lending a helping hand during this project when they saw me struggling to set fence posts or move bags and bags of gravel. The community garden folks behind have also watched this go down with interest, and I’m now friends with the steward and a couple of the gardeners. And through THAT, I was able to contribute some extra materials to the community garden and another space that one of the gardeners is working on behind the church that you can see in some of these photos. It’s all made me feel extra lucky to be a part of the community here, and kind of continually amazed by the understanding and generosity of my neighbors. :)
Holy crap on a cracker, batman! That space is unbelievably awesome. I love the way you do your projects with a combination of things you have on hand in combination with new products. It makes these projects seem attainable to those of us on a budget.
And perennials! That’s what’s wonderful about them! They get big then you chop them in half! Free plants!
Beautiful, as always! I’ve been following for years, but I don’t think I’ve ever commented. I love your aesthetic and your writing and find your projects to be so inspiring!
Also, I love seeing those Pella windows. I’m originally from Pella, the town where the windows are made, and I’m always happy to see them pop up on design blogs.
Hey Daniel,
I often check in on your site to look for updates as I’m absolutely smitten with your ongoing projects. This yard project looks great. What an asset to the property and the neighborhood!
My only request…more posts. The bathroom upgrade is fantastic. I love that you kept the sink. It’s a beauty, for sure.
belle
This is an AMAZING transformation! You nailed it big time!!
I recently put in pea gravel with the cloth and totally regret the cloth – it’s already pulling up in places :(
I’m wondering if you or your readers have any tips on keeping neighborhood cats out of it, they keep pooping in my pea gravel and making a big stinky mess, real bummer!!
I know that cinnamon works a stopping cats from going in a sandbox. It may work if you sprinkle some over your pea gravel but I’m not sure. Worst case scenario… you’d have cinnamon scented cat poo.
At the risk of sounding corny, this outdoor space is so romantic!!! Would it be weird if you brought a date back to your investment property backyard? xx
Wonderful transformation!! I’m so curious about your window selection and experience as I am agonizing over what to do with a dormer addition for a 1921 bungalow in Portland, OR. Btw, I tried to see if Brosco windows were available out here and a no-go. After seeing this, I’m leaning towards black windows and leaving the white trim, still don’t know if going with simulated divided lites will look authentic or tacky.
Perfect.
Absolutely beautiful! Like wow, I’m so in love with your new outdoor space. You worked your magic here!!
I LOVE your blog. My heart always skips a beat when I see that you have a new posting. Your writing is always so funny… goth baby birds. What makes your posts even better are your readers. I can’t think of any other blog where I always read all of the comments, aside from yours. There are some pretty cool people visiting this space you have created. Thanks
Taking down trees is scary but never underestimate the power of seeing more sky. An important feature of landscaping and free!
Oh yes, being able to see the sky, not feeling like when sitting in a little back yard you are sitting in a pit, is key!
As a city dweller who never had a backyard (as an adult) to play with (except a little garden patch I had one summer many years ago), what I get from this is just how MUCH work it takes to take an overgrown, junk-filled backyard into this, a nice place to hang out in. So while I am just a vicarious, possibly theoretical future yard-maker now, I will never again look at such a backyard and think – oh, a bit of work and this will be so nice. It clearly takes a LOT of work, from ripping up the growth, carrying out the debris, grading the soil if needed, building the fence, laying down concrete and other final top treatment like gravel and mulch, finding and planting the right plants for the space, moving 160 pound planters, and other steps I’m sure I missed, not to mention the shed!
I am really curious, though, how much all that work adds to a place’s potential price – either for sale or rental (I get that it works well for AirBnB, when people are presumably, often vacationing and have lots of time to lounge out there in the right weather.)
just beautiful!!!!!! can i rent you? since my dad died i miss having someone to help with projects and finding reliable people to do simple ones is such a pain. I finally found a perfectionist door hanger and then at age 70 he told me he and his wife were moving to kansas to build their dream house!! The weather in california is pretty nice most of the time. Good luck to you and can’t wait for the next post.
What a great job you did!!!! I have a yard at one of my rentals that I’ve been dreading and it looks exactly as your “before”. I think the pea gravel would work well and make the most sense. Keep us updated on how it holds up to use. Please talk about the windows soon!!!! :-) I’m stalling on replacing 5 windows in my vintage house that were replaced by former owners back in the 50’s. I’ve been looking at the Pella’s at Lowe’s and would love to hear how the install went at your place.
Slightly sad the Mulberry went… birds like bigger trees. But I guess it’s messy to clean up the fruit?
I love the look of string lights, but I wonder what happens in weather. Do they swing about in the wind? Do you bring them in for the winter?
So well done! I wish you were closer to Utah. I need help with my yard!
I adore the simplicity of this outdoor space – so clean and functional. Fabulous.
The pea gravel looks lovely in the pictures. And, of course, you won’t be maintaining it on a day-to-day basis. I feel for the person who has to pick leaves out of it in the fall, and who has to pick out the garbage that the kids leave in it, and who has to constantly either weed it or spray it, and who has to deal with what the cats or rabbits in the neighborhood will do to it . . . here, that person is me . . . but, it sure is pretty. At least you didn’t put in a pond for the poor souls who rent the house to have to deal with . . . I have one of those at my new house . . . it sometimes makes me long for the pea gravel.
The backyard is zen now–and the monochromatic floor level sets off the flowers just beautifully.
I’ve just been catching up on your blog after some crazy few years where I basically stopped interacting with the internet at all for lack of time. Wonderful to see that Bluestone Cottage is on the rise, and I love the Antarctica inspiration. I’m British, and we used to have an abandoned hospital near me built in a similar era. It had a similar interior, with the greens and the functional liveable space feel. Also the gloss lol.
Thank you, Rona! Welcome back! :) :)
This is my dream backyard! I love it! Do you have any issues with squirrels chewing your string lights? We put up string lights in our backyard last summer and those little fuckers chewed through every. single. string. of. lights. It definitely caused an electrocution-per-week situation, which was sad but also they kinda had it coming. ¯\_(ツ)_/¯ Anyway, have you ever dealt with that and do you have any advice?
Oh god! I wish I had some advice, but evidently the squirrels here haven’t been interested in the string lights!! Disturbing the mulch and kicking it into the pea gravel is a slightly different story, haha. At least they’re cute!