
This project is in partnership with Lowe’s! Thank you for supporting my sponsors!
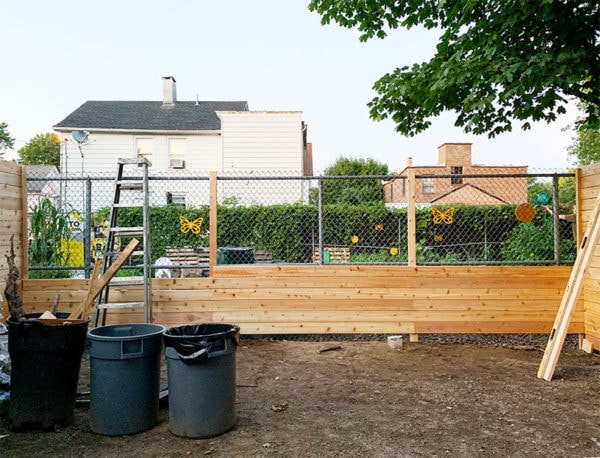
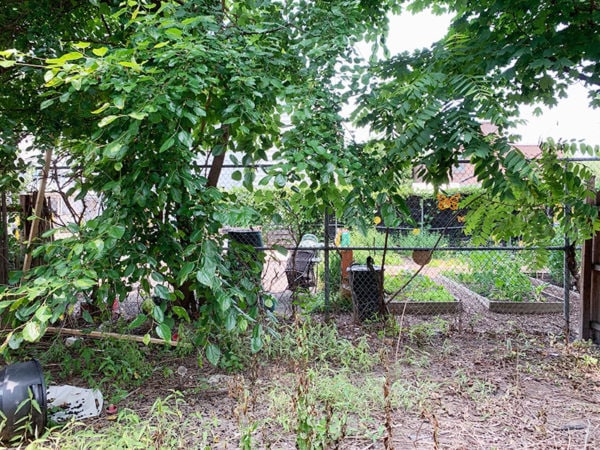
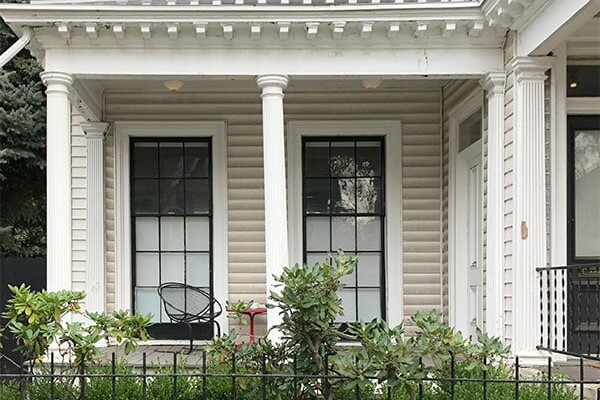
I’ve been putting in long hours over at Bluestone Cottage’s backyard, and I have the insane farmer’s tan to prove it! It’s really starting to look like something, and I’m so excited for the direction it’s going. Here we were a couple weeks ago:

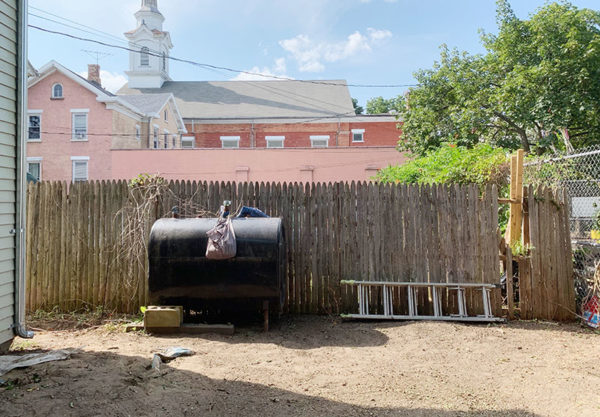
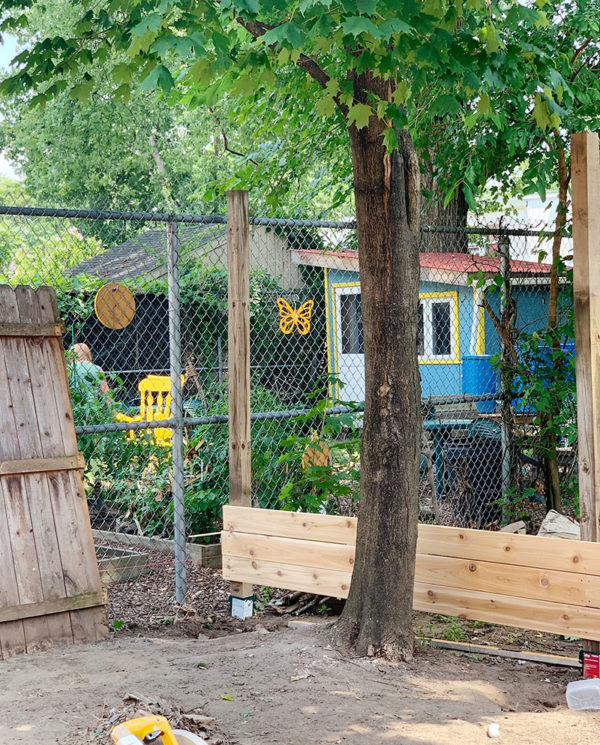
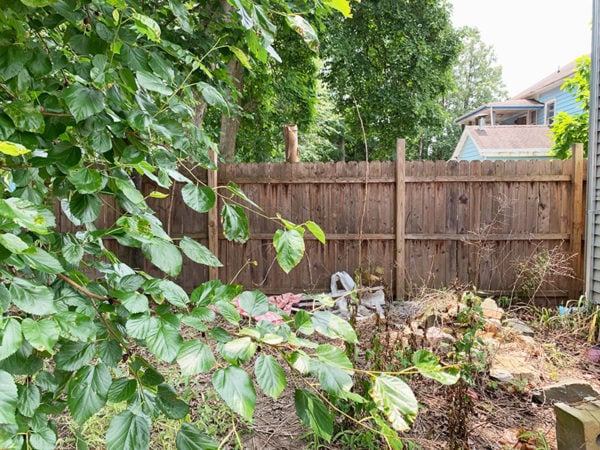
When considering what to do with this backyard, it quickly became apparent to me that a new privacy fence would be the single most important investment I could make back here. There was existing fencing on all three sides of the yard, but each side was a different style: a falling-down stockade-style picket fence, newer but unsightly (and very see-through!) chainlink fencing, and a dog-ear style picket fence. In a larger space, I feel like this kind of thing isn’t as big of a deal—like there can be enough going on that the fence isn’t necessarily a major focus. But in a space this size, the different materials combined with the lack of privacy made it feel visually cluttered and too exposed to use comfortably.
First order of business was to demo the old fence. I used my Sawzall to cut through the rails and then yanked out the posts. The posts are pressure-treated 4x4s in decent condition (and, mercifully, not set in concrete), but the fencing was not pressure-treated and had a lot of damage and rot. A few days before, I discovered that not only does our municipal trash transfer station compost yard waste, but they also compost “clean” lumber—i.e. not pressure-treated or painted or stained! So it’s not in a landfill, and one day I’ll probably buy it back in the form of compost, basically.
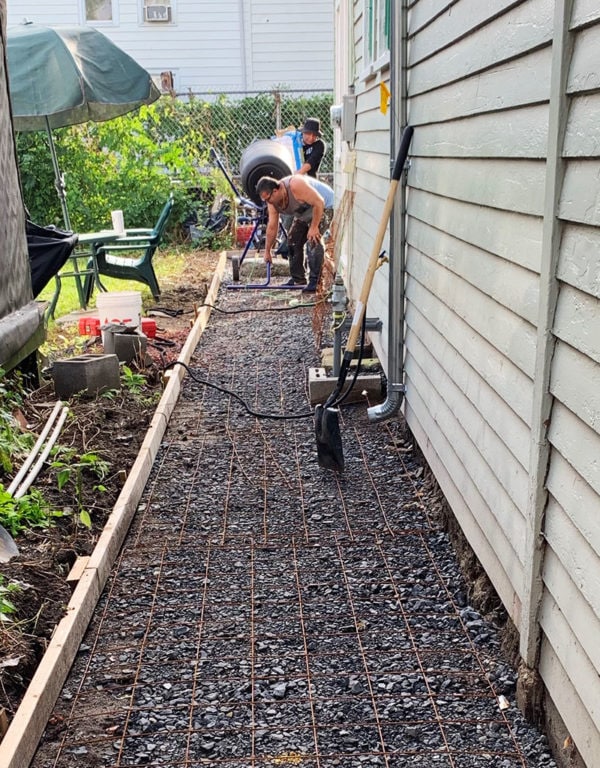
Before installing the new fence, I took this as my only easy-ish opportunity to really deal with this pathway that connects the front and back yards. It was paved with a cobbled-together bluestone pathway, but with dirt on either side and impossible to maintain without a ton of weeding or spraying stuff that kills weeds. I think the bluestone (from which the cottage derives its name!) will be so much nicer to use in the front of the house than along this pathway, and a clean and simple concrete path will be practical and super low maintenance and keep water off the foundation.
SO. We removed the bluestone slabs for reuse elsewhere, excavated a couple inches and leveled, then laid about 4″ of item #4 gravel. Around that, I built a simple form out of 2x4s, driving stakes into the ground every 4′ or so. You don’t typically need the steel remesh for a sidewalk application, but Edwin likes it and hey—can’t hurt.
For the pour, there are a lot of concrete options—including just scheduling a pour with a local concrete company. I was concerned that access/traffic flow would be real issues, and it wasn’t THAT much concrete, so mixing and pouring on-site seemed like the best option.
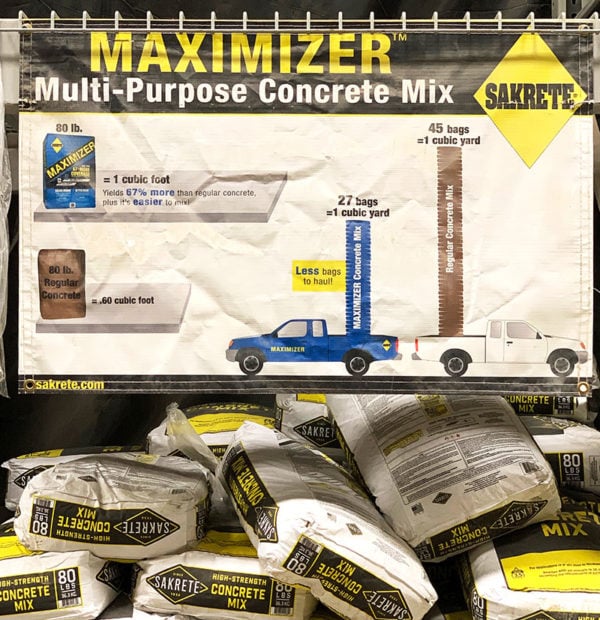
I found this Sakrete Maximizer concrete at Lowe’s, which made things easier! Like other bags of concrete, they weigh 80 pounds each. BUT! Every bag makes almost twice as much concrete as a typical 80-lb bag, which is a big deal when you have to mix a bunch of concrete—we would have needed about FIFTY MORE bags to do the same thing with regular concrete. That’s a lot of work to cut out of the process!
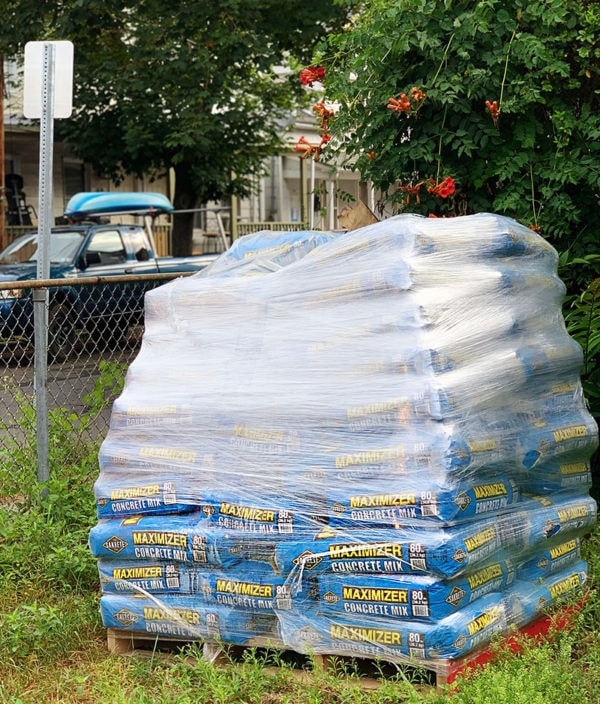
Don’t worry, that’s just a little over 6,000 pounds of dry concrete. Everyone’s favorite summer activity, am I right?!
After tamping down the gravel and affixing Sakrete’s Expansion Joints to the abutting side of the foundation, it was pour time.
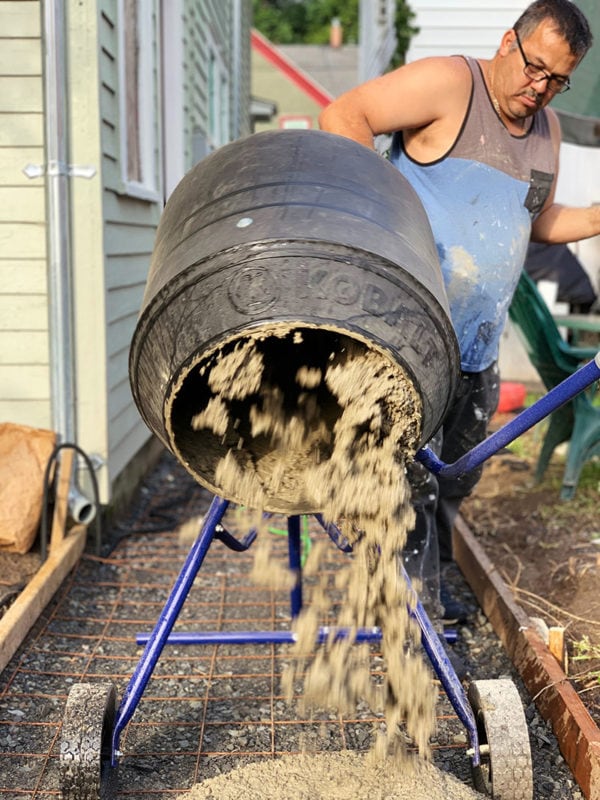
No WAY were we mixing 80 bags of concrete on our own. And at this point, I’ve paid enough to rent concrete mixers that I could have bought two. So Edwin and I went halfsies on this Kobalt concrete mixer, and now we have a concrete mixer.
I know, it’s all very impressive. A pick-up truck, chainsaw, and concrete mixer in the space of one summer. This is not how I pictured things turning out for myself.
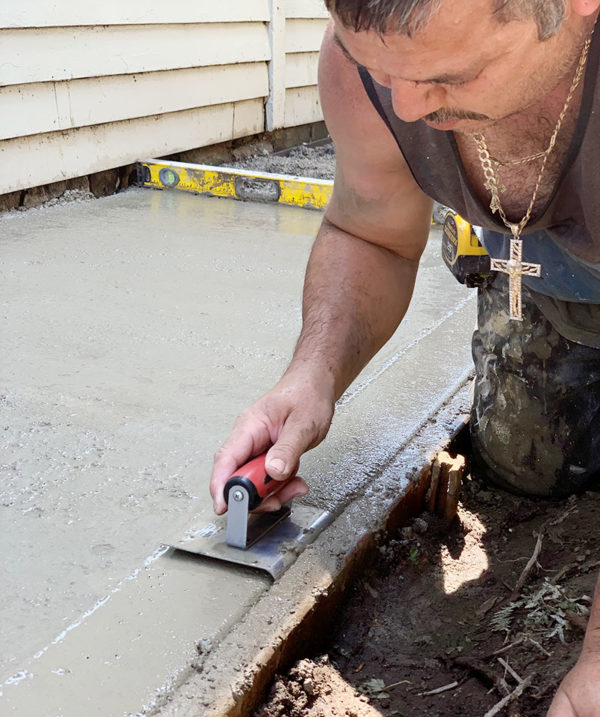
We built the forms and screed the concrete at a slight angle away from the house. After it had set up a bit, we smoothed the edges with a concrete edger and placed our expansion joints every 4′ with this concrete groover. Once it was pretty set, I misted it with water and covered it in 6 mil plastic, which helps it from drying out too quickly and developing cracks.
Hooray! I’ll be honest that it’s not the most exciting improvement but it feels super clean and practical and easy to live with. I’ve really grown to appreciate a simple concrete slab in my old age.
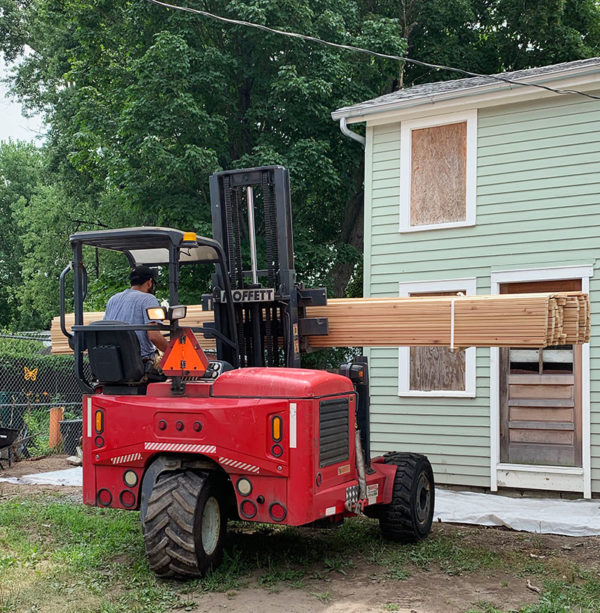
After the new path had dried out for a few days, the fence was delivered! HEYYYY.
(BTW—I opened myself up a Lowe’s ProServices Business credit card, which gives you 5% off everyday AND $20 flat-rate delivery from your local store. Consequently, getting big things delivered—like 80+ bags of concrete or 100+ 16′ cedar boards or like 120 bags of gravel—is my new favorite thing. So much time and energy saved on loading and unloading, which makes the project itself feel so much more manageable and leaves me more time to actually enjoy my summer! I wish I knew about this sooner—for real, talking about this is not part of my blog partnership with Lowe’s, but it’s a good deal if you do this work professionally, so I wanted to mention it. They were also running a limited-time 10% off promotion for opening the card, so that was a nice savings for these few large orders.)
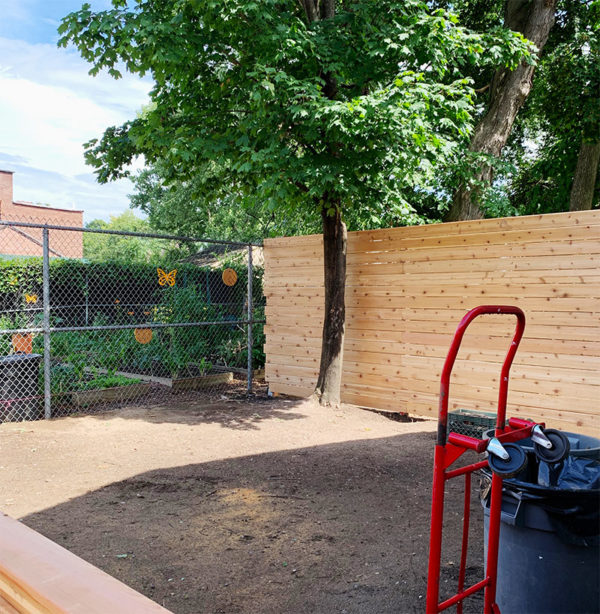
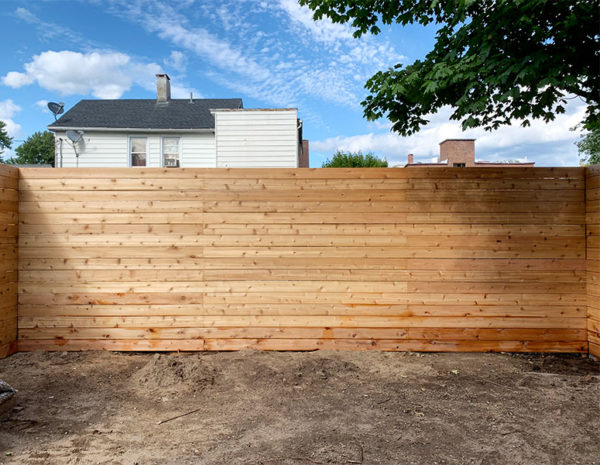
So, about this fence. I thought horizontal fencing would visually elongate the space and it just felt like the way to go here. I also really wanted to use cedar, since it’s what I used on the front planters and I know it holds up well. Pressure-treated wood just always disappoints me in a few years and I try to avoid it. Also—hear me out! It’s a small house, so treating this like another living space feels important. All of this to say: I designed an expensive fence, and the small size of the yard made me feel justified in this decision. Let us pray it was worth it.
After weighing my options, 1 x 6 cedar decking boards in the 16′ length were the best solution in terms of size, price, and quality. 16 feet is a long board, but it’s actually slightly less expensive to buy the 16-ft length than two 8′ pieces. By the way, the boards really are 1″ thick (rather than your typical 1x, which is 3/4″ thick), but are 5.5″ wide rather than 6″.
Is this overkill? Kinda, maybe, sorta, depends. Let’s put it this way: your typical 5’x8′ pressure-treated fence panel will run about $7.50 per linear foot of fencing. By comparison, 1×6 cedar decking boards will run about $17 per linear foot to achieve the same height (I went higher to match the height of the chainlink, bringing my linear foot cost to about $25). So it’s not a small difference—it’s definitely the big ticket item back here. In fairness, I expect this fence to last MUCH longer than typical 5/8″ thick pickets, so there’s that to consider too. But anyway—it’s so foundational to the space and not easily changed that I stand by it. I’ll just have to be crafty in other ways so this whole thing doesn’t cost a small fortune.
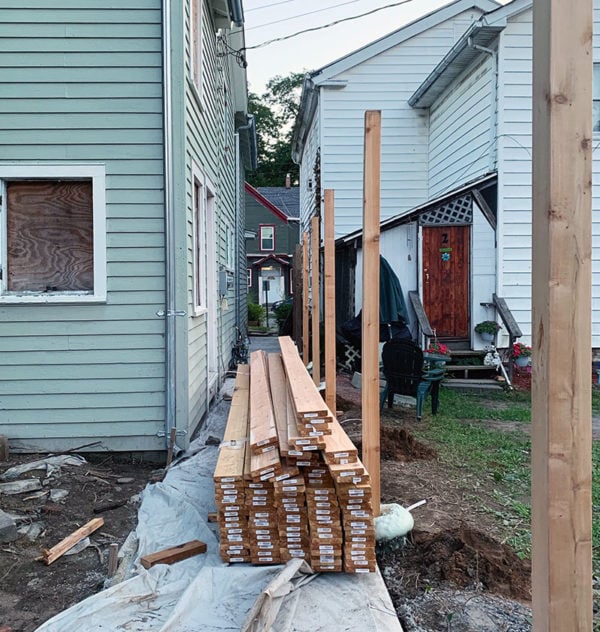
At this point, I’d exhausted the labor budget I gave myself on the backyard and was working solo. I removed the wood forms for the concrete path and used a post hole-digger to dig down about 2.5′, spacing my posts at 8′ intervals. I used 10′ cedar 4x4s, which I’ll cut the tops off of toward the end—it’s easier to cut down the posts after they’re set than try to get the tops all level as you install them.
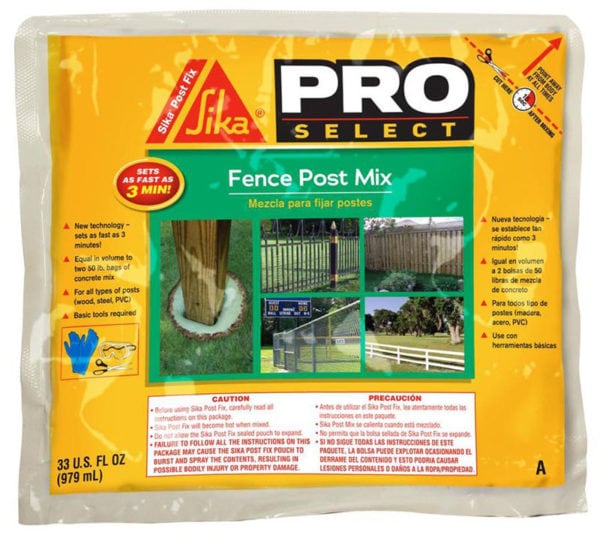
To make my life SO MUCH EASIER (and more exciting), I treated myself to this Sika Polyurethane Fence Post Mix to set the posts. It’s kind of the coolest. Rather than schlepping an 80-pound bag of concrete for each post, you just need this little lightweight pouch of chemical potion that turns into this rapidly expanding foam. Because it expands and cures so quickly, you don’t need to brace your posts like you do while concrete sets—just hold it in place for a few minutes and you’re good. I LOVE it. I didn’t know what to expect, but the posts feel extremely sturdy and stable, and it made the hardest part of fencing feel…not very hard! Easy as a one-person job, and I had all my posts set in like an hour. Boom!
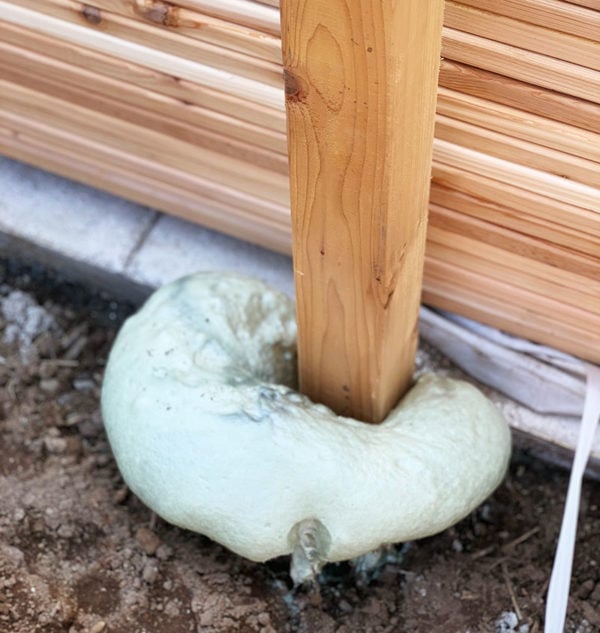
Maybe my holes weren’t quite deep enough, but the foam expanded above the ground, each one looking like a small mushroom cloud. This happens in a matter of seconds! I’ll post a video to Instagram—it’s weird ASMR to watch it grow. Science, man. It’ll mess you up.
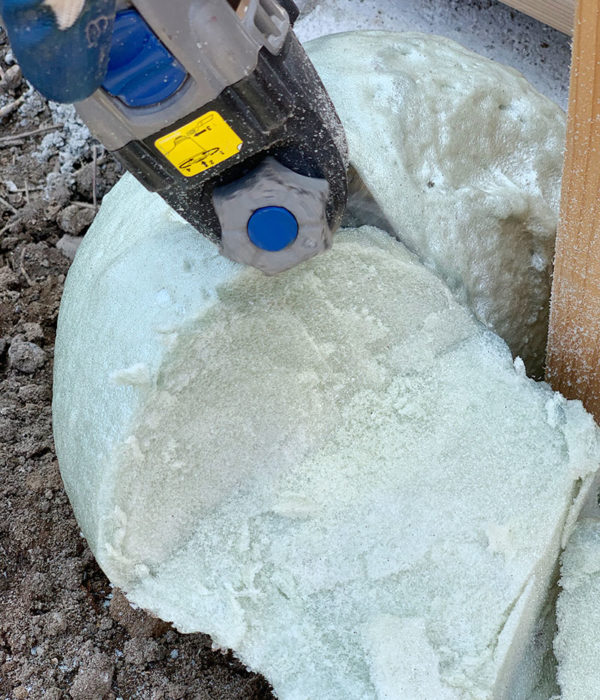
The next day, I used my Dremel Multi-Max 50 to cut away the excess foam. Easy and done. Love that thing.
![]()
Time to start putting boards up! Hooray! This is a difficult one-person job and a somewhat easy and relaxing 2-person job.
Horizontal fencing is kind of like tiling—if your first board is right, it goes pretty fast from there. I left a 1″ gap or so between the concrete and the bottom board and used a level when attaching it. I used 2″ Grip-Rite deck screws to attach the boards to the posts.
With the first board secured and level, I used a paint stir-stick as a spacer between boards. This also allowed for a little bit of play to keep the boards level—you want to recheck your level periodically and make small adjustments as needed.
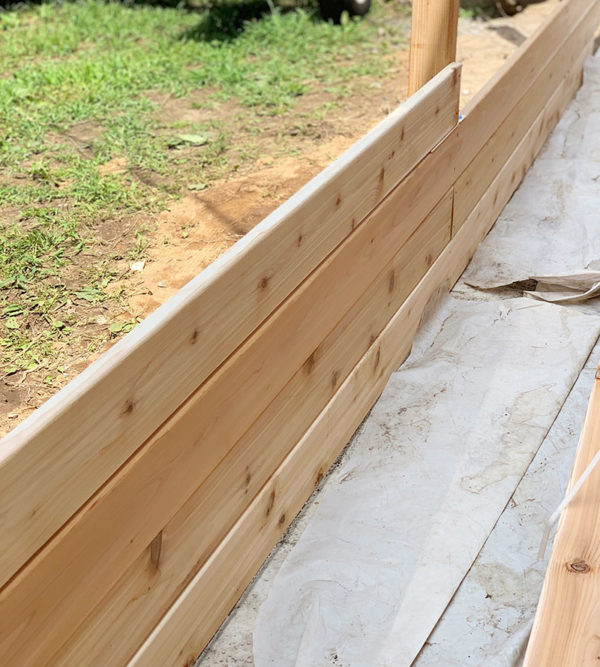
Because the boards are so long, I can span two posts with one board—which means a nice staggered joint! I think this looks really nice (more continuous, I guess), and also helps the fence stay rigid and super solid because there isn’t a big vertical seam on each post.
Before installing the last board, I marked and cut the top of each post at a 45-degree angle, which will prevent water from sitting on the top of the post without needing decorative post caps. I just thought this would look nice! It also saved a few bucks.
With the north side done, I pulled out the dog-ear picket fence on the south side, re-set the posts, and began hanging my fencing—making sure my south-side boards and north-side boards were level with each other.
Oh hi, fence! Looking fancy.
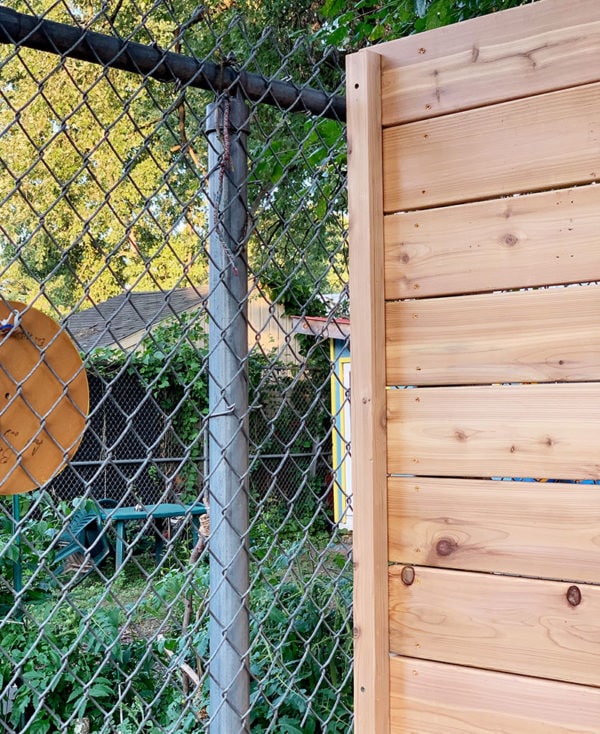
Now it’s time to cover the chain link!! I ripped a cedar 2×4 in half and mounted it to end of the new fence, where it meets the chain link. This is what the boards will attach to in this corner.
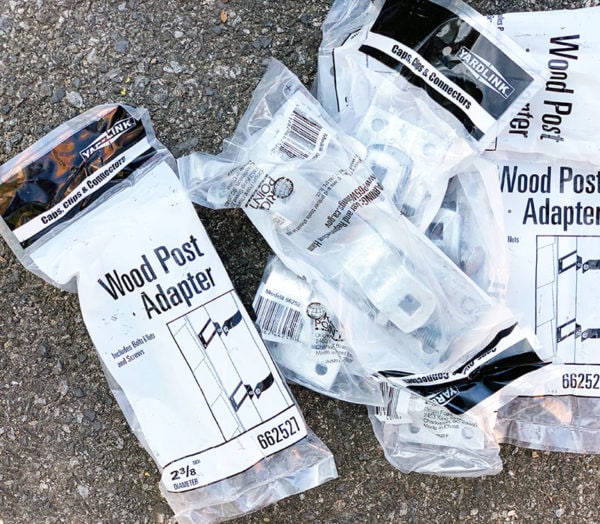
I’ve seen similar stuff done with conduit straps, but did you know there’s an actual adaptor part made just for this? I ordered mine online from Lowe’s and they were here a few days later.
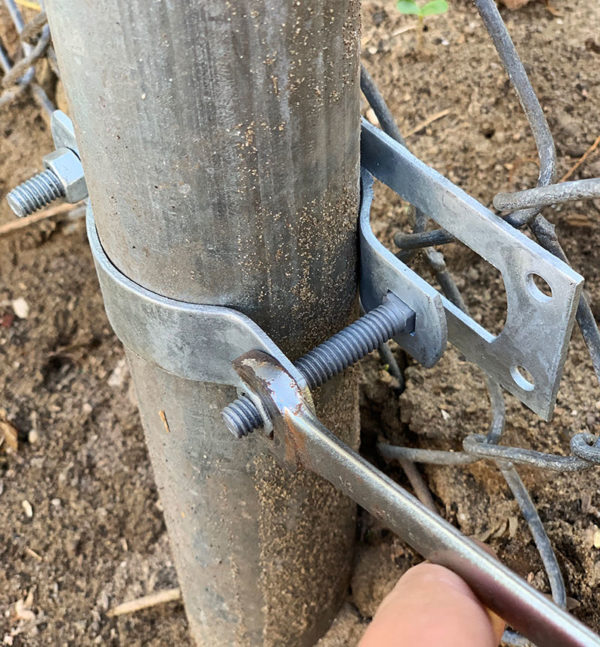
So typically, these would install onto the vertical chain link metal poles, like so. From there, you’d treat them just like a 4 x 4 post, installing your 2 x 4 fence rails to the adapters and hanging your pickets as usual. In some cases it’s appropriate to remove the chainlink itself, but since this is part of a much larger fence that’s not mine, it stays.
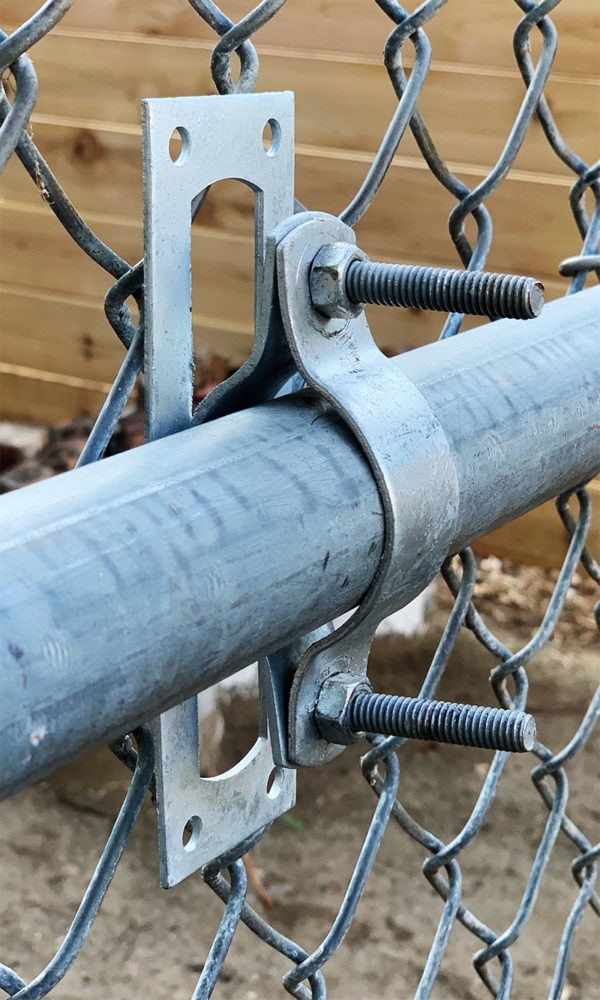
In this case, I used the horizontal rails of the chainlink to attach my adaptors.
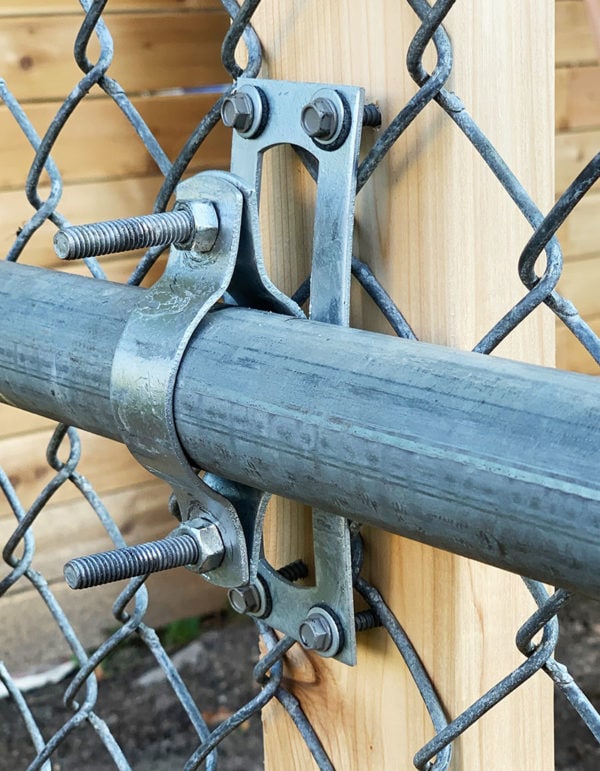
Then I just screwed in cedar 2x4s as my verticals. Like fence posts! Obviously there’s a small gap between the adaptor and the 2×4, but that’s as close as it goes with the chainlink still in place. The screws are long enough to keep it very secure.
Like so! There’s an adaptor on the top rail and the middle, but the bottom was buried so far down that I just kinda buried the bottom of the 2×4 “posts” and called it a day. Note also that attaching the adaptors to the rails rather than the poles allowed me to control the spacing—the span is too long for a single 16′ board, so I needed two “posts” in the middle to keep my staggered seam. If that makes sense? It took some head-scratching once I actually started. You, too, can figure it out.
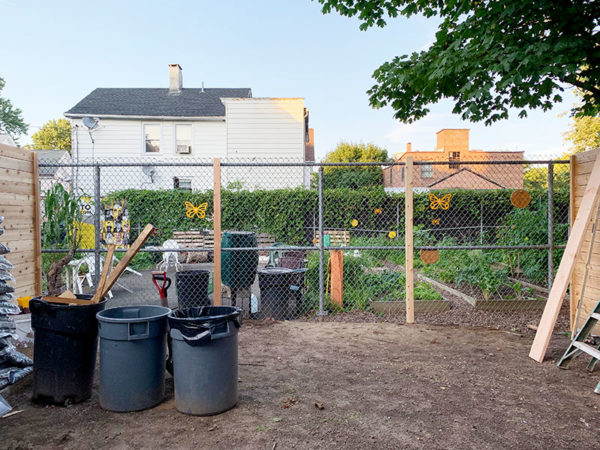
Here! We! Go! From here, the fence went up much like the other sides. Glorious! Because the side walls are attached to each other by the center section over the chainlink, the whole thing is square and level and impressively sturdy.
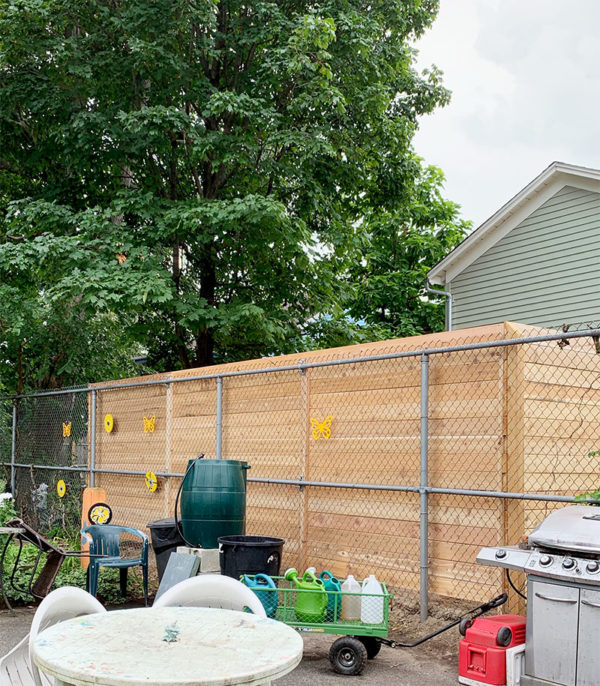
In case you’re wondering how this looks from the back—I think it’s pretty clean and nice! The gardeners seem stoked, too. I hope they find that it makes a nice backdrop for whatever they want to hang on it. I didn’t treat it with anything, but cedar should weather to a nice silvery grey in a few years. I think that’ll be swell.
Remember this, a couple weeks ago?!
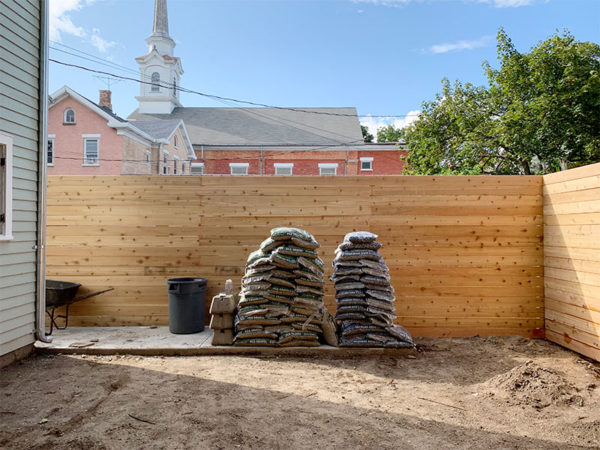
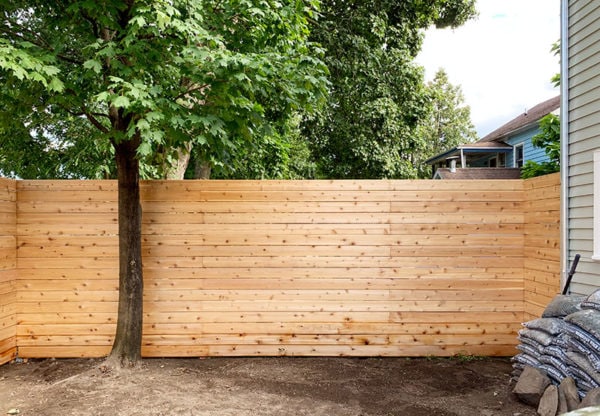
SO MUCH BETTER. I decided to extend the concrete pathway straight into the yard, leaving about 7′ of unpaved space in the corner for a tree. I feel like this paved area could be used in a variety of ways, like a grill and some outdoor chairs, or a small bistro table, or a swanky bar or buffet surface.
While the community garden was nice to look at, having all the sides fenced in a solid material really makes the space… feel like a space? It feels like a (currently comically barren) private little courtyard, where you could totally kick back and read a book and drink rosé or whatever. It’s so small and cute!
So happy to have this fence done! This feels kind of like an interior renovation—and now that we have walls, it’s just floors, furniture, and decor to go! I can’t wait to get some plants back here and really see it come to life.
By the way! I’d be remiss if I didn’t mention all the awesome ideas y’all had for this space—I seriously considered ALL of them, and I’m so grateful for the feedback. This feedback included a lot of suggestions about the chain link conundrum in particular, so if covering your chain link with wood fencing isn’t your speed, here are some great options offered by your fellow readers!
- Climbing plants! Easy, cheap, and effective! Climbers LOVE to grow on chainlink (honeysuckle, hops, ivy, Virginia creeper all come to mind). They’d take a few years to take over, and in this climate would still die back in the winter but provide privacy all summer long. I didn’t go with this option in large part because the community garden actually owns the fence, and climbers can become quite invasive and even damage the fence long-term, and they expressly did NOT want it.
- Hedges! Also effective, but slower, and more expensive. Lots of options: Arborvitae, Holly, Privet, Laurel, and Forsythia are a few I can rattle off. Of course something like that takes up more space than fencing or climbers, but not a ton.
- Privacy Slats and Screens! There are various products designed for this very purpose that are affordable and practical, like privacy slats you can kinda weave into the chain link, or privacy screening meant to hang in front of it. Within the privacy screening category, there is black (which can be a good neutral backdrop for plants) or more decorative options which I’d assume look good from afar and a little cheesy up close. My favorite option here is probably a natural reed or bamboo screen—natural reed in particular I think is versatile and can work in a lot of different styles. You can also get creative! Recycled billboard vinyl is well-suited for outdoor use, or waterproof canvas, or sail cloth, or…IDK THIS IS YOUR PROJECT, YOU FIGURE IT OUT.
Onwards! I’m so glad to be getting this done now, while the next steps on the interior work are still being debated between the pros and the building department (I’ll tell you all about it—it’s nuts but informative, I guess), and fall/winter are just around the corner! I’m glad this is going pretty quickly because I’m still hoping to circle back to a few improvements to my OWN backyard/exterior before it’s too cold and I shift back indoors. Anyone else starting to feel that crunch? Just me?


Wow! What a transformation!
Thanks Dianna!
Love your posts, great job on the yard so far- can’t wait to see what you do next
Thanks Mary W! Gonna build a little shed!! :)
Hi. I’m very impressed with your work. I read about your shed and pea gravel too. Questions: to attach the chain link adapter, did you have to get permit or just asked the neighbor? Same for placing the posts coz I noticed you had to dug in the neighbor’s lot. Thanks so much!
That looks fantastic. I don’t think that is where I would use my money when you lay out the price per linear foot, but it’s your money and your yard and you can’t argue with the result.
I’m glad you’re adding a tree! Make sure when picking a species to consider mature height, whether the fruit, seeds or flowers will be a pain in the ass, and native if possible. I might go for a black gum or a pagoda dogwood (I like the petals but YMMV).
Thanks Kit, I will look into both! Trying to decide if it ought to be evergreen…hmmmm.
I’m always a fan of a nice Japanese maple!
Same!
One evergreen would be SO nice, and less leaves to rake.
Looks nice.
I wonder about the tree next to your new fence. It looks nice now but trees trunks tend to expand. With it being next to your fence, are you concerned about it ruining your fence as it grows?
Wow, that looks like a lot of work you’ve done in that yard, your breezy tone making it sound easy notwithstanding. It really looks like it will be a space someone will be able to enjoy and make into their own private outdoor dining/whatever space now.
Thanks! Definitely a lot of work, just not especially difficult work (well, the fence. The concrete was a different story, but I had 3 helpers that day)—but I think it’ll be worth it!
Wow!! It definitely looks like an (empty) outdoor room, and I agree that it’s not too crazy looking from the community garden side. Good call on extending some concrete out there. Will help all of the pea gravel haters calm down. Can’t wait to see what you do, and as a tree lover I’m sort of most curious about what tree you will do. I love River Birch and think it would look lovely there :)
Thanks Catherine! I was thinking about a river birch!! Plus it should fill out pretty quickly which is appealing. I think it’s a good option!
Nice work Daniel!
I totally love the choice of fencing and it gave me an idea on MY chain link fencing in MY yard, Thank you!
Mind you, I had not looked into options, outside of the slats you can weave into the chain link itself that are easily spotted at Lowes as you shop there so had not realized there were adapters for building wood to chain link fencing, who’d da thunk?
Anyway, looking good and I like this style of fencing, modern, but clean and if stained into a redwood like finish, would look splendid against black, dk grey or blue/black paint on one’s house (mine is sadly, white at the moment, but I have plans…).
Anyway, keep on keeping on!
Thanks John! Good luck with your own fence! The adaptors are great—I’m surprised I’d never seen them before!
I FEEL THE WINTER IS ON THE WAY CRUNCH!!
It always sneaks up faster than I think it will! I feel like this summer flew by.
AMAZEBALLS!
:)
That fence is entirely too dreamy, dare I ask what it ended up costing? We share a VERY terrible fence with the neighbors to the west of us, it was poorly installed and now their carport seems to be holding it up for the most part. We both know it needs to be replaced, but I think we’re all avoiding the inevitable expense of it all.
In the post Daniel mentioned that the horizontal cedar fencing was $25 a linear foot which at first seemed so expensive but then I never calculated the price of wood by the foot. His fence also looks like it might be 7′ tall instead of 6′ so that means more wood of course. I did a real rough estimate of the size of Daniels fence (but I can’t see how far the fence extends down the sidewalk side of the house) and it came to ~$1800 for materials at $25/linear foot. This might not include the cost of the posts and the concrete/polyurethane foam to set the posts so that’s additional and all of the pricing depends on how many feet of fence you need.
I live on the west coast and I don’t see pressure treated pine used for fences or decks although it seems more common on the other side of the Rockies. I easily spent $1000 on cedar for my backyard fence and that was only for 2 sides. I still need to cover the back that has the chain link and I’m considering changing the style of one of the other side since as I’ve done the sides slowly over 10 years it doesn’t match what I decided on for subsequent sections. One way to save on wood costs is to leave larger gaps between the boards. The max space should be under 4″ (for child and dog safety – so they don’t get their tiny heads stuck) but I did once fence this way using the wide side of a 2×4 and now I think it’s a little too wide but at the time I didn’t have much money and that fence has lasted 10 years. The next two sections I used the short side of a 2×4 for spacing and it is close enough to feel enclosed but wide enough to allow airflow and uses 25% less wood.
Its 8ft tall. If those boards are 6 inches wide, it would be 8ft tall. So add about another ~200$ to your estimate.
Also, you could add a 6inch board over the 4inch gaps on your fence as a solution.
Sorry for the delay—thanks Ryan! You’re hired, haha! The finished fence is a little over 7′, and I had to do about 103 linear feet. I haven’t added up every little thing, but including posts, screws, the Sika fence post foam, wood post adaptors, gate kit, post hole digger, it came out to about $3K. Not that it’s especially relevant, but for reference when I had my fence replaced by professionals at my house, I recall it being $25/linear foot for 5′ pressure-treated pickets, so that also helped me wrap my mind around the cost—DIY meant I could get a MUCH nicer fence for a cost comparable to a professional install of a normal no-frills pressure-treated picket fence.
It’s gorgeous! I can’t wait to see the landscaping. I know you’re going to go overboard on that, too!
Haha, we’ll find out!! I really want to buy as few plants as possible—between the front yard at this house and stuff in my own garden, I feel like I should be able to throw together a nice looking bed!
also i would wait til the heat of august passes… late sept/early october would be good time to plant. .. cooler nights and warm days – the plants wont stress more (as they would in hot humid weather) and settle in a bit before the winter
Are you worried by attaching your fence to the chain link fence you don’t own? Did you talk to them about it? I would be worried they’d want a change down the road and then what …
I’m not feeling a summer crunch, but I definitely am feeling it slip away. Luckily it doesn’t get really cold here until after the New Year. And now it feels too hot and humid to do anything!
It sounds like Daniel did talk to the community garden about attaching his fence to the existing chain link fence. Since the new cedar panels are only using the chainlink for support, if it had to come down for some reason in the future he would just need to add two new support posts in the middle and reattach the panels.
I just talked to my backyard neighbor about doing the same thing and he mentioned that he’s thinking of selling soon so I’m not sure if I feel like finishing my fence soon before he sells or waiting to talk with the new neighbors.
OK, now I have to start paying Ryan. ;) I did speak with the steward of the community garden about the new fence and they were fine with it. They are EXTREMELY unlikely to change that chainlink any time soon—it’s relatively new (like last 10 years I think), in good shape, and there’s a ton of it—the garden is placed on what was a residential lot before the house was demolished. I guess it’s technically owned by one church but managed by another church and short of a large donation for this specific thing that nobody seems particularly bothered by, I’m guessing that fence will remain until the end of time! But Ryan is right—my fence is attached in 4 places to their fence, so detaching it and adding a couple of posts wouldn’t be a big deal if ever the need arose!
Looks great! A lotta work, well done! We too have a similar situation with different fences on all sides of our backyard, including chainlink, with all the privacy issues you covered. I’d love to put cedar all around. One of my concerns is the gap between the old and new fencing where weed trees can grow out of control. This is a big problem where we live.
I feel that! That’s part of why I used 2x4s for the vertical supports on the chain link, so there’s only about 1.5″ for that to happen. It’s also easily accessed from either side so I’m hopeful it will be easy to maintain moving forward.
I love the look of the fence but I am DYING to see the whole space, from above, to get a sense of the space, where the concrete is and how wide, etc. As a gardener I’d love to see garden drawings etc. before you plant/do any more hardscaping;). Not that you have anything else to do of course LOL.
Haha, are you really gonna make me climb on the roof Lisa?! I don’t have a drone!!
There is a bird’s-eye scaled sketch at the end of the last post—if you just extend that path on the side of the house into the yard like 12′, that’s the current status! :)
Weird how the unglamorous changes end up being the ones that most affect how you use and enjoy the space. That said, I think the horizontal plank fencing is “hella glam” as the kids were saying 10+ years ago. This will pay dividends!
Haha, thanks Chris! Let’s hope!
Ahh, seeing all those beautiful horizontal boards is like a balm to the soul. Amazing job!! I think I’ve read every tutorial on the entire internet about attaching wood to chain link and this is the best one.
If anyone’s curious, we just bought 9 panels of the bamboo panels you linked to from Lowe’s (in the “carbonized” color, a lovely brown that blends into the surrounding foliage) and they look shockingly great! And you can attach them with zip ties – FANCY! We’ll see how they weather but I’m very pleased so far.
Aw, thanks Caitlin! I was also surprised how few chainlink to wood guides there were so I’m glad this was helpful!!
I’m curious about how the bamboo weathers! My friends used the natural reed one that I also linked to, and it really looks great. They’ve had it up at least a few years! I’d assume the bamboo is heartier—hope it lasts you a long time!
Beautiful! I love outdoor rooms and consider any defined space a room so good for you for investing in your world view :)
Thanks Chrissy!
I need an Edwin in my life.
Don’t we all! I’m very lucky to know him. <3
We just finished a foundation-up, studs-out flip. Took us fifteen months. We only had to re-do the back fence, but it was 105′ long. Making it match the nearly new side fencing severely limited our options. I’m happy with what we came up with, but yours is giving me serious fence envy. Lovely job. You definitely have given the new outdoor living room good bones.
We bought our fencing at Lowe’s as well. In CA, the boards they sell everywhere are green and the quality is crap. We hand-selected every single board and the staff at Lowe’s was very helpful. They kinda got into what we were doing and happily offered to bring down more fencing with the giant forklift. We were very careful to stack the “rejects” perfectly and I think they appreciated that we weren’t being jerks about how we sorted through the wood. Much nicer doing business with Lowe’s, even if they aren’t as conveniently close.
Can’t wait to see what you come up with next.
First of all, CONGRATS! That’s a big undertaking and 15 months sounds super fast from here! Glad your Lowe’s shopping experience was a good one—and yes, I’m sure they were happy to see someone NOT leaving their reject boards all over the place willy-nilly. That drives me nuts!!
I’ve always struggled to come up with solid, creative ideas for covering chainlink (hate it) up and am so grateful for your share! Thank you!
No prob, I’m glad it’s helpful!! :)
Please, PLEASE pitch yourself to HGTV! You and your mad skills would make a great show! And Edwin needs to be your sidekick:)
Haha! I AGREE but we gotta get the Scripps execs on board. Call your senator! ;)
I think that a YouTube channel might also be great. Something like Primitive Technology, only with renovation, might be nice. I will keep hoping.
No, we are not in fear of winter here, yet. We were all rejoicing when the heat and air guys finally came out last week and hooked up the prohibitively expensive geothermal heating/cooling units, and we no longer had to risk heat stroke while putting in the floor upstairs. We hope to (maybe) move in before the winter weather arrives.
This looks so great! But also living in NY I have to ask how did the permit process and neighbor permission go without a hitch? Over in our town in Orange County NY we have so many restrictions (how much visibility you have through the fence, how high, how close to the property line, the direction in which the finish side faces, etc.). Did you run into any unusual issues with that?
So in Kingston you don’t need an additional permit to build a fence (I can’t remember if you need one at all—I think no?—but it doesn’t matter because the house already has an open permit). They have some regulations which are generally not followed—*technically* the fence is supposed to be inset like 1-2 feet from the property line so that the owner can maintain both sides without stepping onto the neighbor’s property (LOL LOL never once seen this), and the height max is supposed to be 6.5′, and the “good” side is supposed to face out. But like I said, these rules are generally not enforced and I think basically as long as you don’t do something in flagrantly poor taste and close to the sidewalk or road (this isn’t), chances are you’re fine. I did go a bit higher to match the height of the chainlink (not sure why they’d get to have such a tall fence but I couldn’t…), figuring WORST case, the city asks me to take down the top course or two or apply for a variance, and I can live with both of those options!
Ah, I wondered when this would come up. It’s a nice courtyard look to have the good side facing in but I was sure it wasn’t technically allowed. Stay on good terms with all your neighbors. Luckily your work looks good from both sides so it’s not like the “bad” side looks bad…but the height and the orientation are easy things for someone with a grudge to complain to the city about. That happened to me a few times during my work in real estate.
Thank you for that horizontal fence! That has been part of my plans for the backyard since I moved into my house. My yard is small but I did NOT start out with something as clean as where Bluestone’s is right now, so a few things gotta come out before I make that major change. I’ll be using your fence as a template for mine!
Nice! Now excuse me while I recover from someone describing this backyard as “clean”…my brain hasn’t quite caught up yet to this new reality!
1. I love reading your blog posts, even when the technical details go over my head, because they’re ALWAYS entertaining.
2. I would highly recommend covering that dirt with some sort of temporary, breathable, anti-weed layer. Like weed fabric or cardboard or even old rugs. Otherwise your wonderful work clearing the space will eventually be for naught. I hate weeds.
Thanks Devon! I’m still working back here so hopefully weeds won’t be a big issue when all is said and done—but yes, little things are already beginning to sprout, so I better get on it! I also hate weeds…unfortunately they seem to love me, haha.
Now THAT’s a fence! What a lovely job, looking good, too, and don’t forget when your first tenants go in, to tell them they are NOT to paint or varnish the fence!! But it is inspired – and inspiring.
Haha! On pain of death, NO PAINTING! ;)
O M G… that fence is so perfect, so sexy, so fucking satisfying… HNNG!!
Haha, sexy fence! It *is* a lot of long, hard wood. Lol
I am dead
There was a Swedish woman who had a site dedicated to photos and poems about sexy neighbourhood fences. Alas, it seems to have been taken down.
(She was also married to the Berlin wall and ran a guillotine museum, by the way.)
WE MUST FIND THIS WOMAN.
beautiful work and love the idea of this 16 inches width wood that’s twice the 8″ panel wood fencing. However I did check pricing…15 panel would cost me 535 dollars whereas this type of 16″ wood would cost me much more. Is there a link where 16″ wood would be closer reasonable cost compare to panel pricing,??? Thanks for ideas!
Sorry, do you mean 16 feet? This kind of fence is DEFINITELY more expensive than a standard 8-foot fence panel! I thought it was worth it for a small space, but it would get quite expensive with a lot more linear feet. My hope is that the 1″ thick boards will allow this fence to stand for a VERY long time, but the upfront investment was not small!
Unreal! So amazing!
Well thanks!
mentally filing away horizontal cedar fencing for the house I’m likely to never have…
Ya never know!
#metoo
Nice! For everyone’s general knowledge, in our area (VT) the local lumber yards will deliver most larger stuff for free. One of them has a flat $5 delivery fee for which they will deliver anything (i.e. you’re in the middle of a project and can’t spare the half hour to run to the store, they’ll come deliver your box of nails, etc.). So while I love that Lowes is sponsoring you, the $20 flat delivery fee might not be the best deal in town. Of course, our local lumber yards don’t offer online shopping, but if you call them up, one of the clerks will usually look stuff up for you or walk over to the shelf to see what they have…small towns!
Thanks Rosie! Unfortunately that’s not the case here, but I do like the local lumber yard for their wider selection when I need a particular type of wood or a really long length of something. Sadly prices also tend to be much higher and customer service I’d rate pretty poorly, so don’t tend to use them very often. But that’s just my experience here! You’re lucky to have a good local place—hope they serve you well for years to come! :)
As far as weeds, in our backyard the weeds were so deeply rooted they came up through a new lawn. So we started over. We put down cardboard and covered it with mulch. We left it for a whole year. It looked and worked great! You don’t have to leave it for a whole year, of course, but three months at least. You could do it now and plant in the spring. The mulch needs to be renewed at least once a year.
Nice! I’ve done that in the front garden at my house and it worked great—I prefer that method SO MUCH to weed barrier which I find always looks messy after a year or so. I think the weed situation here is pretty under control…I think I’ll move ahead with planting this fall and just try to stay on top of anything that might sprout up. :)
Looks great.
You’re very good at getting stuff done.
I’m very good at thinking about getting stuff done…
Haha! Thinking is like 3/4 of the work, though! Gotta be prepared! :)
Gorgeous, inventive, as expected from you….and always learning! I will def use the poly post magic!!! Since I will most likely be doing my fence myself and the dogs will need one ASAP.
If you did it again would you use less of the material since it expands so much or do I buy that thingy too to cut off the excess?
I look forward to tree options, check out fastgrowingtrees.com I found they are the most cost-effective so far and really helpful if you tell them what you’re needs are (for trees, not life of course). What about a shed or hot tub?
Regarding the rebar, I hate to tell you, but with uncoated steel rebar in an exposed exterior application, it’s going to rust due to capilary action in the concrete. Ever seen a bridge with chunks that have fallen off and left the rebar exposed? That’s why it happens. It will take a while, but that rebar will eventually become a weak spot in the concrete once it has rusted away. If it’s not needed for strength, you’ll actually get a better long-term result by leaving it out. Personally, I think a much better way to add strength to exposed exterior concrete is to include synthetic fibers in the mix. You have to trowel it properly so that any fibers near the surface sink down a bit and don’t look hairy, but the really nice thing is that you can remove most of the control joints.
another dramatic transformation! i am impressed as always but building that fence solo – wow!
what a wonderful clean slate! i have tons of ideas – but cant wait to read and see what you do !
A well built, tall fence was probably the best investment I made for my house, after a functional furnace. I replaced a falling down 4 foot tall fence, that left me exposed to all passers by, with a 7 foot fence. The difference it made to how my yard felt – and how I felt in was significant. No more feeling like I was on display, or vulnerable to creepsters.
Privacy is so important. Many people underestimate this. A tall fence (within code of course) also makes it more difficult for thieves to get in and get out with your stuff. And if they can’t see it, they are less interested, too.
Your fence is a major improvement, and despite the cost, is a smart thing to build. It’s smart looking, too.
It looks just beautiful. All these new techniques and equipment. i really like your corner finishes on the fence and the concrete path is such a good idea.
Oh boy – we are dealing with lot of similar issues but on a larger scale at our house. Before I read this post I actually thought we might pour concrete over a really large area (we have a defunct clay tennis court in our yard from the previous owners) and I just cannot handle the weeding. It’s also messy (who wants green sand on everything all the time?) even thought in theory it sounds cool. I think we are going in another direction – deck tiles – since we’ve already got a a flat surface to work on and I think drainage will be better since it’s so large. I was already leaning towards climbing plants for the chain link – glad to hear others recommended it! I think we’d like to do some horizontal wooden fencing in one area, but the space is so huge it’s cost prohibitive. I’m rambling here but I also want you to know (maybe I’ve mentioned in it in other comments on other posts) but your partnership with Lowes has turned me to an avid Lowes enthusiast. I was completely for the other place, but I love how much they seem to support you and other bloggers I have been following for years. Consider me turned! Can’t wait to see what else happens in this yard before the frost hits (ugh I can’t believe I’m already thinking of frost). Congrats on so much progress this summer!
Oh my gosh it looks amazing! Totally inspiring my own backyard reno right now. It’s a giant mud pit at the moment since I took all the blackberries out! Desperately need to do something like this to my yard now. It was insane when I bought the house: https://landoflaurel.com/2017/09/05/welcome-to-berrybrier/ . I need to know how that foam concrete replacement holds up over time. Will you please give us an instastories update in several months?!
Your original poster who suggested the weave-able slats for a chain link may have mentioned it – but it might be a good reminder to everyone to check their local code on this. In particular, the vinyl or plastic slats are sometimes referred to by building and zoning departments as “hurricane fence”. In some communities this is banned by the zoning code – or restricted to particular materials such as wood slats. As someone who has run code enforcement and building and zoning departments for fifteen years, I know that no one likes to be told they have to take down their new fence. And, honestly, no one wants to have to tell a homeowner their improvements have to be removed. You may be fine – but a quick call or email to your city government is all it take to be sure you aren’t tossing money away.
What you are doing – at Bluestone and your own house – is an incredible example of the broken window theory planning and zoning officials tout and so inspiring to see such care for structures and neighborhoods that deserve it. Thank you for investing so much of yourself. (And for making it all look gorgeous.)