
This post is in partnership with Lowe’s! Thank you for supporting my sponsors, who embraced my decision to delay the planned publication of this post last week to help make space for the voices that need to be heard during this challenging and tragic time for this country. Thank you, Lowe’s, for meeting the moment and doing the right thing.
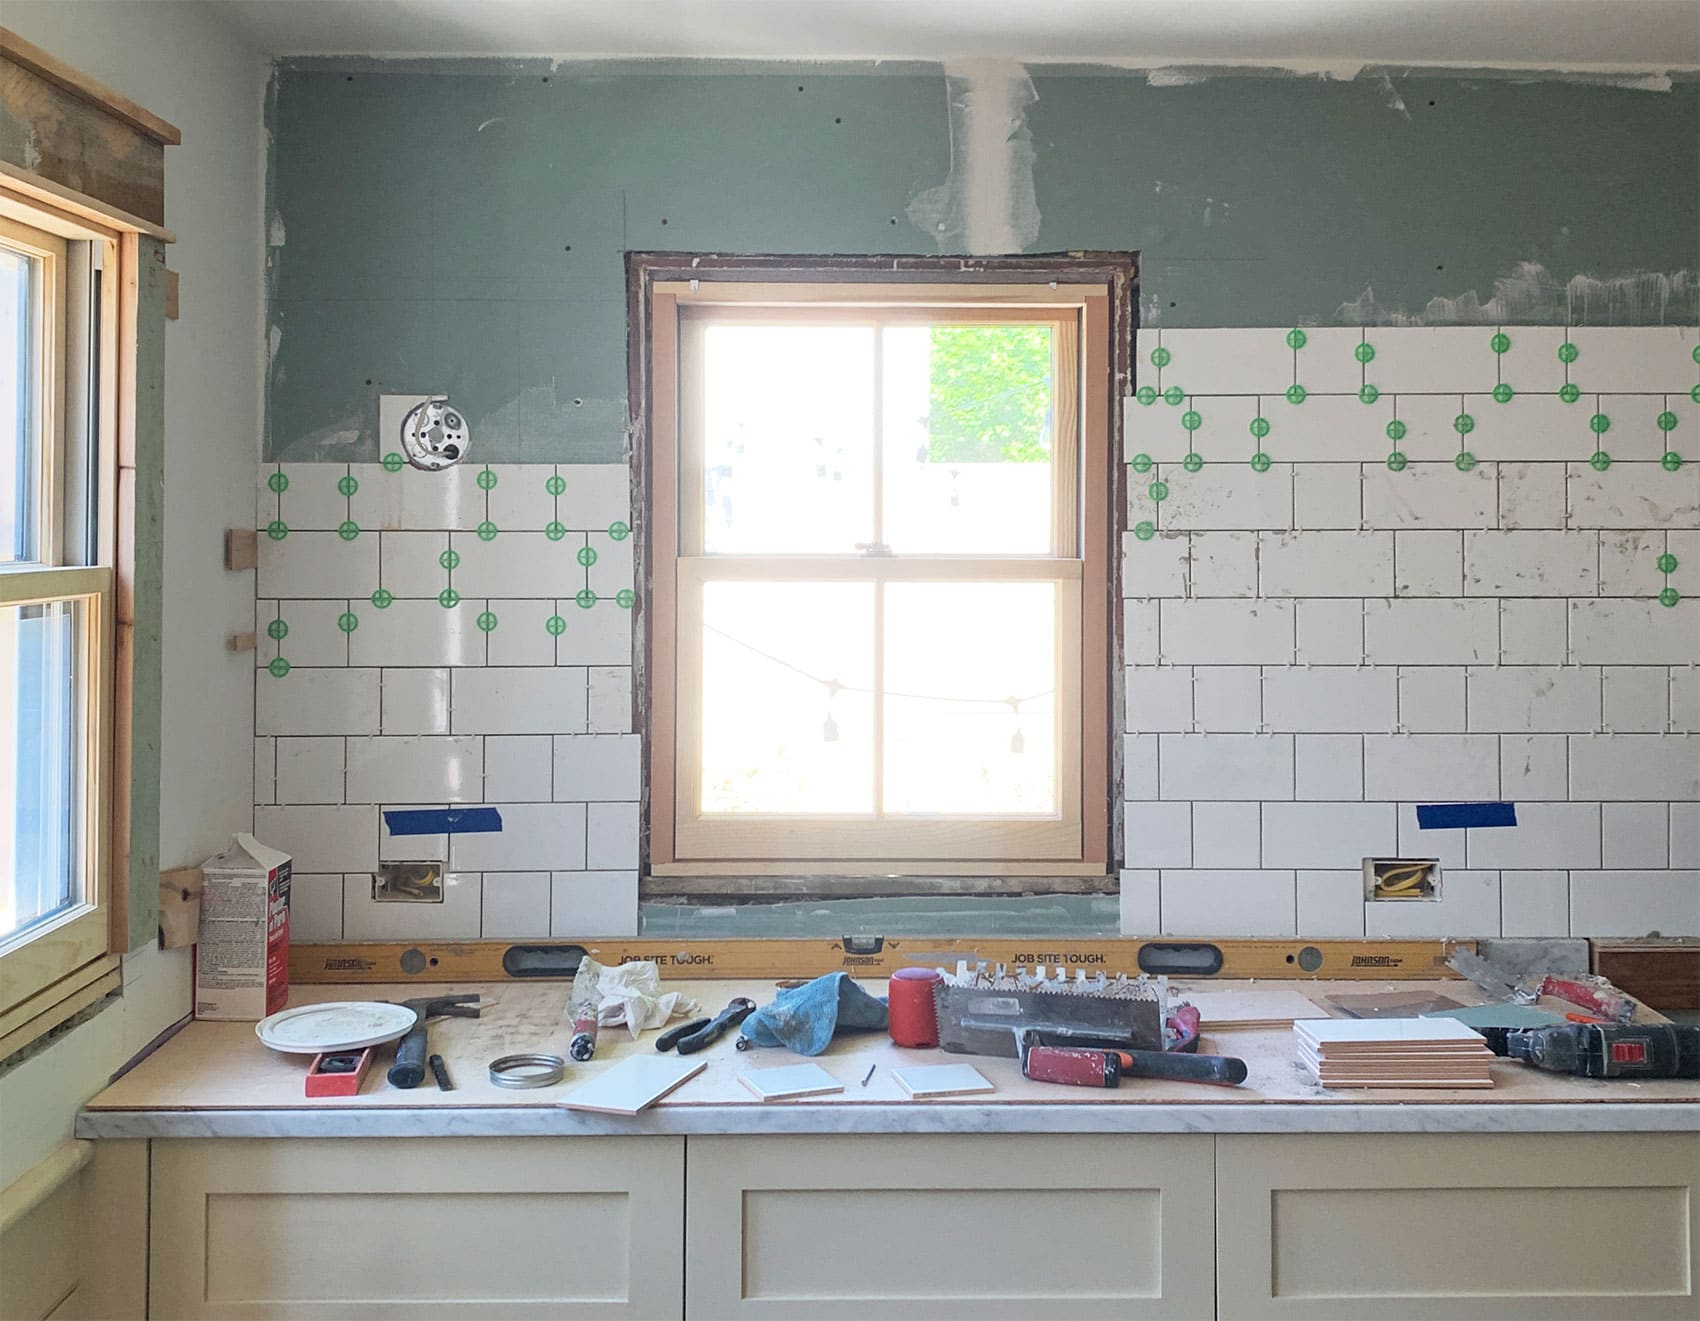
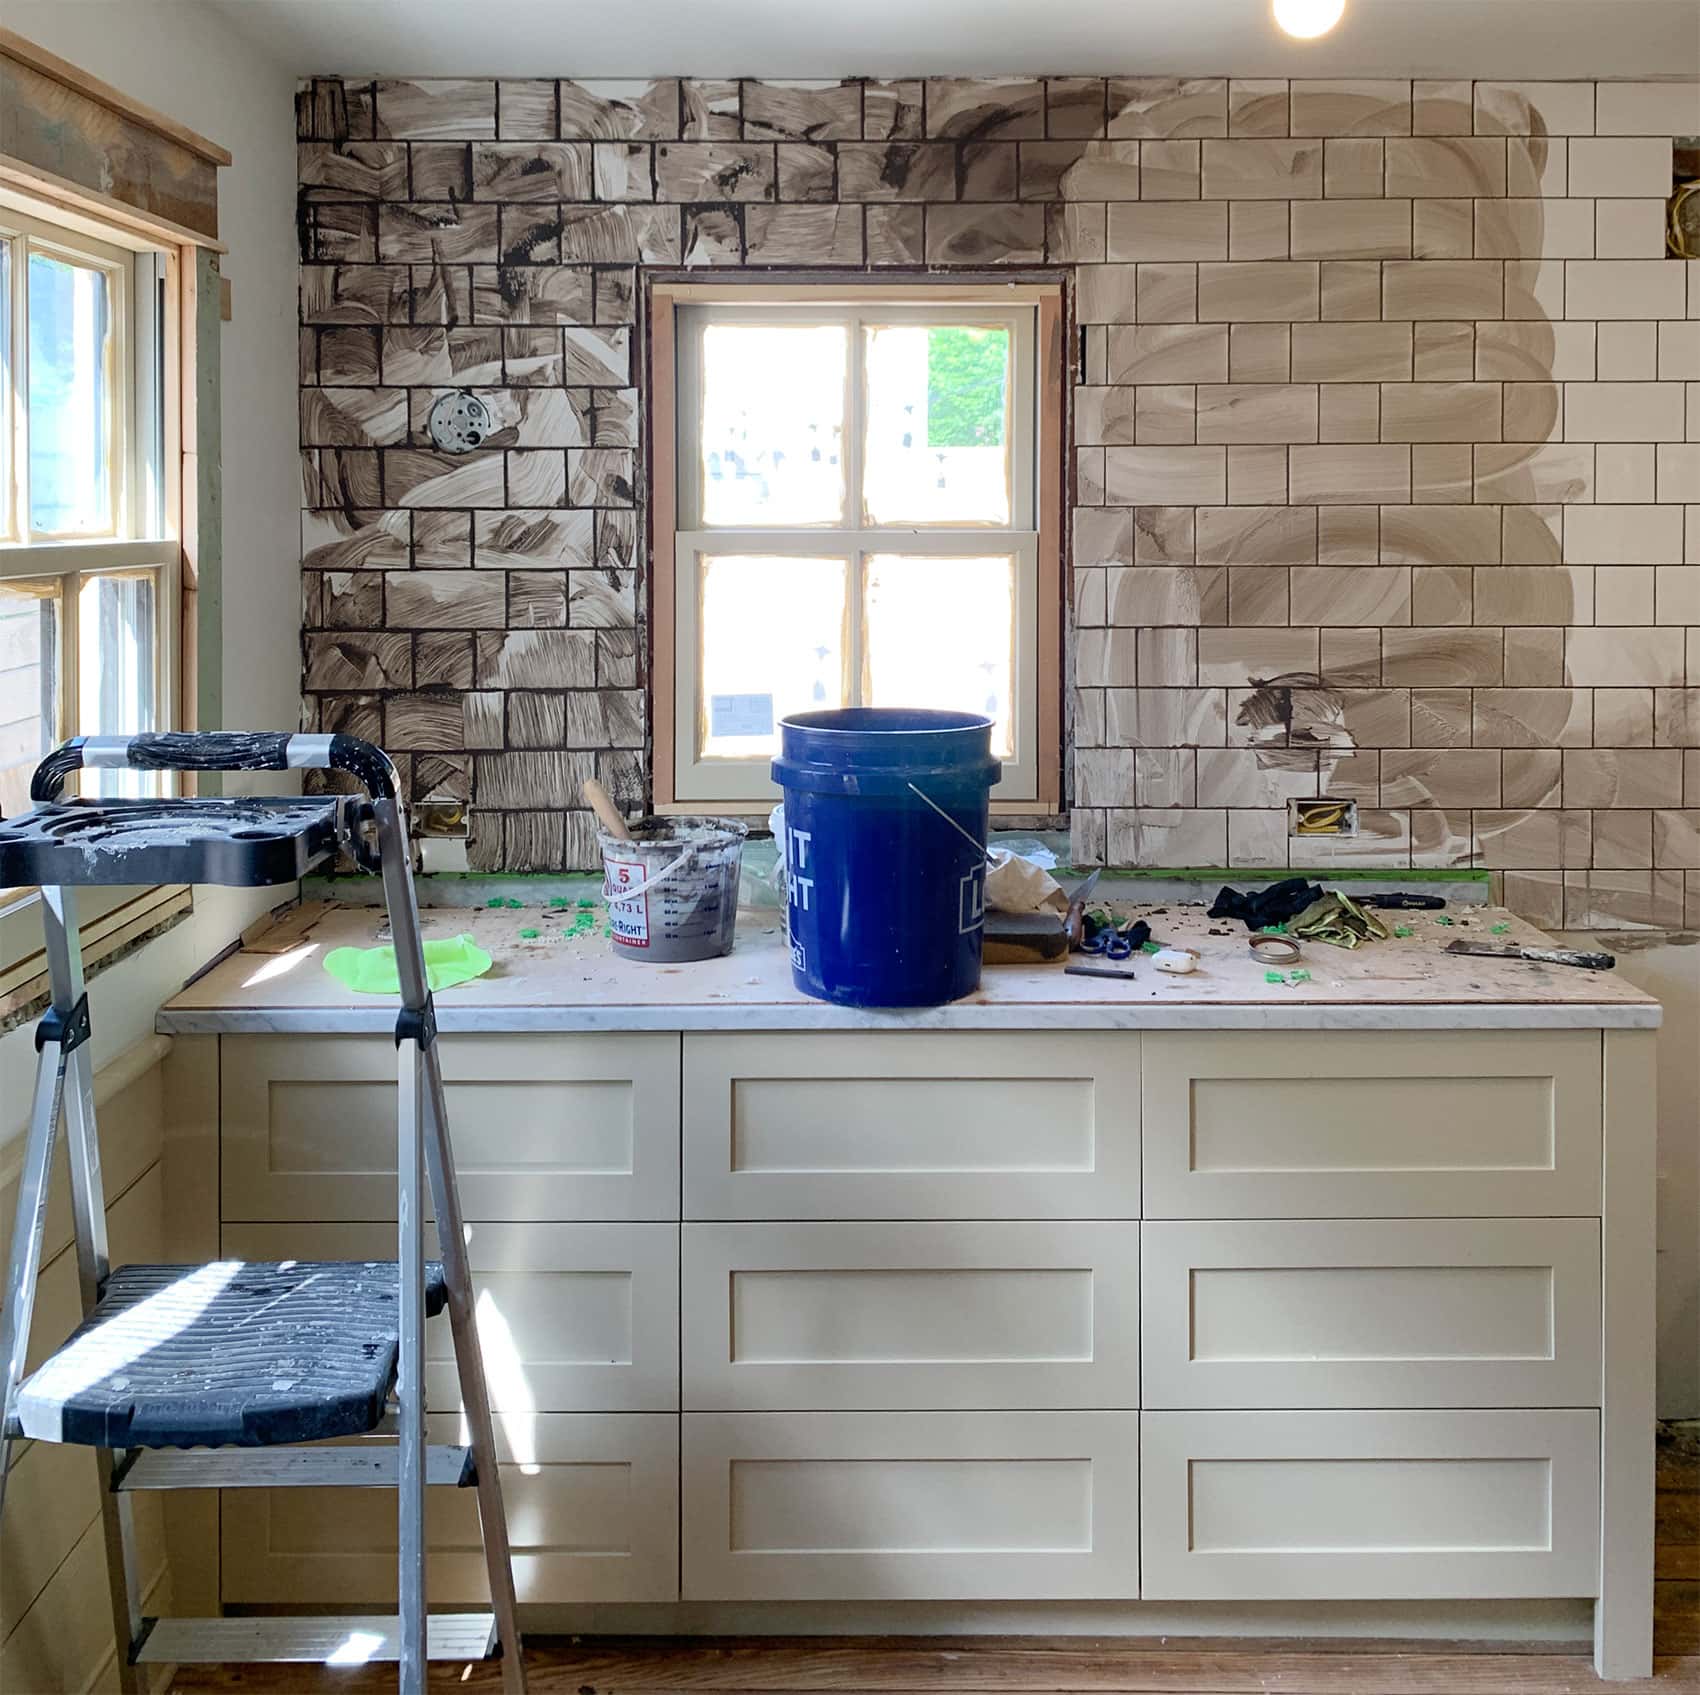
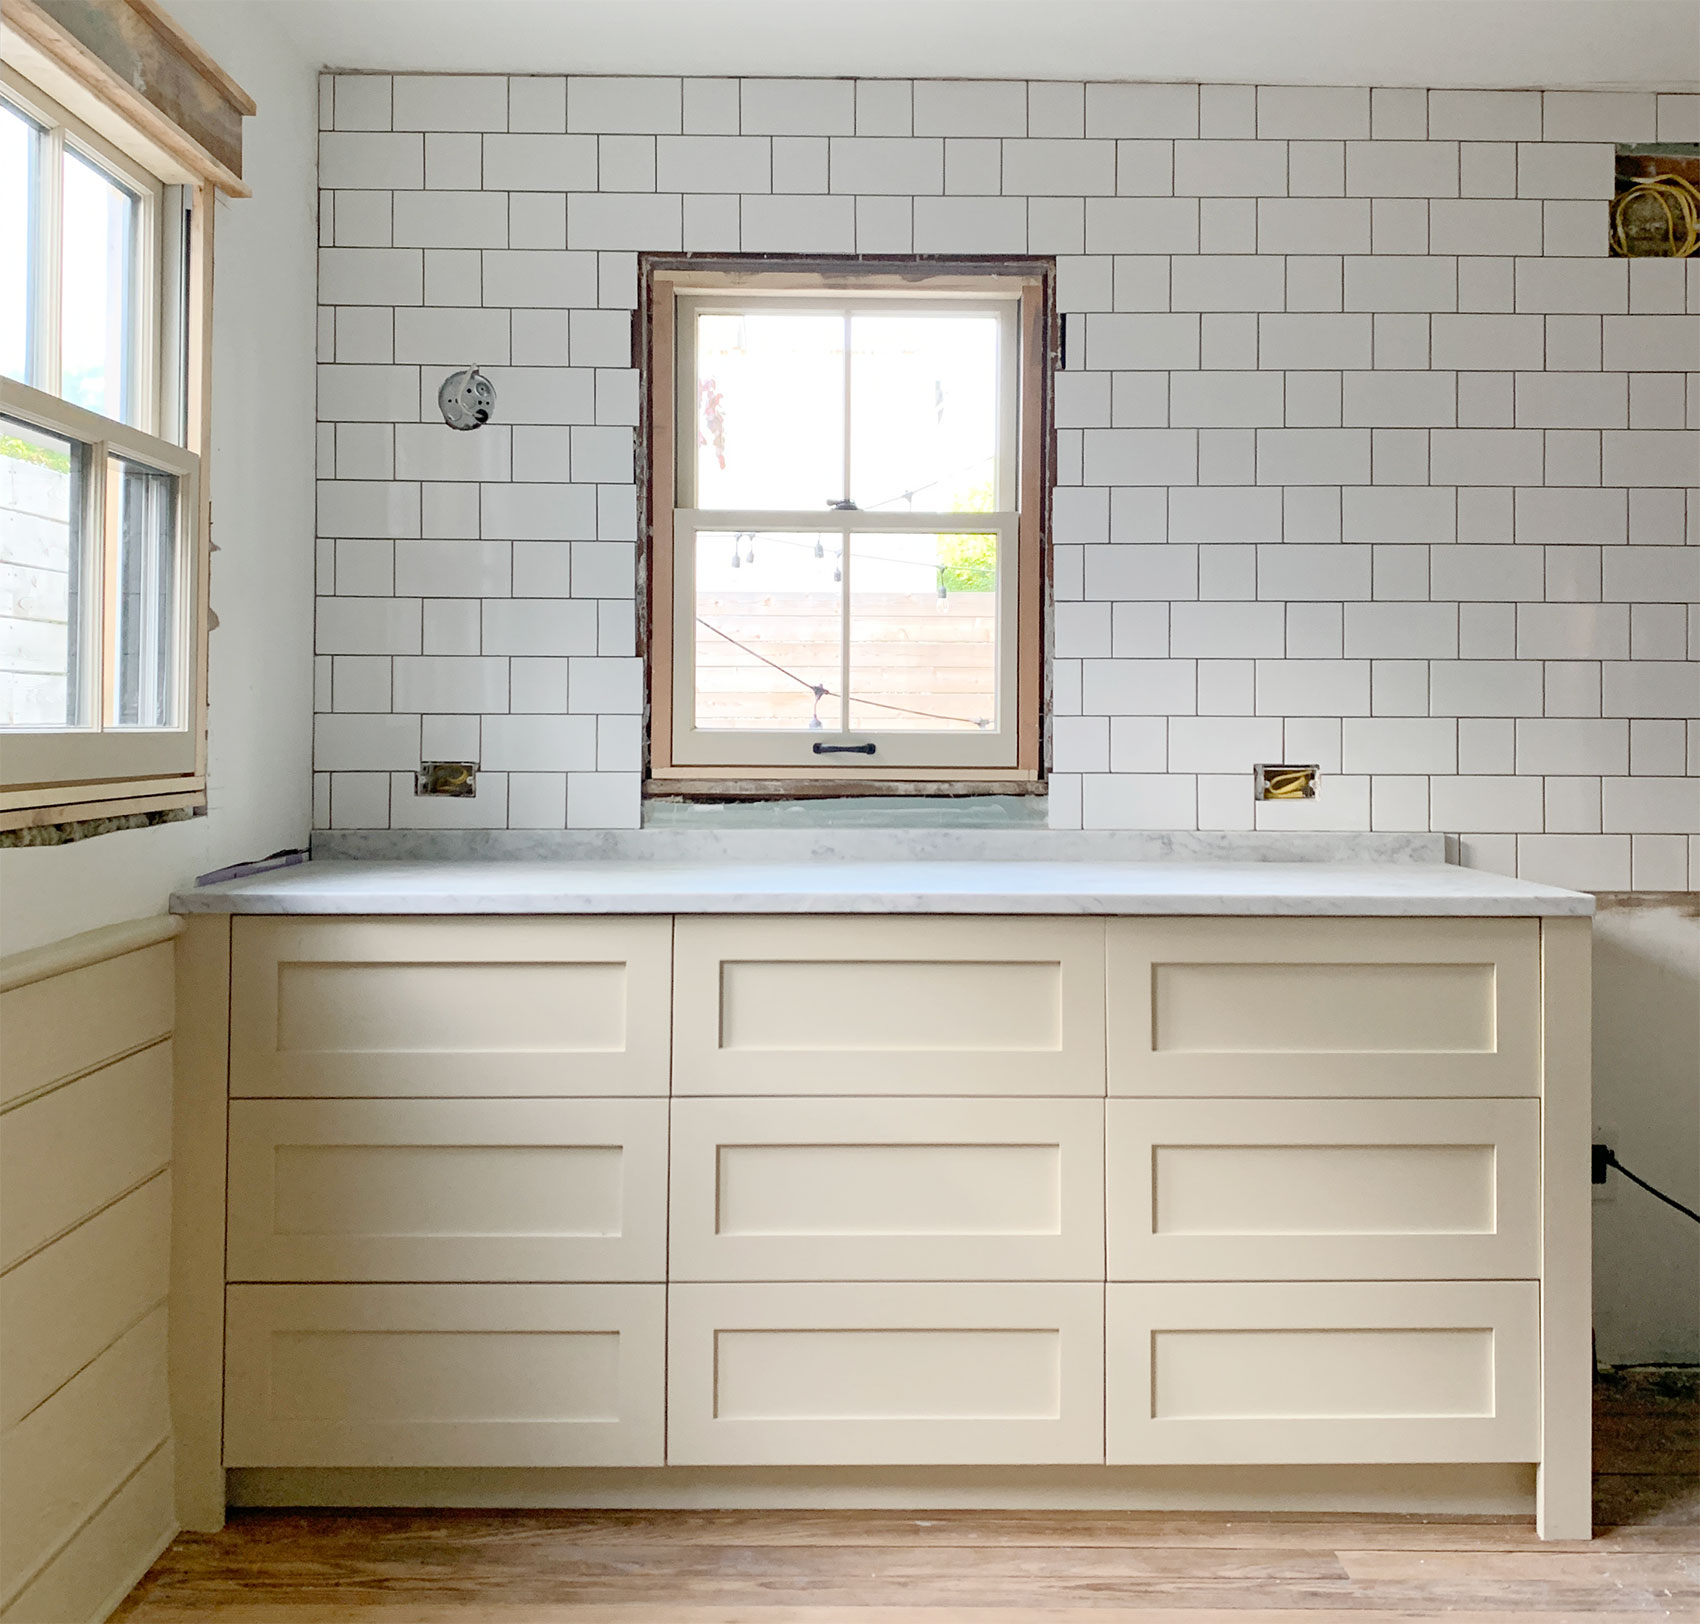
The Bluestone Cottage kitchen is barreling fast and furious toward completion! I’ve been imagining this space for so long that it feels especially surreal to actually be standing in it. I’m so pleased with how it’s turning out, and one of my favorite parts is that I finally had a chance to try out a tiling idea that’s been kicking around in my head for years!
Choosing materials and finishes for a house like this one is tricky! I want it to be beautiful, of course, but it would feel weird to get too fancy or glitzy…it’s such a modest house and it just can’t pull it off. When it comes to tile, this feels like a particular challenge with tile because there is SO MUCH GOOD TILE out in the world, and particularly at Lowe’s where I can get SO MUCH GOOD TILE that actually fits in my budget. Aside from the modesty factor, I also wanted the tile to feel consistent with the age of the home, which frankly doesn’t leave a ton of options! Subway tile—pretty much THE historically accurate option for old kitchens”“is easy and inexpensive of course (and I’d argue pretty timeless, even though it gets referred to as a “trend”!), but I feel like I’ve been there, done that. So this time around, I wanted to attempt something with the same spirit as humble subway tile but different enough to feel fresh and interesting and a little extra-special. What’s the point of doing it if it’s not going to be a little extra-special??
Of course, cost is also a factor in any renovation decision I’ve ever made. Let’s remember that this room started from studs and subfloor, so it’s going to be expensive no matter what. Sure I can do the work myself and save on labor, but at the end of the day a kitchen still needs cabinetry, countertops, appliances, a sink, a faucet, windows, walls, light fixtures, outlets and switches, flooring, and on and on and on. I haven’t crunched my numbers yet, but I’m hoping to clock in around $15K…which to me feels like a ton of money, but in the world of brand new kitchens I still think is pretty damn good. So I think the key to success with a project/budget like this is to splurge in a couple areas that feel impactful (YES THAT IS A MARBLE COUNTERTOP!) and save in others. So let’s get this done nice and cheap!
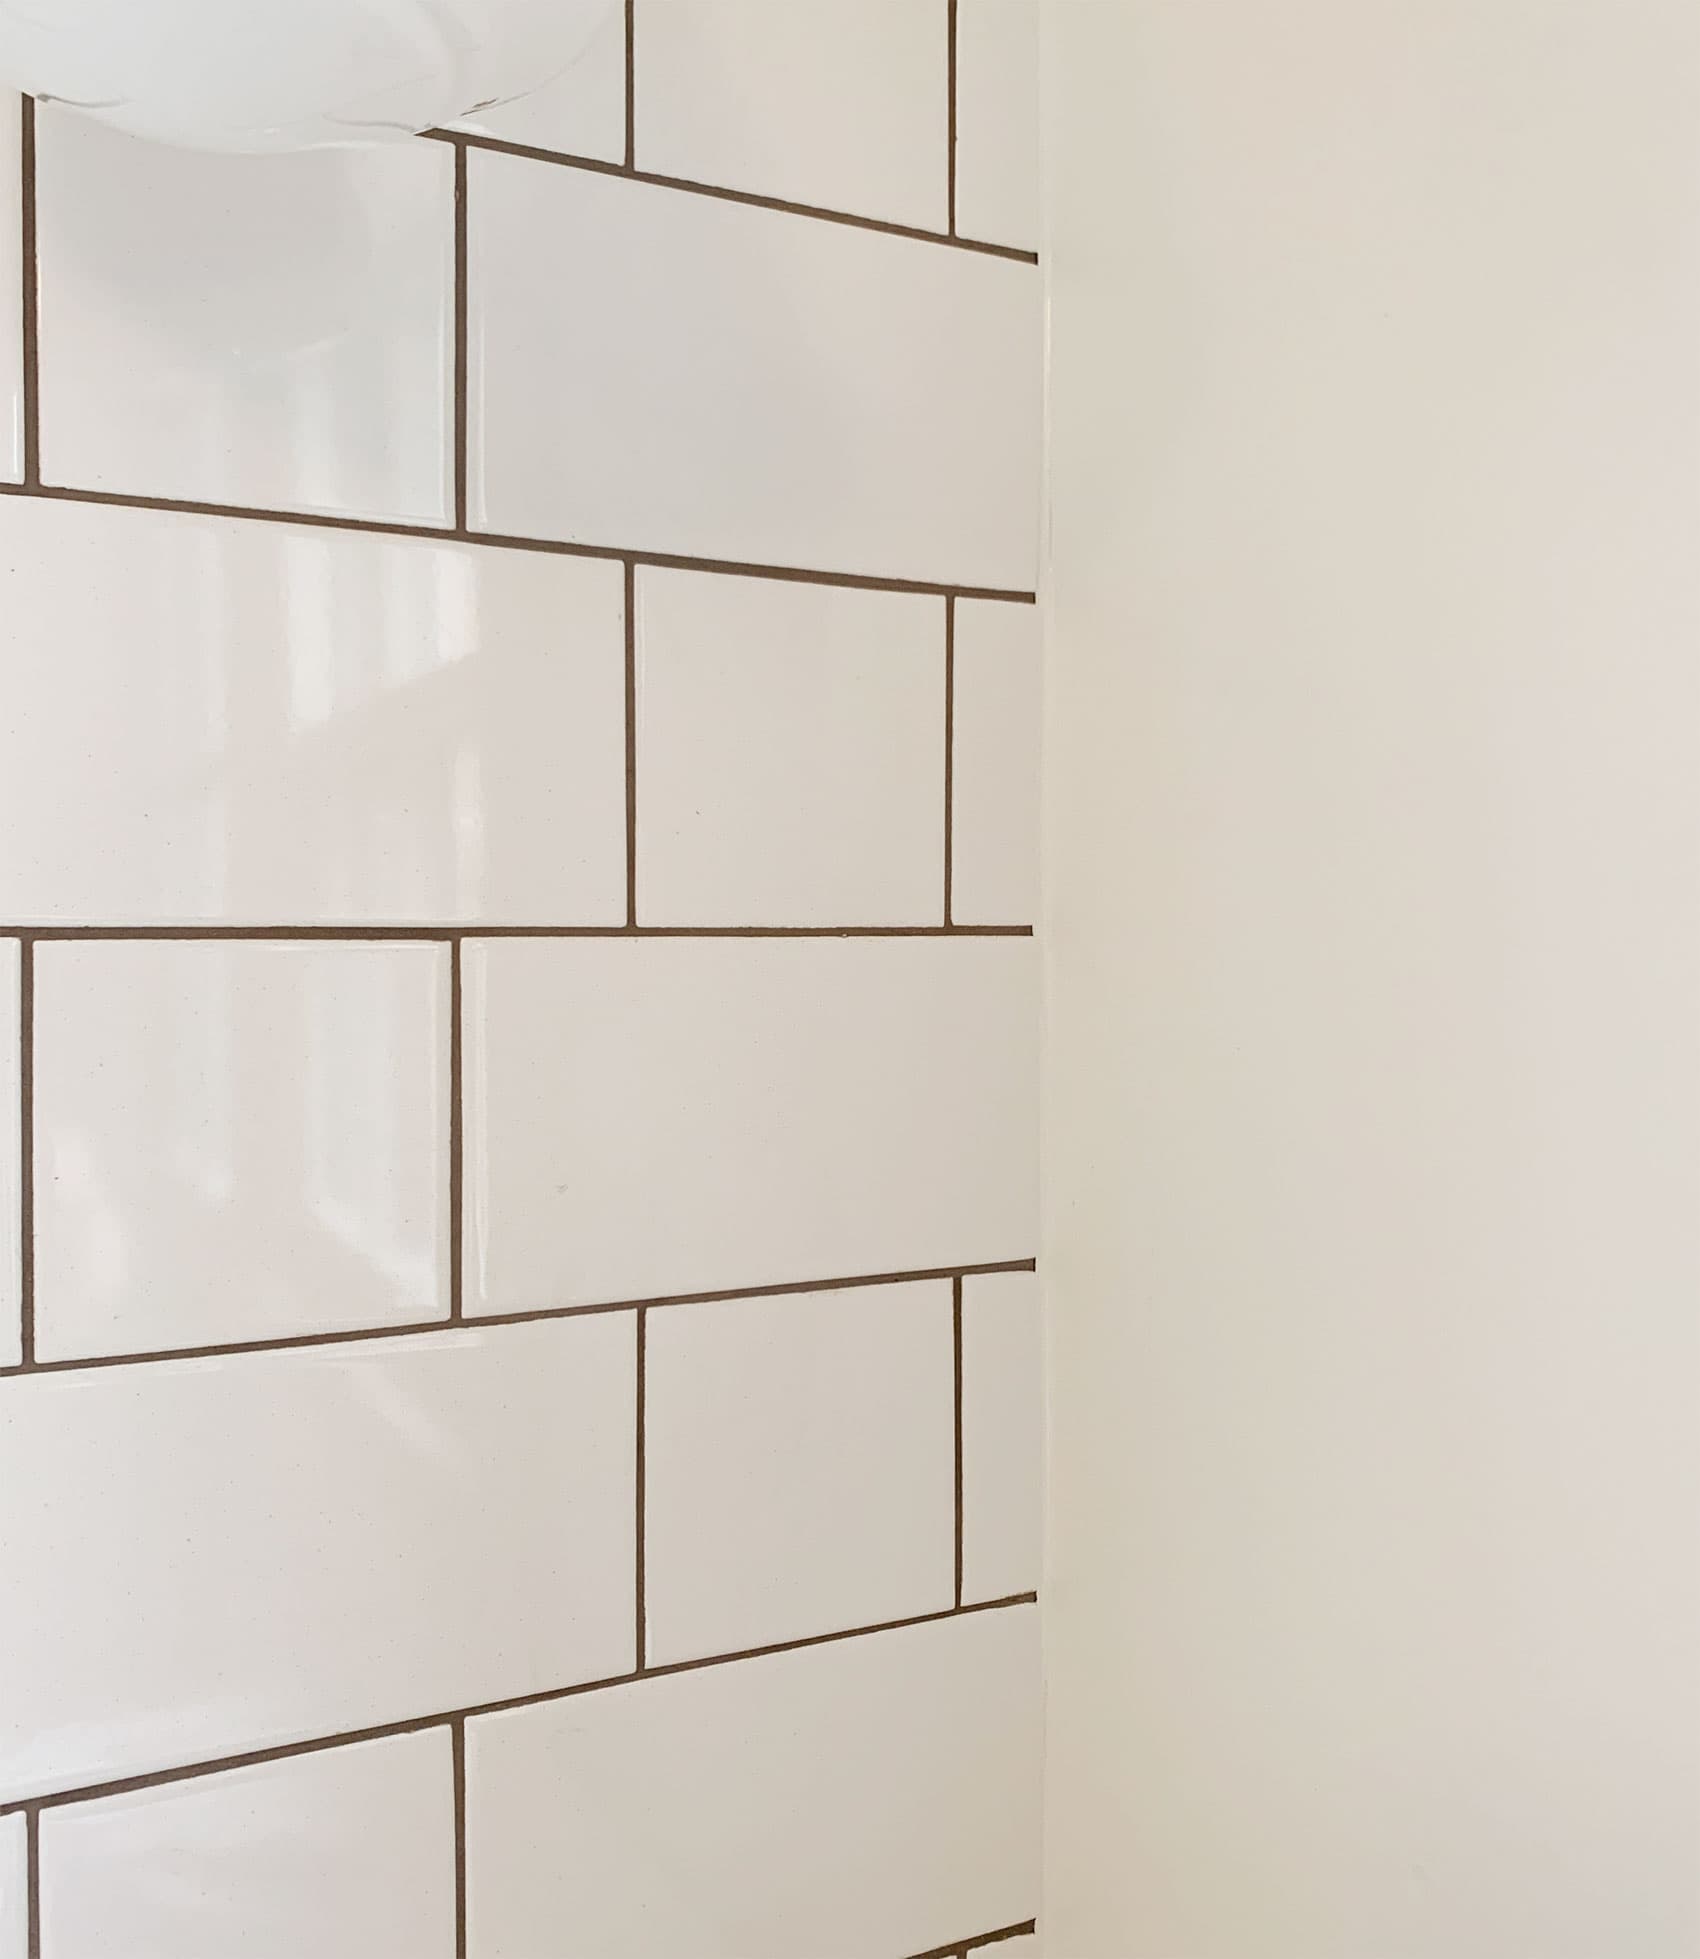
For reasons I cannot recall, several years ago I was reading up on traditional brick-laying patterns, and it struck me that maybe I could translate those patterns into simple tile patterns by just mixing a couple of different formats. All I’d really need is a rectangular tile, and a coordinating tile that’s the same height but half the width of the rectangular tile. From there, there’s a whole world of options! For this backsplash, I went with a combination of the ever-humble basic white 4×4 and white 4×8 subway tiles, but you could go bigger or smaller depending on the scale of your project!
Care to take a look at some other cool patterns you could totally do? Why! Not!
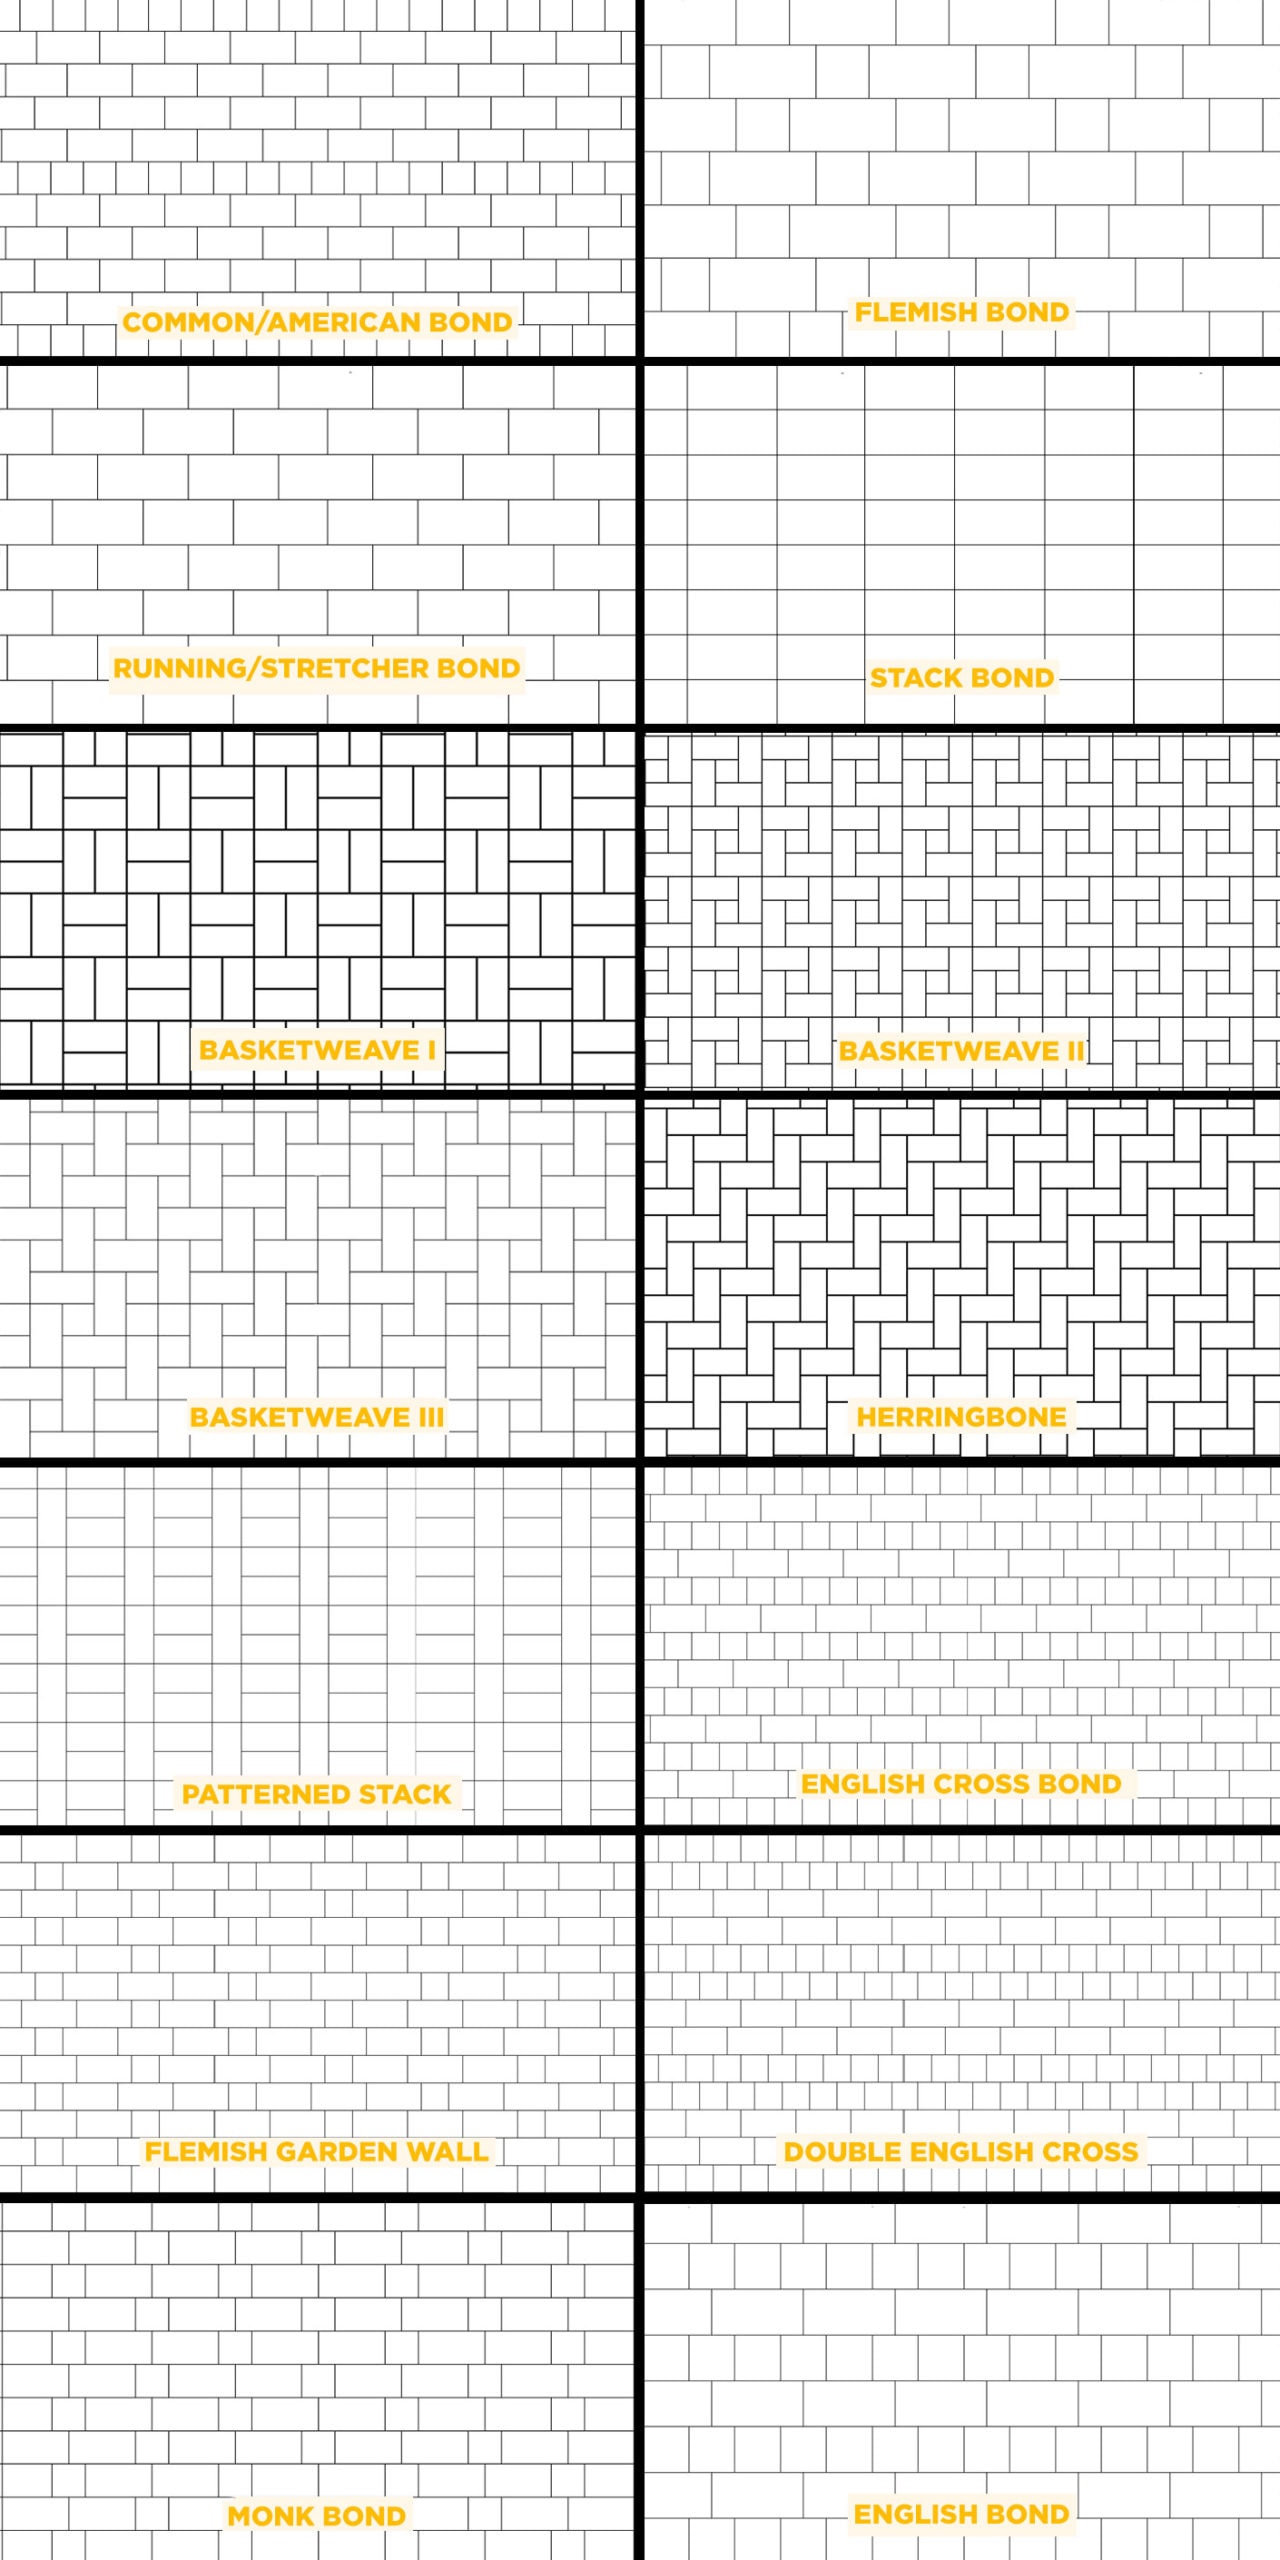
Some good options, right? Now let’s put it into action! For this space, I thought the Flemish Bond was going to be the best-suited. Not too simple, not too complex!
Believe it or not, tiling is really not difficult. You can do it! There might be some variation in the process depending on the type of tile (ceramic vs. natural stone, for instance), the size of the tile, or existing conditions in the room, but the basic strokes are the same. Here we’re talking SPECIFICALLY about tiling a kitchen backsplash, but I’ll try to note where things differ for other applications. Let’s get into it!
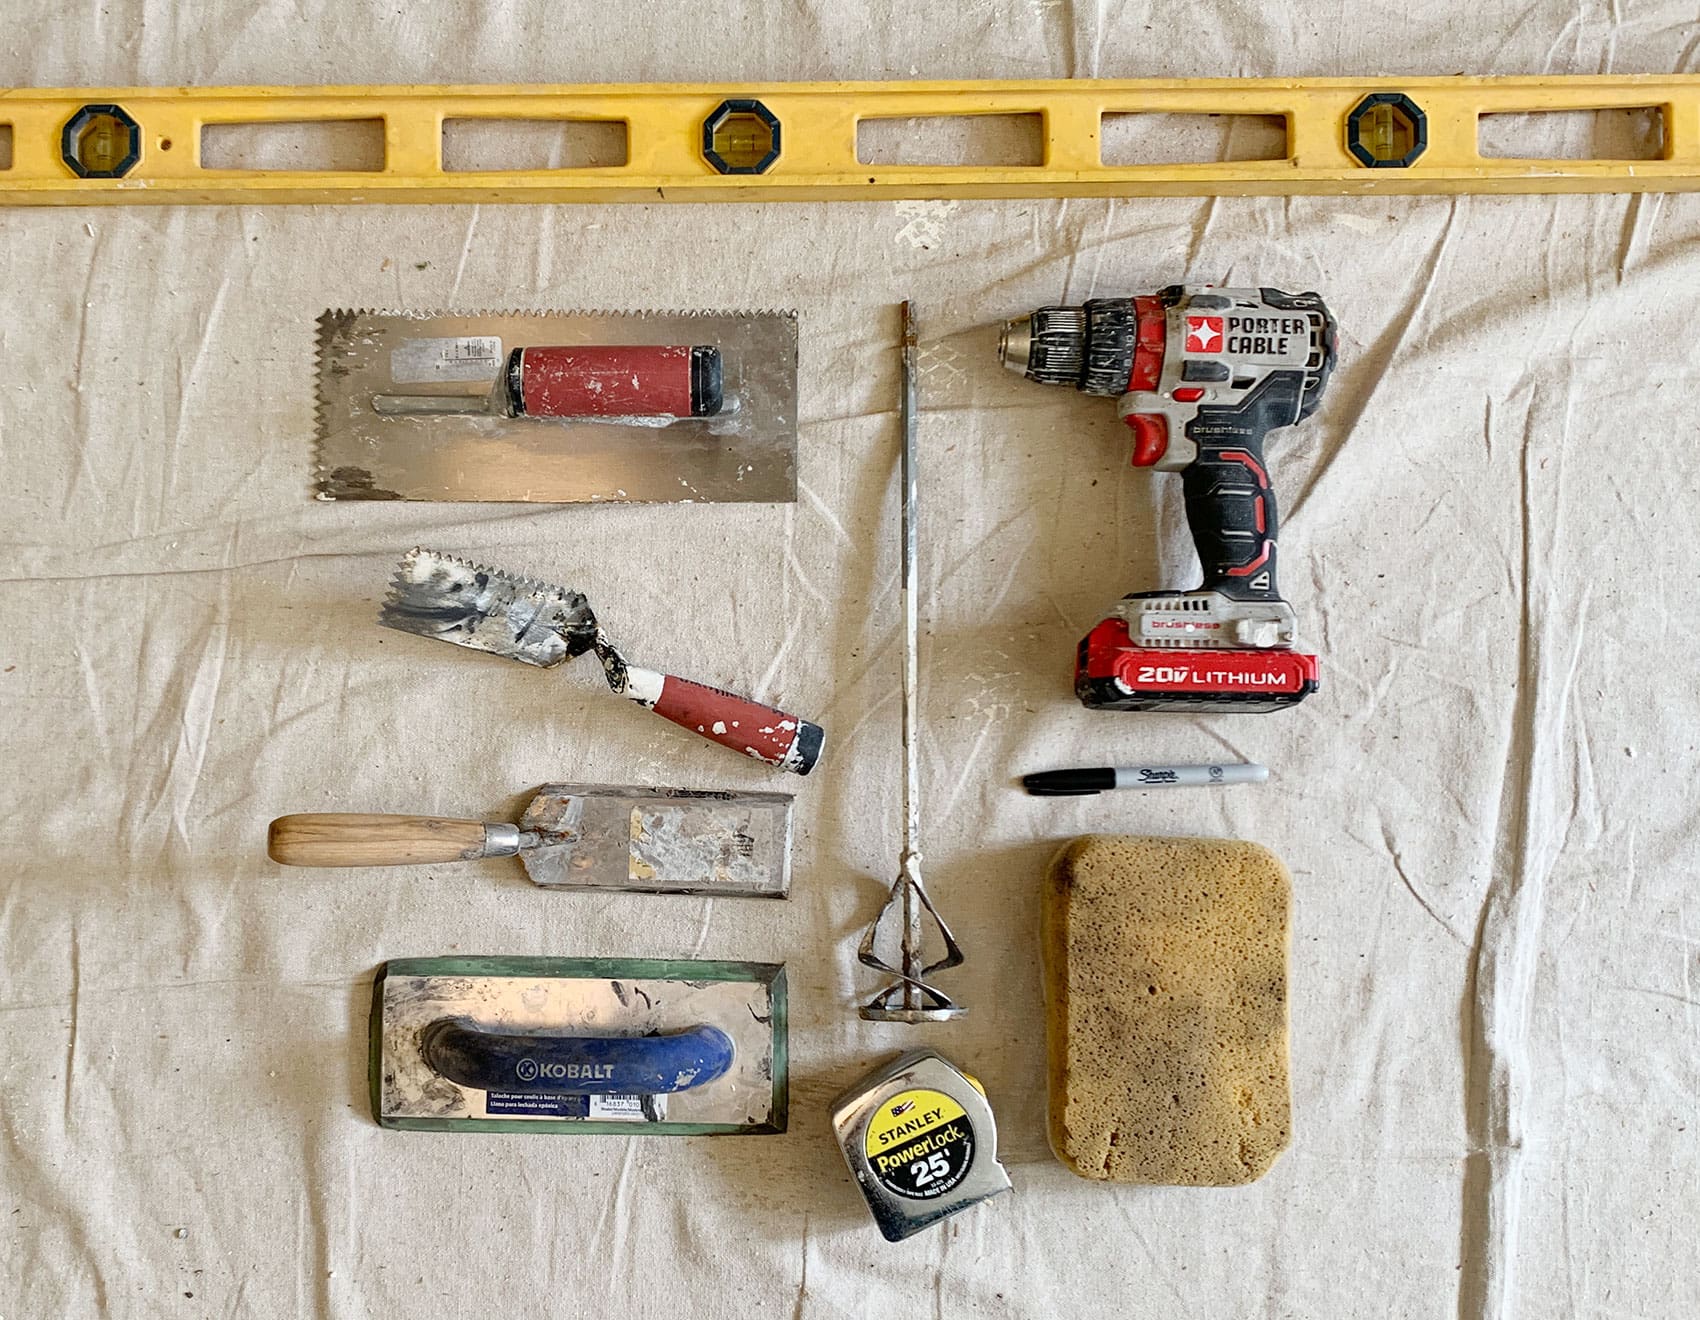
Here are your basic tiling tools!
1. Level
2. Small notched trowel—for back-buttering and tight spaces
3. Large notched trowel—for spreading mastic on the wall
4. Small and large grout floats
5. Drill with a mixing arm
6. Tape Measure
7. Marker, wax pen, and/or pencil
8. Wet Saw (not pictured)

Here are my materials!
1. White 4″x4″ tile
2. White 4″x8″ tile (I’m linking to the actual tiles I used, but I guess the 4×8 in this brand isn’t carried anymore? Not to worry—these American Olean tiles should be basically the same, except they’re self-spacing! Here is the 4×4 and here is the 4×8)
3. Mastic or Thinset mortar
4. Latex/Nitrile Gloves
5. Painter’s tape
6. 5 Gallon Bucket
7. Microfiber cloths
8. Spacers, if using.
9. Grout
10. Caulk, color-matched to grout
Now! Away we go!
Step 1: PLAN! I feel like this is the most frequently-skipped step, but calculate or lay out a run or two to make sure everything falls where you want it to. It’s best to avoid situations where you end up with a little sliver of tile either at the top of the wall or at the corners. You may need to make some adjustments so that doesn’t happen! Generally you can just work from the center outwards, but confirm before you start just putting stuff up!
Step 2: If your wall is brand new, you may need to tape the seams in your wallboard with fiberglass mesh tape. Moisture-resistant drywall (commonly green or purple) is suitable for a backsplash. However, in areas with direct water exposure like a shower, wall material should be cementboard. Just cover the seam with a length of fiberglass mesh tape (there is a bit of adhesive on the back to hold it in place while you work), and use your mastic or thinset mortar to cover the joint (as opposed to regular joint compound). It doesn’t need to be beautiful, it just needs to create a nice consistent surface for you to tile!
Step 3: With seams taped and dried, you may want to prime the drywall. There are different schools of thought on this, and ultimately both primed and unprimed drywall should hold tile just fine. Evidently, primed drywall will suck in less moisture than raw, meaning your working time with thinset may be extended.
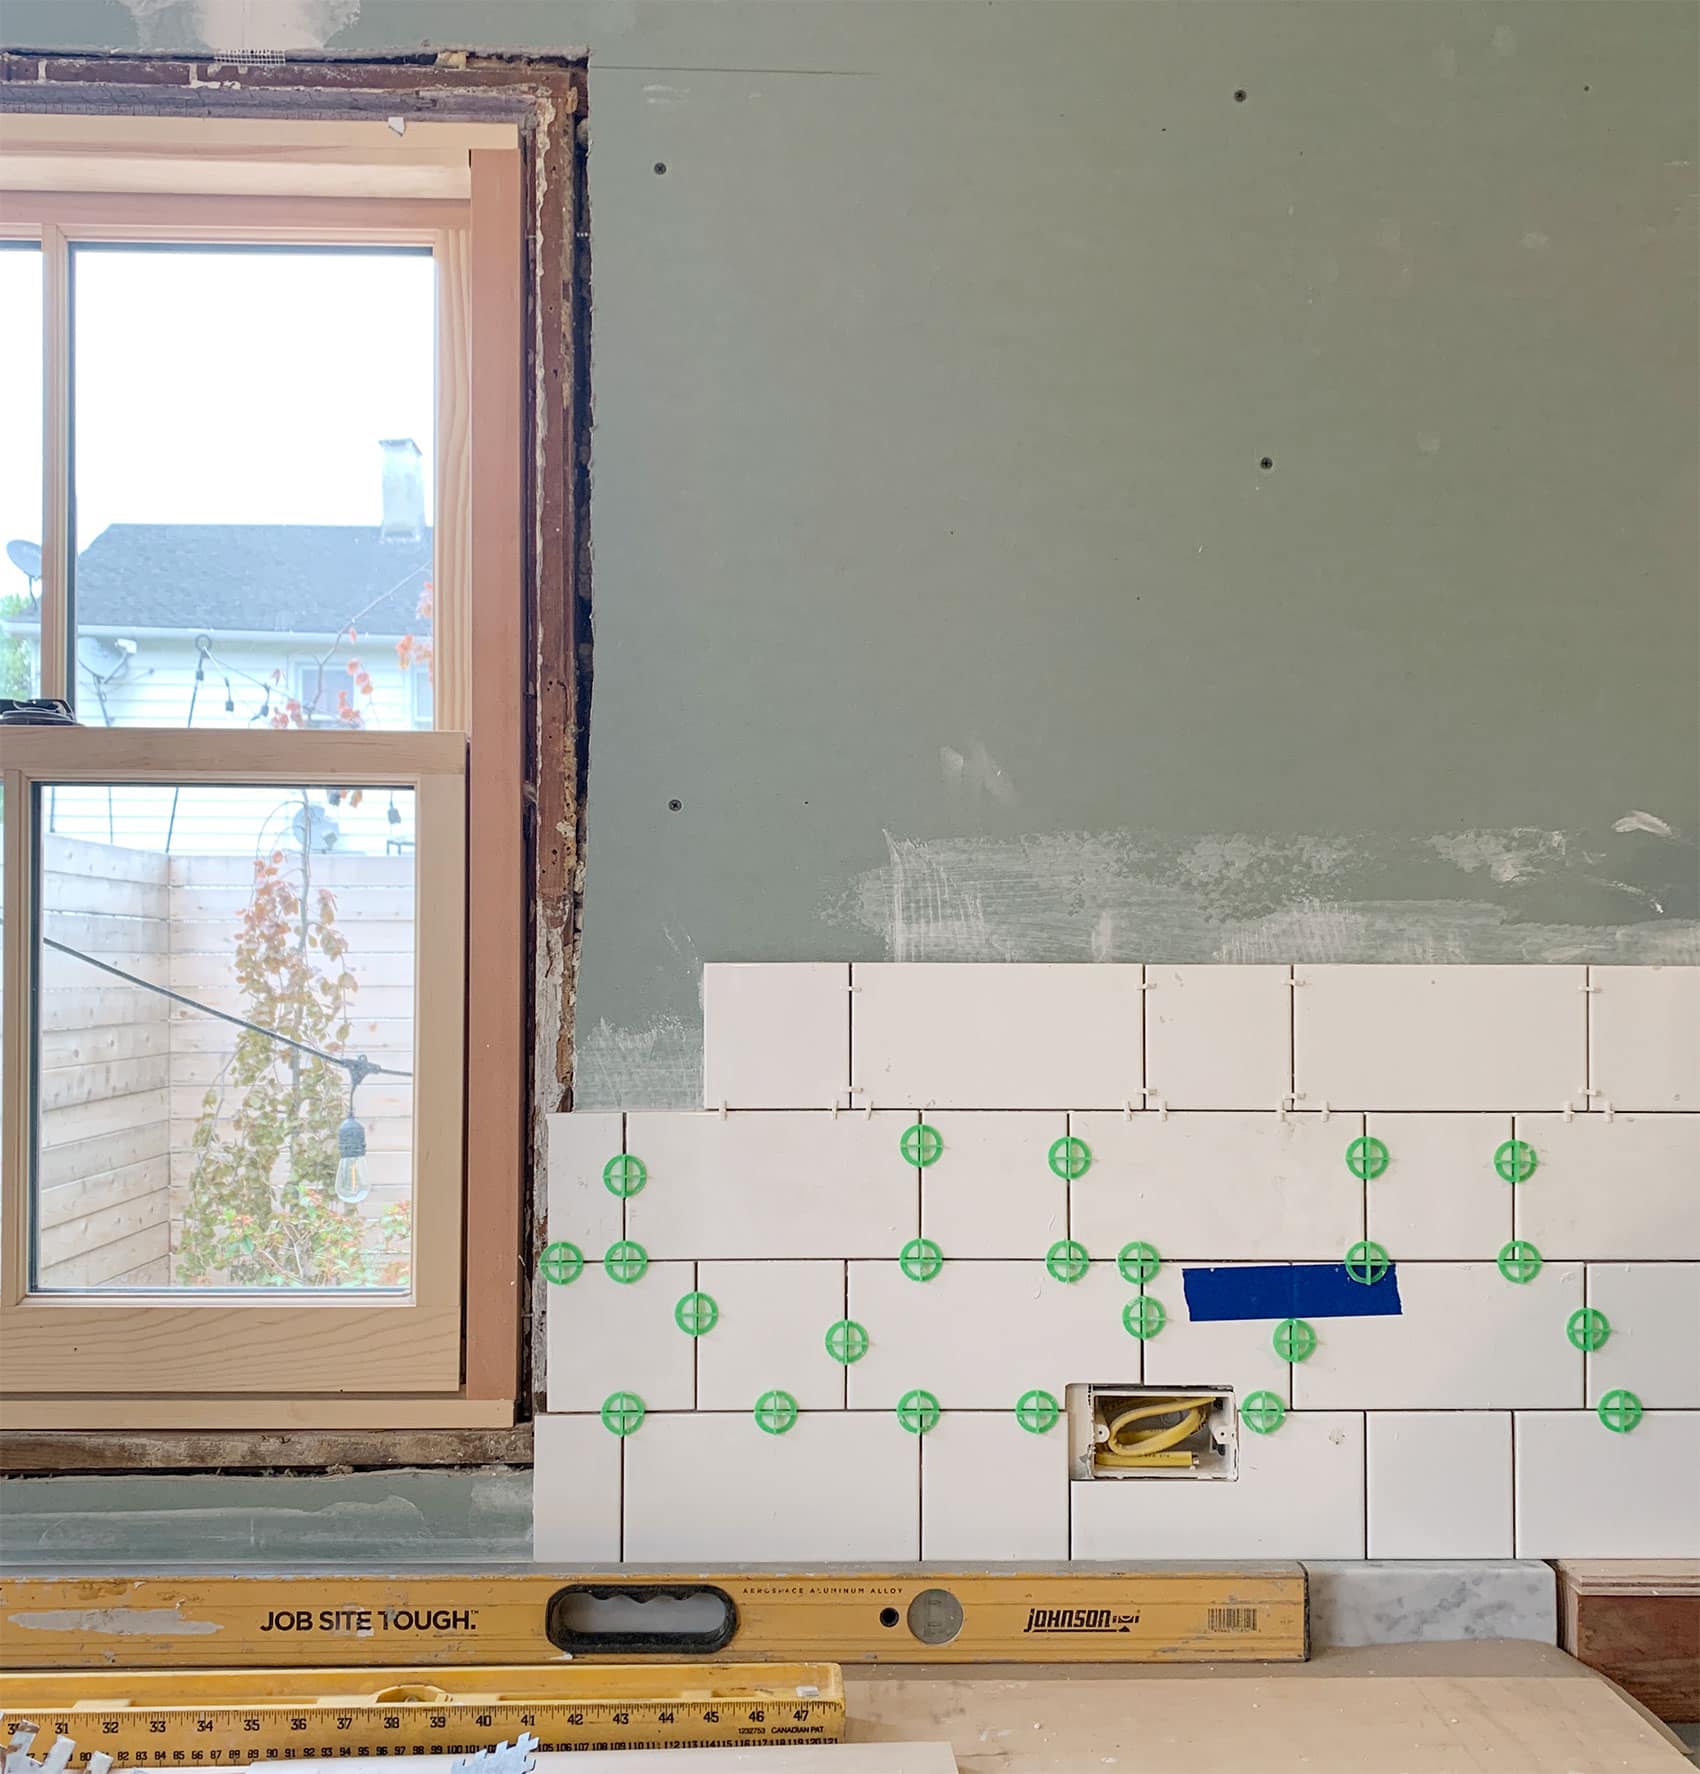
Step 4: Draw a line down the center of your run of tiles—in this case, it’s actually not the center of the wall but the center of where the range sits.
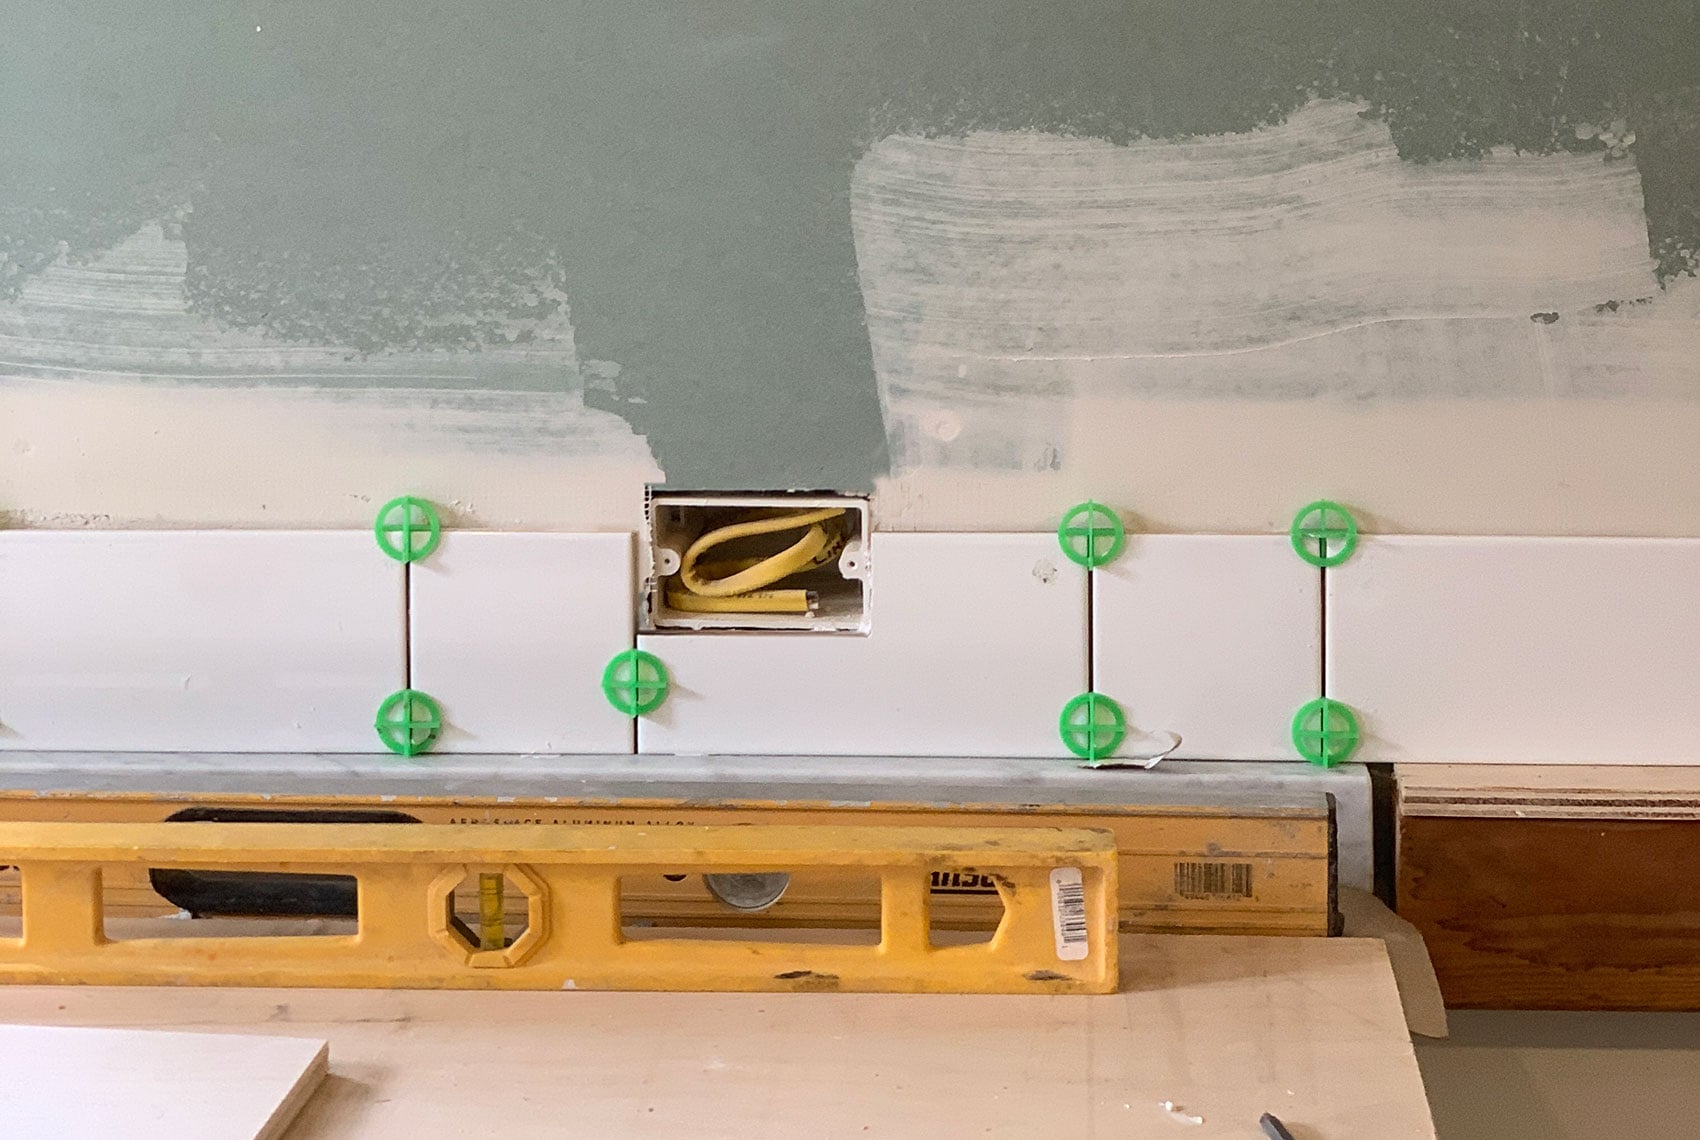
Step 5: Begin with your first row! Think of your first row as the foundation you’ll build your house off of—you want it to be VERY level and even for subsequent rows to rest on. Even when tiling on a flat and level surface, be sure to check your level now and again as you lay the first row. If you need to shim a tile up slightly, a little scrap of cardboard works nicely! You can also use wood or plastic shims—you do you.
To adhere the first row to the wall, I like to back-butter the tiles—meaning you spread the thinset or mastic to the back of the tile with your small notched trowel vs. the wall. This decreases mess and the likelihood of the adhesive drying out before you get to that part of the wall. You’ll save A LOT of time down the road if you do your best to keep thinset or mastic out of the joints that will later be grouted. Slow and steady! Stay focused! If you need/want them, insert tile spacers as you go. I find it’s best to use two spacers per side of the tile to keep everything nice and level.
NOTE: There is a large difference between mastic and thinset. Thinset is basically a cement mortar, which you can buy powdered and mix yourself or pre-mixed. Pre-mixed is more expensive, but after doing this enough times, to me it’s worth it. Aside from saving on mess and time, pre-mixed thinsets afford you a longer working time so you don’t have to try to speed through tiling to avoid wasting the thinset. It also comes mixed to the ideal consistency, which can be tricky to achieve when you’re mixing it yourself. Thinset is suitable for nearly all tile applications and the more versatile option.
MASTIC, by contrast, is basically a glue (from the mastic tree, I just found out!), and has limited uses. Essentially you don’t want to use it in an area with a lot of water exposure, such as a shower—it’s best for dry locations, like this one! That being said, if you CAN use mastic for your application, it’s worlds easier to work with, less messy, no mixing, and sets faster than thinset.
With any of the above options, the packaging will tell you two important pieces of information! The first is what sizes of tile it can be used for. Large format tiles may require a different product than small tile. The second is which trowel to use—different products need different trowels!
In addition, use of spacers is both an aesthetic and functional choice. Often simple tile like this is designed to be self-spacing, meaning the sides of the tile have a small ridge that forces a consistent 1/16″ gap for grout to fill later. This particular Satori brand of tile from Lowe’s is not self-spacing, so I used 1/16″ spacers to achieve the same thing. As a general rule, except in very specific circumstances, I personally think grout lines should be as small as possible, but less than 1/16″ may compromise the performance/hold of your grout.
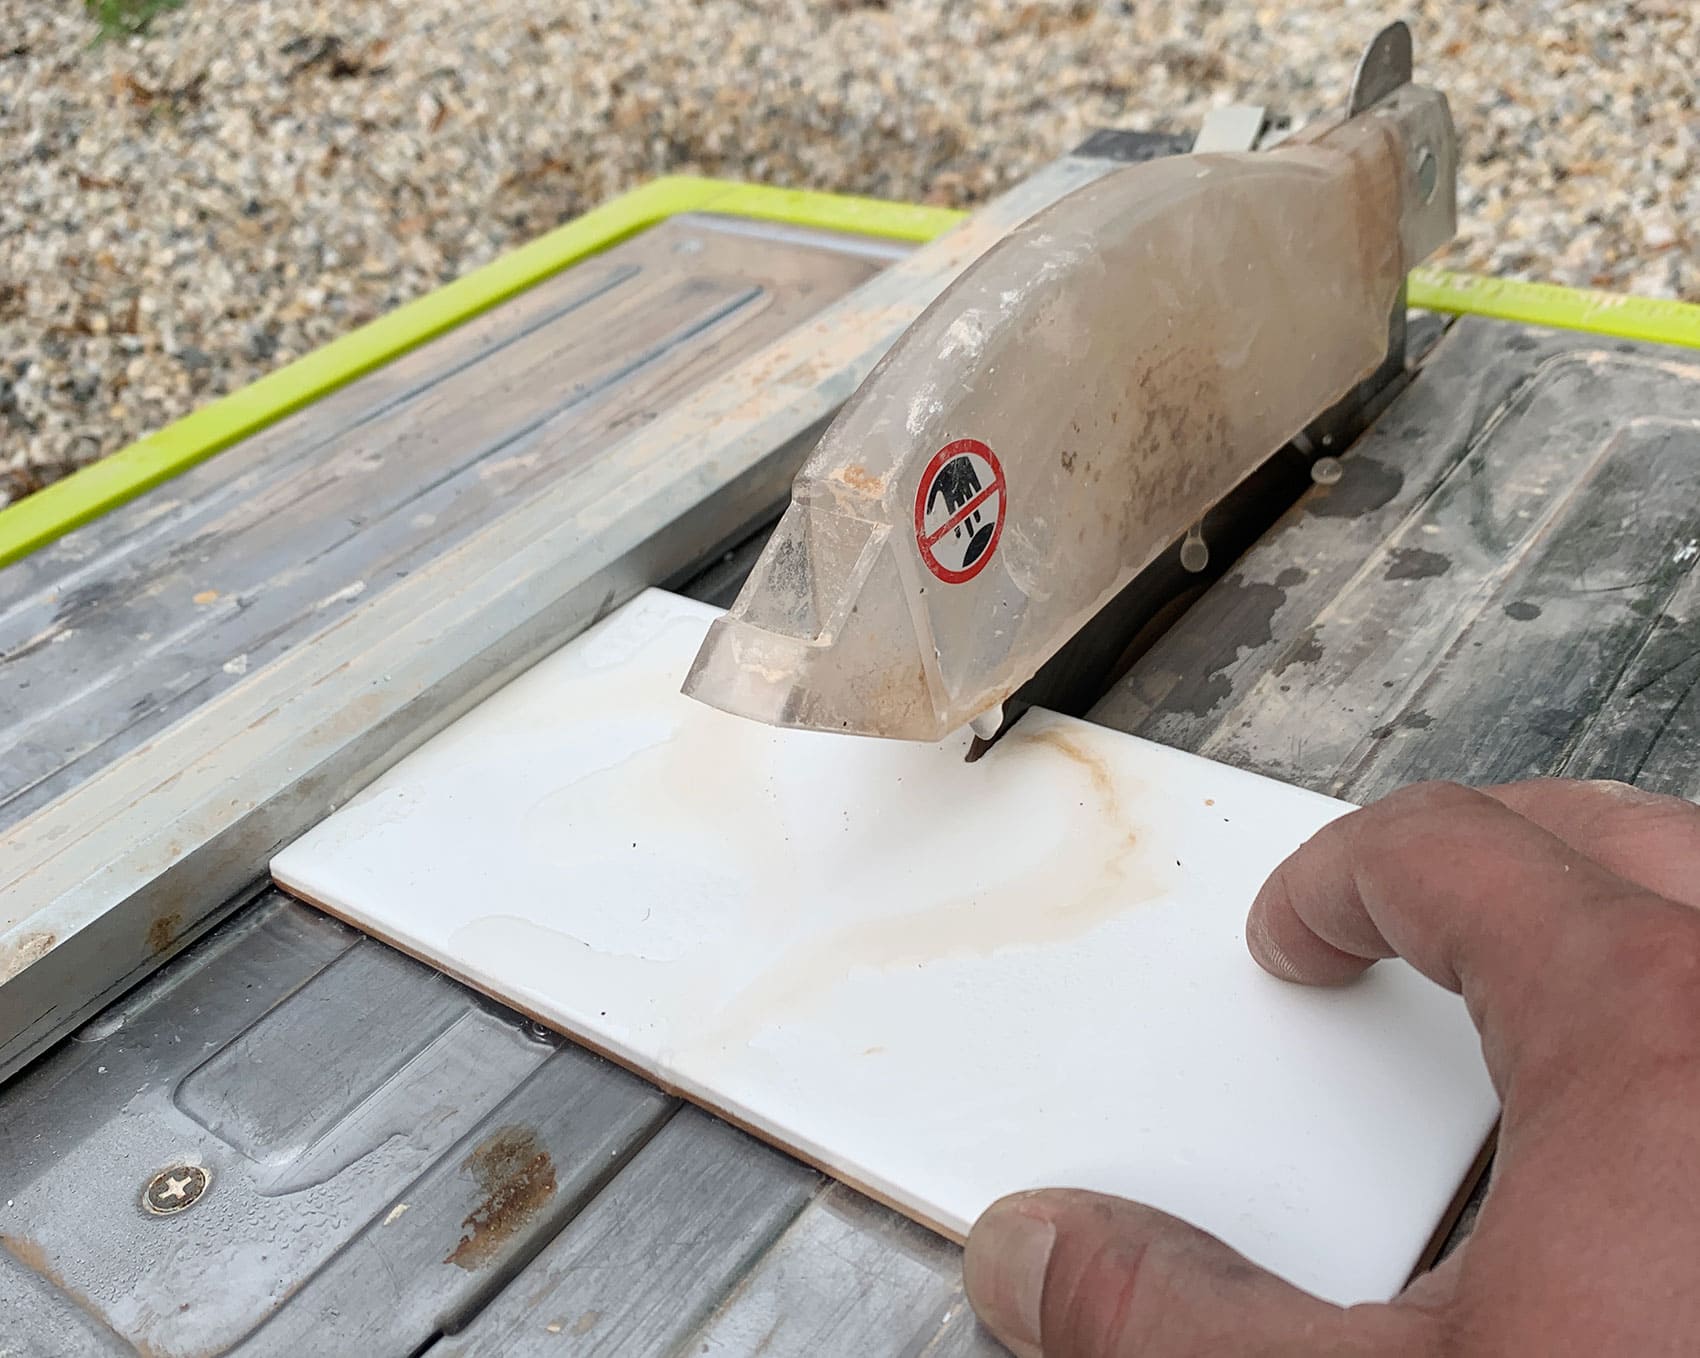
Step 5: Cut your tiles to accommodate the end of a run and/or to cut around outlets, switches, or other fixtures. The easiest method by far is a wet saw, which you can either buy or rent depending on what’s available in your area and how often you see yourself using it! Because I do a fair amount of tiling, I decided a little while ago it was worth it for me to buy one. For a tiling job like this, an inexpensive small wet saw should really be all you need! This one by Skil is totally sufficient, or this Kobalt one is a great step-up if you’re using larger tile or just feeling like treating yourself.
If you only need to make straight cuts, you can use a score-and-snap tool. It should reliably make straight cuts with ease.
If you need to make a compound cut (like removing the corner of a tile to go around an outlet) but don’t want to use a wet saw, you can use a small manual coping saw and tile nippers. It’ll be slow-going, but it’s an option! You can also get a diamond-grit jigsaw blade and give that a shot, just be sure to keep the blade wet with a spray bottle as you’re cutting. For ROUND cuts (such as around a plumbing pipe), a diamond-grit hole saw also works nicely as long as you keep it wet!
If the entire bottom part edge of the tile isn’t being supported by something below (like the countertop or another tile) because of a cut, use painter’s tape to secure it to stable surrounding tiles to keep it in place while the mastic sets. Once it’s dry (which may only be a couple hours, but I like to let it be overnight), just remove the tape.
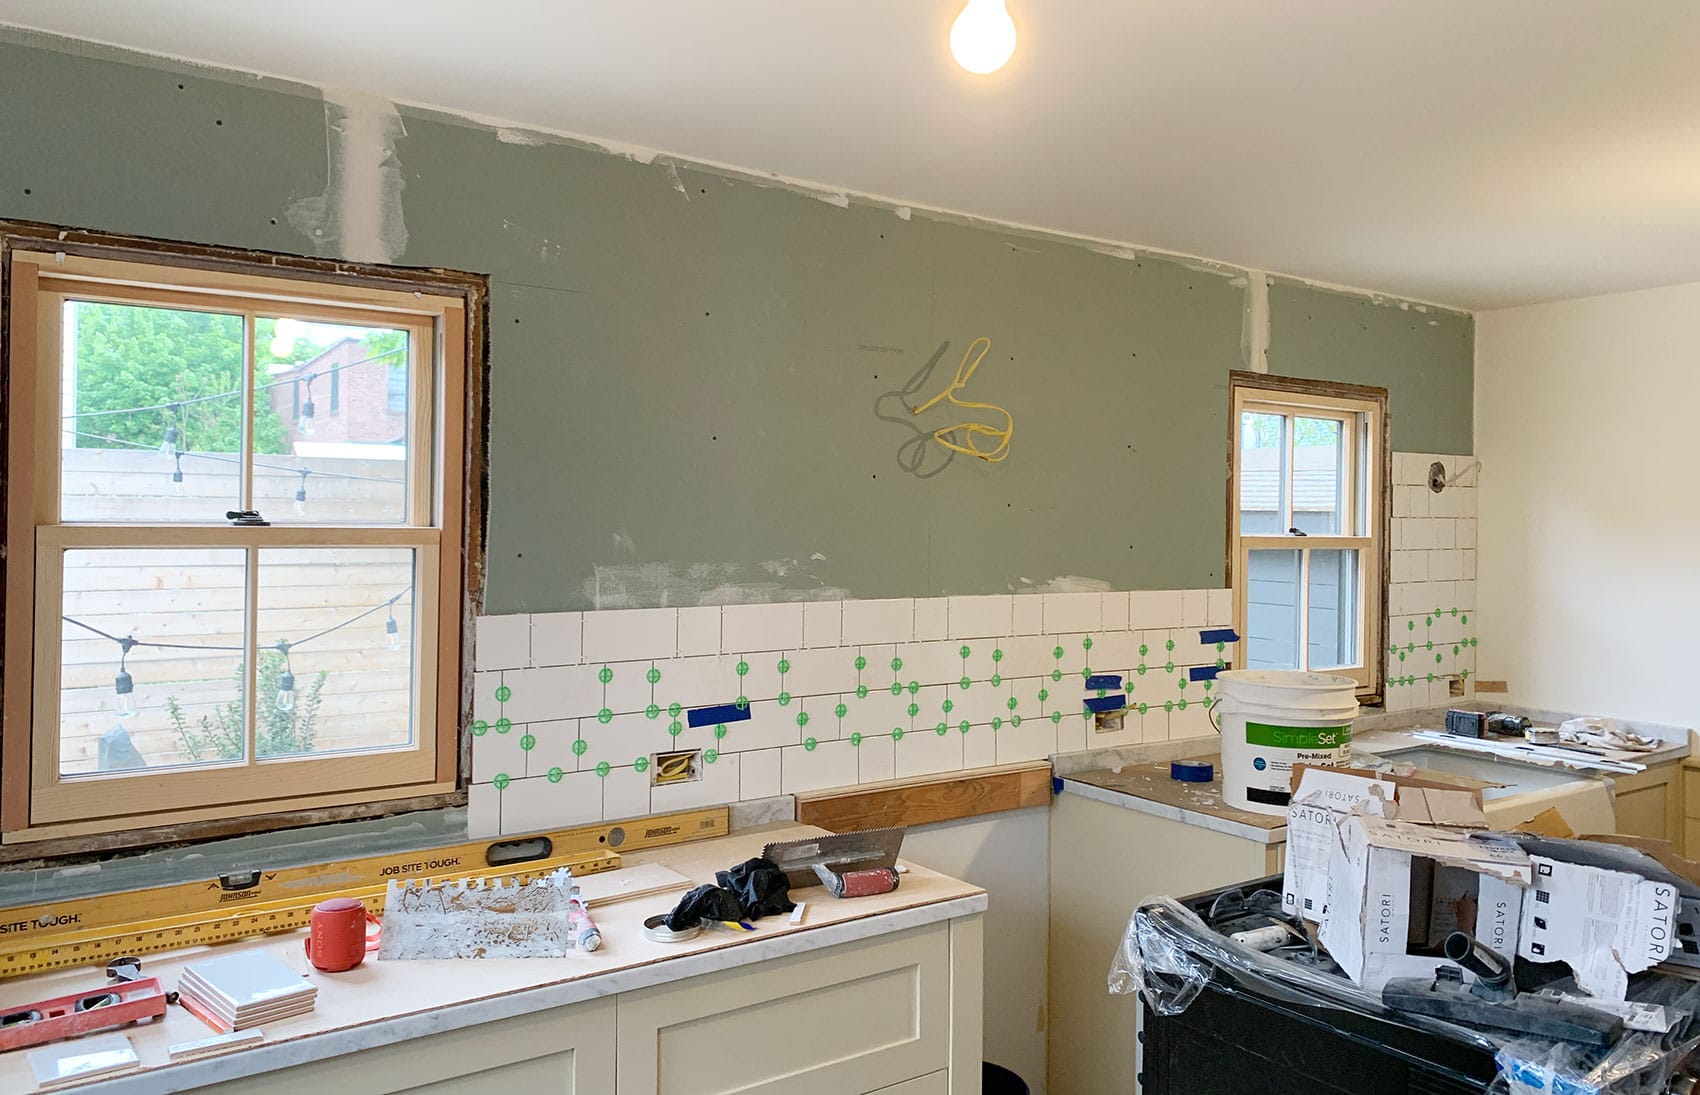
Step 6: Continue up the wall! Once your more complex cuts like for outlets are out of the way, things should move a lot faster. Make sure every row or two that you’re staying level—slight variations in the wall or the tile itself can throw things slightly out of whack, so you just want to stay on top of it and make minor adjustments as-needed, which might include a little shimming (I like cardboard!) to keep everything just so!
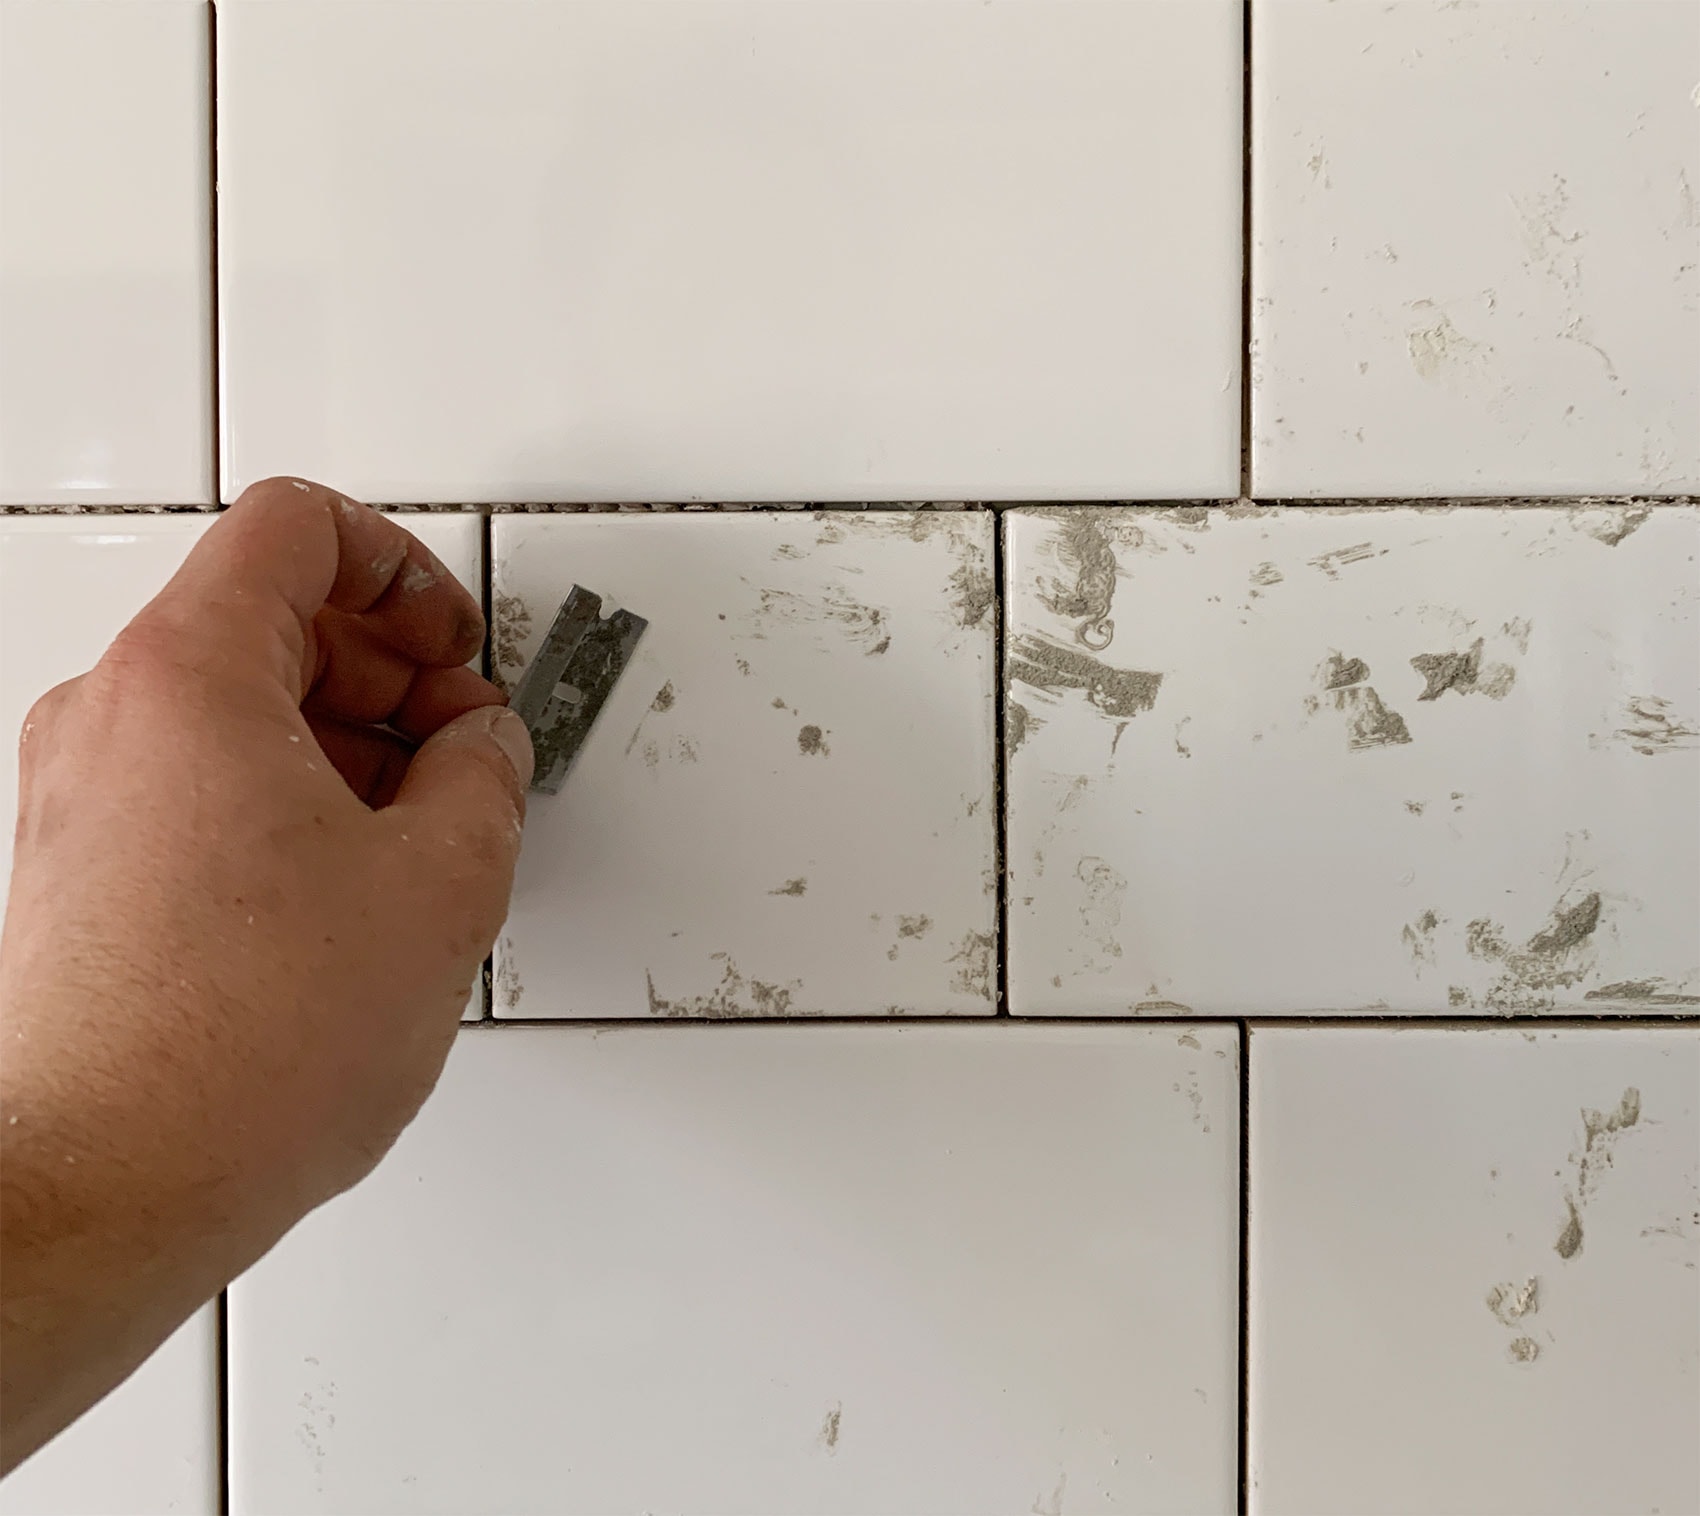
Step 7: Once everything has had a chance to set (again, I like to wait at least overnight), you’ll need to remove the spacers and clean up the tile and the grout lines. A razor blade works nicely for cleaning any errant mastic or thinset off the face of the tile, and a grout remover works well for scraping dried mastic or thinset from the joints. This part of the process can be slow and tedious, but it’s important! This is why it behooves you to avoid allowing mastic or thinset to dry in the grout lines to begin with.
Step 8: Grout! Again, the packaging is your friend here—it will tell you the mixing and application instructions, so just follow them! Like thinset, you can get grout either in powder form or pre-mixed. Pre-mixed grout is typically an epoxy type and is more expensive, but easier to work with and shelf-stable over time. Powdered grout, by contrast, EXPIRES! The clock starts ticking when you open the bag, and if you don’t finish using it within a few months, toss it. Expired grout will go on just fine but quickly become weird and powdery and fall out of the joints.
There are sanded and unsanded grouts. Again, take your cue from the packaging. Essentially sanded grout is for larger grout lines and unsanded is for smaller grout lines, but the packing will detail what the minimum and maximum size grout line the grout is formulated for.
Grouting IS messy and looks like a total crisis while you’re doing it, particularly if you’re using dark grout. You may think you’ve ruined everything. You haven’t. Just follow the process—typically spread it on with your grout float, pressing it into the joints. After around 15 minutes (again, follow the package instructions!!), you’ll start to clean it off, and you kinda just repeat until you have nice clean lines!
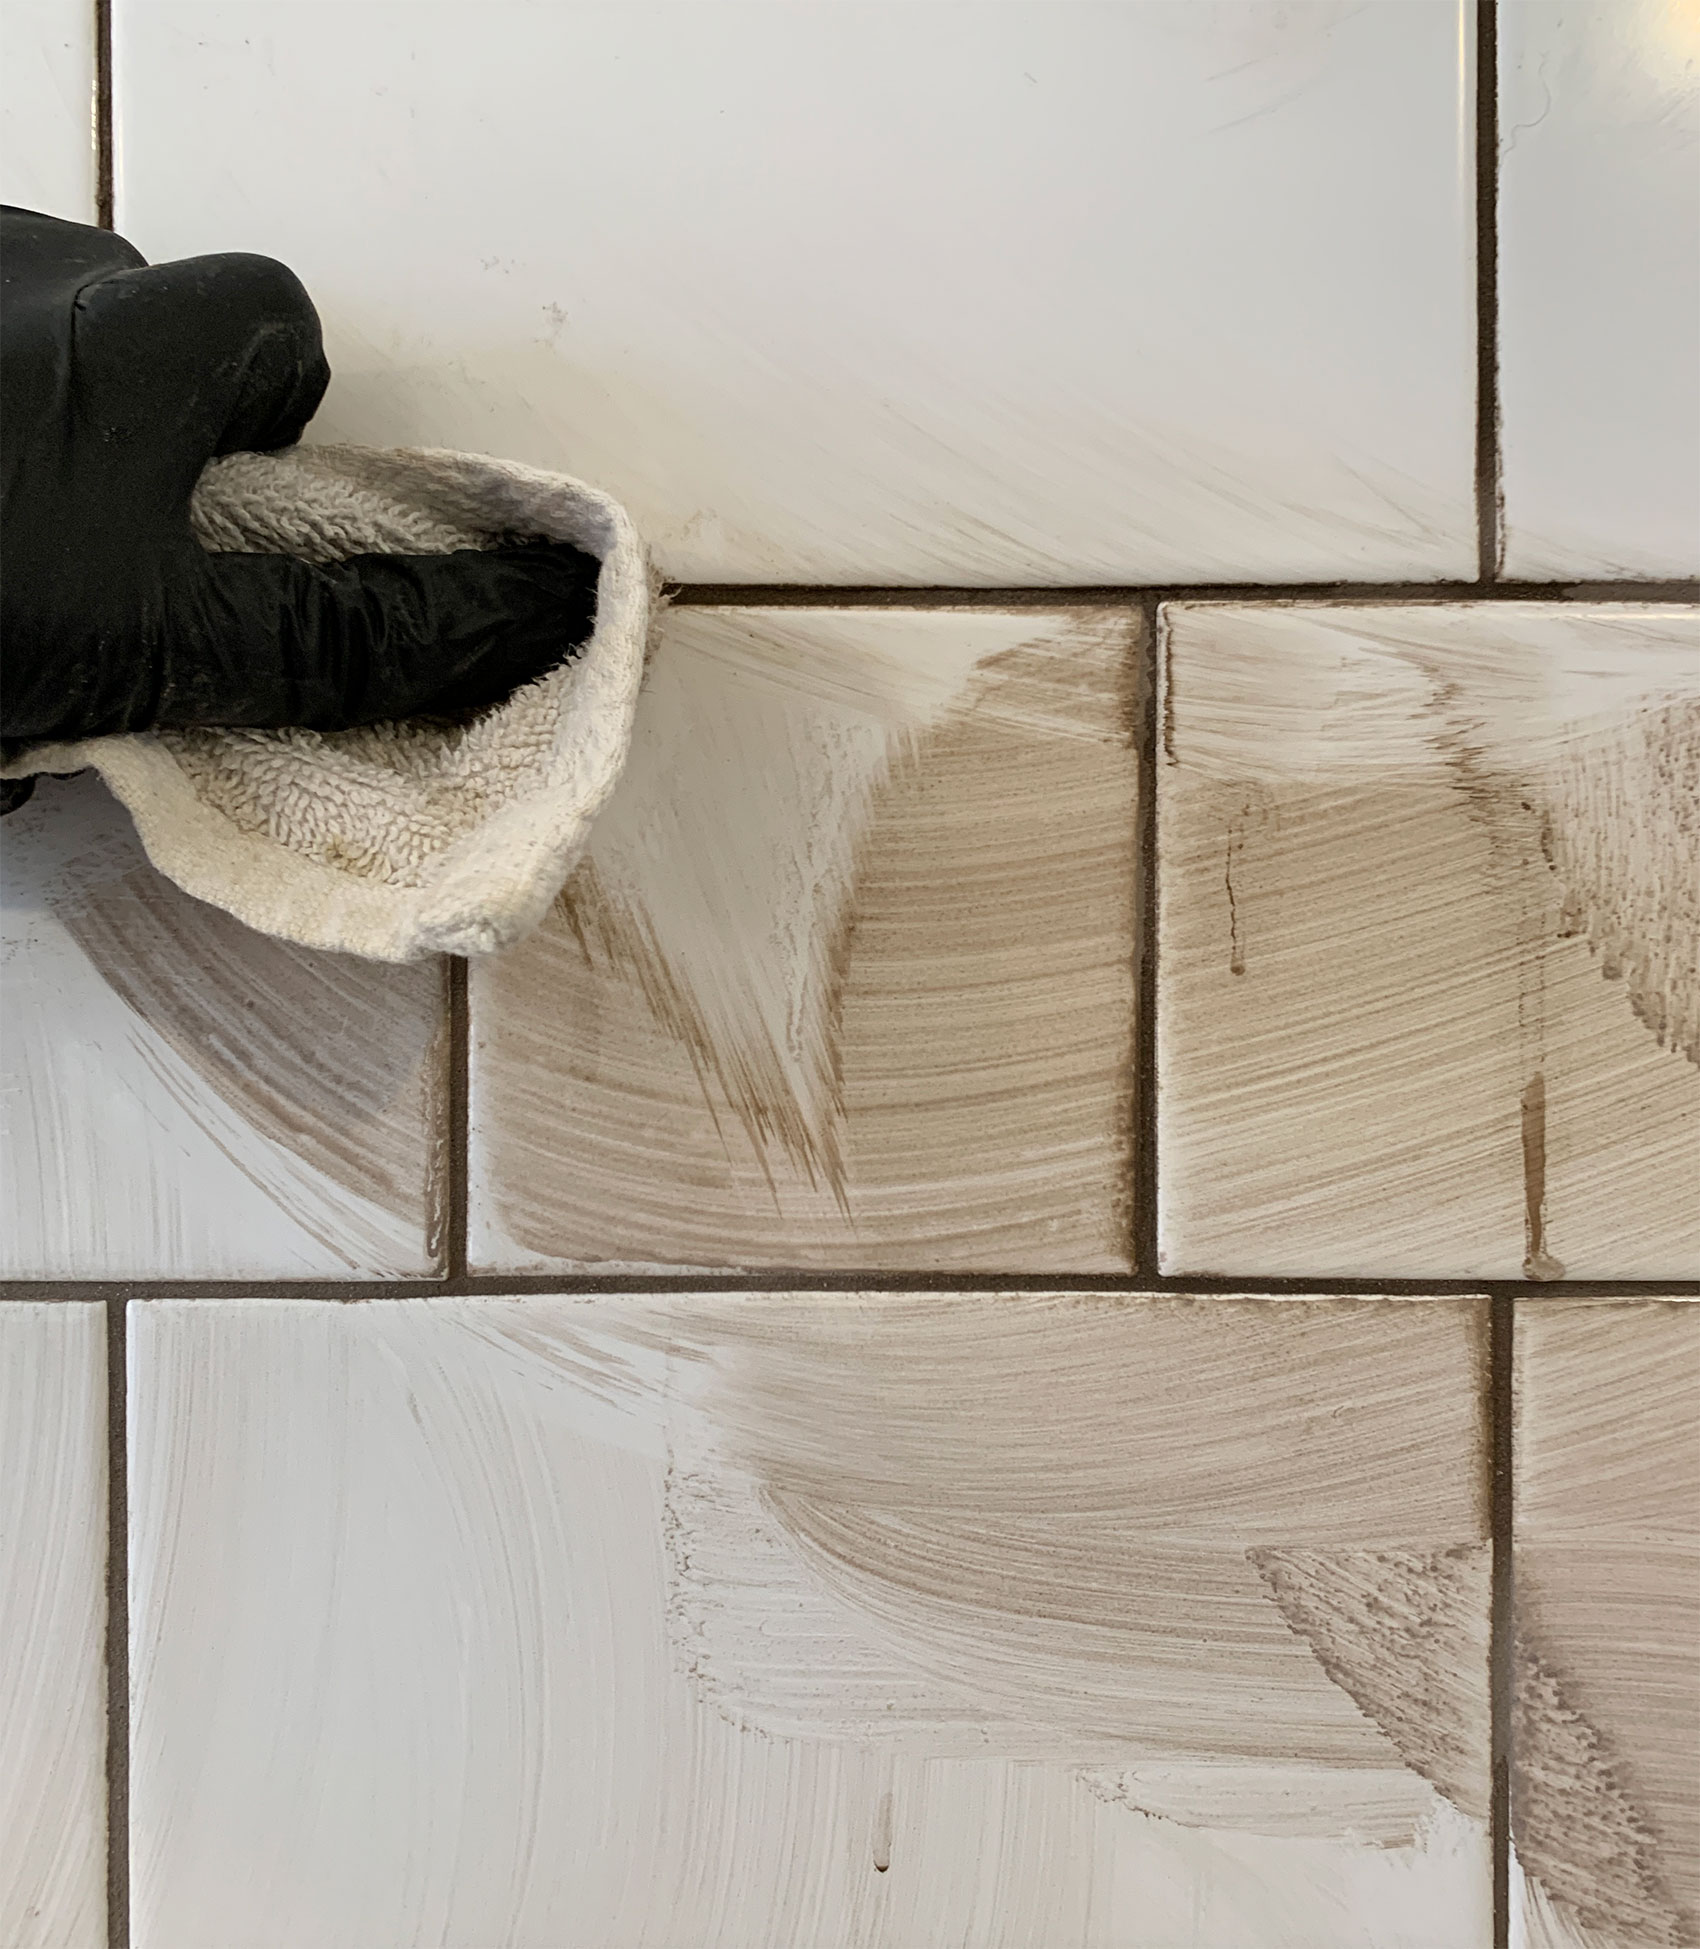
One area I deviate from the instructions is the final clean-up pass, where I’ve found that microfiber cloths are the key to really crisp grout lines! Just cover your finger with a damp microfiber cloth and run it along each grout line—you’ll see the edges go from a little rough to nice and cleaaaan.
Some grouts need to be sealed and some don’t. This particular Mapei brand powdered grout says there are sealers built in, but it rarely hurts to add a little extra protection with grout sealer, especially if your grout is on the lighter side and more susceptible to staining. I thought a darker grout would work better here to emphasize my tile pattern, but black felt too stark so I went with two words I never thought I’d say in my life: BROWN GROUT. Yes he did and no he does not regret it. I think it works beautifully here. The color is called Bahama Beige which never fails to make me chuckle. 2020 is wild, man.
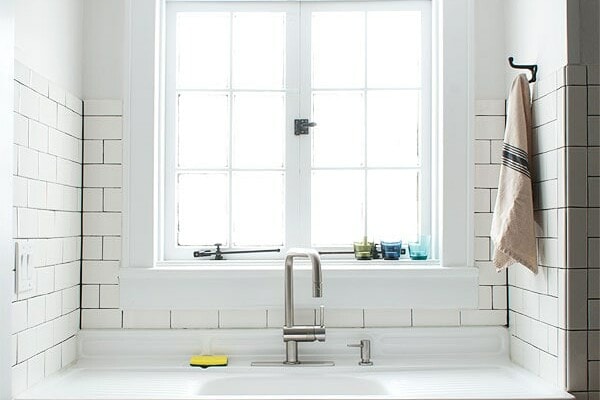
Step 9: Caulk! You’ve come this far, so take the time to make your caulk lines look pro!
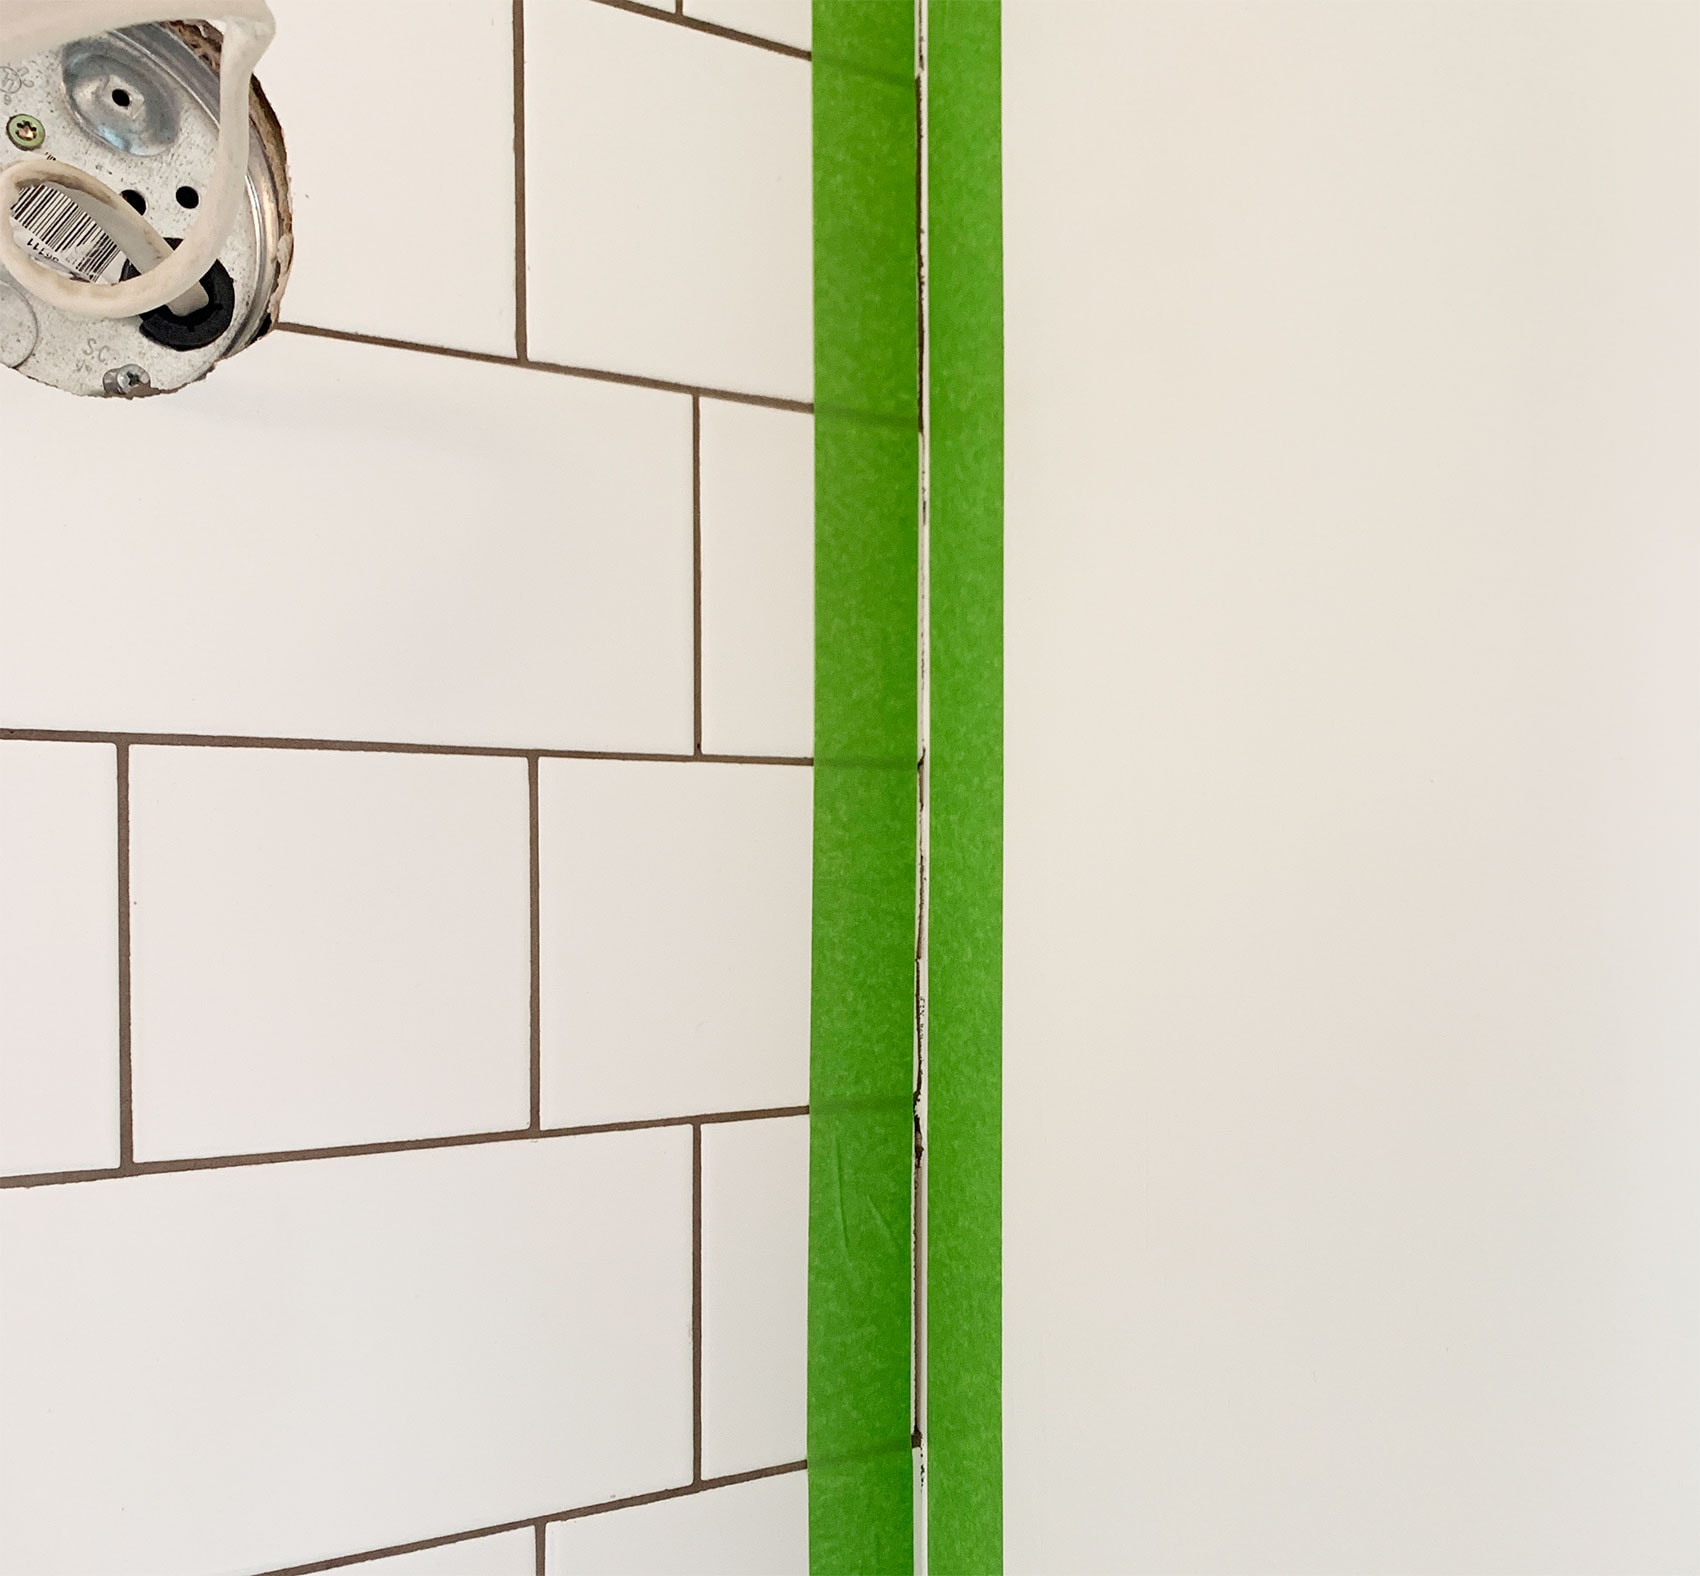
All you have to do is run painter’s tape on either side of the caulk line…
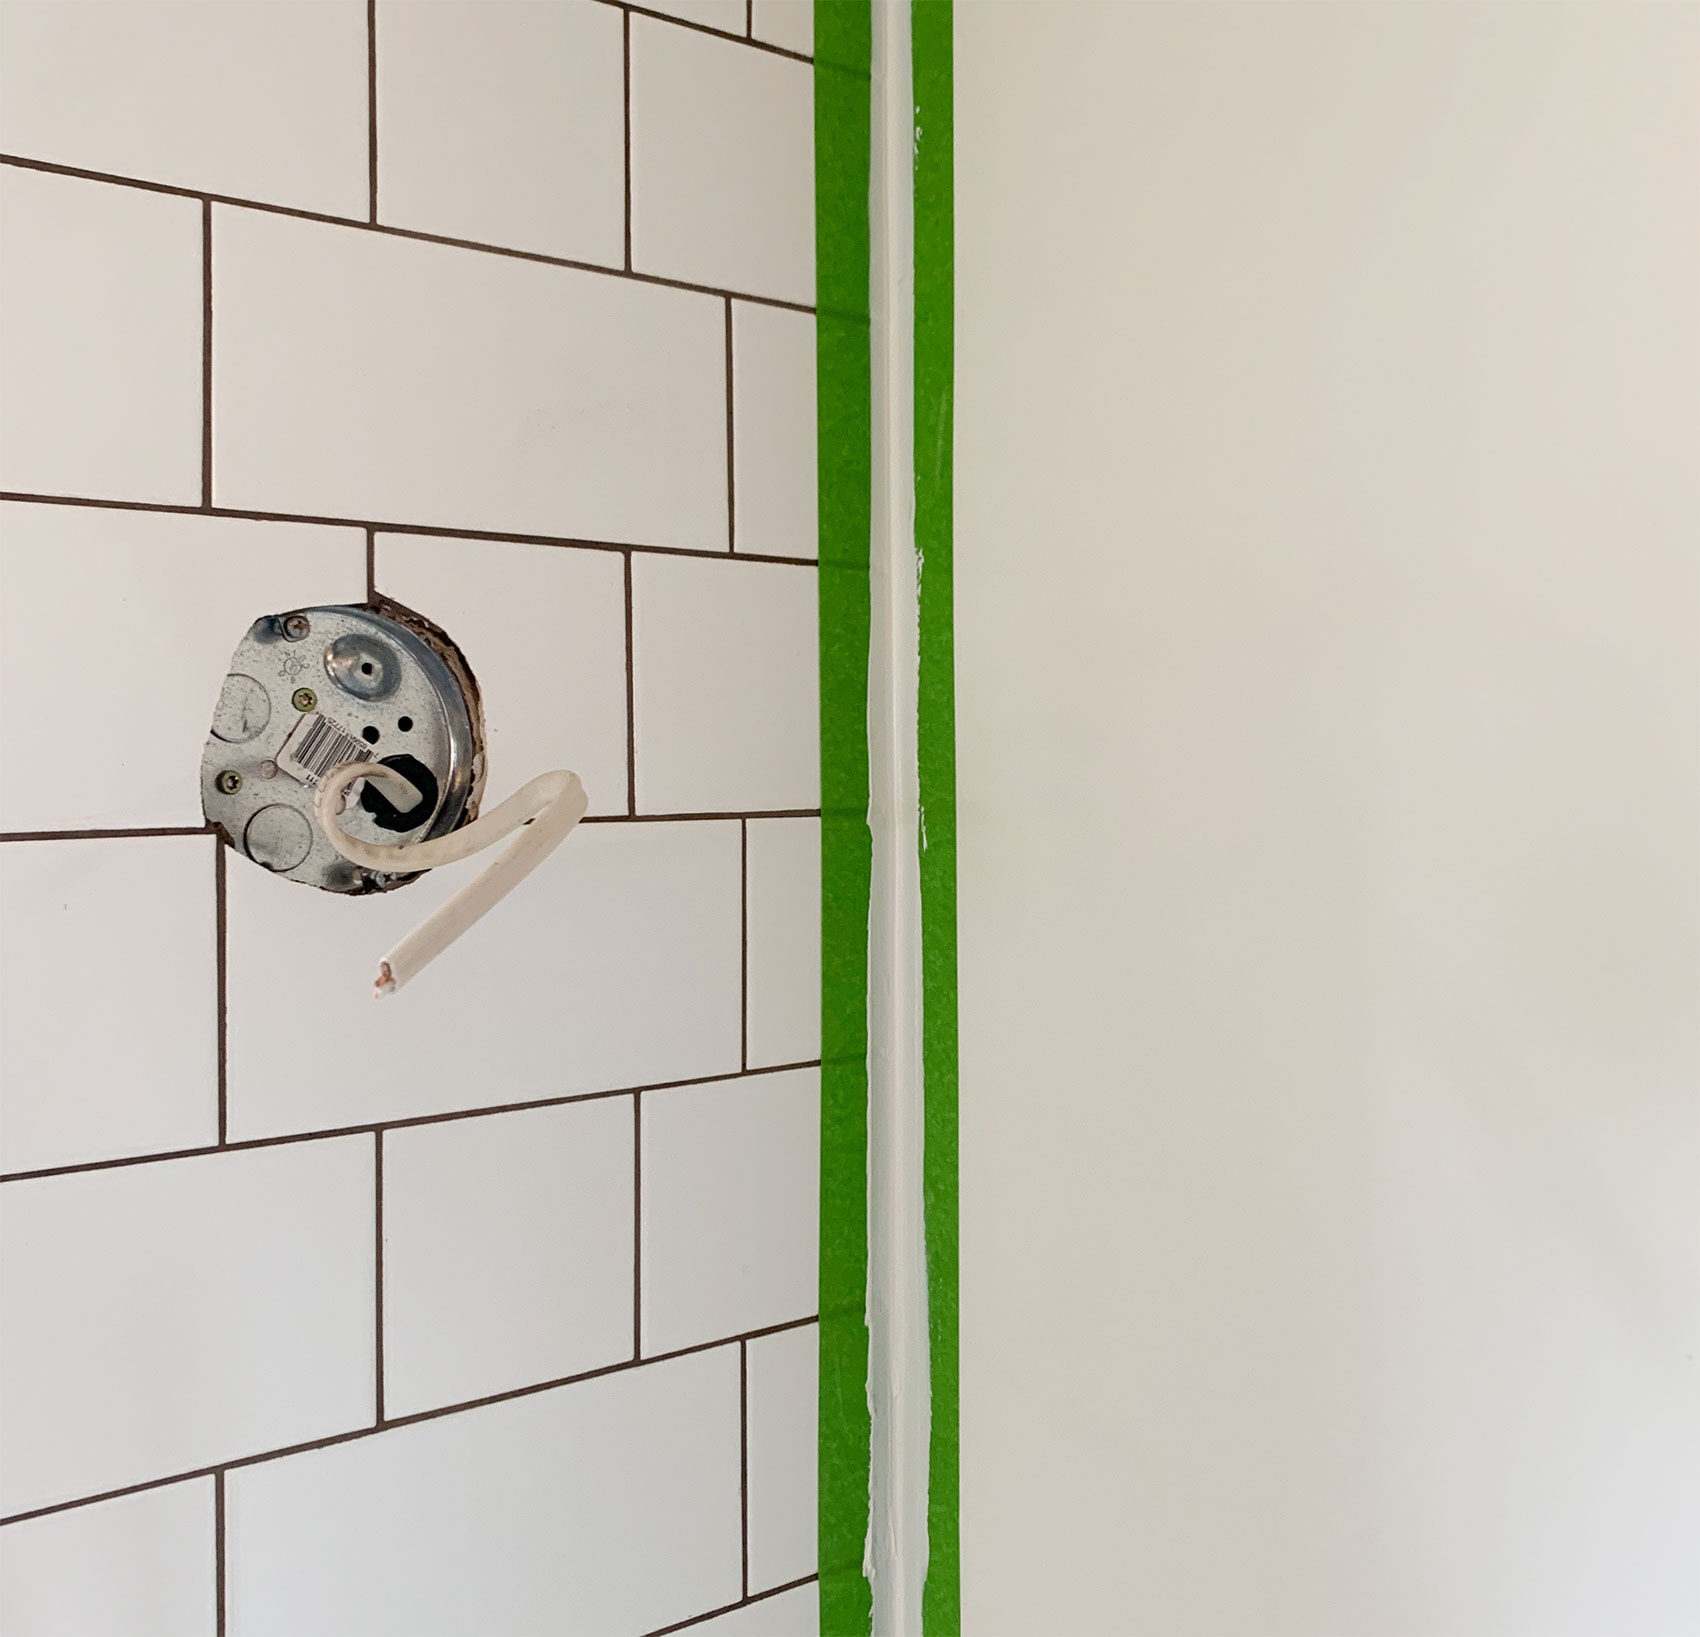
Apply the caulk and smooth with your finger…
…and immediately remove the tape. The tape gives you nice crisp edges, and allows you to keep the caulk line nice and little. Nobody likes a big globby caulk line!
For interior corners with tile on both walls, it’s generally best to use a caulk that’s the same color as the grout. The whole line of Mapei grouts have coordinating caulks available, and they’re really nice! In other circumstances, like where the tile meets the ceiling, it may be better to choose caulk that coordinates with the paint color rather than the grout color. Case by case basis! In this case, I felt that a white caulk would look less conspicuous where my tile meets the wall and ceiling than a caulk color-matched to my grout.
Step 10: Since you may want to hang things on your tiled wall (like a range hood, a shelf, a hook, IDK it’s your life!), a tile bit and a rubber anchor is all you really need! I’ve watched people successfully use a masonry bit for this, but there are very different drill bits specifically for tile that are way easier and decreases the risk of cracking your brand new tile! Worth a few bucks to just buy a set.
Step 11: Step back and admire your work and general badassery for taking on your first tile job with such confidence and vigor! You’re amazing! Then you can set about bragging to your friends and family members and neighbors and vague acquaintances that you are, in fact, better than them. Which we knew all along.
I SO love the way this came out! This picture was taken before I did the caulk around the edges, but you get the idea—you’ll see the rest soon enough! To me it feels perfect for this space—modest and humble, but not boring, and hopefully will continue to look good for years and years to come. And you really can’t beat the cost—this entire wall was under $200 in materials, including the mastic and grout!
Onward! I can see the finish line!


I love this tile pattern! And it’s flush to the ceiling. How on earth did you solve the problem that on one side the ceiling was 1/2″ lower than the other?
It looks like he may have trimmed the bottom off the tiles on the right side, but my eyes might be deceiving me.
Is it lower, or is that just the angle of the photograph?
OMG Daniel is it looking amazing! This kitchen is so dreamy!
It looks amazing! I can’t wait to see the rest. I plan on doing my own backsplash if I ever get my old formica countertops replaced. I appreciate the tutorial and the tool/materials list. I will definitely refer to this post when I am ready. Brown grout, especially dark brown, is actually not horrible at all. My mom used it with large white subway tiles in her kitchen. I was skeptical at first, but it looks fabulous. (Fun fact, she also has a mastic tree in the backyard )
It is all gorgeous! As usual I could not really see what you were seeing ahead of time when you talked about it…but now it is all coming together so beautifully. I am so impressed with your skills, but it is your vision that I truly envy. Keep up the good work!
It looks great and I love the Flemish Bond pattern. Also, once again you’ve surprised me with how well your color choices come together. I was so not sold on the beige, and now it looks amazing!
I really like the change up on the tiling pattern. Very nice and effective but still keeping with the house. Plus those cabinets! Looking nice Daniel.
Looks INCREDIBLE! Love! Thinking this might be just the thing for my tiny, humble kitchen.
I love the tile pattern you selected! I always read your posts bc you give so much information. Even if I am not going to do the project myself, I find the info helps me to ask questions and check on on the workmanship of the installer. Plus I always learn something — I need to go throw away my old powdered grout.
So beautiful, I just want to lick it…
Interestingly, all I can see in the Flemish bond is its basketweave optic. Can’t unsee it. Terrific, I can’t tell you how fab it vibes with your cabinet doors, marble counter and reclaimed wood. Elegant, chill, and emanating an almost Shaker-esque spirituality around how form and artisan humility make the stairway *from* heaven for the angels to come sit in the plain, honest chair you made. Order is the first law of heaven, didn’t they say that?
So nice and who knew there were so many patterns…thanks for all the options.
Can’t wait to see the finished kitchen!
LOVE!
This is awesome….getting ready to redo our small 1958 bathroom, this is a perfect pattern. Always appreciate the inspiration.
Put this in a book! If you haven’t already written one, you should. Just sayin’
I second this. You should write a book. You are amazing. The kitchen is looking so great!
Thank you for this useful and comprehensive tile setting guide! I’ve been contemplating tiling a kitchen wall in a modest house (problem: ugly Corian counters with a short Corian backsplash), so this is very timely information. The Flemish bond looks fresh and yet suits a cottage. Very inspiring!
I swear you are single handedly bringing back beige but I’m dying to know if you met your personal goal of using up all your leftover thinset?!?
I’ve been curious too!
It’s so pretty! The tile pattern is perfect for the space. I was really doubting your beige cabinet paint choice but I stand corrected — it’s beautiful. Your creative instincts are so impressive!
I get so excited whenever I see a new blog post from you. You are such an inspiration, and you’re giving me the courage I need to tile our cottage bathroom. Thank you xxx
Gorgeous! I’m inspired to tackle my 1941 kitchen!
Brilliant job! So excited to see this kitchen moving forward.
So GREAT of Lowe’s to read the mood and not force the timing of your post. But, we’ve missed you SO amongst all the life lessons we’ve collectively learned in the last few weeks. We can all do better, and have to, for our world. Thanks to you and Lowe’s for being leaders at this time.
I’d like to second this! I have missed your Instagram stories and have been hoping for a blog post for a while, but I am glad you decided (and Lowe’s agreed!) to put it off. Rarely do big stores warm my heart, but Lowe’s has here.
beautiful job, as always.
Subtle yet beautiful! I’m hoping to see more brown grout in the future now.
phenomenal job! was just thinking the other day that you went silent and hoped all was OK.
Kudos to Lowe’s for doing the right thing!
That cabinet color is getting dreamier with every new material. Flemish bond and phlegmish beige! I am here for it. 2020,man. Who knew.
It’s looking fantastic! I know I’m gonna be referring back to this post a whole bunch.
Gorgeous job!
Looks amazing! Love the grout colour
Always love your work! Have missed your instagram stories!
Oh my godddddddd, it looks so good! I mean, I knew it would, but it’s so pretttyyyyyyyyy. And I love the look of the Brown Grout, even though that seems like weird blasphemy.
Also, just so you know, I respect you not being on Insta this past week, but man, do I MISS my daily dose of you and Juliet, Bungee and Mekko.
Just gorgeous.
I love your tile! When I had tile done in my bathroom 2 years ago I went round and round with the man tiling about the size of the grout lines. I wanted 1/8” lines and he wanted 1/4” or bigger. I’m not sure anymore but I think the smaller the better too! I feel justified in my opinion now that I know you think so too!
You have outdone yourself again, sir! Well done!
I was missing you and your tribe of crazies! I love this kitchen! The tile pattern is so imaginative.
About the wood walls: looks like New England to me :-). They had wainscot like yours at Pewter Pot restaurants and Friendly’s restaurants interiors. I was happy to see you discuss the wood wall treatment. Personally I am so tired of Joanna Gaines’ decorating look, always the same. Your work progresses with each project…each room is different and beautiful.
The “beige” color looks more like a soft shade of milk paint to my eye; like a color I had in my old colonial in Massachusetts. LOVE IT ALL. Can’t wait to see the lights! XXX
That beige is gorgeous!
I am in love with this cottage and the kitchen is divine. Carry on.
By taking care of the little details and always making small changes, you have really pulled this kitchen to the next level. And this corner of the kitchen makes an impact from the front door. It is an important sight line. Great work!
Nicely done!
I love it! You always do such a great job explaining the options; I would never have thought there would be so many possible designs with the same, plain, white tile. You also got a ton of bang for your buck, because the end result is absolutely fantastic!!
Great job, Daniel! However, I’m confused as to how many walls you’re tiling. I saw the finished tile job on your blog, dated around 6/11, but stories continue to show you setting tile, with grout yet to come. Is this a wall on another side of the kitchen?