
I’m not sure if it feels this way because the last kitchen renovation I did had so many moving parts, but things are going…suspiciously quickly over at Bluestone Cottage.
First up was making some slight modifications to the electrical rough-in, which I didn’t think through especially well when it was first done. Countertop outlets had to be lowered a tad and switched to a horizontal orientation (my preference), sconce locations had to be slightly changed, and I decided two ceiling lights would work better than one. But since everything was essentially there already, this was all quite simple work! Yay!
Obviously, the world is not normal right now. But aside from the uncertainty over countertops (WE MIGHT GET MARBLE, AFTER ALL! Pls pray.), things haven’t been too terribly different than normal—the biggest exception being that I’ve had to be more conscious of planning ahead. While most hardware stores are operating as essential businesses, obviously it’s still best to avoid going anywhere whenever possible. This has meant a lot of online ordering, and trying to be precise when planning work order so that we have what we need when we need it! I’ve also been trying to order as much stuff as I can think of at one time to cut down on shipping/delivery charges and interactions. Which has meant some very large purchases.
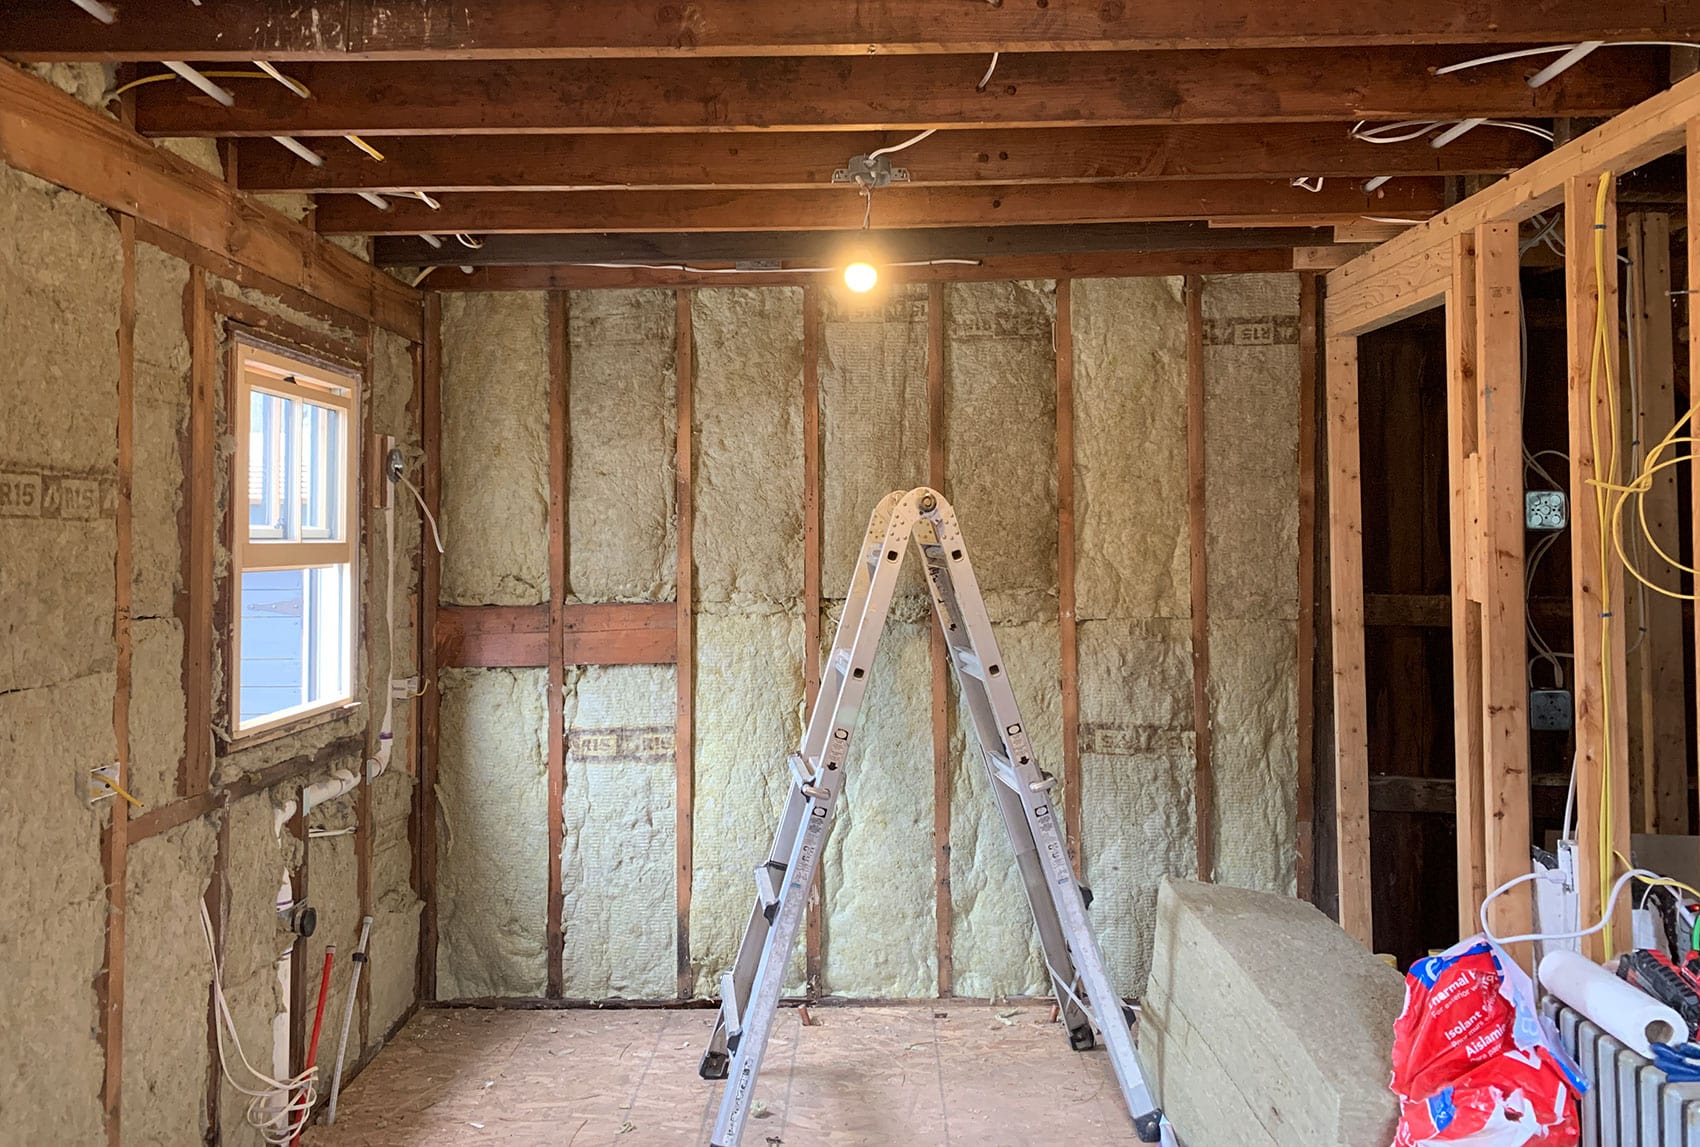
So the first thing to be delivered? SO MUCH INSULATION. I went ahead and ordered as much insulation as I think I’ll need for all the exterior walls of the house (roof/ceiling work was hired out, but walls are on me!). This felt like a slight risk because I ordered like 25 gigantic units of a product I’ve never used before: Rockwool!
Now, getting an insulation plan approved for this house was a total pain. Ultimately, here are the options that were pitched and seemed to be acceptable to our building department:
1. Spray foam. This would have cost a fortune (like, $11,000 on top of the $7K+ spent on the ceiling/roof), and made it nearly impossible to make changes to exterior walls (like where outlets and switches might sit), which I tend to change sometimes in the course of construction.
2. Flash-and-batt. The “flash” is a thin layer of spray foam applied to the backside of the sheathing for air sealing, and the “batt” is either batt insulation or blown-in insulation that makes up the extra space. This was less money but also very expensive and not very DIY-friendly.
3. Blown-in cellulose. This could be a DIY endeavor, but it sounds miserable and I would have highly preferred to hire it out. That said, depending on the product being used, it seems like an invitation for pests like mice, and it seems to have a tendency to settle over time, leaving the top of walls uninsulated, which I’ve never really understood. My gut does not love this idea.
4. Classic fiberglass batt. I have hated fiberglass bat pretty much since I started doing this kind of work. Rarely have I opened up a wall with fiberglass insulation that wasn’t either moldy, compressed with moisture, or had become a home for mice. From my understanding, fiberglass basically never degrades in a landfill, and it makes you itchy, and install isn’t complicated but can take some time.
5. Rockwool. This is what I went with, and I am SO GLAD I DID. I mean this with all the sincerity I can muster for insulation: I love this stuff!
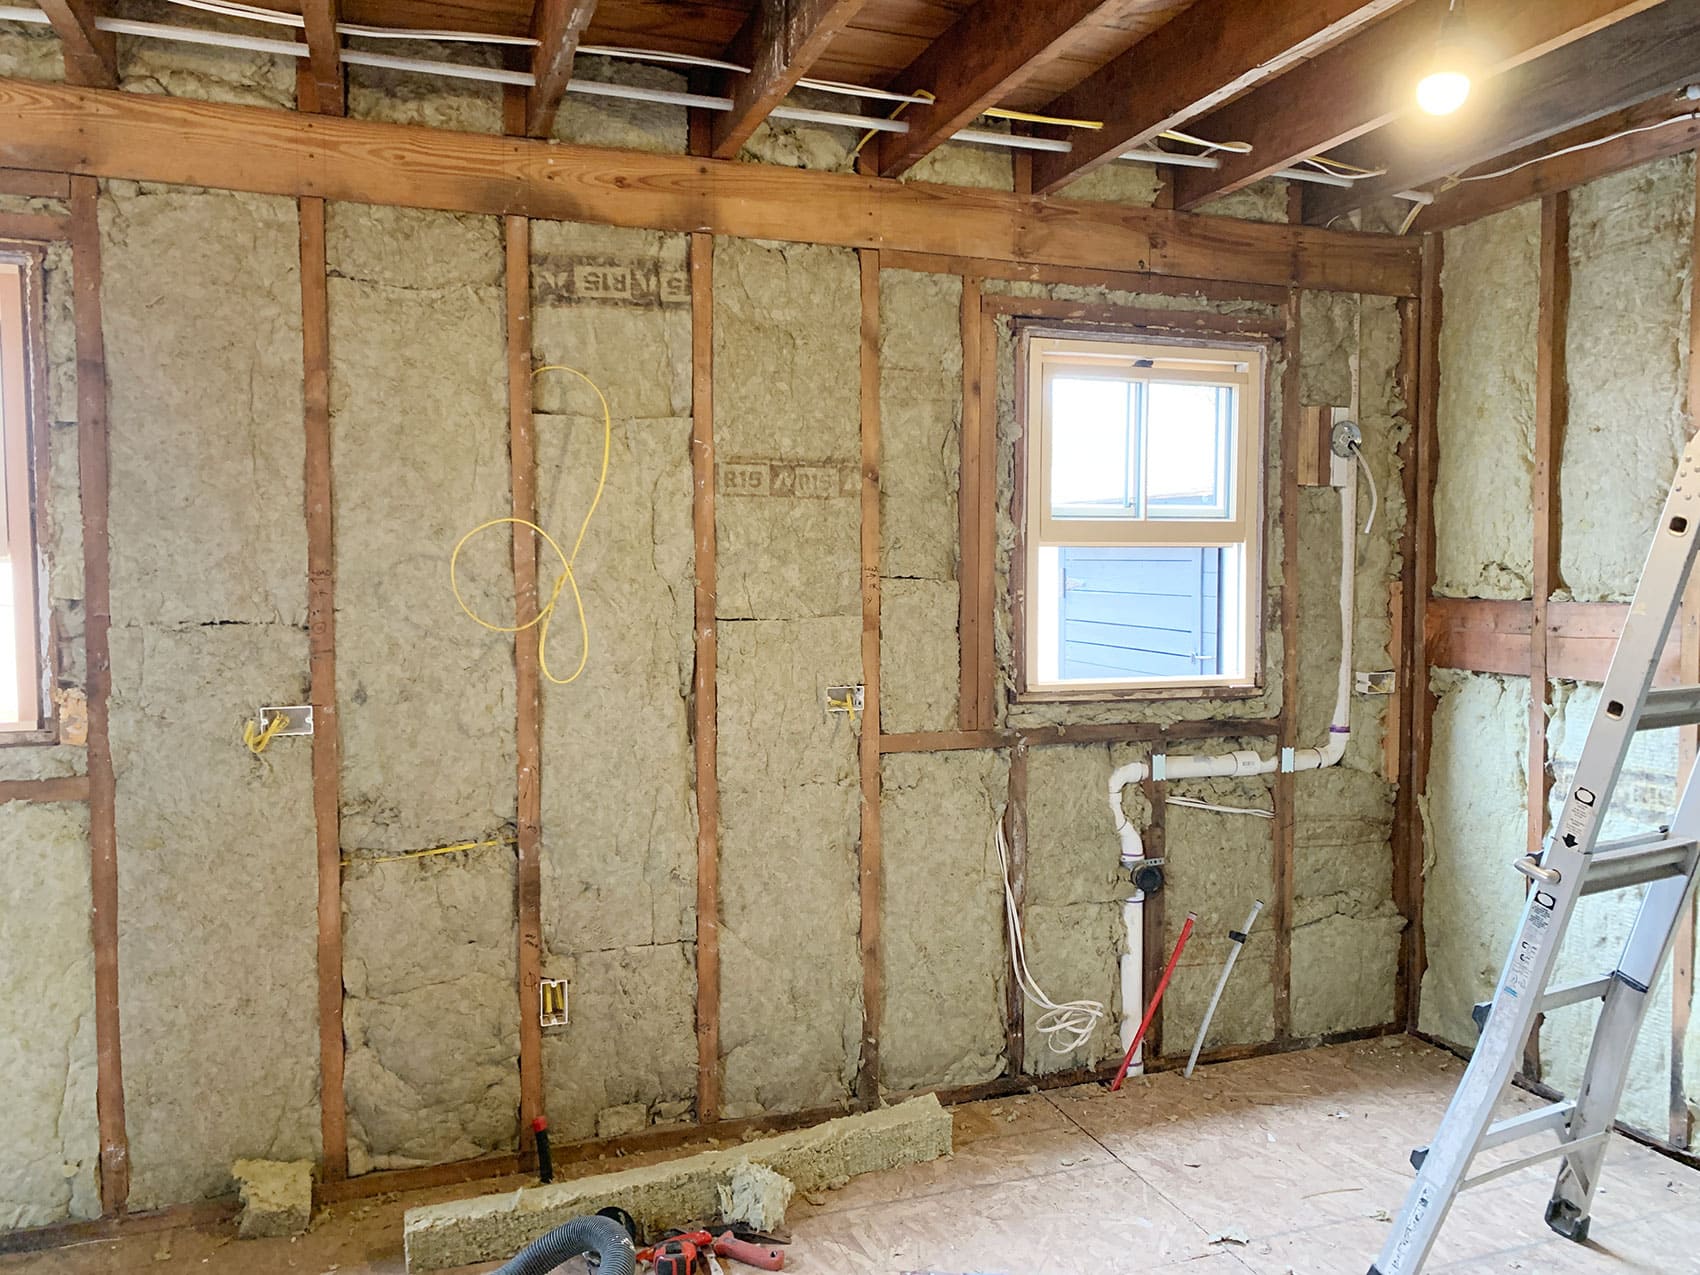
At approximately 70% recycled material, it’s way more environmentally friendly than fiberglass. And install was SO EASY. The batts come sized for walls with 16″ on center studs, and are very easily cut with a serrated bread knife (of all things!). I’ve also heard an electric carving knife works great, but I don’t have one and honestly that seems like overkill. It also just gets held between the studs by friction, which means no stapling or other reinforcement!
While wool-based insulation is a thing, Rockwool actually has nothing to do with wool. It’s made from volcanic rock(!), which through some magic gets “spun” into something closely resembling wool. For this and other reasons, it’s mold and mildew resistant and unfriendly to a variety of pests that like to take up residence inside insulated walls, and fireproof. Prices may vary regionally, but in my neck of the woods it’s almost exactly the same price as fiberglass batt, too. What’s! Not! To! Love!
Anyway. It took me and Juliet maybe an hour to insulate the whole room? So! Easy! Make yourself a cocktail and have your kids do it for you.
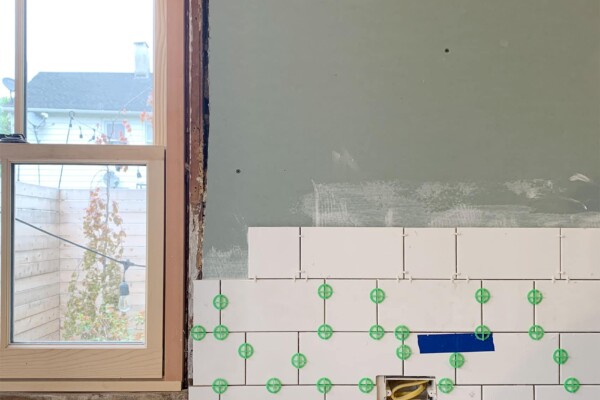
Since my local building department has suspended interior inspections, luckily they were able to accept photos as an alternative. And with that squared away, it was time for drywall!
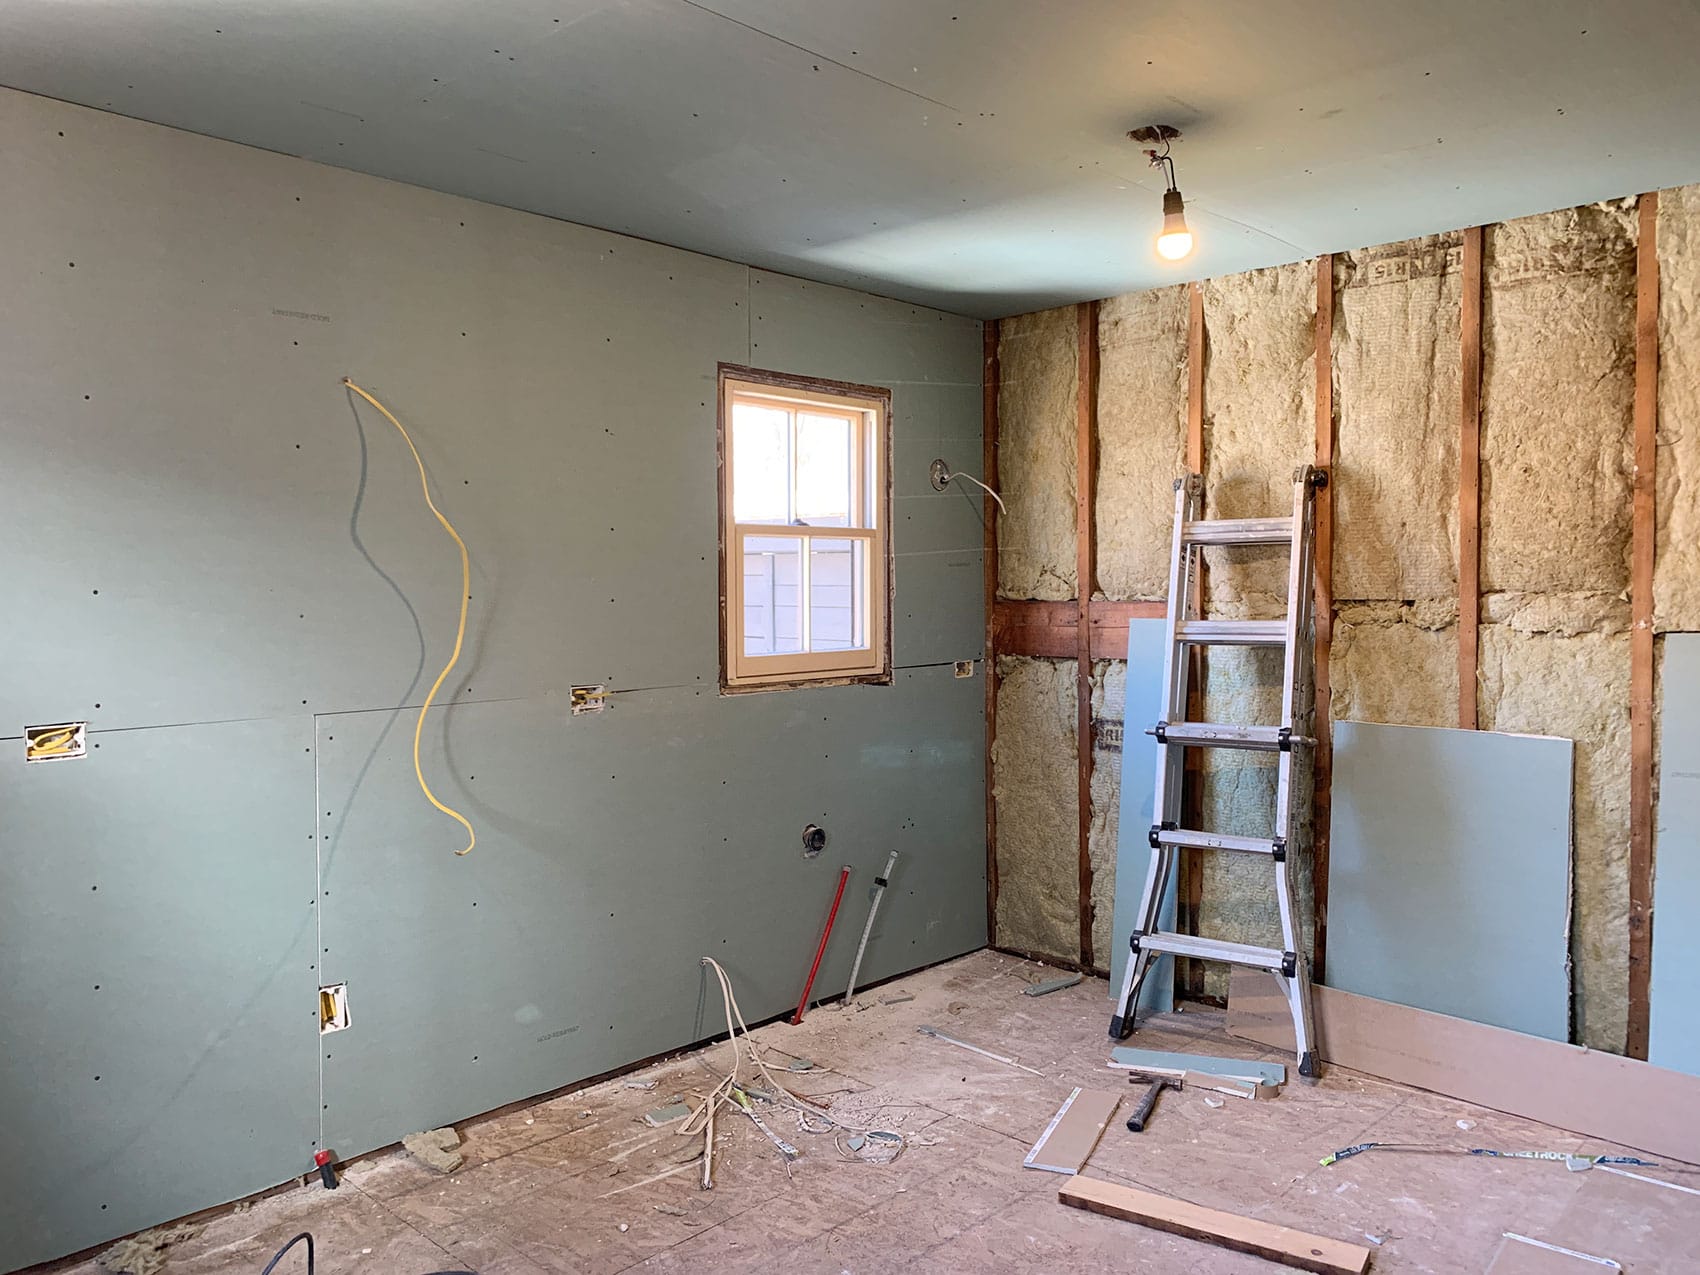
As usual, I hired Edwin to do the drywall work. He has keys, so he was able to let himself in and out of the house without me being present, and then Juliet and I could go in later and sanitize (just in case!) and get back to work. To streamline ordering, we used mold and mildew-resistant drywall throughout the kitchen. I neglected to order enough 1/2″ green drywall (the green paper indicates mold and mildew resistance across a few different brands), so we supplemented with some extra 5/8″ PURPLE drywall I had leftover from my own kitchen walls! I asked him to leave the bottom 3′ on the side walls without drywall because I have another plan for that!
With the walls squared away, it was time to address the FLOORS!!!
Floors for this house have been a source of long-term debate and anxiety. I wrote a whole post about it years ago, and continued to debate it up until the night before we started laying them!
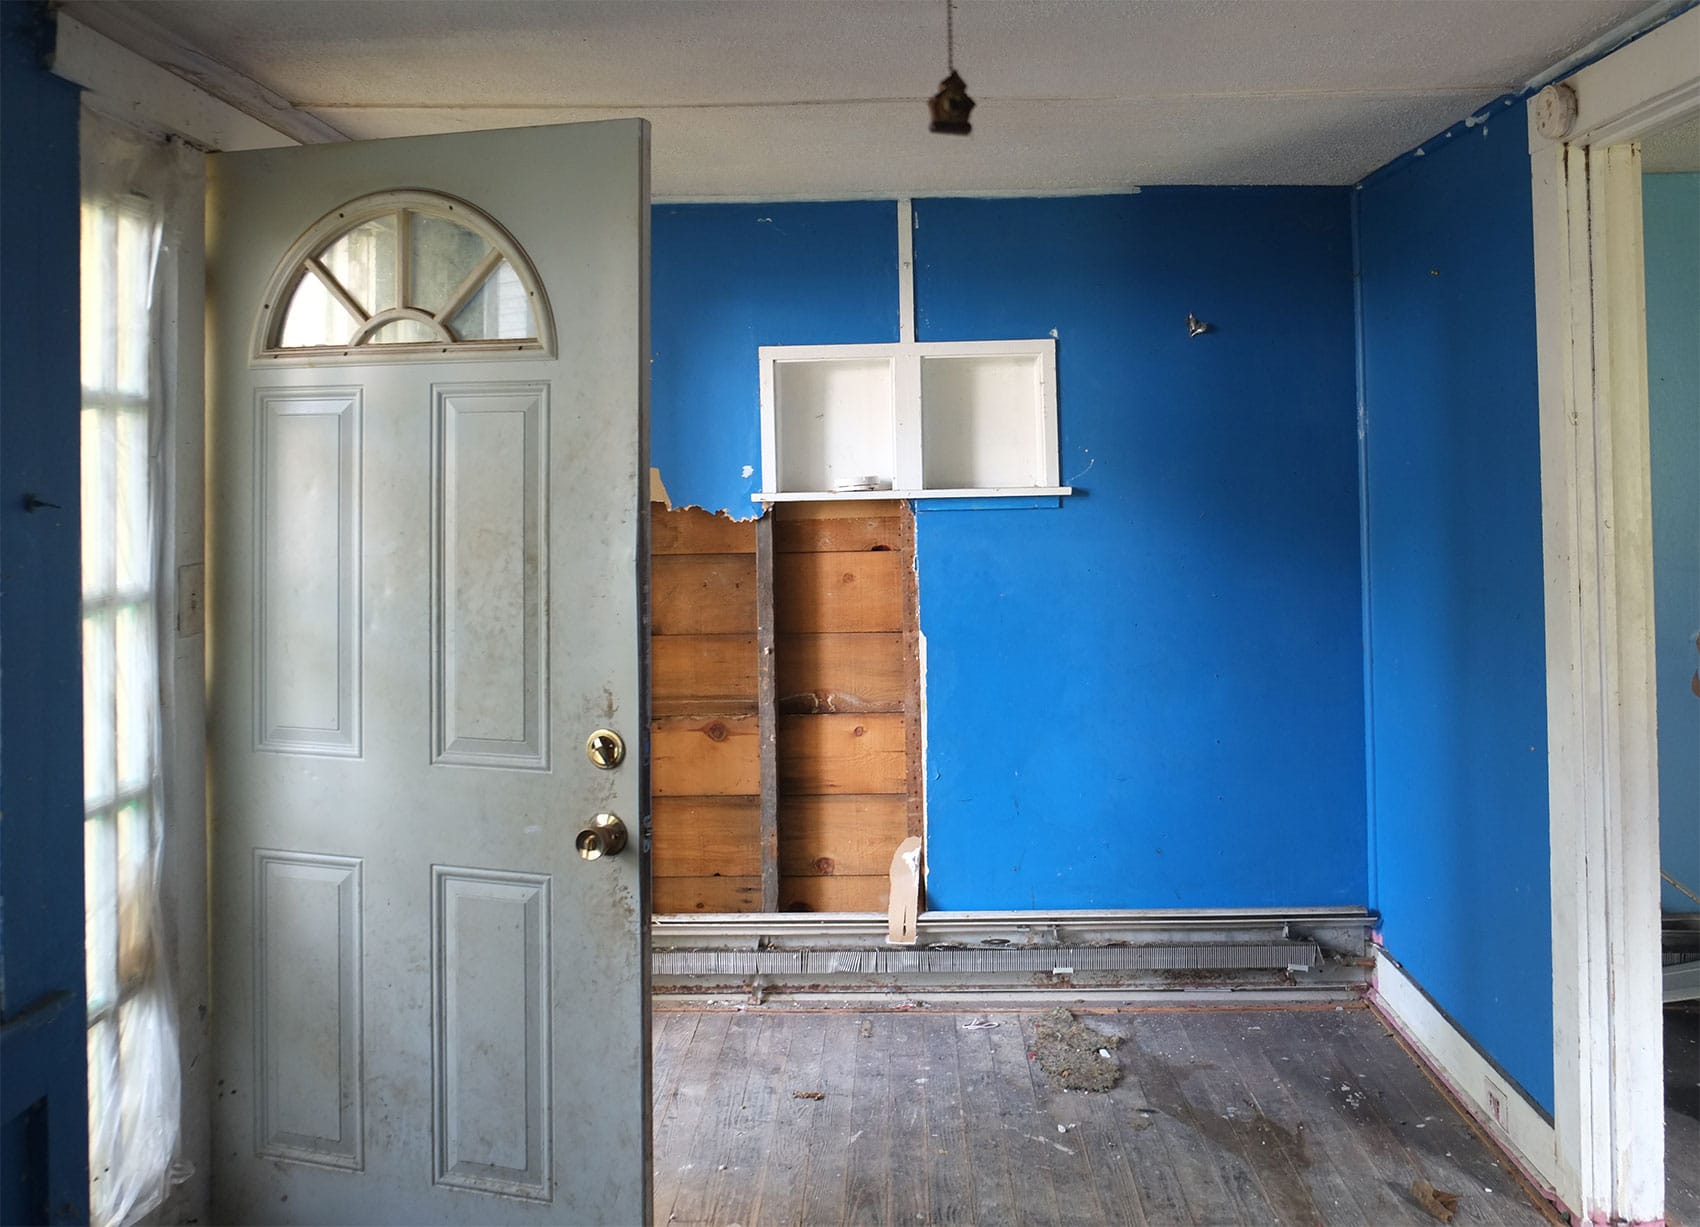
The picture above is of the entryway into the house (this room and the one behind it have now been combined into one living room) when I first bought it, and you can kind of see the flooring! We ended up having to pull up nearly all the original flooring on the first floor of this house to deal with the crawlspaces, but naturally I saved everything I could for future use! And now it is the future!
The original flooring on the first floor of the cottage was in rough shape, and it was different in the dining room and kitchen than in the front two rooms, which just made things feel choppy and disconnected. Sadly the dining and kitchen floors got tossed by accident during demo, so only the living room floor got salvaged. That flooring was in the best condition anyway, but I wish I had the rest of that old flooring right about now! Like any salvage rescue mission, some pieces get too broken to be salvageable, so you end up with less square footage than you started with. But after some careful measuring, it appeared that I would have enough of this salvaged flooring to cover the the whole kitchen floor!
Now, ideally I think the wood flooring would be consistent throughout the first floor, and my plan was to run it back-to-front rather than side-to-side to give the illusion of slightly more space, but that would require me to have enough flooring to cover the entire first floor…which I don’t have! I think I have a hook-up for antique fir flooring that can make that happen (IT WOULD BE SO NICE), but that was before shit hit the fan with the pandemic, which has thrown all of that into question because work has halted on the old building it was being removed from.
SO. SO SO SO. I switched gears. I decided the best use of the original living room floors (3.25″ exposure yellow pine) would be the kitchen, and HOPEFULLY the (2.25″ exposure) antique fir boards will materialize at some point for the living and dining spaces. Everything can run side-to-side, and it will be FINE. It feels appropriate for the kitchen to have a more modest floor, anyway. So that’s the new plan!
*Funny(?) note: I did some ultimately inconclusive research on whether to use an underlayment over the OSB subfloors, and decided it wasn’t a bad idea. So I raided the garage and came up with a partial roll of tarpaper roofing felt, and another partial roll of what I thought was a different roofing product that seemed comparably suited. Only later did I realize this second roll was not a roofing product, but weed-blocker landscaping fabric. So…fingers crossed that the dandelions can be kept at bay from growing on the kitchen floor? Quality work, Daniel!
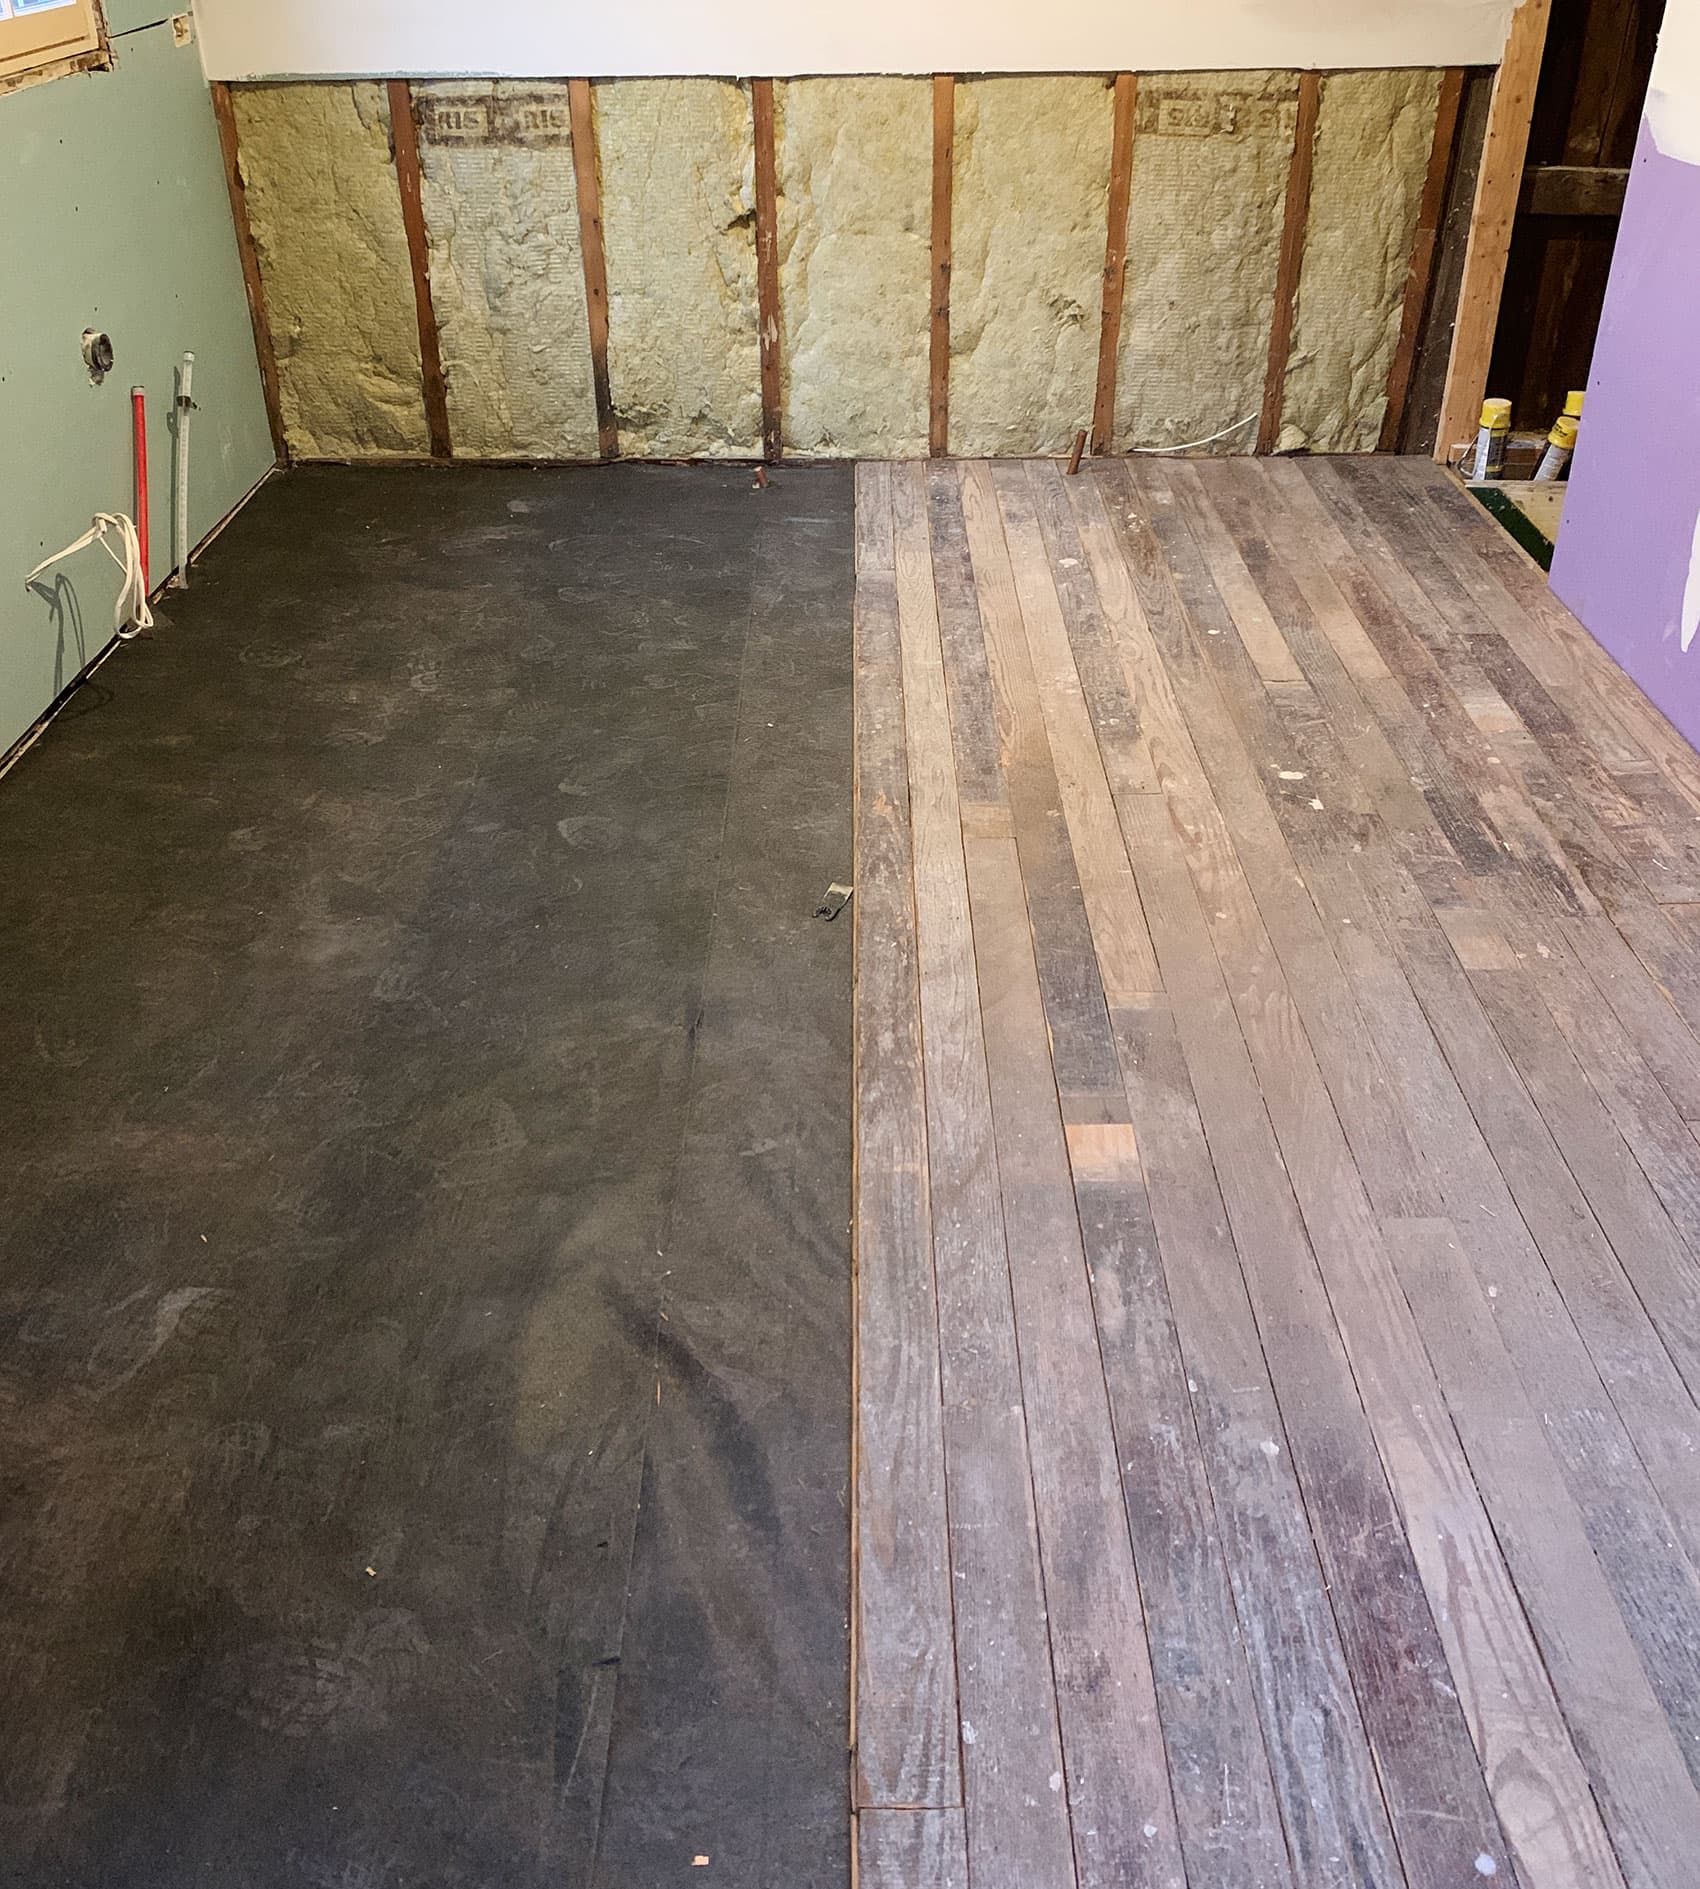
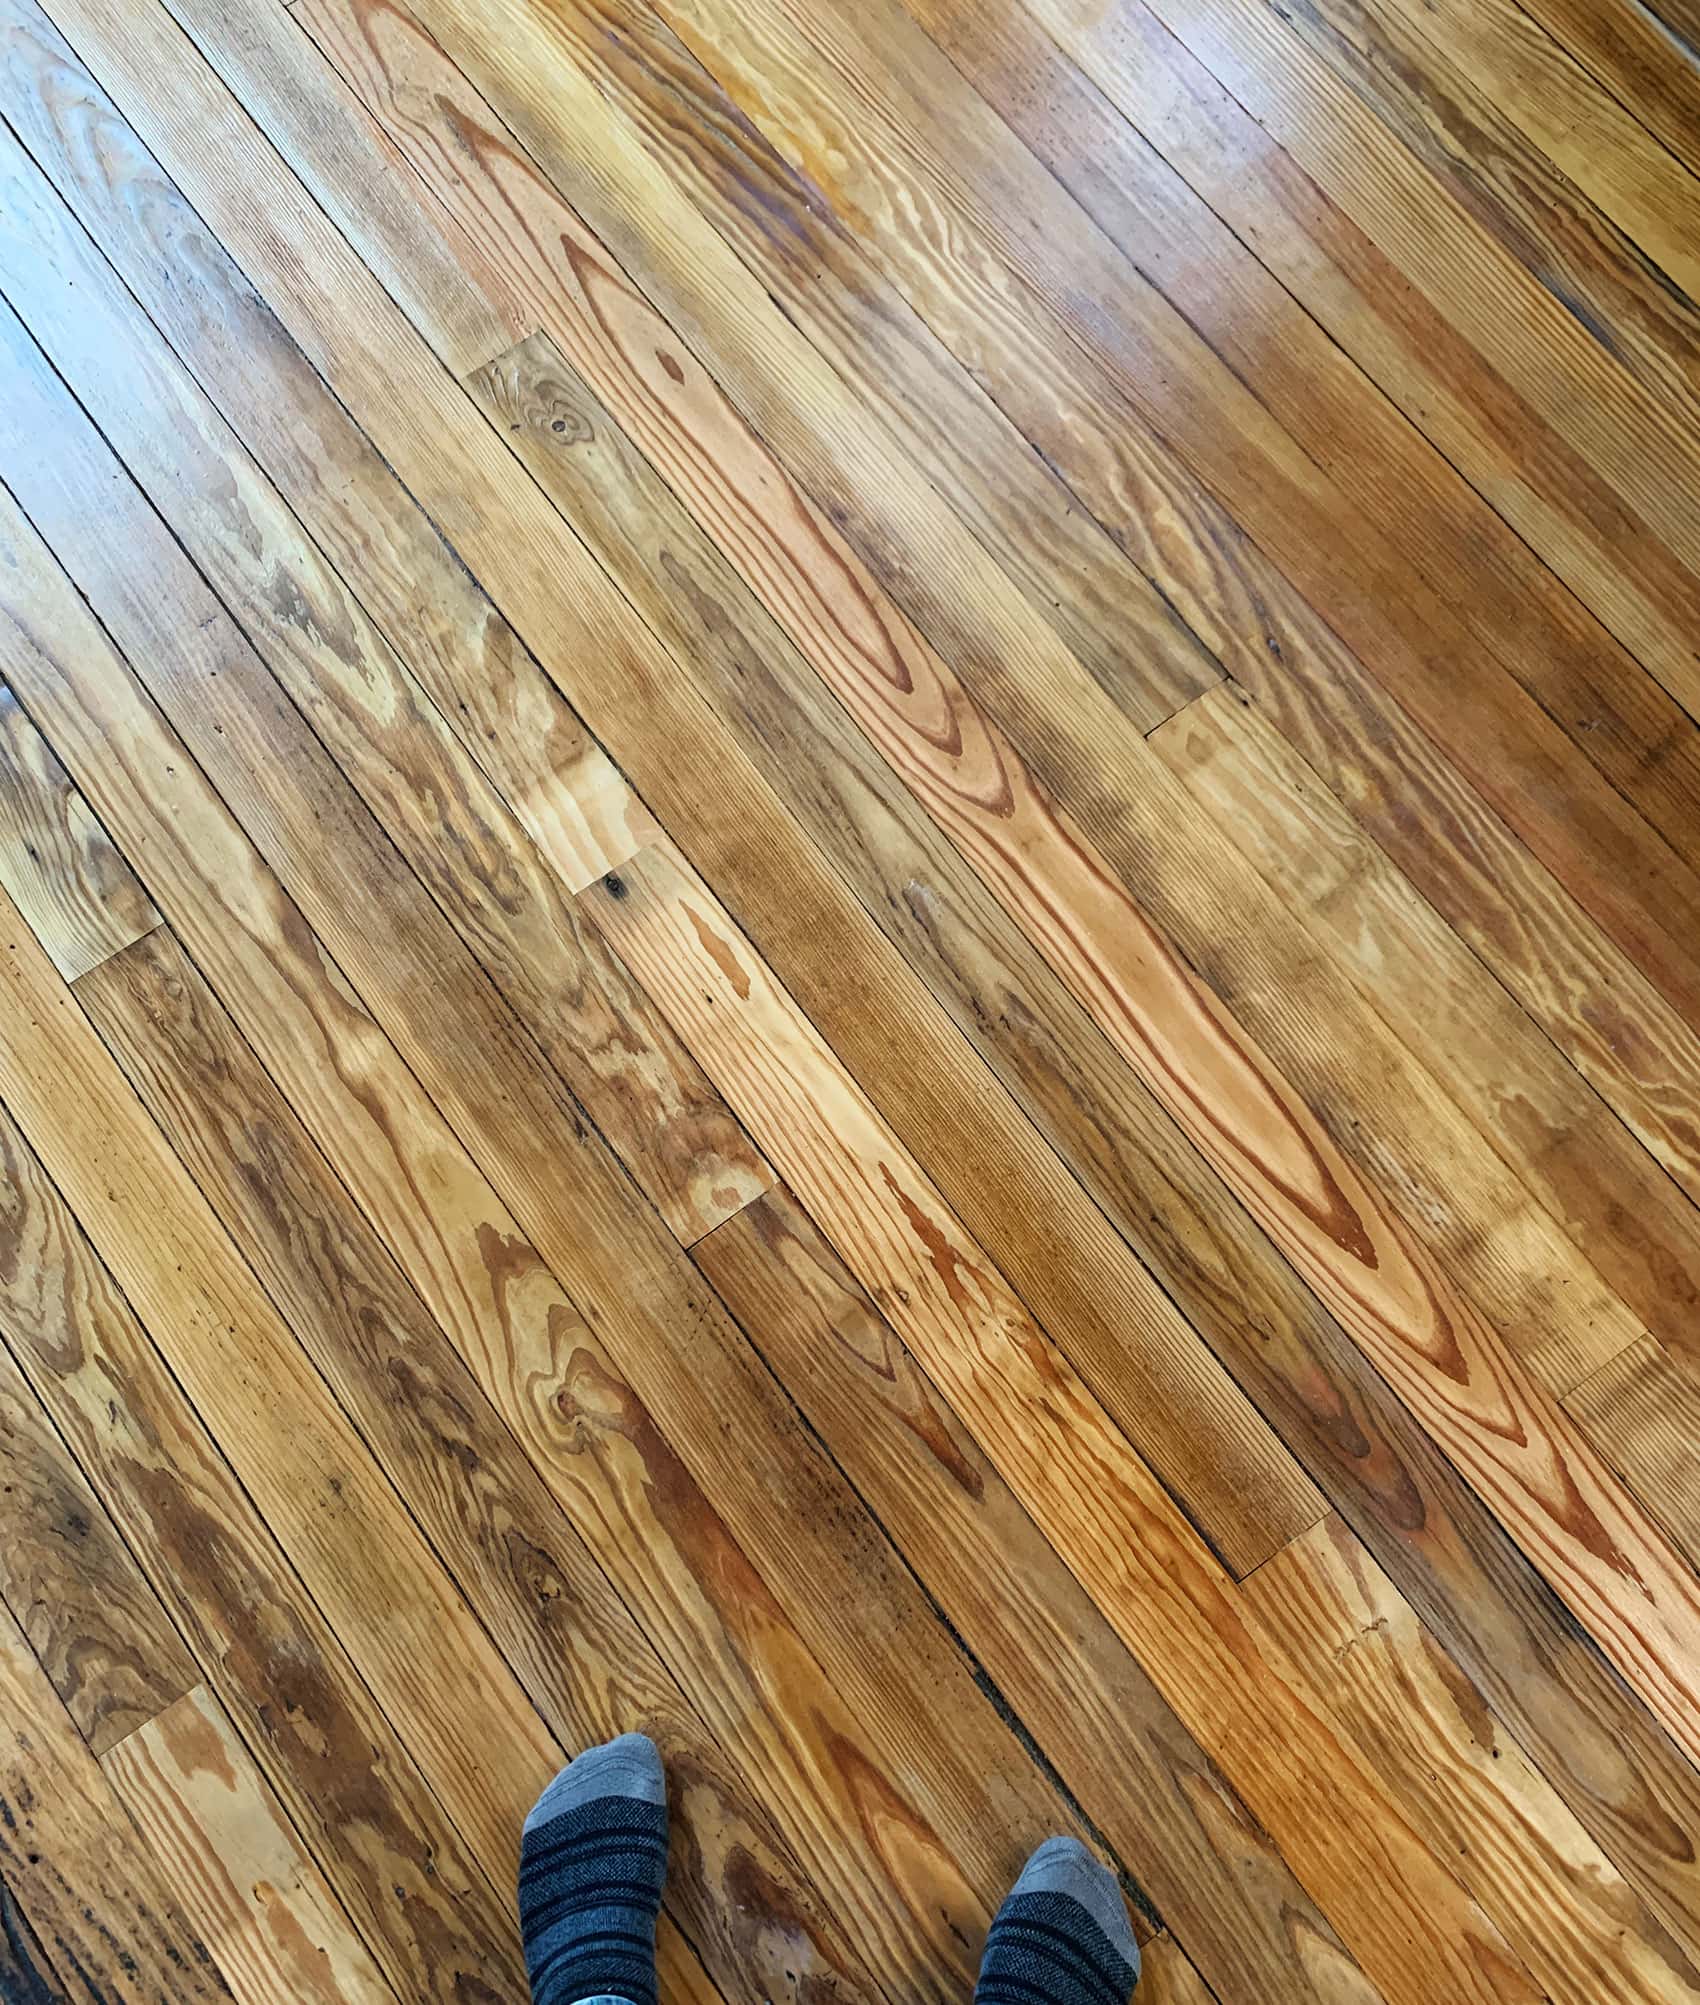
Laying the flooring was a labor of love, made much easier with the assistance of my quarantine-roommate Juliet! Each board’s tongues and grooves were caked in 100-ish years worth of dust and grime, so we used a wire brush and scrapers to clean those parts up before install. We spread it out over two days, and it probably took about 10 hours total to go from bare subfloors to this!
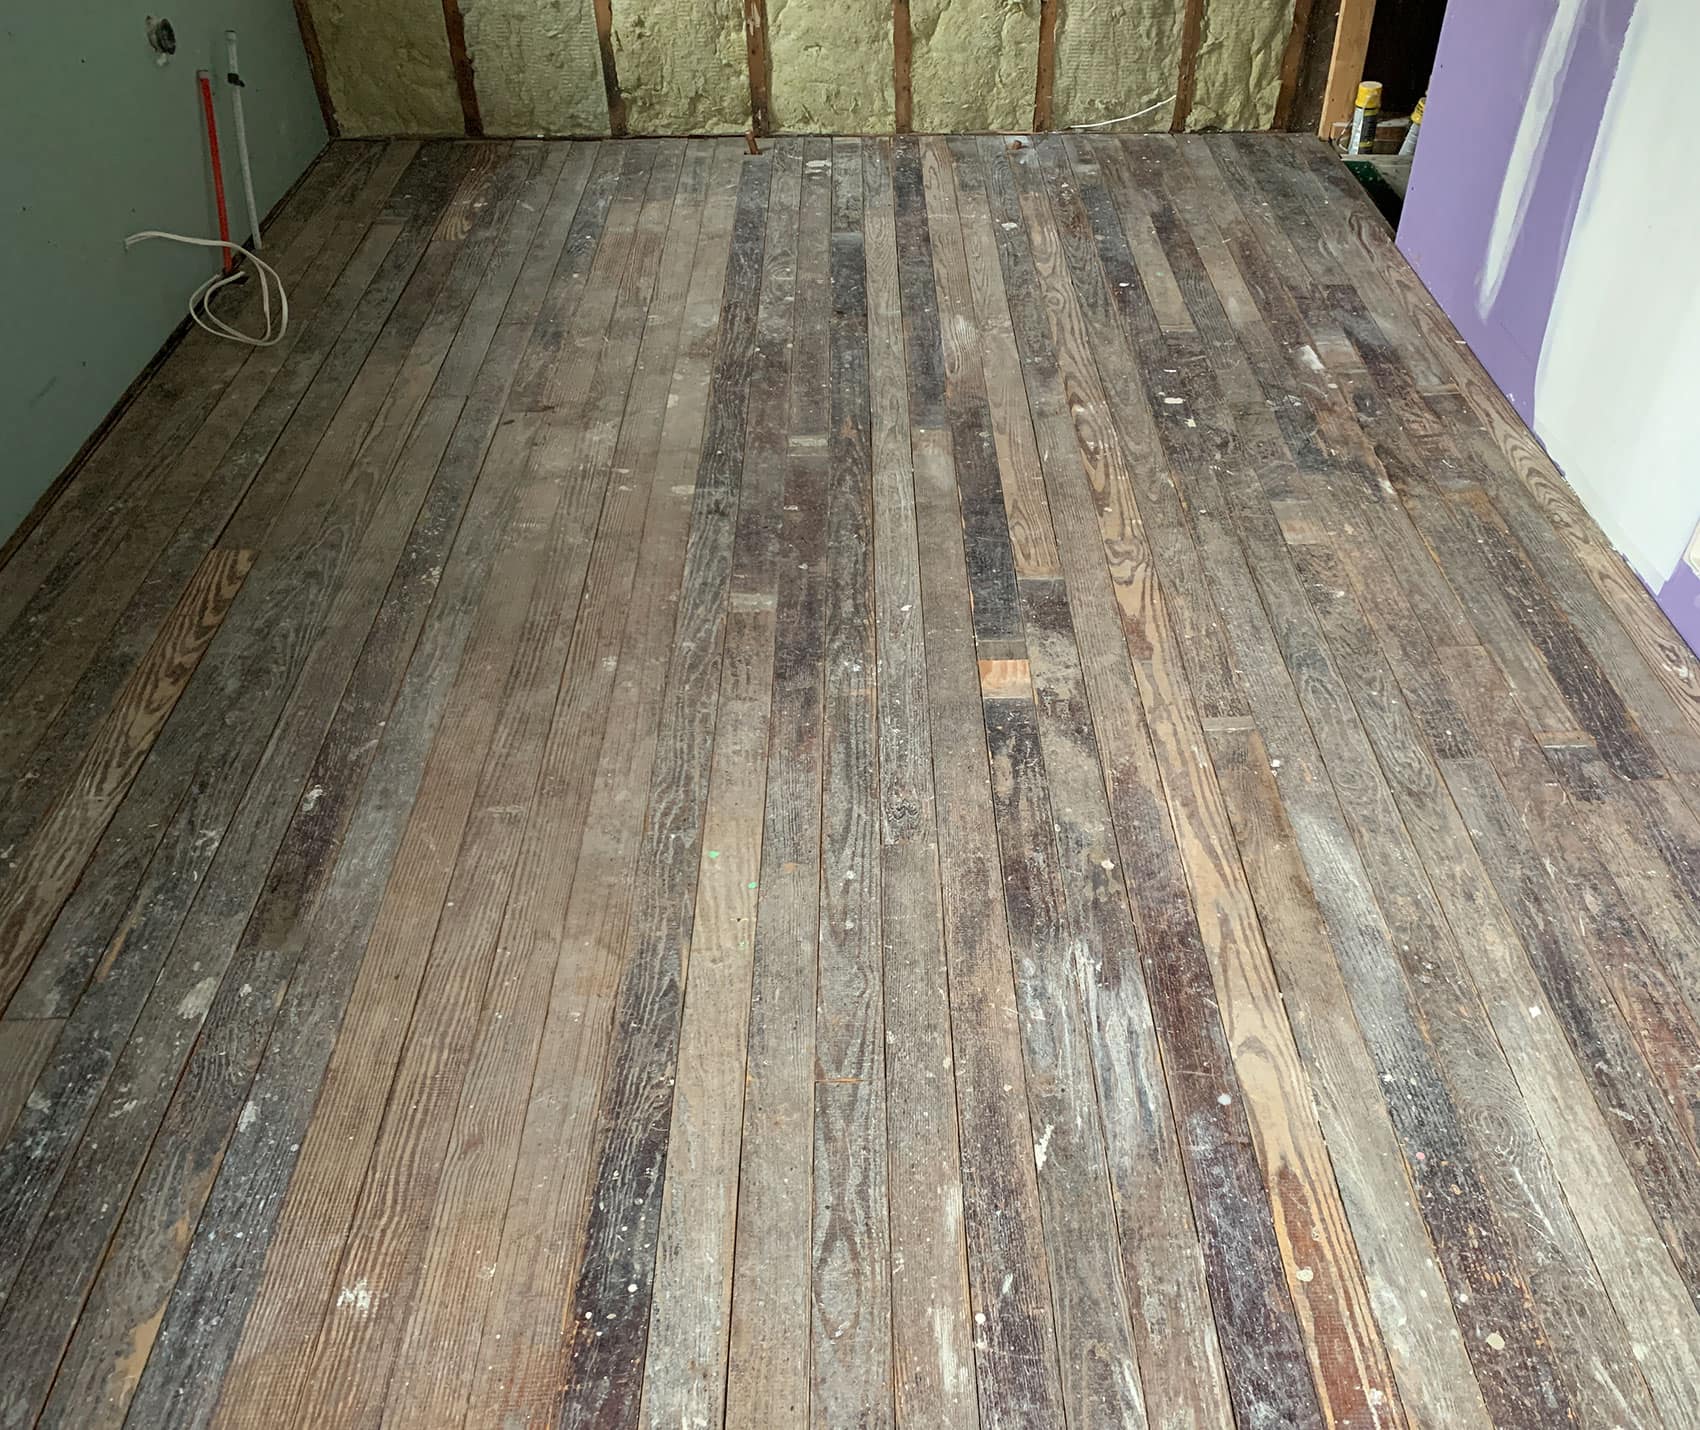
If you are not convinced, that’s fair. This was a haven of splinters and does not look good. But an hour or two with a rented drum sander later…
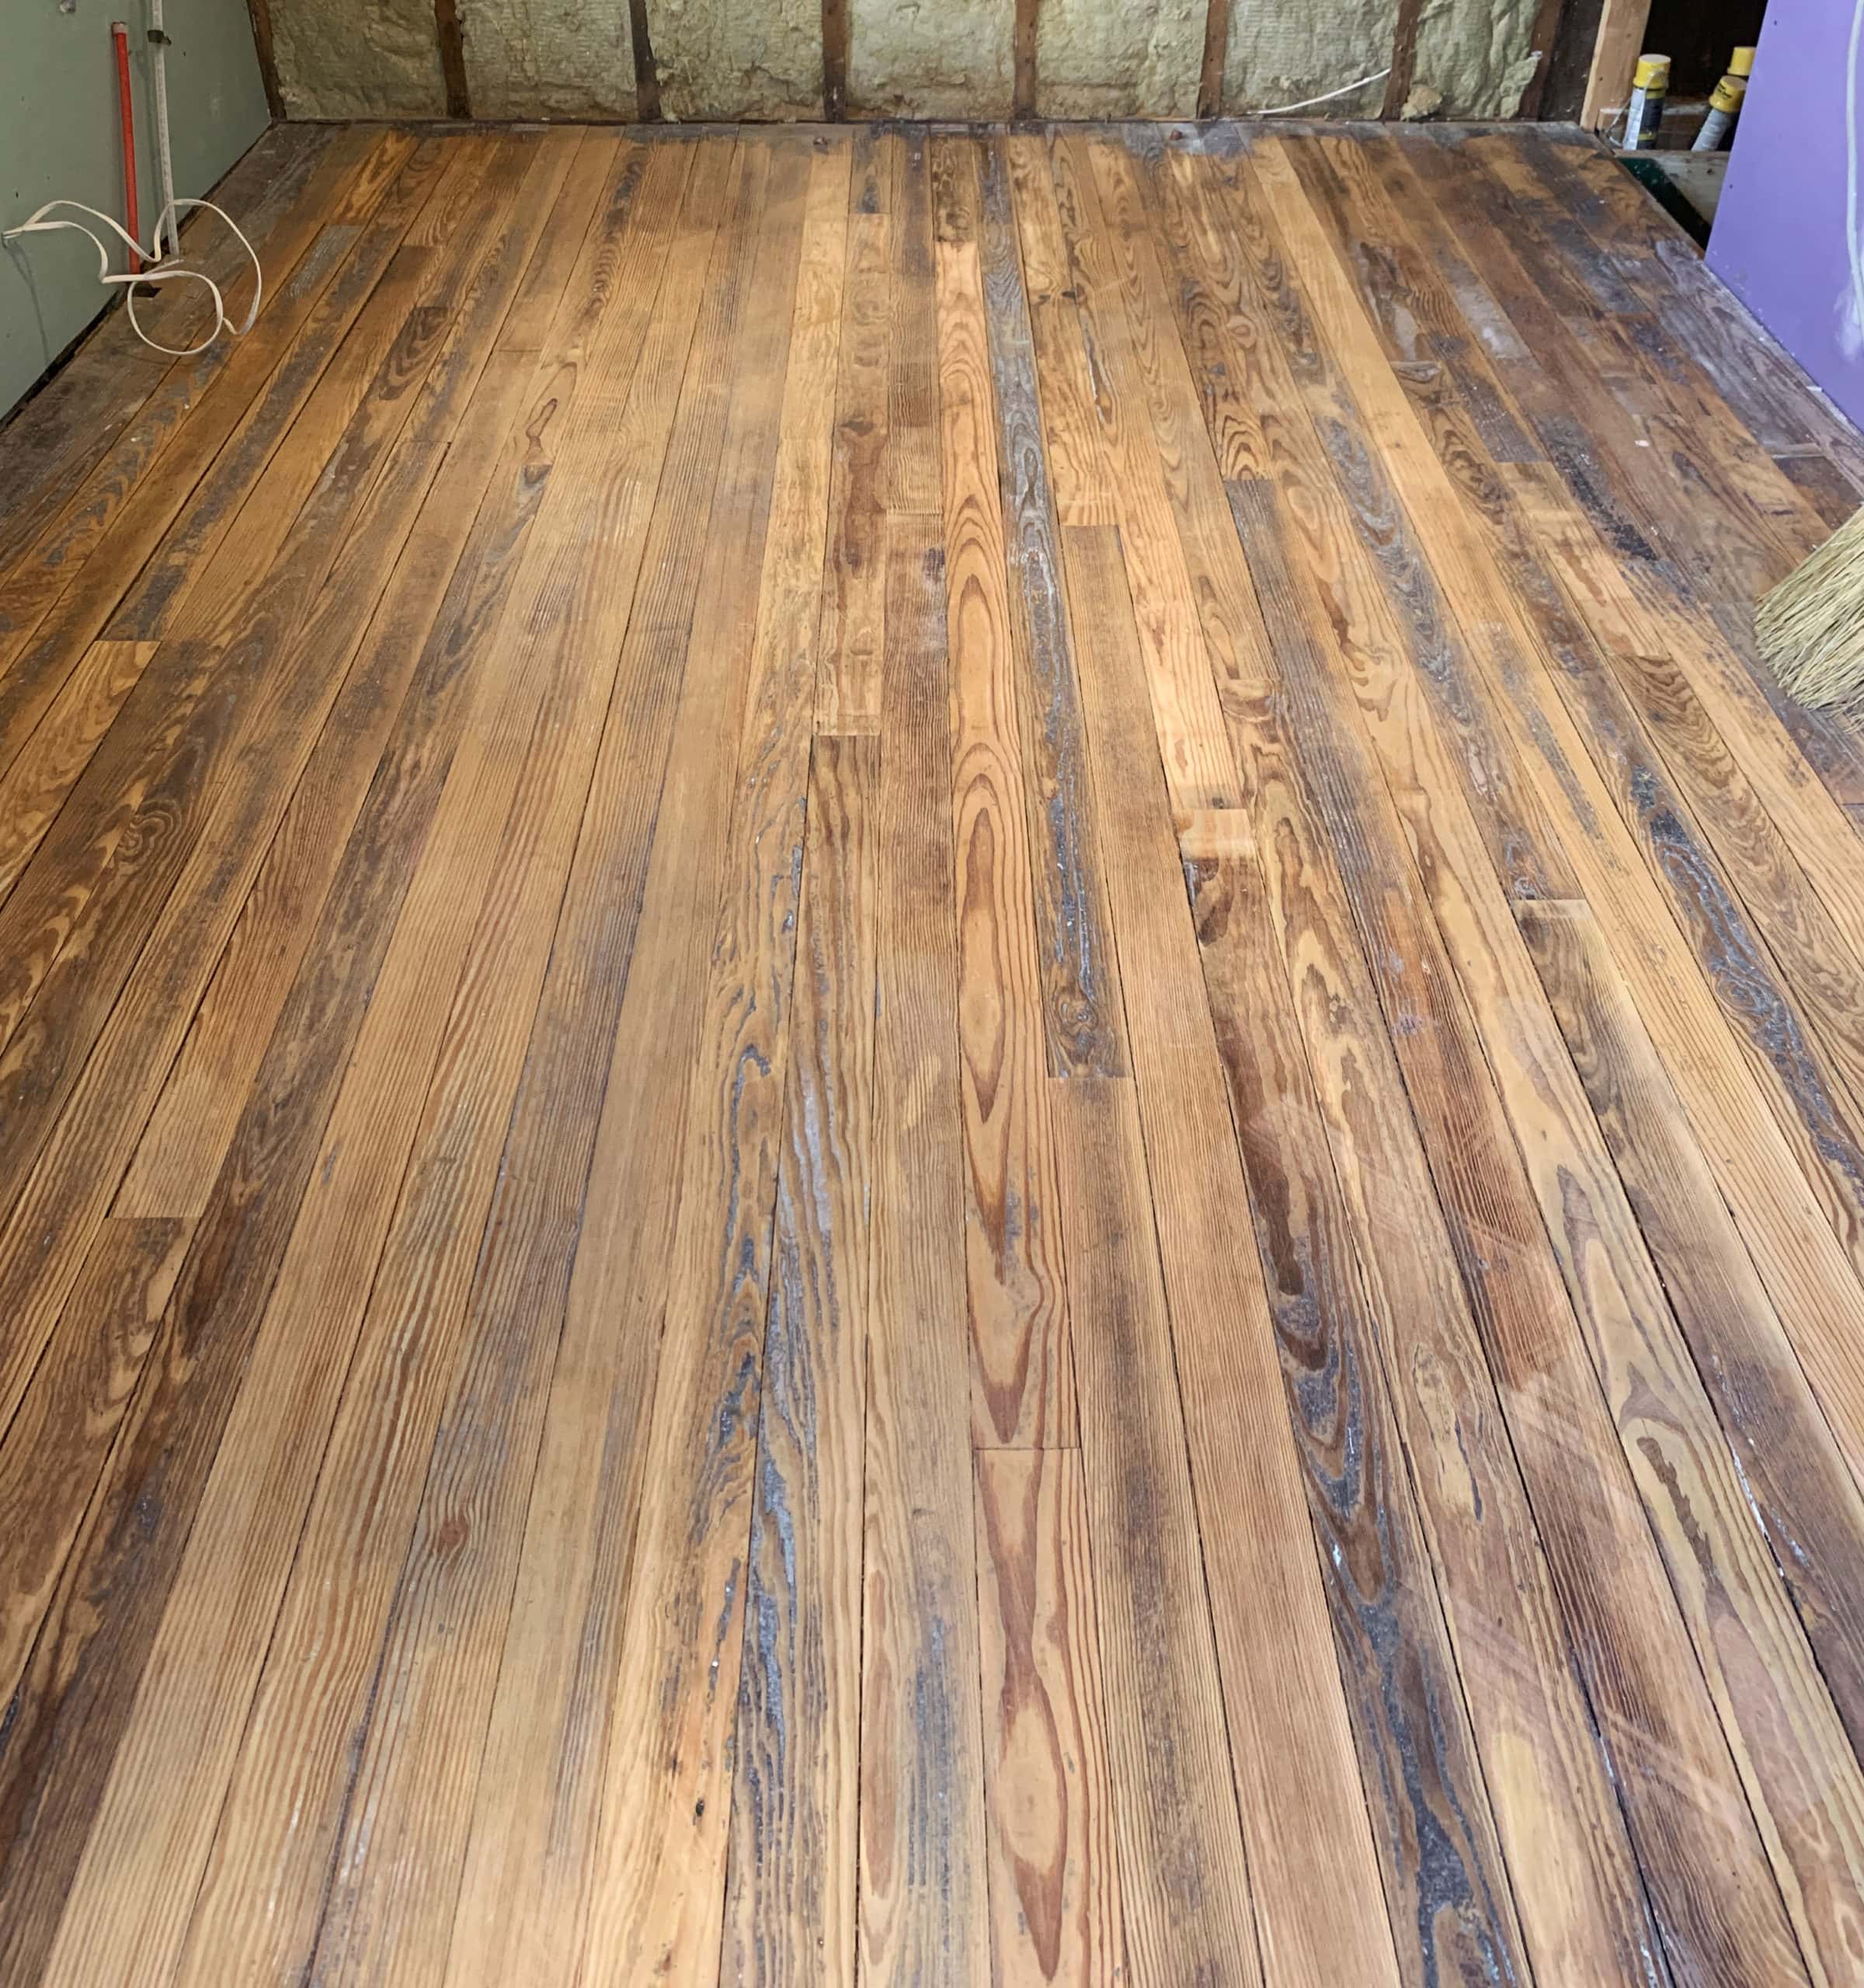
This is when things started feeling very exciting! Look at that grain! Look at that warmth! Look at that character!

This is about where I decided to call it and stop sanding! I don’t have a lot of experience refinishing floors, so I get nervous about taking too much off. What I particularly love about old wood flooring is how long the individual boards typically are, so some of these go all the way from one side of the room to the other! Over 15 feet!
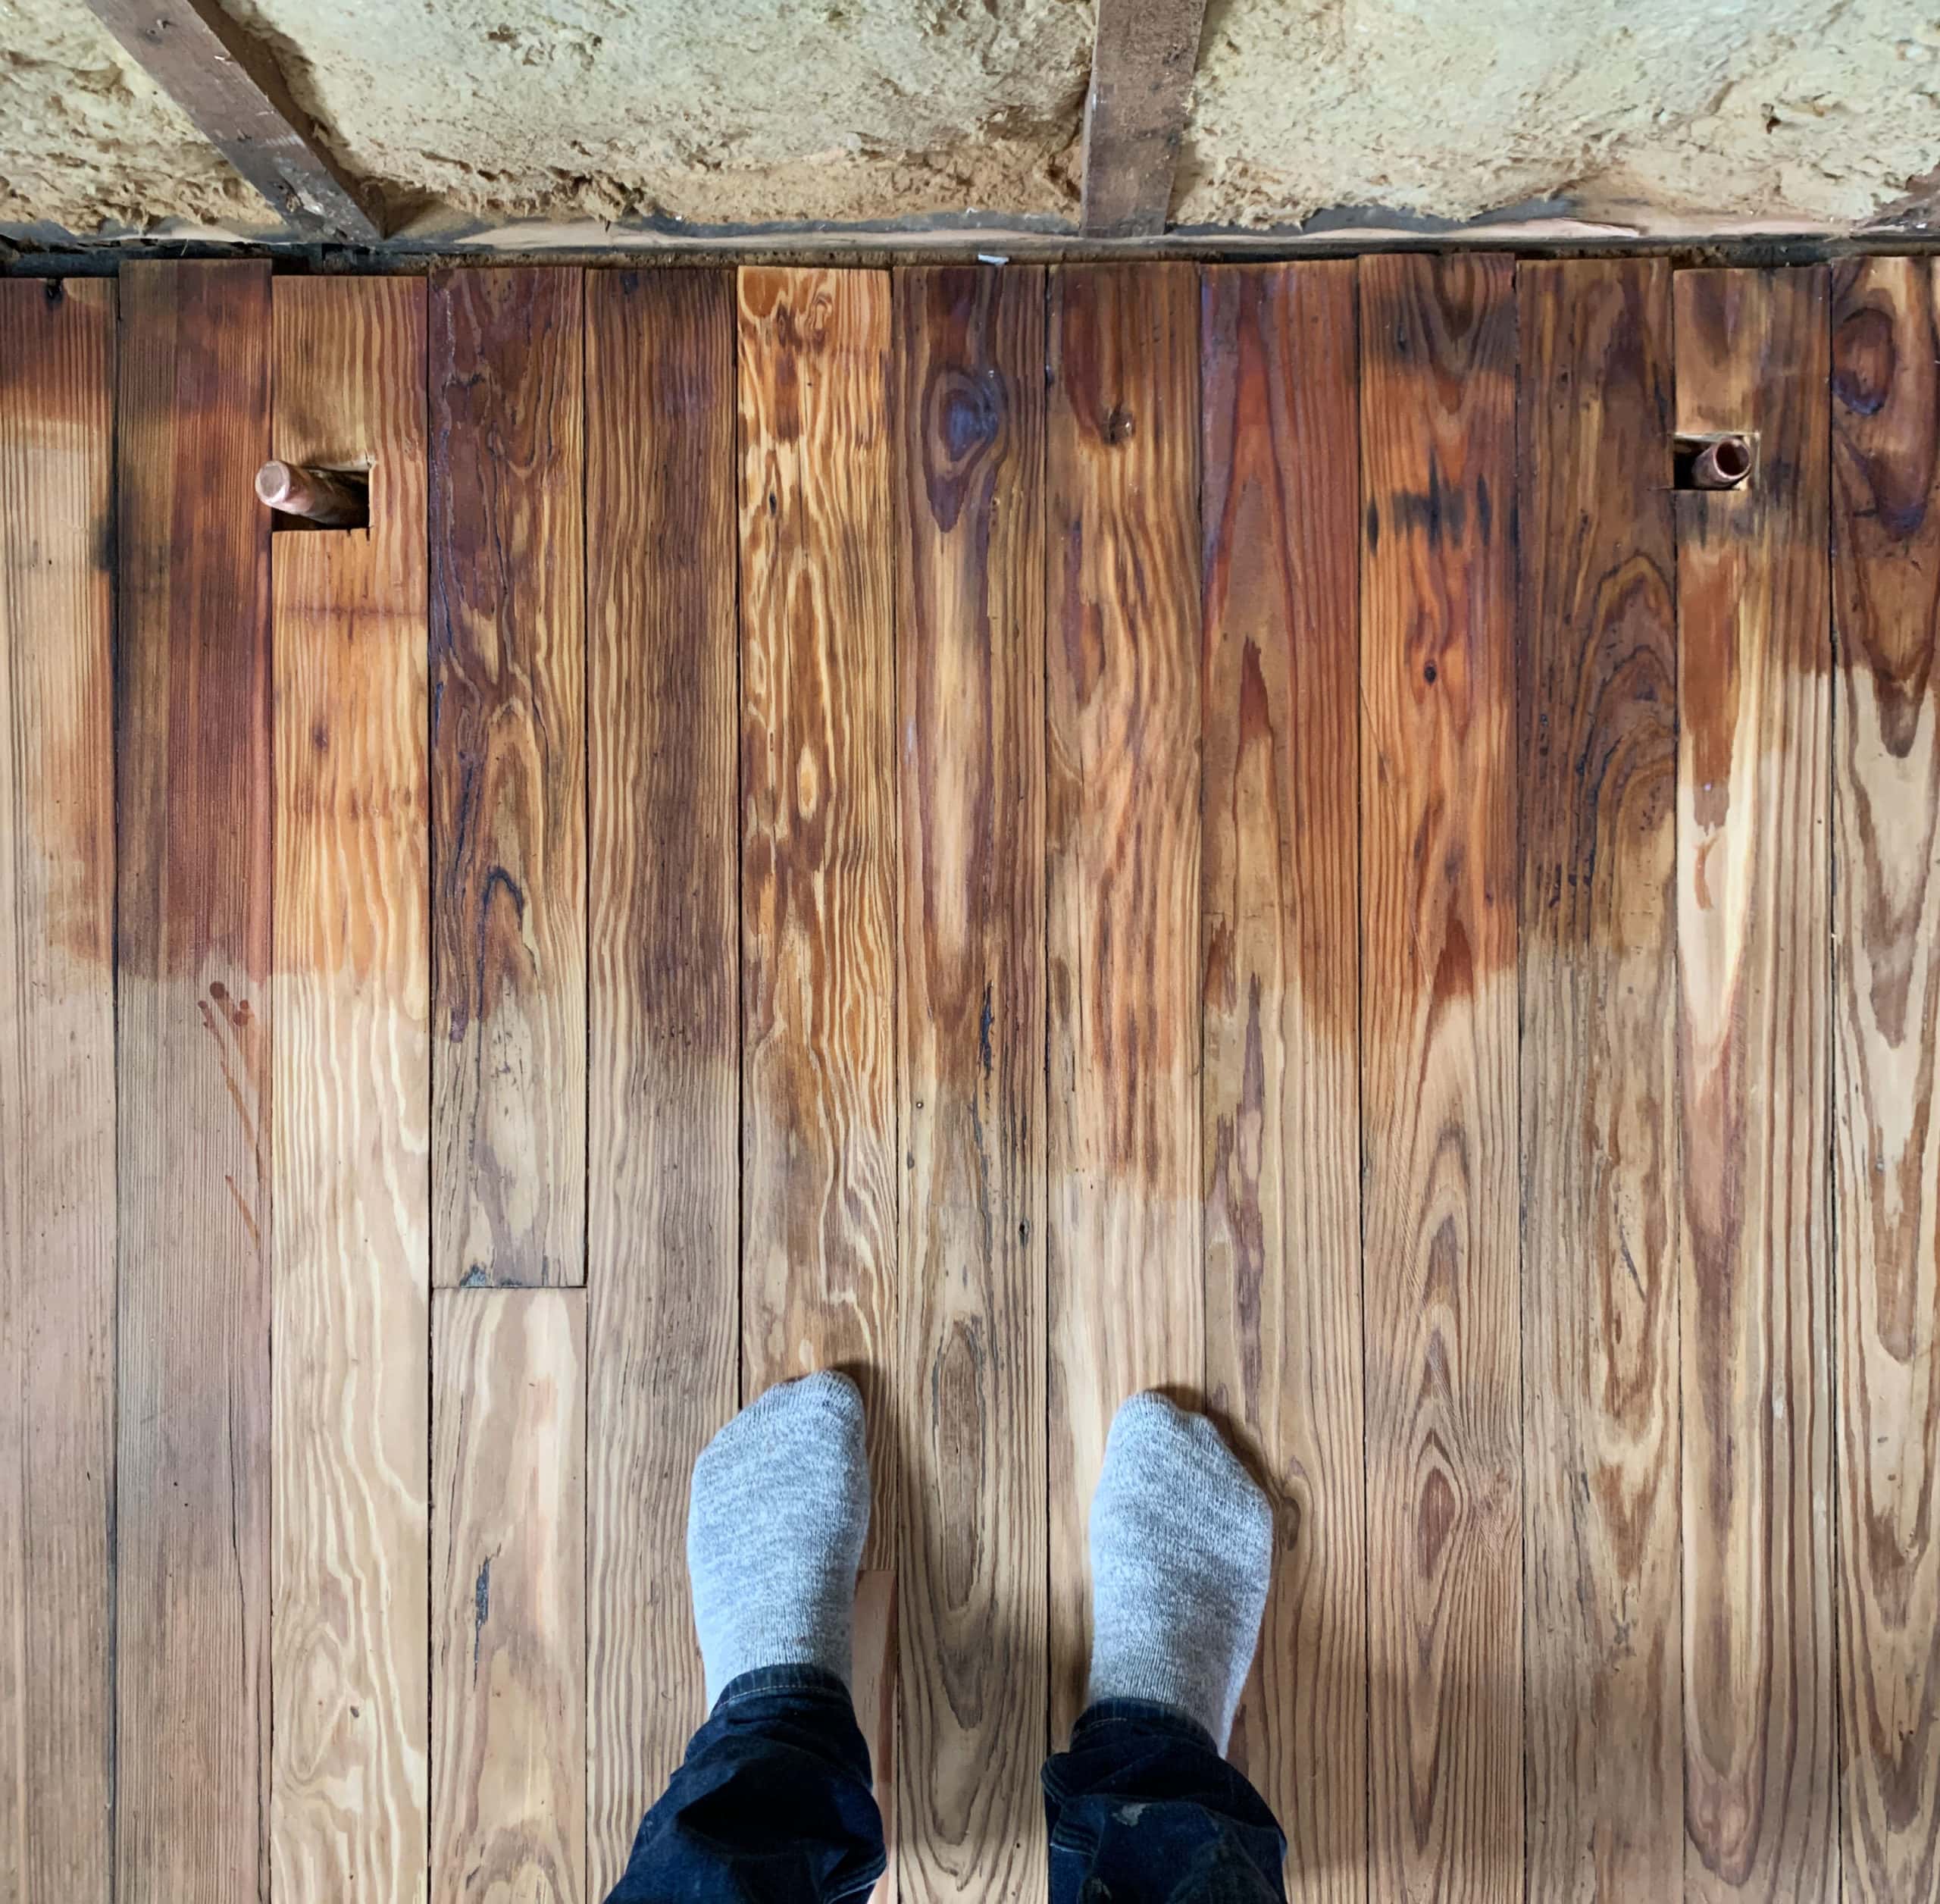
For finishing, I debated a few different things but ultimately went with sealing the natural color rather than try to lighten (or darken, but I don’t like the way pine stains so I never considered it) them—it just feels like that kind of house. So I fell back on my old faithful (which I had ready to go in the basement) poly—Bona!
There are various Bona floor finishing products, and wading through them can be confusing. The basic gist is this: first goes stain (if desired), then one coat of sealer, and then 2-4 coats of poly. The sealer can also act as stain if you like their options. I’ve used ClassicSeal and NaturalSeal in the past—ClassicSeal will make the floors look essentially the same as if you wet the raw wood with water, and NaturalSeal has some white pigments to preserve the lighter freshly-sanded look. There is a lighter option and a couple darker options as well.
There are options with the poly as well, but I’ve used Bona Traffic HD a bunch of times and it’s really an excellent product. Like an epoxy, it comes in two parts that you mix together to activate it. Application couldn’t be simpler, and it dries quickly so you can move on with your work without much delay. I like the satin finish! It’s sold at some retailers but not locally for me, so I always order it on Amazon—except that one time I found 3 gallons at the Habitat for Humanity Restore for about 95% off retail. Score!
Look how finnnneeeeee those floors look! I think the biggest challenge with this house is giving it back some historic character since everything is essentially brand new, and having these well-worn floors restores my faith that that’s possible!
I have a good feeling about this one. Hopefully the timing of these deliveries doesn’t throw things off, because I’m loving this momentum!
Are you tackling any bizarrely-timed projects during this global crisis? I’m curious how other folks are spending their time. As has become my usual habit, you can follow the ups and downs of this kitchen renovation over on Instagram Stories! Daily updates! It’s a raucous good time.


Beautiful flooring transformation. It’s great to see the pay-off of all that elbow grease (of anyone’s elbow). P.S. I’m on the west coast so I’m able to watch the IG stories saga with my first cup of coffee.
I’m in South Africa – I watch while my husband makes dinner!
Awwwww! It makes me feel so special to be part of your daily habits!
You have the best Instagram daily updates Daniel (and thank you to Juliet too) !!! and NOW you have written a post to the floor finish. LOVE. Looking forward to … the next stage of your kitchen rebuild.
Joy
I love the work you’ve done on this kitchen. Those floors are everything!
That floor looks amazing! I love following on IG stories and then reading the posts on the blog! It’s like watching the game live and then catching the highlights later. Beautiful floors! Can’t wait to see the rest of the kitchen!
The quarantine content we all need!! Also loving Juliet’s assistance on the Insta stories.
This might not be the right place to ask – but usually, your posts show up in my email and this one did not. Do I need to sign up again?
Yes, I also stopped getting email alerts, but it was since the redesign. I’m hoping he will add in an email subscribe button again!
Me too!!! No longer receiving blog posts in my email and I see no place to subscribe. Daniel, please help!!!!
Looking into that! Hang tight! (do you know if the last two posts did? trying to figure out if it’s a weird fluke or something that went haywire during the redesign…)
Not the OP, but I haven’t gotten any e-mail alerts about new posts since the redesign. (Which looks smashing!)
I haven’t gotten email alerts since the redesign either. And the redesign looks great! I just kinda miss being able to have threaded replies. I only have the option to respond to the OP now.
I haven’t gotten email alerts since the redesign, and then couldn’t find a new place to subscribe. I follow you on Instagram and FB so I am still up to date, but I love getting the posts in my email!
I so appreciate watching your work. I have my own 105 yr old house projects. I’ve always just thrown myself into learning what I don’t know to do a project, but there are somethings that still feel too much to try. You do a very good job of making things look actually doable (like floor refinishing). Thank you for that! One question – you don’t need poly vapor barrier behind the gyp board on the exterior walls?
Aw, that’s so nice to hear! To be honest I’m not 100% on the vapor barrier—I’ve read conflicting information and it seems to somewhat depend on climate. For a bathroom I’d certainly use it.
I am loving your insta stories; they are my quarantine Rx to stay sane. And so entertaining, from insulation, floors etc to candlelit dinners. Juliet, so glad you are there–adds another facet of comfort. Keep going you guys.
Rockwool sounds like a great choice for insulation; thanks for listing all the alternatives and explaining why you went with that.
The floor looks STUNNING! The long boards and that grain, so unique.
I just found your site, because I was sure that was Rockwool going up in your remodeling project. I loved how you summed up all the different types of insulation. I just did the same research as you did last fall, as we had a major unexpected electrical problem that moved up our gutting our house one room at a time. I agree with everything you said but my husband wasn’t to sure about Rockwool until he started working with it, and he’s now sold on it! It’s the easiest insulation he’s ever worked with and he loves how he can handle it without gloves, and that it fills the bays of the stud walls completely. We’re excited to see how it changes our heating bills as we slowly work our way through our house.
Loving this kitchen reno! HGTV in real time :)
It’s not a house project (and it’s not totally unexpected), but the nonprofit I run in Georgia has received nearly 100 requests for bikes for essential workers in the past 36 hours. We recondition donated bikes for those in need, so it’s time to get working!
Wow, that’s wonderful! Do you have a link to your non-profit you’d like to share? Maybe we can get you some more bikes!
Of course — thank you, Daniel! We’re Bike Walk Savannah, and our website is http://bikewalksavannah.org/.
We’re trying to focus on ready-to-ride (or nearly ready) bikes at the moment, but are also accepting financial contributions to support our programs. There are also a lot of other programs operating similarly, including Transportation Alternatives’ “Bike Match” program in NYC and BikeMatchDC. So no matter where you are, people can find a way to help out! <3
Tell me again who Juliet is? Is she an out of work Broadway star? Seems to have the voice! Anyway, out of work as an interior painter so I tore a surround off a chimney to expose brick in my room and then skim coated the walls to fix terrible texture done by previous owner. Caulked and primed and painted it all. Looks fab. Moving on and doing same thing in our library. Fixing bad walls, recaulking painting. These are things I never have time for because I’m always doing someone else’s house. SO satisfying. Adjoining bathroom also getting redone. Yay quarantine! (Who says that???) Kitchen looks Fab!!!
Juliet is my old friend since high school! She does have a fabulous voice and is a musician normally! Unfortunately the pandemic has meant show cancellations and various recording delays, but when she’s not messing around with me she’s writing music and playing piano and filling my house with song! It’s lovely! (don’t feel alone in the yay quarantine! while obviously the reason we have to do it is horrible and tragic, I find myself admittedly feeling jealous of family members who are “SO BORED” at home. CANNOT RELATE.)
Um…may I quietly pipe up and join you in the ‘yay quarantine’ chorus? I feel pretty bad about it, since I have lost work in my most lucrative season and many friends have been laid off and every friend with young children lost their mind maybe 17 days ago, but for the first time ever, I have the time to cook and bake and appreciate my spring garden & use up my bolting winter herbs & veg, and the reduction in traffic means I can work the hours I want to work (I’m a professional gardener) instead of idling in nonstop traffic for hours on end. I am really loving this more sane pace of life, despite everything.
Such a nice finish! I really think you stopped sanding at the right time. I love that this room is coming together, and very curious how the view out the kitchen window looks! It feels like this space will really set the tome, I hope it matches that exquisite basement. I just love the basement. So cute in a Wes Andersson type of way. You should invite Bill Murray to a photoshoot doing his laundry. Inevitably many large white undies on the drying rack. If you could get a kitchen to fit Gustave H that would be spectacular! =)
Hahaha! Well now I have a new goal!! :)
The link for the stove took me to electric, oops.
Free is good. For the radiator use a thermostatic radiator control valve, they allow the heat to be balanced and controlled at the radiator without return runs and added complexity.
Keep the Marble for your kitchen and do quartz, it will appeal to more buyers and better ROI.
The floor looks great and my fingers are all crossed that you can get the marble after all! #teampatina
Gorgeous!!
We used Roxul rock wool insulation under the floor of our cabin a few years ago. I did most of the work myself, and it really is so easy to use.
But I also discovered that even if it gets soaked with water when you accidentally flood the laundry room, the insulation can be removed and drained and dried in the sun and reinstalled! True story!
Oh, you are doing the cottage kitchen–I thought you were re-doing your own, as you had mentioned that in the past. I am so glad it is being done while the home is unoccupied. I find that very handy, myself. One feels less pressured to finish.
I’m sorry that I didn’t know you were wanting used wood flooring. We had about 3000 sqft of it at one point and had to pay to have it dumped. Ah, well–it probably was too far to drive, anyway.
I hope that if anyone has been inspired by you to do a reno that they will let you know if the flooring has to be removed. It is always good to reuse when possible.
Daniel, I always learn so much good stuff from your posts. Thank youuuuu and congratulations on the spiffy site update.
Another great blog post to accompany stories. All the heart eyes.
Looks great! But how do I get new posts on e-mail?
When I saw the post about used flooring from one of your followers, it made me think of an idea for your next project. What could you build from leftovers from your fans?
How do you find these types of finishing on floors hold up to dog nails? We just bought an old home where the owner used a very dark stain, and every dog nail makes marks. I feel bad considering linoleum, but I can’t stand the dog nail impressions everywhere
Hi Daniel!
I already tried to leave a comment/question but not sure it went through, so I’ll try once more… Just wondering about the douglas fir and whether you tried it in another area, how close it looks to the antique pine, how you finished it, etc, and finally: where you got it from. We’re in the same situation with not enough old pine flooring to do our openish plan first floor.
Apologies for the very slow reply! I haven’t used the douglas fir yet in this house, so I can’t really say! Salvage fell through so I think I’m purchasing new from our local lumber yard, who carries doug fir tongue-and-groove (3 1/4″ exposure, I think), and finish it with Bona Traffic HD, likely with a little stain to keep it from looking so brand new. I have used it in other projects and it’s nice stuff! I’ve seen people force a small gap between some boards to give it a little more of an old house feeling, which I don’t mind!
Hi Daniel! Thanks so much for the reply! I didn’t mean to say YOU were slow in replying, I was just dumb and didn’t realize my first comment was in moderation for a bit. But great suggestion on the douglas fir with little gaps to keep it from being too perfect, I will definitely check it out. Also, your bluestone kitchen is the stuff of dreams!
good info here on insulation that i truly never thought of. also i was surprised that the local building dept had to approve/inspect the insulation! i wonder if that’s standard for any home reno or just when you’re getting everything?