

I’ve never really been a fan of stopgap measures when it comes to renovating and decorating. If I have some sort of grand vision for a space that will take a while to accomplish, it’s just not in my nature to spend any additional time, money, or effort to do anything makeshift of half-assed, or anything that I’ll eventually have to undo, thereby creating more work for myself down the road. If it isn’t directly in the service of the final goal, you can usually count me out.
This is why I’m more or less OK with living in squalor, as long as there’s a bright beacon of hope somewhere in the distance. As long as I get from Point A to Point B at some point, what does it matter how things look in the interim?
But what I’ve found in the kitchen is that it does matter. Each additional thing I’ve decided to do to it requires hours of work, not to mention added expenses, and after a year and a half, I just got totally tired of cooking and living in a space that just felt so rag-tag and unfinished, particularly after all the work I had put into making it better (like replacing and adding cabinets).
So, one weekend several weeks ago (camera troubles delayed this post a while, sorry!), I just decided to pull my shit together and do everything that I could do for the kitchen without dropping a bunch of money. I knew that some of the work would only make an appreciable difference in the short term and I’d be spending a little extra money and effort, but it just got to a point where that felt very worth it.
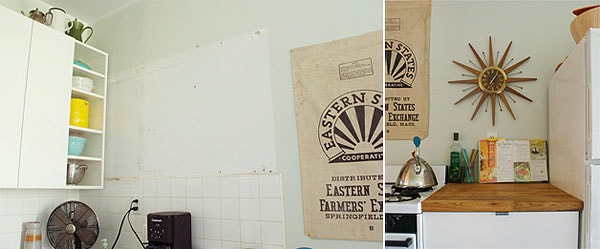
The biggest issue, aesthetically, was this back wall behind the stove. After removing and replacing the upper cabinets, the wall had this big unpainted section and tons of holes, and it didn’t help that at some point I decided to tack stuff to the wall just to…fill the space? I don’t know why I did that. Also, when I painted the rest of the kitchen, I left this wall unpainted because I ran out of paint and figured that some of it would eventually be covered in tile, anyway, so there wasn’t too much point in worrying about it. But one can only live with greasy seafoam green paint for so long before it starts to wear on you. This kitchen has been through some seriously sad times under my care.
The first order of business was removing the crap on the wall, patching the holes, and finally finishing the painting. I did have to buy a new gallon of paint (Benjamin Moore’s Dove White in matte, from the Aura Bath and Spa line) to make this happen, but FINALLY eliminating the last of the previous tenants’ paint was such a relief. Seriously, I cannot recommend this enough: even if I’d done nothing else, just whiting everything out made the space feel so much bigger, cleaner, and fresher, and it really only took a couple hours from start to finish. Paint really is the easiest and cheapest way to refresh a room.
The other thing was lighting. I had a plan for the lighting AND the lights themselves, so I figured I might as well hang them already and stop moping about how bad the lighting was in the kitchen. Having a good lighting plan goes a really long way toward making a kitchen feel more functional and finished, and I was tired of the two existing overhead lights that were super unflattering and made the kitchen feel overly sterile and prison-like.
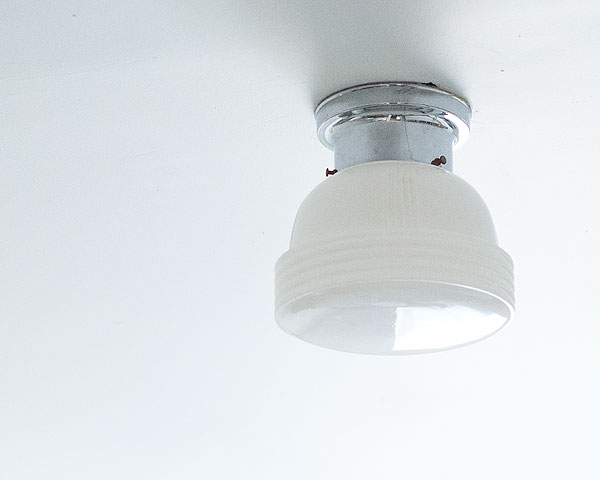
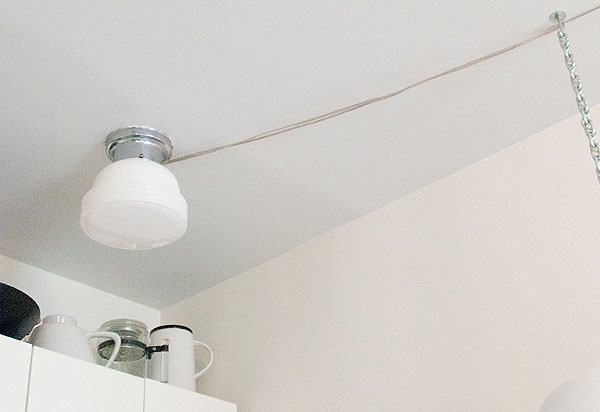
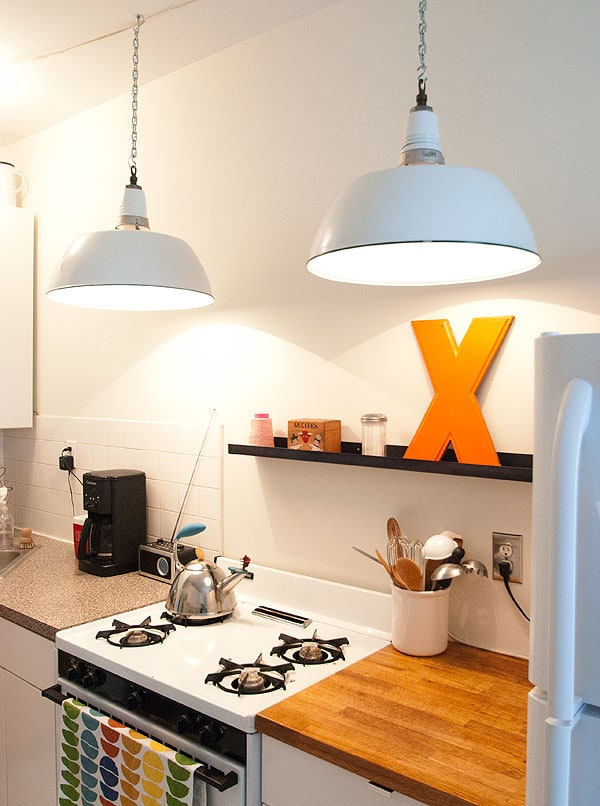
First, I replaced both of the overhead fixtures with these vintage lights that I bought in Buffalo over the summer at a weird yard sale. They were only $5 each, and I liked that they were kind of boring and understated, but a style that would play well with the dramatic pendants. Since the pendants are such a big presence in the room, I didn’t want anything that might compete.
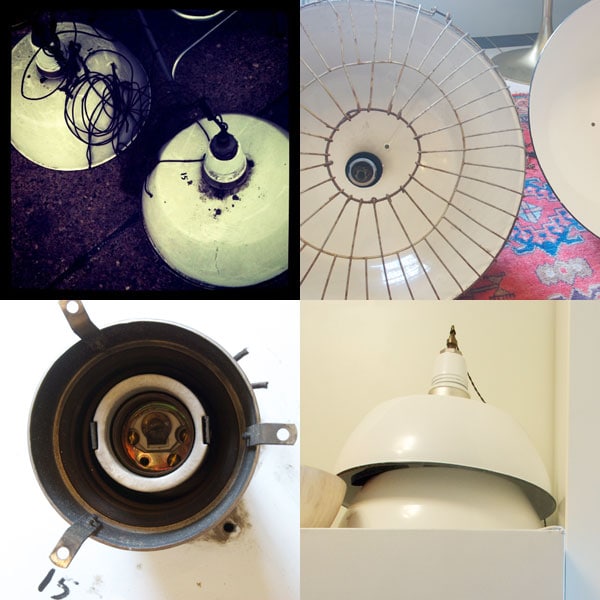
And then there were these lights. You might remember them from this post a while back. I bought them when Max and I were up in Buffalo in June, 2011 (OMG, SHAME), with absolutely zero plan of where I’d use them. They were $50 a piece, but even underneath all the dirt and grime, I could tell they were super amazing and something I’d keep for a long time, so I went for it. I love the detail work and substantial nature of the vintage hardware, and you can’t really go wrong with vintage industrial enamel. Right?
Only one of the lights had its original cage, which was a little bit too industrial and creepy for my taste, so I opted to discard it. After a good cleaning, both lights basically looked brand new, so all that was left to do was rewire and hang! Easy! So I put them in an awkward pile on top of the fridge for the time being.
And there they sat for a good year and a half (give or take a couple months), which I spent waffling over exactly where and how to hang them. There was something very intimidating about deciding on mounting hardware, the mechanics of rewiring (and wiring into the existing ceiling boxes), and picking the chain to suspend them from, so I just avoided it altogether. Eventually, I talked the whole thing out with an Ace Hardware employee and MADE. IT. HAPPEN.

I was a little worried that the scale would be totally out of control in the space, but I LOVE them. They’re a little unexpected and make a huge visual impact, and I think they’re just really beautiful as objects.

The chain is a basic thick steel chain from Ace, which I was able to cut to size using my little Dremel tool after figuring out exactly how low I wanted the lights to hang. I probably could have figured this out before going to the hardware store and saved myself some work (and waste), but I’m dumb.
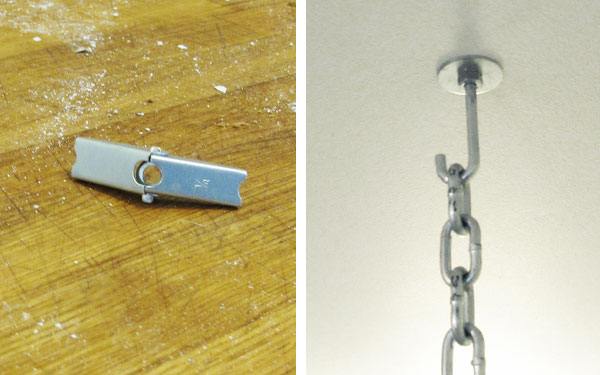
Because these lights are super heavy and I wasn’t able to screw them into studs, I bought these heavy-duty 1/4″ toggle anchors. The anchor is inserted through a hole I drilled in the ceiling, which a big washer covers, and then a nut keeps it in place. (Here’s a really good video on how toggle bolts work if that’s confusing!)

After hanging the lights, I just threaded the clear plastic wire up the chain and across the ceiling to the ceiling box. These flush-mount fixtures happen to have a hole in them for cord to run through already, so this part was pretty simple. I’m still not totally sure how to deal with the exposed wire running across the ceiling, but I think I’ll probably end up using some kind of cord channel and just painting it with ceiling paint.
Again, the whole thing took an hour or two, and all the hardware only cost me about $20.
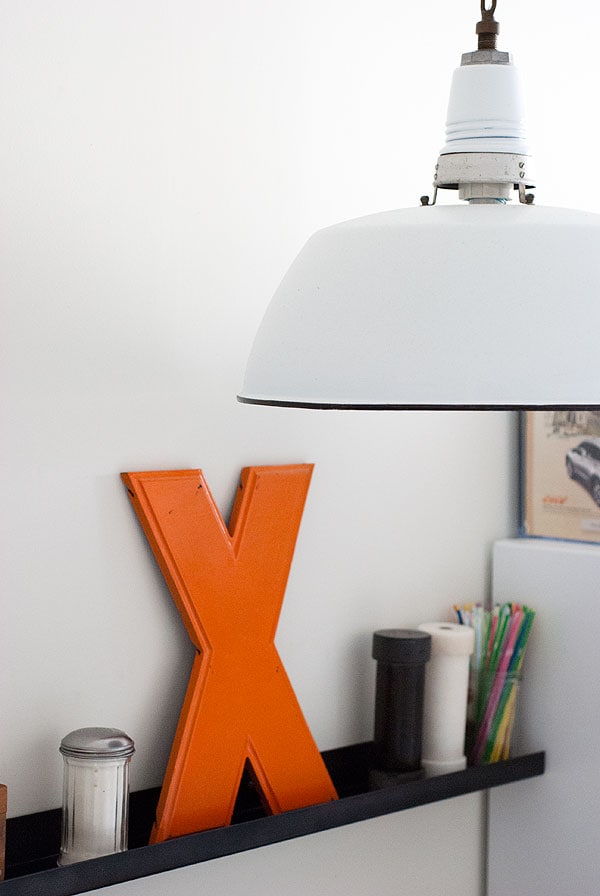
After replacing all the lighting, I figured I might as well go whole-hog and hang this 4′ steel ledge I ordered from CB2 a while ago. Even though I’ll have to take it down when I get around to tiling the backsplash, it was really nice to finally get it out of its box and throw it on the wall to get an idea of how it would look and function when the kitchen is done. Originally, I’d planned to do a wood shelf here (and maybe a bit deeper), but according to code, nothing flammable can be within 30″ above the stove, so steel was really the only safe option. The ledge has been awesome for getting some stuff off the counter, and I think it looks pretty good, too!
I have a second ledge, too, but it needs to be cut down before it can be hung (and an even surface to hang on), so that’ll have to wait. It’s going to be so awesome though.
The pendants have 40W bulbs in them, which are beautiful and bright and light up this whole prep/stove area super well.
And oh look! I also finally got my ass over to IKEA to buy two lousy hinges so that I could finally hang the last door on the new cabinets.
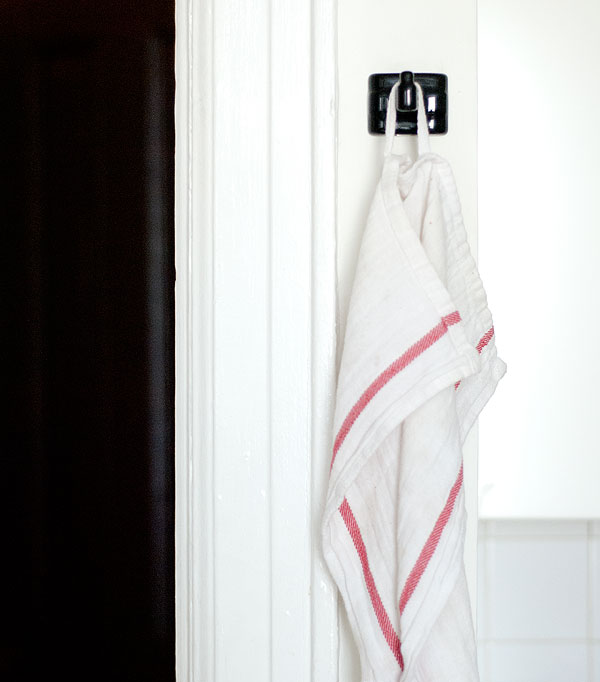
Oh, and I finally hung up this little porcelain hook I bought a year ago. It’s so cute! It took no work! I don’t think this is where it will be in the long run, but it’s nice to have it up and serving a purpose.

I’m by no means done with the kitchen, but getting it to this point was really exciting. I finally don’t feel like I have to apologize for it when people come over, and it just feels so much happier and more efficient and pulled together. It’s finally actually nice to cook in, and consequently we’ve been cooking more (and better!) food.
Now I just need to finish it. GULP.


I think your solution, although it’s not your final ideal, looks really good. To get to the final/done state, are you just planning to tile? Were you going to change anything else?
Big plans! I have to maintain some mystery (haha) but I have plans for an additional cabinet, more light, changes to the area around the sink, and the floor. AND the tiling. There’s a lot of work left. :)
Amazing as always, maybe not complete but quite nice regardless.
I love the direction the kitchen is going & how everything is coming together! What kind of tile are your using for the backsplash?
It’s just going to be a continuation of the existing white 4×4 tile.
Have you been succesful in finding something that matches the tile that’s already there?
Not completely. I compared a few different brands of tile and found what looks the closest, and I’m just going to use that and re-grout everything with black grout. I think the grout will help unify things, and I’m OK with the tile being slightly mismatched. I’m guessing that with everything else in the room, it won’t be terribly noticeable, but I just can’t really justify tearing down the existing tile, repairing the wall, etc. etc. etc. just so everything 100% matches.
That makes sense. I like the idea of re-grouting the existing tile, I think you’re right, it should help unify.
Very nice looking – I’m sure there is a ton more light in the room now! Was the three-way splice in the fixture difficult? Is it easily reversible?
Thanks! Wiring the fixtures was super easy——all three white wires (or ridged wire, as on the clear pendant wire) are just wired to the white wire in the ceiling box, and the same with the black wires. SUPER easy to reverse, I’d probably just use smaller electrical nuts.
Those pendants are fantastic! You have excellent second hand light fixture mojo.
I totally know what you mean about getting rid of the old tenant’s paint. Our house was “move-in ready” but I could not stand the paint on the walls. Depending on the time of day, it would turn the most awful shade of Bandaid. People think beige is beige, but it isn’t.
Love what you’ve done so far, especially those lights!
Even if it’s on the way to your final idea, it looks already great. I admire your tenacity!
I have some proposals for the exposed wire. What if you didn’t use the cord channel but instead accented the wire? For example here they made a drawing http://www.loomrugs.com.au/?page_id=554#10 (although it doesn’t seem so easy to do for me at least:) ) or to leave the cords longer so they can hang as in this picture http://2.bp.blogspot.com/-mzonB45WeAw/TuIZgWxj6XI/AAAAAAAAJjk/bTEvWLtEGzk/s400/par+alander+13380.jpg ? Maybe using a black cord (or blue as in the entrance?)? Just throwing some ideas.
Can’t wait to see what magic you’ll do on the kitchen in the future!
Thanks for the links, Marta. I think in this case, I’d rather just have the cords disappear rather than become a feature. The lights are a big enough statement in themselves (in a small room!), and I think drawing additional attention to the cord would just make things too busy.
Your kitchen looks sooo nice! Your post hits so close to home too. I haven’t touched my kitchen because it’s such a freaking horrible mess (how horrible? popcorn tile ceiling, warped gross wall tiles, dirty cracked lino in the ugliest shade of brownish-yellow imaginable that they also decided was the *perfect* shade to paint the walls and cabinets (yes all the same), which they also decided shouldn’t cover the empty space under and next to the stove so there is even older slightly less ugly lino there, fugly white speckled counters and OMG my favorite part is is the 3 different pieces of moulding atop the beadboard along a 4.5 foot wall (one of them being a completely different kind of moulding than the other two!!) cuz why just invest in one piece of moulding when you can use 3 scraps amirite? Phew sorry for the rant!) I really don’t want to spend any unnecessary money until I can afford to do it all knowing it will be a waste and probably undone at some point, but that hasn’t happened in almost 3 years and this year I am at least painting the damn space if nothing else! TY for the inspiration.
I know exactly what you mean, Sherry! It’s really hard to get motivated to do ANYTHING when you have bigger plans down the line. But if a more comprehensive overhaul might be a few years down the line, it really is helpful to just spend a couple days painting everything and getting it to a point where you don’t totally hate it. When we were in Kingston a couple weeks ago, the house we stayed in was still being renovated, but the owner had done things like painted the bathroom completely black (including right over the existing plastic 4×4 tiles) or painted the old kitchen cabinets. I’m sure he plans to do a bigger renovation down the line, but stuff like that really made the spaces seem fresh and welcoming, even if his choices aren’t permanent! I think it’s a nice way to approach renovating, even if it feels like a drag to spend some money you didn’t NEED to spend.
Daniel,
Could you show the whole space as it is now, in the middle of things? I saw the before, and can wait for the after, but would like to see where it is right now. The vignettes don’t show me. Paula
Hi Paula,
There are lots and lots of pictures in the kitchen in these past posts, which should give you a pretty good idea of how things look right now. If I haven’t talked about it, it probably hasn’t changed since the previous posts. The entire room is only about 7.5’x14′, so there isn’t much else to see! I’ll be talking a lot about the kitchen moving forward, too, so there will be many opportunities to see other parts of the room!
Just followed the kitchen link, and it’s maybe just a temporary glitch, but everything is in caps letters, when you read it, it’s like you’re shouting the whole thing haha.
Also awesome job on the kitchen, I agree that even though it’s “just” a temporary fix, it makes a big difference. And a great tip for renters in general, because a big expensive makeover maybe isn’t in the plans, just paint and putting stuff up makes a big difference.
I actually just noticed that all-caps thing earlier…I’m not sure why it’s displaying that way! I’ll try to figure it out!!
Thanks, L.K. You’re definitely right…just these few little changes (painting and installing better lighting) really make a HUGE difference in the look and feel of the kitchen, and both are great options for ANY renter, regardless of whether their plans extend beyond that or not. I know I’m going a little overboard with this kitchen (what can I say? I’m a lunatic.), but I think any of the projects I’m doing in it are things people could take and reproduce independently to make improvements in their own space. I wouldn’t be doing it ALL if my kitchen had started out a little better, but it was SO non-functional for us that I really just want to do a thorough, complete job at this point.
I fixed the all-caps thing! Thanks for the heads-up, L.K. :)
DAT SHADE. Or well, DOSE SHADES I guess I should say.
I’m still incredibly amazed at how well they cleaned up. You’re a genius, man! And they look great how you’ve set it up. Nice work.
The kitchen looks absolutely fabulous here. The lighting really changes it all up.
The kitchen looks amazing! Don’t feel bad about your time lag with projects. I can assure you that your place looks leaps and bounds better than the rest of us slobs in our rental kitchens :)
I’m an architect and LOVE your code comment about the steel ledge. Safe cooking!
Okay, I looked up “dove white” on the BMoore website, and I came up with “White Dove,” “Dove Wing,” and “White-Winged Dove” (ooo, baby, ooo, baby, oooooo. . .). I’m on the lookout for good whites to use in the bedroom, so which is it, for reals?
(Yes, I’m a whiny, needy creep, but I have no color sense at all and am getting tired of “Pure White” all the hell over the place. Help a sister out, here.)
Hi Jo! I’m sorry, it’s White Dove! I always forget which one it is! I’ll go fix it in the post now. :)
I had to deal with a similar light cord issue in my kitchen and dining area. I ended up going with NUD Collection cords in grey and silver. I figured that if there have to be cords all over the place, I may as well highlight them! And NUD cords are super long, so you get plenty to work with and repurpose for other lamps.
I just realized I have the same oven as you do. Except yours is white, and mine is fugly late 60’s almond. It matches the almond refrigerator that’s loud and runs all the time.
Daniel – even though some of this is just stop-gap – WOW! It looks GREAT! Well done!
Love it, love the scale of the lights. Fab.
I have the same stove–How do you get it so clean?
Mine came with some perpetual baked on stains over the pilot lights and around the burners that I have not been able to get rid of by any means.
Haha, isn’t it the worst stove?? My temperature control is abysmal and the oven runs really cool. Ah well.
I usually use a combination of Mr. Clean Magic Erasers and a wet sponge to keep it clean, but for the baked on stains I’d recommend using some kind of mild abrasive, like Barkeeper’s Friend or Ajax in conjunction with the rough side of a sponge or even very fine steel wool (you can find many grades of steel wool at any hardware store). You might even try to scrub it with a sponge or a nylon pad and a water/baking soda paste, which is a little milder and more natural first. Enameled metal tends to clean up pretty well with some persistence.
Once you get it all cleaned up, the trick to keeping it that way is just frequency! I clean my stove after every use, normally. And obviously it’s better if you can wipe little spills and stuff as they happen, since they’ll be much easier to remove before they get baked on.
Holy crap, magic eraser indeed.
I bought one at Target today and years of grime are gone with ease. I didn’t even have to open the container of barkeep’s friend. The brown circles over the pilot lights are gone and all that is left are the scratches from some previous tenant who evidently tried to clean the stains under the burners with a wire brush or metal scraper.
Seriously…it just wiped it away with the exception of a couple of tough bits.
Ooh, magic eraser for the stove! I’m gonna try that.
Just a question. I love all the work you are doing, but how long do you think you will stay in the apartment? I’d be afraid to do this much work if I wasn’t going to stay there for a while.
Oh, I think we’ll be here a LONGGG time, hopefully! I don’t know how familiar you are with NYC rentals, but this is a REALLY good apartment in a great neighborhood at a really good price. As long as we don’t get kicked out or something terrible, I’d guess we’ll be here for many, many years. To me, it’s worth it to put in the work/time/effort/money to have a kitchen that I like cooking in and works for us, and I’d rather get it done at the beginning than live with something I hate for years and years. (I also kind of enjoy this stuff, so there’s that!)
Well crap, I was planning on putting a 5″ deep wood shelf the whole length of the wall above my stove and it hadn’t occurred to me that it might have to be non-flammable. I don’t plan on having any stove top fires…
I like the steel shelf you put up, but like you I would have to join two of them to fill the entire space or find something else that is approx. 60″ Like you my kitchen is done on one side and terrifyingly bedraggled on the other. I need to get some shit done in there.
Ryan, there are lots of places to get steel ledges! Room and Board makes a 60″ option. I think West Elm still makes one, too. TBH, I’m glad I have steel just for the cleanliness factor. Wood might have looked good for a while, but it would have been a pain to clean and keep looking nice.
The Room and Board ledge is awesome and comes even in 72″. I may have to measure my kitchen wall tonight and order one. Then I can test out how much i like it before i tile and have to drill through the tiles.
I love that ledge! I think it is exactly what I’m looking for… the measurements on CB2’s website say that it is 4.5″ deep and it looks like the ledge walls are pretty slim… so would you say that the actual shelf space is about 4″? I’m wanting one to store quart size mason jars and they have about a 3.5″ base. Okay I’m done asking for free design help;-)
You are awesome, that is all.
Nothing is as permanent as a temporary solution ;-)
Cant wait to see the whole shebang though!
Great job as usual! I love the little bit of black paint on the rim of the lights. Couldn’t help but notice the Big E feedsack on the wall in the before photo — go Springfield, ra ra!
This looks soooo good. Side note, I’m thinking that re-purposed hole in the gorgeous $5 light is for a pull-chain switch. How convenient for 2013. :o)
You’re doing a great job with the kitchen. It’s already a stunning transformation. Great idea with the pendants, too. We’re getting ready to swap/add pendants to our dining room but it’s going to entail some wiring that we are completely incapable of doing, so calling in a professional for which we’ve been saving our pennies. I have no idea how much it’s going to cost, though, so if the estimates are super high, maybe we can incorporate your idea somehow.
P.S. We have the same teapot that you do! I spotted it and got a little excited because it must mean we’re cool, too, ha ha. Yes, I’m a dork.
there’s nothing like bad overhead lighting to make me feel like slitting my wrists. my mother’s house is full of bad lighting. (and wallpaper.) it’s 150 watts of flickering, humming fluorescent lighting or nothing, baby. so I LOVE your new lights. i think your kitchen looks fab just the way it is!
There are good looking stopgaps and there are bad looking stopgaps. This is definitely the former. I’m now looking at my ceilings with fresh eyes and working out how I can improve our lighting. Thanks for the inspiration.
Hi!
I just found your blog, and I’ve got a suggestion regarding your tile. You said somewhere that you’ve able to find a relatively close match, but not perfect. Why don’t you do something contrasting immediately behind the stove, and then put the close match tile on the wall to the right of the stove, finishing out that stretch of counter?
Like these: http://www.lightstreamsglasstile.com/siteimages/01_Lightstreams_Glass_Kitchen_Backsplash_Tile%20(3)_Spring_Green.jpg
http://st.houzz.com/fimgs/cf41b0270f74d45a_4655-w394-h394-b0-p0–eclectic%20kitchen.jpg
That way, the close match tile is not right next to the old tile in a way that looks deliberate. It will be much harder to see that it doesn’t match when separated like that.
loooove those lamps! though, I keep envisioning the chain and hooks painted black…
Ooooh! I love those lights! I’ve been scouring around looking for the perfect lights for our kitchen too.. these are great. Nice tutorial too. I’m a new follower, but do you have a way to receive your updates via email? That’s my favies.
you are freaking hilarious! i just read through your ENTIRE blog from the very beginning (yes i am one of those OCD people that must read everything in chronological order when i discover a new blog – i’m sure you can understand haha) and i absolutely LOVE it!! i was just in NYC visiting my friend last month (she also goes to NYU) and her apartment is in bushwick. first time ever staying in brooklyn and i must say – i loved it! i love love love your DIY-thrifty-inspiration striking in the middle of the night-crazy stories and HI-LAR-IOUS way of writing everything for blog stalkers like me to read and laugh about.
i rent a place too – except i live in a 330 square foot FURNISHED (i hate the fact that it came with ugly black furniture) studio in los angeles and i’ve done a lot of crafting to make it cute (link to my blog above) but you go way above and beyond what i’ve ever tried as a renter! thank you SO SO much for sharing so much on the lovely internet and inspiring me to just DO MORE with my place :)
can’t wait to see what else you do!
-yenny
p.s. LOVED what you did with the hallway!
p.p.s. i am also dog obsessed and SO wish my apartment allowed pets :(
Your kitchen looks so great! I have studied feng shui for decades and although I have never been into the compass, coins, dragons, and koi fish, I totally get the common sense aspect of it. When our space looks better and functions properly we just feel better – the energy (so real) is good. You have re-energized your kitchen!
Awesome. I’m a creative writing professor and now you just gave me an idea about the next writing exercise…what room in your house would your character redecorate? why does he hate it? and how will he tackle this task?
Hi. Dig your blog. Instead of channels on the ceiling, or some other new addition, why not just use more chain all the way back to the outlet or hardwire where the cords go back to: the chain would go vertically up to the ceiling hook as you have it, and then hang more loosely in a nice arc below the ceiling, directly back to wherever. You already have a great simple solution for hiding the cord, weaving it through the chain, so just own it and keep it going…
I don’t know why, but I keep imagining those lights swinging during a horrible earthquake or dinosaur attack!
I was just over on DesignSponge reading about a really lovely brunch, when- WHAT??? Is that MEKKO???? Oh my gosh, this must be THE MAX writing this??? You guys are making hot cranberry scones??? And then as I’m further trolling the site- Hey, those look like Daniel’s doorknobs! How do I know this??? I’m ashamed, I’m a hardware stalker, but I’m sure… Yes, I do! I DO know these doorknobs! And I recognized your playful, intelligent, oh-so-recognizable voice clearly coming through in the writing… Really enjoying the contributions over there, guys. It was like bumping into an old friend unexpectedly.
Ha, thanks Carls! Yes, Max has been working at D*S since the summer, and I’m just writing a few little posts about cleaning for the next couple of weeks! It’s fun, and always strange seeing little glimpses of my house on the site all the time now. :)
Hi Daniel,
Just come upon your blog through Design Sponge. You are awesome – great practical advice for people living in the real world. Just love what you have done with your kitchen space. I agree about paint – rather than live in depressing squalor until you can afford/get around to doing the finished job it IS worth investing a few hours and a few dollars to clean things up and paint.
As a perpetual and not very skilled renovator, I thank you and will worship at your shrine daily.
I love your kitchen so much. It’s simple but sooo nice. I’d to have a kitchen like this one!
It seems like you really gave yourself a big project when you uncovered the wall with all those holes. Great job.
I was searching Pinterest for ideas for something… who knows what at this point, and I stumbled on your heavenly blog. I’ve now been stuck here for a couple of hours. I love your style – both in decorating and writing and just wanted to say hi and I love your kitchen lights!
Oh – and Barkeeper’s Friend? Best stuff ever!
Hej Daniel,
I love Your blog and I love the way how You use the yidish words :))
I come from Poland and we use so many expressions as “sziksa”!
It made me laugh – love, love, love Your writing style :)))