
I am really not one of those people—the people who get sick a million times every winter and spend the rest of the year dreading the cold months with a palpable sense of terror and despair. I generally weather the winter months just fine, save for three years ago when I contracted Swine Flu and was quarantined to my dorm room with little more than a box of Kleenex, a few DVDs, and some cough syrup with codeine. Which really just ended up being kind of a fun vacation, at least the parts I remember.
But this year has been so different! Head colds here! Sinus infections there! I am a walking cesspool of virus and disease! Over the course of the past week, I have demolished entire jumbo boxes of Puff’s tissues with ease, spent more hours in bed than I previously thought possible, barely showered, and asked in earnest “what’s a credit card?” during a bout of fever. I am so done with this bullshit.
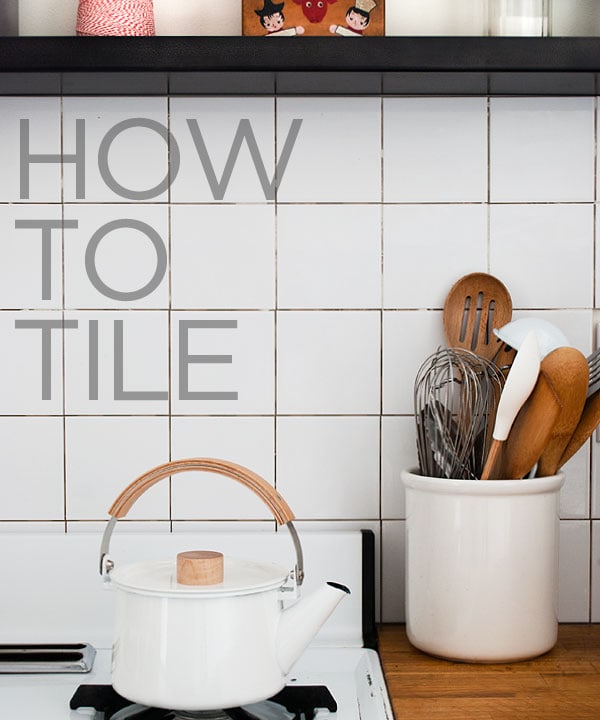
This got me thinking about the last time I was sick, which, as it happens, was only a few weeks ago. I remember this time vividly because I chose the opposite recovery strategy: instead of lying low, biding my time, and staying hydrated, I decided to live large. Nothing would hold me back. It was time to tile my kitchen’s backsplash, and neither searing headache nor minor fever would hold me back.
I don’t know if it was the tile or just a much, much less miserable virus, but distracting myself with tiling while also feeling generally terrible turned out to be an OK strategy. There were no bowls of steaming soup or cups of tea, but there were headachey trips to Home Depot and then Lowe’s looking for a simple saw (later ordered on Amazon anyway), and some fun coughing fits while hauling a 50-pound bag of thinset powder down a street and up five flights of stairs.
The important question isn’t why I got myself into this, but what I got out of it, which was basically not feeling totally useless and hopeless. Which, after the past week of feeling nothing but despair and misery, I can say is worth a lot.
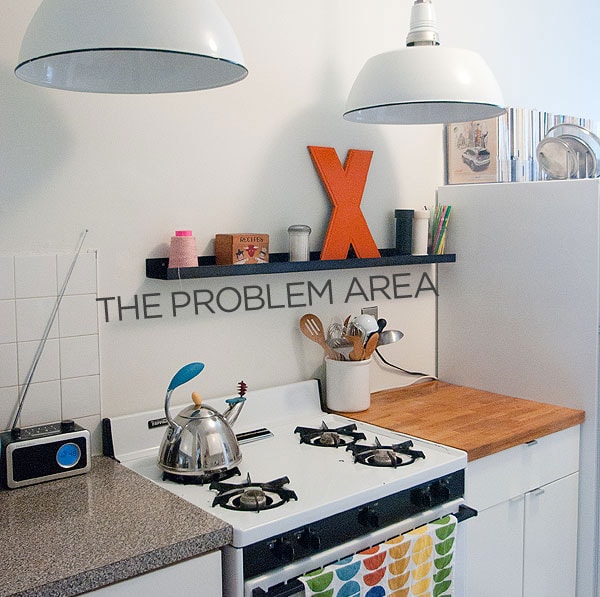
I talked about tiling my kitchen backsplash a while ago, and mentioned that it was proving difficult to find white 4″x4″ tile to match the existing tile that the landlords installed about a decade ago. In theory, matching this tile seemed like a pretty simple proposition, but there are many different brands of tiles, each of which boast a range of different whites. Added to that is that even the same white may vary between dye lots. Oh, and glazes tend to change slightly over years of exposure to sunlight. So yeah—100% matching tile, not happening. Like ever.
I know a lot of people had strong, valid opinions and ideas regarding this very important topic. There were ideas about doing something different behind the stove to break it up, about using a different material entirely, about ripping down the existing tile and replacing it entirely, but ultimately it all seemed like too much. Backsplash tile is supposed to be utilitarian and functional, and that’s all I really wanted. Tearing down the existing tile seemed just a little over the top for a rental (EVEN for me), and would probably lead to a whole mess of drama of replacing the drywall, discovering mold/monsters in the walls, dying, etc.
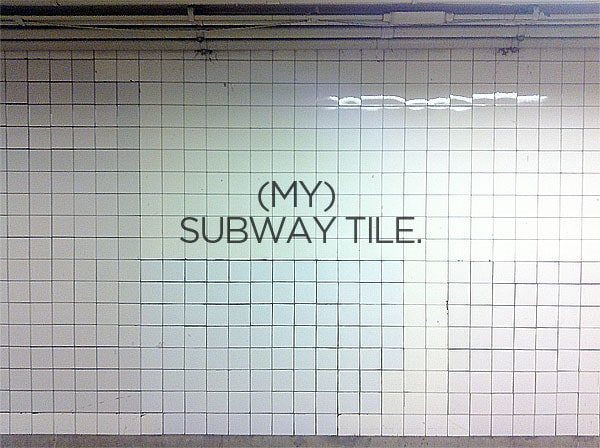
So ultimately I just decided to match the tile as closely as possible and move on with my life. This is, after all, a Brooklyn rental apartment, and that’s kind of how it goes here—things don’t always match, nothing is perfect, and that’s OK. Hell, most of the NYC subway stations are tiled with white 4×4, and it’s all a crazy patchwork of different whites. Look at that picture! There are at least 4 different whites there. But it’s fine. It’s whatever. It’s New York. Deal with it or GTFO.
So, my backsplash! It’s not perfect, and I’m fine with it. And I really think that once the kitchen is finished, the mis-matched tile will be hardly noticeable.
My beautiful tile-happy friend, Anna, came over to teach me how to tile since this was my first time, and I’m super grateful. There was a LOT I didn’t know, and I now realize that my plan to “kind of wing it?” was severely stupid and I’m so lucky to have an Anna in my life. If you don’t have an Anna, I will try my best to teach you my limited knowledge of tiling now.
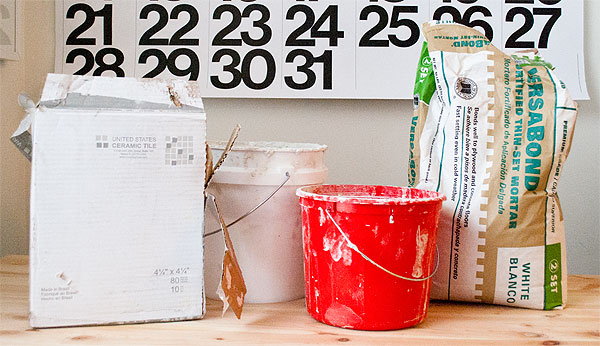
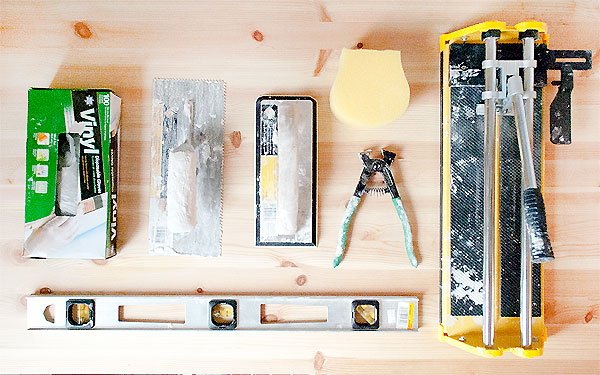
Firstly, supplies! I really should have taken these pictures before I used everything and mucked it all up, but you’ll definitely want:
1. Tiles. Duh. Don’t be stupid. I used U.S. Ceramics brand Bright White tiles, which are $20 per box (each box covers 10 square feet).
2. A couple of big-ish buckets.
3. Thinset mortar. I actually used a mix of pre-mixed thinset and powdered thinset during this project, and to me they seem to work the same, although powdered is supposed to be stronger. Thinset comes in either a grey-ish color or white—I’d recommend white but it doesn’t really matter with solid ceramic tiles.
4. A box of disposable latex gloves. Tiling is MESSY and you’re doing yourself a HUGE favor if you can just periodically remove your gloves and toss them. It seems wasteful, but it’s really kind of necessary.
5. Notched trowel for applying the thinset. Try to take care to wipe this thing down FREQUENTLY. Or be like me, let a hard cast of thinset completely dry around the handle, and learn the meaning of real shame when Anna asks to borrow it a few weeks later and says when you hand it over, “oh, you don’t take care of your tools, do you?”
6. Rubber float for keeping the tiles even and applying grout.
7. Nippers. If you have to make any small cuts to work around irregular stuff or remove spacers or whatever, you need these.
8. Sponge.
9. Score and snap tile cutter. This handy tool is very easy to use and only about $20, and way less scary than a wet-saw.
10. A level! You really need to make sure your tile is staying level, so this one is important.
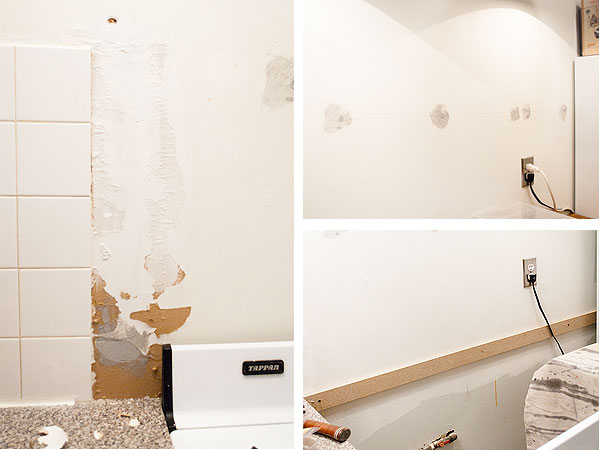
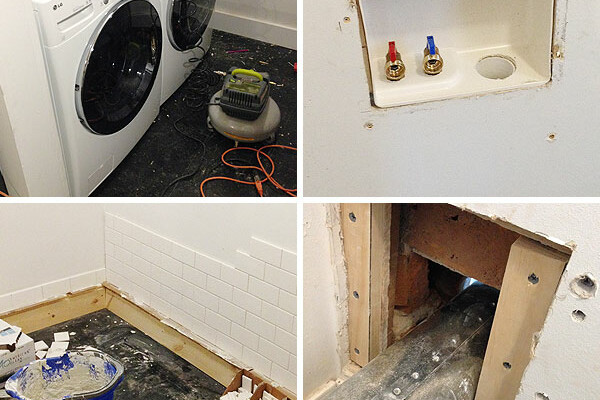
First, you need to prep the space. For me, this meant removing the shelf and patching the holes in the wall, removing the last column of existing tiles (it had a plastic trim piece at the end, which is installed under the last row of tiles, so the tiles needed to come down to remove it), and painting the wall where the old thinset took the outermost layer of drywall with it. Because thinset is water-soluble, the surface it’s being affixed to should always be painted—never tile directly over unpainted drywall or joint compound. At the same time, thinset won’t adhere as well to glossy paints, so either rough up the surface a bit with sandpaper or scrub with TSP, depending on how glossy the paint is. I’m really not an expert on this.
Next, Anna and I mounted a piece of wood to the wall to support the bottom row of tiles. Tiles will move with gravity while the thinset is wet, so they need a solid surface to sit on while they’re drying.
Mixing directions will be on the back of the thinset bag, but it should be about the consistency of mashed potatoes or peanut butter when mixed. It’s important to get the consistency right—thinset that’s too watery is bad news. Make sure the grooves stay rigid after being applied with the trowel and it should be OK.
Obviously, putting ANY amount of thinset down your drain is a terrible idea, so this is where the buckets come in. Mix the thinset in one bucket and fill the other with water, which you’ll use to wet your sponge and keep tools clean throughout the job. Later, when you’re finished, use the bucket to give your tools a cleaning and dump it outside, where it won’t fuck anything up. If you have access to an outdoor hose, you are SO LUCKY.
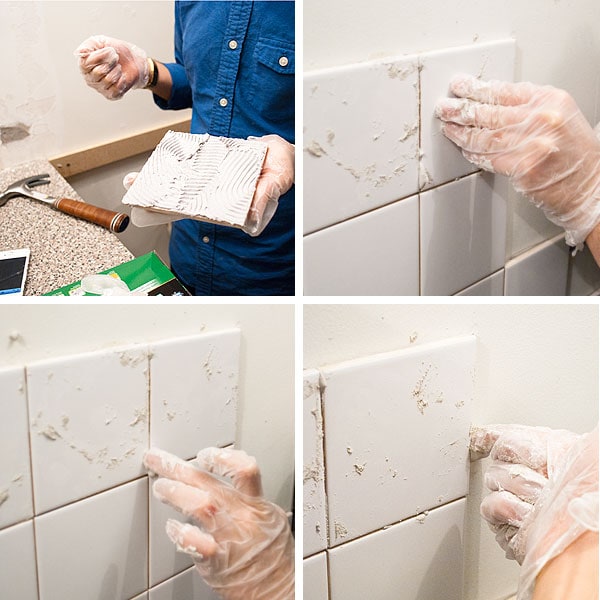
We decided to back-butter these tiles, applying thinset to the tiles themselves instead of directly on the wall. This allows for greater precision, which was important because the new tile is butting up to existing tile, so it was really important to constantly make sure things were level and looking OK.
When applying thinset, it’s important that it be multi-directional (the grooves act like suction, so using multiple directions improves adhesion…or something). Each tile needs to be pushed gently into the wall, and it’s a good practice to use your finger to remove any thinset that might come out from around the edges after every tile. This keeps the job clean and orderly instead of chaotic and nightmarish. You’ll also thank yourself later on when you don’t have to scrape your grout lines before grouting.
Every five tiles, Anna recommends using a lightly damp sponge to clean the surface of the tiles, the grout lines, and around the edges of the row. Again, this keeps things feeling clean and manageable and makes clean-up at the end much, much easier.
Also every five tiles, run your rubber float over the tiles just to make sure that things are all on the same plane. Especially when back-buttering, it’s easy to have inconsistent thinset thicknesses between tiles, so it’s important to frequently check if everything is flat and even and make adjustments accordingly if they aren’t. You don’t have long to remove an odd tile and add more thinset, so consult with the float frequently.
I basically just went on like this for the entire wall, building from the bottom row up. Tiles likes this are self-spacing, so there’s no need to use spacers (you’ll have huge, sad grout lines if you do!). If I’m being honest, all of this took a lot of time and energy and overall was surprisingly torturous. Tiling is a weird thing that makes you feel miserable while it’s happening, and then for some reason hungry for more when you’re done or between sessions. I simultaneously want to tile all the things and never tile again ever.

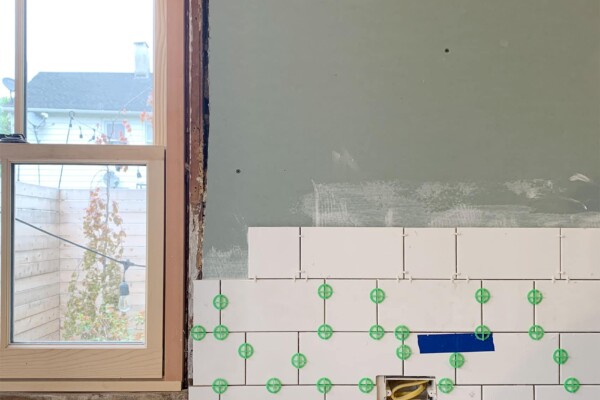
And here’s the current status! I’m totally ashamed to say that I STILL haven’t grouted, which is why it all looks kind of dumb and unfinished. I know grouting shouldn’t be that difficult, but I really need to be able to set aside a few hours for it and I’ve just been either super busy or super sick and it just hasn’t happened. The main point of this post is to shame me into making sure it happens soon though.
SO. You can definitely see where the two different tiles come together. It’s not a great match. BUT. BUT. BUT. I really think that once everything is grouted (the old tiles will be re-grouted), the tiles will look much more unified. AND when I get around to mounting the second half of the ledge (it has to be cut down a bit first), the transition point will totally recede and nobody will even think about it. I think. I hope. If I keep saying it, it’ll definitely be true.


grouting is quite possibly the worst task I have ever taken on. with that being said… GOOD LUCK!
Ha!! Sounds like it’s for me, then!
Are you kidding? Grouting is the best thing ever. Seriously.
If you’re a little OCD and fond of getting things messy, it’s a lot of fun. First you mix the grout up, then you float it over the tiles, and then–then! when everything looks awful and disastrous, you wipe off the excess with a wet sponge and blammo! Gorgeous, finished tile.
Use sealant even if you’re using self-sealing grout, and buy two new grout spinge. Otherwise, you’ll be sad. Trust me on this. I have a whole backsplash I have to rip out and replace because I did not heed those simple rules.
Yeah, I’m with Jo! Grouting if the best part of tiling. Just think karate kid. Grout on, wipe off.
I love that you tiling a rental. It puts the controversy of doing projects that a potential mysterious future buyer might hate verses living in a builder special beige townhouse to sham.
It looks great so far!
I know exactly what you mean about it being torturous but also making you hungry for more. I volunteered fixing up hurricane damaged houses for four months once down south and became the place’s tile guy. Every house that had any tile work, I was the one to do it. Tiling a 2,800 square foot house and all three showers in a week was pretty crazy work and torturous when happening, but then when I put the last piece in the last shower I wanted to keep going.
Okay, I *never* comment on all your work, although I have been reading faithfully since the Manhattan Days. But the different color whites *beg* for you to hang a lantern on that vertical line.
Continue it up the wall with a faded blue? Use it as a datum for a series of small pictures you hang over the backsplash. *I* don’t know, YOU’RE the creative one, but I can tell that if you make a THING out of it, the universe will be better aligned, and if you pretend it is not there then the rats that are comfortable with the tile job in the subway will obviously be happy in your kitchen.
No, I promise! Hanging the ledge above it will help. It’ll be fine. There will be no rats. Just be patient…once I get a few things resolved (grouting, hanging the ledge, polishing off the cabinets, etc) and you see everything in context, it really won’t be a big deal.
The tile looks so good!!! Love the new tea kettle.
My rental apartment doesn’t even have tiles in the kitchen, just the 60s plaster wall right there behind the lip of the counter. Good planning, guys. Yours looks great! But lots of work. But worth it! Frankly I’m still distracted by the lights. I never would have guessed how good they’d look if I’d found them. Totally admire your eye for things.
Great work! I love seeing how your kitchen is evolving!
Awesome! I may tackle my kitchen on my own. Question though- had you or Anna tiles around outlets? How does that work?
I’m going to talk about that in part 2! It’s not super hard, I promise.
when is part twoooooooooo? Impatient owls want to know. :]
Soon! I am just so very slow and grout is so messy and I have to do it still! I’m sorry. :(
This guide looks really helpful! I’ll have to keep it bookmarked for the hypothetical future in which I live in one place for long enough to do some tiling.
Congratulations on finishing the first big step in tiling! You did an excellent job for your first time. Now, would you like to come take on a job in Westchester? Just kidding… unless you were considering it for some bizarre reason! We will be tiling our kitchen the third week of March and the thought daunts me. I hope I can convince my brother to come up from Brooklyn to help. He has tiled before.
It may be imminent madness or perhaps just years of squinting at a series of small digital screens finally catching up to me, but I think once you grout, you’ll hardly notice the difference. The tile color is really close — if you really did guesstimate, you are either a superhero or a freak of nature — but what stands out is the difference in the grout lines, not the tile color. Nice work! You and Anna need a TV show.
Thanks, Greg! I totally agree. The tile colors are close (I would say closer than they look in this picture, actually), and it really doesn’t bother me! I bought single tiles of several different brands of white tile, and this one was just the closest.
I agree with Greg that it’s the grout lines that stand out, not the tile.
It looks great! Very nice job!
Can I just add that you should not use those adhesive sheets they sell in lieu of thinset. It may seem like it’s going to be easier and less messy, and you may think to yourself, “if they use it on This Old House it MUST be good!” but they actually suck, because the tiles then are still a little flexible/movable when you start grouting and that is really annoying. (translation: I wish I had an Anna)
I was curious about those things (after seeing them on TV, of course!!)! Thanks for letting me know, I’m sorry you didn’t like them though!
Wow! You did that when you were sick? I’m so impressed! Uh, my kitchen is still not grouted. *SHAME!*. I’m happy to see someone else tiling their RENTAL, as, actually {it’s funny timing} because my kitchen tiling job was just posted about on Apartment Therapy and I got 63 comments of hateful evil vile trying to convince me I was an awful heartless person for making changes to a rental — Hah! It was SO bad they took it down. Can you imagine? But I thought of all people you would certainly appreciate ;) HAH!
Looks wonderful as always Daniel!
A
OMG! I’m so sorry about the commentroversy! That’s so annoying. People are the worst.
Don’t feel bad about the no grout, you’ll get to it!! And thanks for tiling in the first place, it made me feel like it was so doable! Your tile looks so great.
OH GEEZ.
Oh my goodness! I saw that post and yeah, most of it was extreme- I didn’t notice they took it down though. What a shame. Ariele, you do beautiful work!
Why am I always so surprised about how truly vile some people are online? It gets me every time.
I saw that post and loved it. In fact the only reason I read Apartment Therapy is for posts like that ”“ ordinary people doing inspirational but achievable things with their homes on a budget. The reason I sort of despise AT is the priggish comments. Didn’t realize they took the post down. F”¢ck ’em. What do they know of rental living in Brooklyn.
(Also very happy to read both that AT post and now this tutorial as I’m about to move into a new rental and want to tile the backsplash there.)
Ohhhh…Daniel, come fix my disastrous rental kitchen. I have duct tape on the floor where the peel-and-stick tiles have chipped in half. I have hideous tile. I have barf-coloured cabinets that the landlady doesn’t want me to paint because they’ve been painted so many times they barely close. Your kitchen is a rental inspiration.
Oh, ‘col, I’m sorry!! You know I would just do whatever I wanted anyway in that situation!!
Is it crazy to suggest stripping the cabinets first, then repainting them? Too much effort?
It’s not crazy–at least, not crazier than I actually am. But I’m pretty sure some of those layers are lead paint, and I have cats and a preschooler, so I’m hesitant. (My landlady is pretty great about most things, and she has a point about the functionality.) Research time, I think.
Who’s the clown who thought up 400 shades of white tile, anyway? Your whole tile/stove/that area looks so cute, I envy your ability to keep your stove clean.
Two thumbs up Daniel! Hope you’re feeling better!
Thank you so much for writing this – I promise to some day actually come back and use it for my own tiling adventure. You and Anna are my heroes. Also, I want your teapot.
Good on yah for being so productive when you’re sick. I’m still quite sick and feeling blaaaaarghhhhh and gross. I am sure once you finish with the grouting and regrouting it’ll look fine :)
Well done !
This post simultaneously excites and terrifies me. Im about to rip all the old tile off my backsplash and re-tile in nice glossy white subway tile .I am also a tiling virgin.
Between your and Anna’s blogs Im confident all will go well. So Im thinking ready mixed thinset will be fine ??
Fingers crossed I dont have to replace the drywall.
Sarah
Vancouver
I am absolutely OBSESSED with your (new?) white teapot!!! Where is it from????
Also love love love the tiling. Good for you for improving your rental and making it a happier homier space for you and your boo.
Agreed I don’t remember where the tea pot came from. Please share! And the tile looks great how was moving the stove? I get nervous about gas fixtures.
Annie, moving the stove was fine!! Any stove should have a long enough gas hose thing to be moved out a few feet from the wall without any issue. Which you should really do to clean under it anyway (an AMAZING amount of dust/pet hair/food can accumulate down there, which I think can be a fire hazard if left unattended). It’s nothing to be nervous about!
the Memphis look-a-like is the one you hated, right? Just because I hate it too and I think its the only thing I ever saw in your pictures and hated so its funny to know that you hate it too. I just never have been a Memphis girl. Like the new one, do I need an electric kettle myself- why are there no good designed electric kettles?
This one! LOATHE.
(i’m an asshole.)
You’re not an asshole, you just have good taste:-)
Hey Tux, it’s the Enamel Tea Pot from West Elm Market. It’s the fanciest thing in our kitchen, and only became worth it because of my EXTREME loathing for our other teapot, solely on aesthetic grounds. It was a big point of contention, so when we found one we could both agree on…we just went for it. It is very nice, but doesn’t whistle. I like how little it is though.
Going for the worst mom of the year award, I am pleased to see your post so that I know you are still alive. CRAZY, right? I’m glad you felt up to a post. I hope you are doing well. Please think about your feedback for that other space. Need it soon.
That’s so awesome! I think it’s the perfect blend of effort with “go with the flow” attitude you need if you’re going to do something more permanent in a rental. I’ll be sure to use this if ever I have a rental that needs it. (I’ve had a subway tile obsession for a while now…)
Great job! And I have to day, those lights are killin’ it.
Swine Flu? But that’s not kosher, isn’t it?
Ha! I have no idea. Pretty sure I’d get a pass, but I don’t keep kosher. :)
It looks great- you are really making the best out of this kitchen!
No one will even think about it.
I think it looks amazing…. AND I kind of love that the tile may be slightly off-color. It is TOTALLY appropriate to the venue, gives it a lived-in and loved look. Also I’m very interested to see the grout process…. will you scrape the grout out of the old tiles before grouting??
Yes! I don’t think it’ll completely come out, but enough that the new grout can cover and it’ll all look fine. Fingers crossed!
Ha! Daniel – I do restoration work for the MTA and I can’t tell you how hard it is to find new tiles that match the original white tiles. They don’t even make the original glass subway tiles anymore (because they shatter if anything hits them – which, duh, happens all the time in those stations). They’re all ceramic now and look totally different. So I love your philosophy of “yay patchwork!” Now if only I could get my boss on board so I don’t have to compare ten shades of off-white to find the one that is closest to the original. Your kitchen’s going to look much more authentically New York than any of the sterile uniform white subway tile kitchens that are all over the place now!
Ha, thanks Jen! And what a fucking cool job!! Although I can’t imagine trying to match tiles all the time…this was about as much as I could take! Thanks for making our city more beautiful. :)
Great work! For me the old and new tiles look the same. The cooking area as a whole looks very harmonious.
I think it will be one of those things where people won’t notice the color difference unless they are looking for it. Your kitchen is coming along very nicely!
It looks great! Miles better than it did before. And I can’t even see the difference between the whites but that’s because my eyes have always been a bit wonky when it comes to extremely subtle differences in color.
P.s. I have always been jealous of your kitchen and this jealousy is reaching unhealthy levels…ha. I’m in a tiny little Chicago studio apartment that used to be a hotel, so all I have is a dinky lil kitchenette.
I work for NYCT, and have done so for 30 years. I love tile, and I love your tile work!!
When we redid our bathroom, I had subway tile put in. It’s a glass tile thin border around the room, making it look something like an old Brooklyn IRT station. Tile is great stuff!!
Wow the tile came up great, and that is such a cute tea-kettle. Are you planning on changing the oven?
No, as long as the oven still works, it stays! If we owned the place and had a bigger budget, we’d probably change it (it’s a terrible stove! and it’s falling apart…), but our landlords aren’t about to buy us a new one and this one is OK enough. I actually kind of like how completely plain and simple it is, so it’s fine.
Oh yeah of course. It is a nice oven though, and surely it shouldn’t look out of place with the white cabinets.
When I tiled my kitchen backsplash I was in TEARS after the tiling part. I saw every imperfection and everything that didn’t line up. Then I grouted and it was like this magic product that made everything look uhmazing. (It probably helped that I grouted white on white tile.) Seriously, I get so many compliments and everyone swears they can’t tell where it’s wonky (which means I should probably stop saying, “Yeah, there are wonky parts here and here and here” every time someone comments on how nice my tile looks.)
OMG, I do that ALL THE TIME! Let’s start a support group where we’re unapologetic about our mistakes and just let everyone think we’re flawless and awesome? It’s like a crazy compulsion, pointing out all the little things I mess up that nobody would ever notice otherwise. I guess I should just save the blog for that. :)
Daniel. I’m a fellow thrifty diy-centric gay, albiet a wee bit older, offering one easy solution to that kitchen crockery mess. You need to separate your woods from your metals. Two different vessels (whatever you have on hand, no need to buy something new). It WILL make your kitchen sing.
I didn’t realize it was a mess. :(
But for real, it works fine for us and I’m not giving up more counter space. I think you’ll just have to deal.
Lovely tiling job! I have to do some tiling myself that I’ve been putting off, so this post has given me great courage. Your whole blog is new to me, and has inspired me to make changes at my own place and finish off my “projects.”
I read your entire blog in one sitting the night I first came across it, I loved it so much. Your wonderful writing style next to those fabulous interior shots are such a treat! I also love your process walk-throughs that you give for your DIYs- it’s very inspiring. I think my favorite, though, are the Linus and Mekko updates. Those two are so adorable.
For the nasty colds, can I recommend oil of oregano? I’ll warn you- it tastes terrible, but works. I hardly ever get sick now since I’ve started taking it (some 5+ years ago), and before the OoO I would catch everything from everyone. You can get OoO at the health food store.
Thanks, Laureg, I might try the Oil of Oregano! I’m so done with being sick!!
And thanks so much for the kind words about the blog! I can’t believe you read the whole thing! :)
I love it! I’ve been dealing with a similar issue- I just finished grouting my bathroom and realized after I’d finished tiling and grouting a walk-in shower that there were 2 dye lots mixed in the boxes of white tile I ordered from HD. You couldn’t tell before we grouted, but with white grout it is REALLY noticeable. It wasn’t at all pre grout (with dark spaces between tiles), so maybe try grouting with a dark grout (charcoal or black) to minimize the difference? It’s easier to keep clean too! My only grouting tip is to buy the caulk that matches your grout color and use painters tape to make super crisp caulk edges. It’s the only thing I use painters tape for, but it makes a slightly shoddy caulk and tile job (I didn’t have an Anna!) look pro.
Great job! It looks beautiful.
What I’m really drooling over, though, is that clock radio by your stove. *wolf whistle* Where might I find one?
Maybe it’s your photos, but I really can’t tell where the old stops and the new begins. I think it looks awesome!
just saw max’s face on design*sponge! http://www.designsponge.com/2013/03/editors-letter-march-2013.html
Yep! He’s been working there for about 6 months!
Wow this is truely awesome, it has really refreshed the space. Good on you for DIYing, cost effective and it turned out brilliantly!
You. Are. Brave!! The equipment, alone, would have me running for the hills and calling a hunky handyman to help out! But you’re clearly talented, so congrats on achieving a flawless look…and getting a great post out of it. Two-fer!!
Thanks for the wonderful tile tut. And it looks super beautiful…
I just wanted to also mention that since I’ve been making fresh vegetable juices with greens and a couple of carrots and maybe an apple thrown in, I have not been ill.
Eating a whole foods diet with lots of raw veggies and this fresh greens juice is the way to go!
My kitchen sink as well as my bathroom are tiled but right now, most tiles are cracked and needs replacement. I worry for my kids but I don’t want to hire somebody to fix just 2-5 broken tiles. If this is how easy tiling is just looking at your post, then I guess I could fix my tiles on my own or convince my husband to do so. Thanks! :)
Daniel,
Came across your blog this afternoon in a fit of what-do-I-do-with-my-next-apartment anxiety. I have barely peeled my eyes from it since. Hopefully, my new landlord will not mind when my boyfriend and I apply new tiles to create a much-needed backsplash.
(As for your other projects, I’m drooling over those black doors and scraped, scrubbed, and soaked hardware!)
Keep it up. This is my new favorite design blog. (Your commentary along the way is also very enjoyable!)
Colleen
Thanks, Colleen! :)
WOW! Amazing job and you were sick. I’ve never attempted tiling, and you did it with a cold. It also sounds like you didn’t spend a fortune on a rental. You can easily fall into that trap. Congratulations and good luck with the grouting!
You could also take your tiles to a tile store and ask them to sell you an appropriate thinset.