
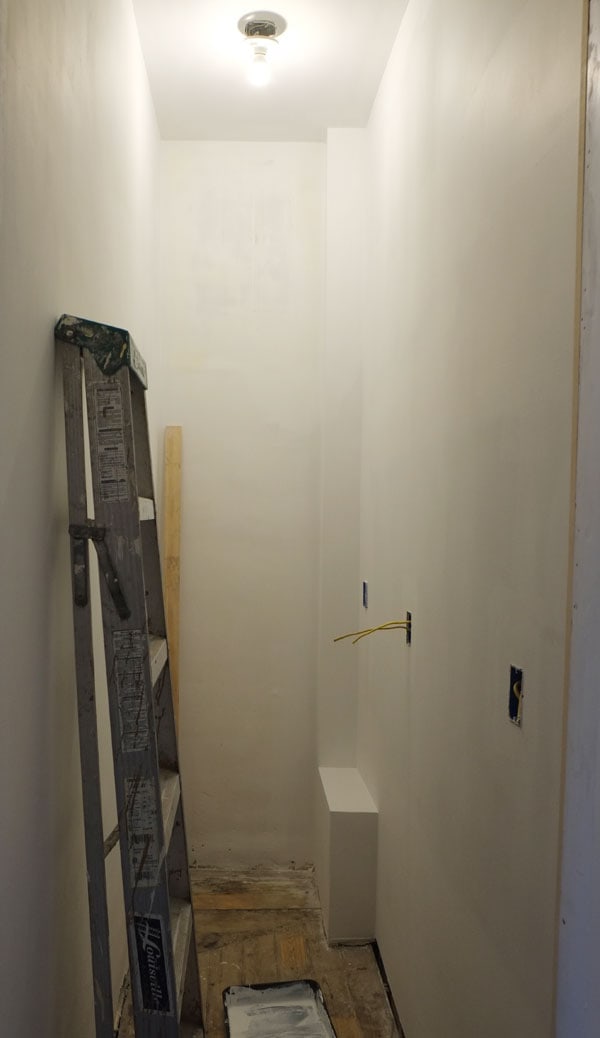
Remember a couple of posts ago when I explained the stupid horrible plumbing chase that had to be built in the back corner of the pantry? To refresh your memory, it holds the supply and return lines for a radiator above the dining room, and had to be built after we removed the old exposed pipes on the dining room side of the wall, only to realize that burying the pipes neatly inside the wall wasn’t technically an option in this case, as we had planned.
Stupid. So, so stupid. I have a couple of regrets about things I’ve done throughout this renovation, and this is a big one, not because I care so much about the pantry but because I envision this as part of the kitchen someday and I’m going to have to find a way to work around it then, too. In any case, instead of the nice simple awkwardly long rectangle I thought the pantry would be, it became an awkwardly long rectangle with an awkward plumbing chase and I became even less inspired to work on it. I do give my main man Edwin props for drywalling it so nicely and finishing all those outside corners so well, but that did not make me like it.
ANYWAY, it took me a long time to figure out quite how to effectively use the space in the pantry. I was inclined to just do open shelving all around and try to ignore the awkwardness of the chase completely, but that seemed sad and lame. I didn’t care all that much about the pantry being particularly nice, but after putting off working on it for so long and knowing how excited Max was about it, I decided to try to up my game and figure out a way to camouflage the stupid chase and eliminate its awkwardness from my life. The little skinny top section doesn’t really bother me, but that big stupid part at the bottom is what I wanted to never see. It sticks out over 2 feet into the room and just fills me with rage when I look at it.
Have I mentioned how I feel about the plumbing chase? No bueno.
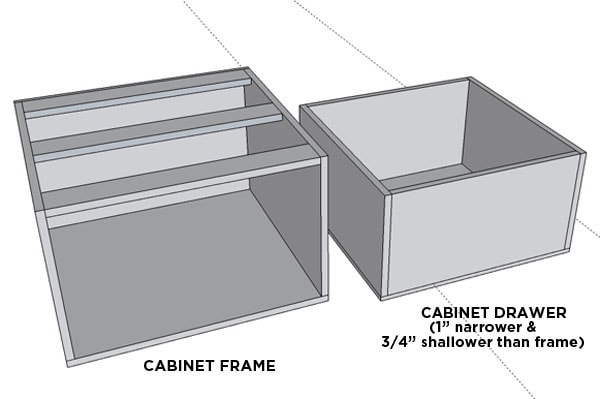
So I had this concept. WHAT IF: I just custom-built a little cabinet to fit between the wall on the left and the side of the chase on the right? What if I took it a step further and additionally built a drawer to go inside of the cabinet. And then what if I made the face of the drawer extra-wide so that it would cover the front of the chase, giving the illusion of a cabinet that spans the full width of the space? And then what if I achieved total world domination because my cabinet would be so boss that all who entered my pantry would pledge their allegiance to me as their sovereign overlord?
I found the cabinet idea appealing also because as much as I like open storage for lots of things, I don’t want it for all things. Since the rest of the plan for the space was open shelves, being able to stash ugly stuff away in an enormous, deep drawer sounded fancy and fun.
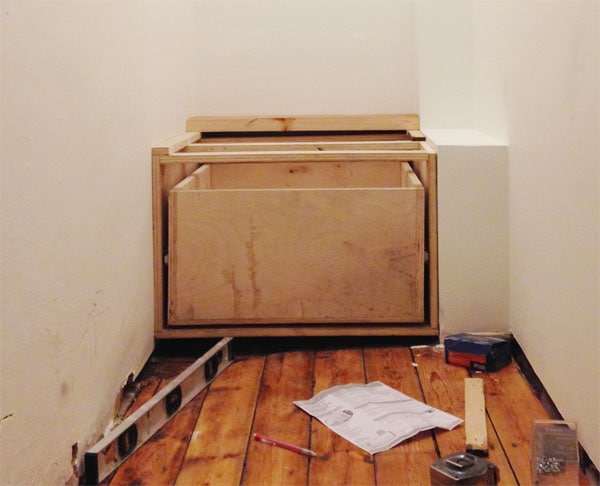
Problem was, I’ve never built a cabinet and didn’t really have much of an idea how, but I figured I could probably figure it out. I had the tools and I had the idea and I had a lot of the wood already from my scrap pile so it seemed like an interesting and possibly fun challenge that I would definitely not regret at all.
I don’t even recall making that SketchUp rendering, but I’m pretty sure it happened after I built the thing and knew I didn’t take enough pictures of the process to really explain the construction and stuff because I was figuring a lot out on the fly. My big disclaimer here is that I know this isn’t the most amazing way to build a cabinet (nothing is joined in any kind of advanced technical way) but it worked and seems very sturdy, so I guess I did OK.
So. I pretty much designed the frame to be similar in construction to what I can remember of putting together IKEA base cabinets. They’re built kind of like this, I think. I used a scrap piece of 1/4″ ply for the backing instead of the thinner masonite-y stuff you get with an IKEA cabinet. I also added that middle piece on the top because my cabinet was a little deeper and I wanted more support to affix the top to at the end.
The drawer is an inch narrower than the frame to accommodate some stock drawer glides I found at Lowe’s. I think I bought the nicest option, which extends fully and I think held more weight than the other options. They take up a 1/2″ on each side.
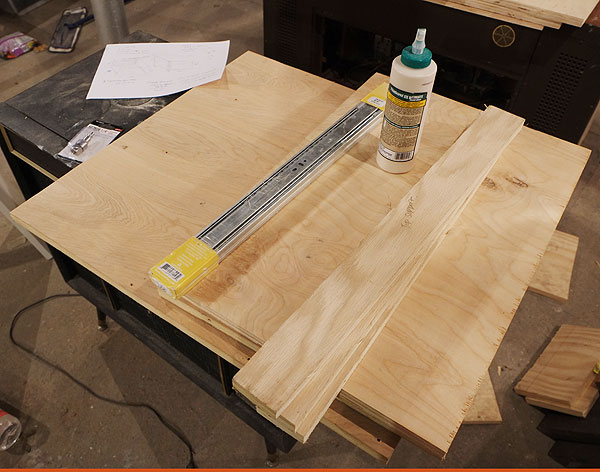
If you only look at the pile of pre-cut lumber, it would appear that I am very super organized in my approach to things. In fact I did this because I didn’t realize I was out of wood glue on the night I started with these shenanigans, so I decided to spend my time pre-cutting all my lumber without the satisfaction of assembling anything. This turned out to be kind of nice in the end because assembly went really quickly and I felt like a real badass in my filthy basement.
I cut all of this on my table saw, by the way, which is possibly my favorite tool investment ever. The table saw is really the star of this whole pantry showdown because I used it so much to cut down pieces of scrap wood into smaller dimensions. This would all be possible with a circular saw and a cutting guide, too, but it would take a lot longer and it would probably be harder to get things as precise as you want them with something like this.
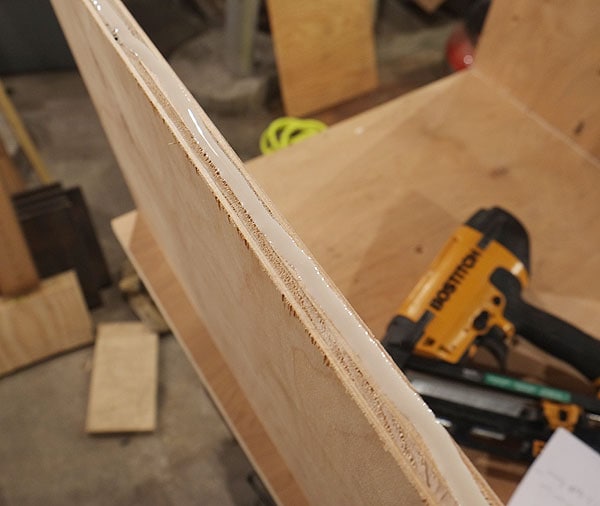
Anyway, onto assembly! The quick and easy way of assembling cabinets, I gleaned from flipping through a cabinet-making book in the checkout line at the hardware store, is a combination of wood glue, finish nails, and drywall screws. After applying a line of wood glue, position the other piece of wood, and use a liberal amount of 2″ finish nails to attach them together. Having an automatic nail gun is important for this part—I think it would be almost impossible to do with a hammer and nails just because things would get too out of whack.
Nail guns, by the way? WORTH IT EVERY TIME. It took me way too long to spring for a finish nailer, and I use it constantly. Aside from making you feel like way cool, it’s just so handy for all sorts of things, from trim-work to simple building projects. I have this Porter Cable air compressor and the older version of this finish nailer
, both highly recommended. If you’re doing a big-ish renovation project, I’d recommend going straight for the pneumatic options and ignoring the corded or cordless electronic stuff. I made that mistake and in my experience they don’t work nearly as well and are more prone to breaking/jamming, and the price difference really isn’t that big.
After everything was all nailed up, I drove a drywall screw in about every 6 inches at all the joints. I think I used 1.25″ coarse-threaded screws. Even though they’re called drywall screws, they work well at joining wood together and I prefer using them over wood screws. They’re cheaper, and I find that I tend to end up stripping wood screws but not drywall screws. The metal is harder? I don’t know. I’m not a scientist. I don’t have all the answers.
Anyway, fast-forward a bit and the cabinet and drawer is installed! Like magic. This space is only 32″ wide and the floor slants a little over an inch. It’s weird. There aren’t any real signs of settling and if you look at the joists in the basement, I think it’s actually been like this since it was built. I think the whole kitchen was an early addition and they just made an error in keeping the floor level with the original section of the house when they were building it, which is kind of cute. This was the mid-1800s or so, so I’m going to go ahead and say they had several valid excuses like having lots of dysentery but not lots of advanced modern tools.
Because of this, I opted to mount the cabinet by screwing the sides into the walls, rather than try to rely on the floor and bunch of shims and stuff. I used 3″ screws and went into studs on both sides, and the whole thing is super solid. Then I installed my tracks on the drawer and on the insides of the frame, slid the drawer into place, and that was about it. The glides came with some simple instructions that were helpful—it was all pretty straightforward.
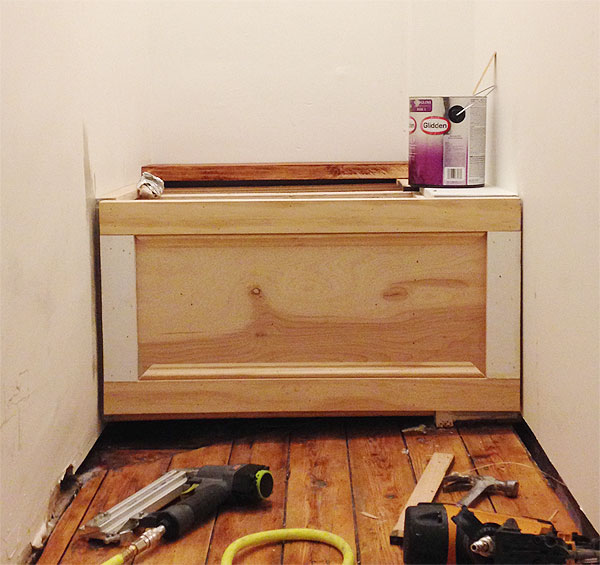
Next, the drawer face! I cut a piece of plywood to the width of the room, leaving about a 1/4″-1/2″ on each side so that the drawer could fully extend without scraping the wavy, imperfect walls on the sides. Because I was working alone, I recall face-nailing it into place in a couple of places (watching my level throughout), then driving several screws through the back of the drawer into the new face to really affix it properly.
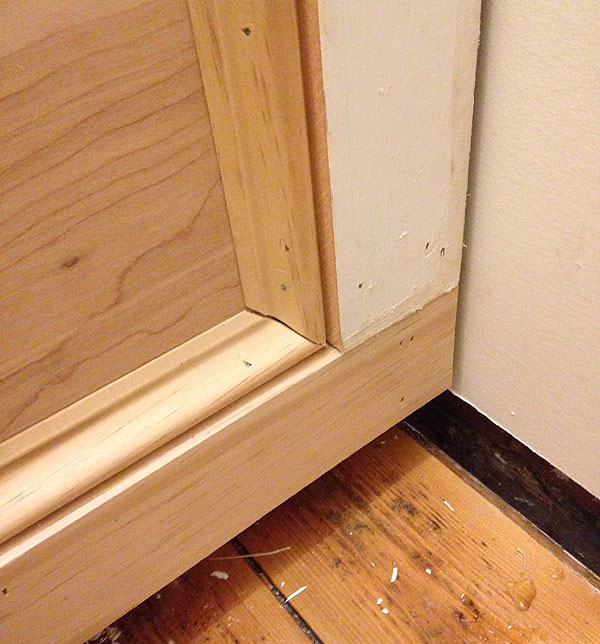
The only big thing left to do was trim it out! I opted for 1×3 for the border (scrap pieces ripped down on the ol’ table saw), and simple base cap molding to finish off the inset panel.
This is NOT how you construct standard door/drawer fronts, by the way. Doing it correctly involves more advanced (but, apparently, achievable by DIY-ers) joinery techniques and all manner of wizardry that someday I will definitely teach myself but that day was not this day. I did the same thing for that rolling cart in our laundry room so I figured that if it was good enough for there, it was good enough for here.
Yep, I’m well aware that this looks kind of shitty, but after caulking, patching, sanding, and painting, it really turned out swell. I cannot stress the importance in my life of caulk and Ready Patch enough. I first gave the whole thing a pass with my mouse sander, just to bump down transitions and rough up the previously-painted surfaces. Then, I gave the whole thing a first coat of paint. You could use primer, too, but the idea is to seal the wood and then apply caulk/patching. I’ve done this wrong in the past, but the idea is that you want to seal in the wood before you apply caulk. If you don’t, over time the wood will continue to draw moisture from the caulk and dry it out prematurely, meaning it will have to be scraped out and replaced sooner.
I really like Ready Patch for small wood patching, by the way. It dries harder than other spackles or joint compound, and sands a lot smoother than any wood filler I’ve ever used. It’s still a gypsum-based product, so I wouldn’t use it for large applications or high-traffic areas, but to patch over seams or old nail or screw holes or whatever, it’s perfect.
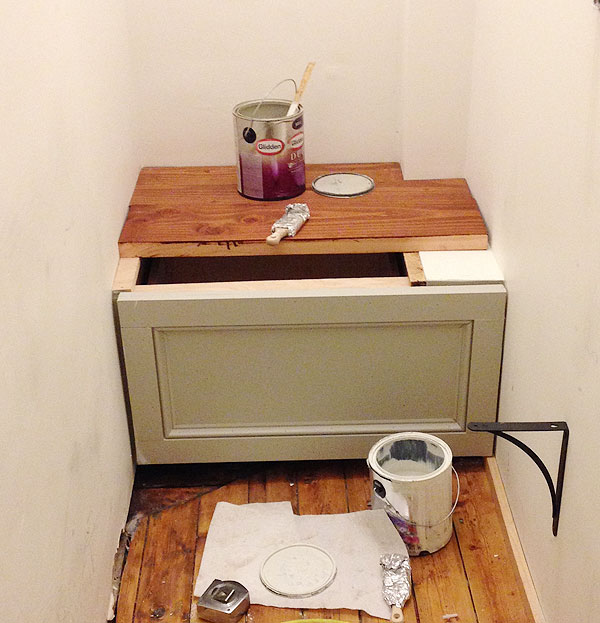
As on the transom window, I used the same semi-gloss Bedford Grey color for the cabinet face and the inside of the drawer. This is a terrible representation of the color, but this is what you get with iPhone photos taken at night. I think this photo was taken after the first coat of paint but before the patching/caulking, so it all looks a bit more seamless in the finished product. This is also a preview of the top and the shelving that came next, which is pieces of our old countertops! I just ripped the 2×12 boards to the dimensions I needed, sanded, and stained them a bit darker. Then I face-nailed the pieces into place with 2″ finishing nails.
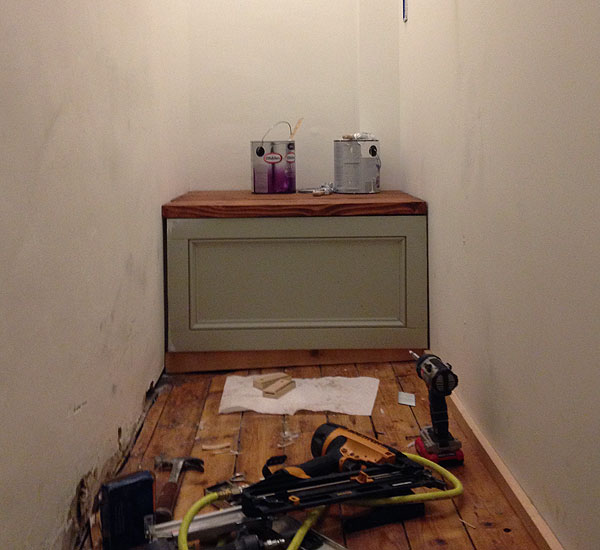
The last piece of the puzzle was installing the baseboard and toe-kick below the cabinet. The baseboard on the right is just standard 1×2 lumber, and the toe-kick had to be cut with my circular saw in order to account for the significant slope in the floor. Later on I finished off the baseboard on the lefthand wall with 1×3, but it isn’t in place yet because I had to do some more repair to the wall before I could install it. In a perfect world I would have taller baseboards in here (anything under a 1×6 tends to look too dinky in an old house), but then the baseboards would block the drawer from moving out, and I wasn’t willing to rebuild the entire cabinet just for the sake of taller baseboards in this glorified closet.
I don’t want to spoil the fun of the the big reveal by showing the totally finished result, so that’s about it! I’m totally happy with how the drawer turned out, and it packs a real punch storage-wise! Even though it’s not nearly as tall as a traditional base cabinet (it’s only about 18″ high), the drawer is deep enough to hold tons of cleaning supplies (Swiffer pads, gallon jugs of white vinegar, etc. etc.) that we needed a place for, but didn’t necessarily want out in the open. And because it sticks out about 27″ into the room, it helps eliminate some of the awkwardness of the overall length of the space, too. So that’s cool.


Genius!!
You made a drawer and cabinet! Who cares if you aren’t a scientist-you’re kind of magical!
I am tackling a similar project this weekend. The drawer glides are giving me all kind of anxiety, but it looks like you had no issues– that’s encouraging.
Yeah, I was really nervous about using them, too! They aren’t so bad. I think the trick is to just make sure you’re keeping everything level and as precise as possible when affixing the pieces to the drawer sides and the cabinet frame. Definitely a bit more challenging than putting together something stock, but not as hard as I’d built it up to be in my mind!
The amount of pleasure I get from seeing a new post from you in feedly account might be a tad bit obscene. I promise the fact that you’re also cute as button has nothing to do with it. I’ve said before, I live on a college campus and you’ve become a surrogate for my nesting instincts. Keep working hard. One day there will be food in that thar pantry!
O Bluestone, Bluestone! wherefore art thou, Bluestone?
Shucks! Thank you!
Ohhhh, Bluestone. It’s been at such a stand-still! No heat, bitter cold…it’s too hard to spend a lot of time in there, and really just limits what can be done…I don’t think it’s responsible to rough in plumbing until the pipes won’t freeze (or I have a heat system), and that’s at least couple months away. It looks like I’ll be starting a pretty big freelance project in the next couple of weeks, which should wrap up right around when I can get going on the cottage again. Luckily my carrying costs aren’t very substantial, so it’s not a HUGE deal to just sit on it, but I really hate the lack of progress. Poor little house :(
Daniel, think of it like this: Bluestone is hibernating (for one more year) in this bitter winter. It will awaken and be ready for it’s next new adventures in the spring!
Ack, the pains of a sloping floor! Our house is full of them, and it’s been quite the challenge in the kitchen especially! Our counters are shimmed by almost an inch from end to end, ouch.
Nicely done! That looks great. And thanks for that tid-bit on the caulk and needing to paint FIRST. Totally just solved a mystery I had going in one room. I thought the brand of caulk I bought was bad, now I know better!
This is such an ingenious solution to that awkward plumbing problem! Very creative and functional – I’d never know that the drawer front is hiding something. Excited to see the rest of what you’ve done!
This looks wonderful. I love that it makes the room less long. And I think that you’re having fun teaching yourself how to build things! Pantries are truly wonderful clean up areas–if you have unexpected guests just toss all the stuff lying around the kitchen into the pantry and close the door.
OMG. you’re a genius. I absolutely love it. such a genius solution to a major annoyance, additional practical storage, AND it looks classy and amazing… a triple whammy. can’t wait to see the finished pantry!!!
and LOL at those sloping floors… that might be the most sloped I’ve ever seen! in our (rented) house, all the floors basically slope away from the center of the house towards the front and back… if you look out the bathroom doorway into the dining room you’re basically at the apex and it’s SUPER obvious. but even that isn’t close to as bad as these!
It looks great ! Well done (and thought and built and caulked and painted) Daniel.
I love this solution! It’s brilliant!
Oh man! I feel so spoiled with three posts in a week! I think that cabinet/drawer situation is a great solution to your problem. Can’t wait for the big reveal.
It’s so much fun seeing that sad closet being made beautiful and useful. I do feel sorry for the 19th-century dysentery sufferers wielding their clumsy hand tools.
‘Blame It On The Dy-dy-dy-dy-dysentery!’
Very cool idea! You also made me chuckle this morning, which was a good thing.
okay I’m officially obsessed with this pantry….we too had an awkward weird space by the back door. Plumbing pipes ran up it but I knew there would be room for shelves if only someone could build them…enter husband number two with his tool kit….and presto…enclosed pantry with multiple shelves and tons of storage…all hidden away in a tiny space….
love me a pantry.
Dan, will you ever tell us more about your freelance projects on this site? I’m always so curious about what you do/how you get business now that you’re out of school.
Yeah, definitely! Sometimes it’s complicated to blog about because I’ve done a lot of smaller kinds of online consulting jobs where I provide a plan, product recommendations, that kind of thing, but don’t typically get to see a finished result, or have the opportunity to photograph it nicely. A couple times, clients don’t want the project published on the blog, which is OK, too. I’m in negotiations for a local-ish job right now, which is really exciting since one of my goals has been to do projects up in the Hudson Valley/Catskills region rather than remotely or in NYC, so maybe this’ll be the start of something? It’s also cool because they specifically want the blog coverage of the project, so assuming it goes through, you’ll be hearing about it, and soon! So anyway, we’ll see. The last couple of years have been a lot of flying by the seat of my pants job-wise and just trying to figure it out, in all honesty, without having to live more or less full-time in New York and try to get , er, a “real job” and stuff, so I’m hoping 2015 is the year when things start to fall more into place. We’ll all find out together, I guess!
That’s great! I grew up in the Hudson Valley (other side of the river though) and keep thinking about eventually settling back there in an old house I can play with. My town was settled in the mid 1600s and the houses are so unique. The west coast is fun, but it doesn’t have the same kind of old architectural history that I really loved back home.
I think a lot of us are inspired by how you’ve gone your own way, but the risky, shadowy logitical and financial mechanics of setting up freelance work such that it supports food, heat, fun projects, etc. seem more or less out of reach. It would be awesome to see how you’ve been able to make it work.
That looks great! I love your attitude, tool skills, and writing. I wish I could know you in real life.
Scorpion decking screws. Seriously for anything and everything that needs holding together. But I agree that sheetrock screws are otherwise preferable to normal wood screws for some odd reason. Cabinet looks great, nice solution.
Cool, thank you for the recommendation!
Daniel. You’re a badass.
Please come over to my house. I’m begging you. It’s only an 8-hour flight and we have the best waffles and fries in the world. I will feed you and bring you beer. Your dogs will get on fantastically with my cat (who happens to believe he’s a dog).
Ha! I think Mekko would probably try to kill your cat, as much as your cat may think he’s not a cat! She’s insane about cats.
Rest of the plan sounds great! :)
Pantry envy! We have a narrow but deep pantry cupboard in the place we’re renting while house-hunting. All storage is appreciated, but with such a deep space, an amazing amount ends up buried at the back, only to re-emerge in triplicate and well past its stale date. Shallow pantry shelves are my goal for a space we can shape to suit ourselves. Your snippet of pantry is looking practical and beautiful. As usual.
YES. I’ll talk about this more in the next post, but I’m actually super happy with the fact that this space can really only accommodate shallow shelves. I HATE HATE HATE not being able to see everything (even kitchen cabinets are too deep for most pantry items, I think) precisely because of what you’re describing! When we started putting food in the pantry and unloading the cabinets where it was being stored, I was really surprised how many duplicate and triplicate items we had, or just things I had no idea were in there! Who knew we had like 4 kinds of lentils? And multiple varieties of couscous?? Madness. It feels nice to use up some of that stuff now that we can see it all!
Daniel, What kind of table saw do you recommend? I might be getting on, maybe maybe. I’m a little scared of them from a safety perspective and I do have a circular saw, but they don’t make the nice straight cuts. Tool help is always appreciated!!
Hi, Suzen! I don’t have super specific brand allegiances, but mine is this one by Porter Cable! I think maybe it was on sale when I bought it…I don’t really remember paying that much. I really like it…I think it’s worth it to get one that’s on a stand and I love that it folds up and has wheels for easy-ish transport. I do recall it being a little challenging to assemble out of the box, but otherwise it’s been great! The circular saw still comes in handy sometimes (like for that angled toe-kick), but I use my table saw ALL the time. I wish I’d bought it sooner, which is pretty much how I feel every time I get a new power tool, haha. Oh, and for what it’s worth—I feel like table saws are more intimidating-looking, but are really much safer than handheld tools. I feel like it would be difficult to hurt yourself with this one, assembled correctly of course!
This is my first time posting and I have to say you have a great “voice” on your blog. I often am cracking up as I read. I love it that something bugs you and you figure out a solution that is both practical and beautiful.
I have been ruminating about a finish nail gun and then there you go writing about your favorites. It is super helpful when you discuss tools, please do it more!
And three posts recently, so great!
Thanks, Kristina! I appreciate that so much!
I’ll definitely think about how to incorporate more tool recommendations and stuff—I’ve even thought about adding a page on the site for things like that since I get asked about it pretty regularly. Plus, I love tools!
Please oh please do the tool page! I am a complete amateur/religious follower and would kill to have and share the resource. I’ve taken your recommendations more than once and been happy every time. Plus, marketing: not many blogs I’ve seen do that, so possibly a good differentiator for traffic.
OK, I will try to make it happen! The technical side of it is more complex than I know how to do, but it’s something I’ve been thinking about for a while now so I need to get on that. Thanks for the encouragement!
Great job. I’m always impressed by you willingness to jump in feet first and just do it.
Are you familiar with the expression ‘Do your best, and caulk the rest.’ This is my mantra when building anything and your post reminded me of it.
Ha! I love that. I feel like I need it on a t-shirt.
AAAAnnd we have another winner! Can’t wait for the big reveal AND news of the freelance project SO exciting. Have a lovely weekend.
I love it! I can get crazy stupid over hiding uglies like pipes. This is so beautiful!
Can’t wait for pantry reveal.
Clever, clever, clever! Such a functional little drawer that is!
First of all, SO boss! And secondly, man I REALLY want it to be true that my house is so slanted because the builders had tons of diarrhea!
Oh, this is the bomb! The shiz, if you will.
I love it when you say “this isn’t the standard way of doing things but I had all the stuff and I measured twice and cut once and it worked out”. It makes me feel brave.
Three posts and counting on the tiny little pantry. We’re all waiting for the big reveal. You are being such a tease. Where, oh where, did you learn that? BTW, I need a little itty bitty credit here for being the one mom who brought HER OWN toolbox to cub scouts (ugh, homophobic idiots, don’t get me started…) to teach all you little guys about tools when you were like 7 or 8. Pat on my back!
I know! I originally thought I’d just write one before-and-after post but then I went to edit the pictures and there were like 50 of them so I thought that might be excessive. Had to break it up!
You get lots of credit! <3
Oh yah, Mom for the win! FYI, you’ve been absent here too long, mother of Daniel; you have your own fan base. Consider your back patted. (P.S. As a h.s. graduation gift eons ago, I asked my parents for a hand drill. I had dreams of learning Great Skills and becoming the Great Renovator. It was not to be. But I still have that hand drill.)
I was about to post about you being a tease but your mum beat me to it…and in a typically humourous way. I’m as much a fan of her as you!
As a few other commenters have said — genius! I’ve been following your blog for the past couple of years and enjoy your writing style and especially your spirit. Things go wrong but you always seem to find the positive in the end and work through the rough patches. You’re gifted in many ways. And I just have to add that I so much appreciate your desire to improve your community by reviving the Bluestone Cottage. You don’t just talk, you DO. One question — I notice your pantry door is white and wonder why; all the other doors are black.
Thanks so much, Joanne!
The pantry door is white because I painted it back when I renovated the kitchen, and I didn’t think I wanted black doors then. The kitchen door is actually two-toned—inside is white, outside is black. At the time I think my reasoning was that between the deep grey-ish/navy cabinets and the black floor and the black radiator, painting the doors black (there are three in the room) would just feel like too much crazy contrast all over the place…which might still be the case? I don’t know! I think painting the pantry door black would probably accentuate the weird framing going on above it, so I guess I’m inclined to leave it white.
I was actually really enjoying that the pantry and firewood closet thing had white doors. It’s like, closet doors are white, room doors are black. To me it makes sense!
Reloving an old house is total problemsolving and you are, indeed, the boss.
Freaking love this solution, Daniel.
This looks fantastic. Cabinets with drawers are in my future, and I’m very intimidated by the slides, so this makes me feel encouraged!
Here is something I’ve always wondered, and now that you have built drawers, you obviously have all the answers: why is it called a “finish nailer”? “Finishing” to me means, well, something that happens at the end. But we use our finish nailer at the beginning, middle, and end. Like, I used to think we had to buy two nail guns: a regular nail gun and a finish nailer. (And by the way, I totally concur on how a nail gun will change your life. I can’t believe we went so long without one.) Any ideas?
I think because a finish nailer uses finishing nails, which are a smaller gauge nail that has traditionally been used for “finishing work” like installing moldings and stuff? Just like how framing nailers use big framing nails used for framing and roofing nailers use nails for roofing, brad nailers for brad nails, etc. etc. Right?
i agree with Daniel – I think it’s “finish” in the sense of perfecting, not “finish” like ending.
Perfect! Congrats!
mang, that looks fantastic! Good job on making the best of that awkward situation. I also dabble in renos/diy and I get a real satisfaction out of building something that looks professional from scratch. I’m super jealous of your tool arsenal and seemingly endless basement/workshop space.
Thank you Daniel for recommendation re: nailer etc., and links to Amazon. Products now in route to my house which puts us one step closer to completing much delayed flooring project. Alleluia.
Beautiful and ingenious solution. Love it!
Wow, that plumbing chase just disappeared! So badass!
Dear Daniel, I’ve been reading your blog for months now – for some reason I don’t understand it’s profoundly soothing and calming to my spirit – while inspiring and feeding my imagination – very grateful. I’m curious about what else is going to be happening in the space above this new cabinet – just leaving it open, as a space to put things or even sit on? or do you think you’ll be building shelves or a work surface above the cabinet? And I’m also curious about what you’ll be doing with lighting and wall decor such as pictures and mirrors. (I’ve just had my georgian flat in Somerset, UK redecorated, and all my wall art is being reconsidered).
Have no idea what you are talking about until I see the 5th picture! Blame it on my lack of imagination. Great solution to the “ugly” chase. Look forward to the reveal. ;)
I know I am jumping the pneumatic gun with this query, and should wait for the reveal, which will surely show what is going in above the drawer, but curious… This drawer not only hides the chase but gives you the closed storage and fills up the back of the narrow pantry so perfectly… Did you consider building more of the same and having a tall stack of drawers up the entire wall?
yes Jessica this is exactly where I was coming from in my comment! so so curious about this! I guess we probably will both have to be patient :-)
I actually read “I don’t know. I’m not a dentist. I don’t have all the answers.” first. I was confused. :D
I’m really happy with all the updates lately. I always laugh while reading, and usually have to read for my husband too. :D
What a clever boy!
I just discovered your blog, read a few posts, and you’re so funny! I’ll definitely keep reading :)
Daniel, you were already my sovereign overlord, even before you built the cabinet. I was your minion from the first time I read your blog about a year ago. Each post is equal to at least three posts for me since I reread the parts that make me laugh out loud multiple times. I frequently do the rereads out loud to my cats, who don’t find them to be as funny as I do, but who can understand cat humor. You are so smart, so funny, so clever, so handy, so cute, so kind….
My minionism is showing.
AWWWWWWW. Thanks, you! <3