
First, the Ace Hotel did it. Then The Brick House figured it out for the masses. Hindsvik did it. Five 2 eight did it. Now, I did it. Except miniature. Super long post alert, I hope you’re on your lunch hour. Check it, yo:

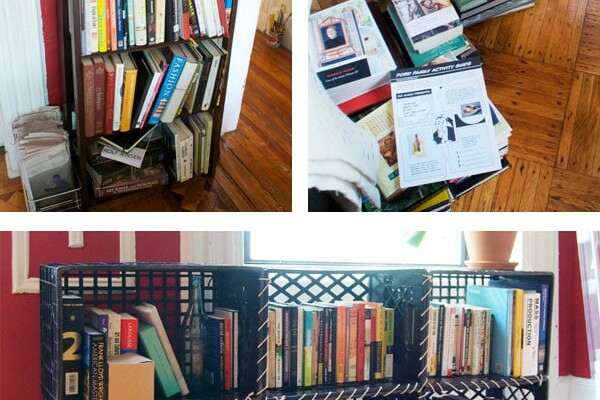
My whole workspace was sort of lacking in the storage department. I unpacked my books about 5 minutes after moving in back in May, and then shuffled them around my room in various precariously teetering stacks while I figured out a storage solution. I came this close to just biting the bullet and ordering one of those vertical CB2 Array bookcases, but at $189 for only five vertical feet (meaning I would have needed to get rid of some books or buy two bookcases), it wasn’t the most practical choice. And there’s no space for a real grown-up sized bookcase anywhere. Also, apparently I’m addicted to building my own furniture.
Since I can’t screw into our wood floors, I needed to figure out how to properly support this as a wall-mounted endeavor. I don’t know much about anything, but I tried to be aware of the weight and design a suitable bracket accordingly. This, gentle readers, was a feat of engineering. There were several drawings that worked on paper but couldn’t be constructed in real life and a good hour spent in Home Depot screwing different formulations of piping together like a confused, frustrated toddler. About 45 minutes in I was sitting on the floor, surrounded by plumbing bits and stupidly screwing T’s into 10″ pipes when another shopper approached me. It turned out he was also building shelves and wanted to get chatty about it, but I wasn’t in the mood. He was one of those strangers who didn’t get it, the kind who can’t take the hint and leave you alone with your tinker toys.This was Go Time, I was in the zone. He explained his shelving plans and asked about mine. I tried to explain my plan, but at that point I was mostly nonverbal and flustered so he just kind of nodded and smiled, the way you do shortly before walking away when you realize normal-looking people are crazy. It wasn’t fair, really– I came to Home Depot because I knew nobody would bug me. The employees would make themselves scarce, I assume all smoking pot in a back room, complaining about their jobs and plotting new schemes to piss people off. They wouldn’t give two shits that I was ripping the plastic packaging off every little piece of pipe for my own benefit. Sometimes you need that.
After Mr. Talkative was out of my hair I got back to business and eventually came up with this little ditty:

So simple, so obvious. So here’s what you need. Note: those small pipes are actually called “nipples,” but I will hereafter be referring to them simply as “pipes” for obvious reasons, giggling to yourself at work chief among them. They are all 1/2″.
- 10″ pipe: 3
- 2″ pipe: 6
- Tees joints: 9
- Elbow: 3
- Close pipe: 9
- Endcap: 3
- Flanges: 6
- One can matte-black spray paint
- 24 hefty screws (preferably already black)
- 2 planks of wood (mine are 7″x74″)
I definitely didn’t want the shelf to be very deep, just deep enough to accommodate my more sizable books.
THE STEPS:
1. Buy all your pipes, clean them well with Murphy’s oil soap, let dry, and spray paint them black.

2. Since it would really blow if this thing fell, I invested in a studfinder, which totally sounds like an online dating service for gay guys. In fact it’s a sweet tool that can, through witchcraft, detect the studs under your drywall. It was about $20 and totally worth it for the peace of mind. Especially in an old building, you can’t assume that the studs are standard distances from each other. Mark the center of your studs.

3. A level is a great tool to have for nearly anything in life, but especially for this (a real one, not the iPhone app which I’m pretty sure is a prank). Figure out how high you want your bottom flange to be off the floor and mark it. Then use a level to mark the rest of them. I lined up the bottom screw hole with the mark on the wall and hung all of the flanges so two screw holes would always form a vertical line (and therefore be affixed to the stud at the strongest point, the center). After your bottom flanges are in place, center your level vertically over your bottom flange and draw a line in pencil ten inches above your bottom flange. You’ll need this later (step 5)
4. Screw your closed pipes, your tee joints, the 2″ pipes and the elbows into your bottom flanges. The point of the tee is that it creates a level surface for your shelf to lay on. Then lay your wood on top, trace around the top of each elbow joint from underneath with a pencil. Remove your wood, use a paddle bit or hole saw (I used a 15/16″ paddle bit) to drill through where you just marked. I’d recommend a hole saw since the paddle bit can make your wood a splintery mess, as I found out.
5. Put your wood back, screw in your vertical 10″ pipes, the tee, the 2″ pipe, the other tee, and the closed pipe.
6. Now, getting it all on the wall is kind of tricky. I loosened all the screws on the bottom flanges about an inch so the whole thing could kind of fall back from the wall a bit (it’s a good idea to have two people for this part, Eva held the shelf up while the screws were all loose), which gives you the space you need to attach the top flanges. Re-tighten your bottom screws and affix the top flanges to the wall, the top and bottom screw holes lining up with the vertical line you made earlier. Sorry there aren’t pictures, it was kind of all hands on deck.
7. Lay your top shelf, making sure the edges line up with the bottom shelf. Trace the holes and drill. Lay it back on top and screw in your closed pipes and end caps through the holes.
Phew, the hard part is over. Now onto those finishing deets:

I insisted on using plywood because I love that exposed edge, which ended up being an expensive headache. Home Depot in Manhattan doesn’t sell 4’x8′ sheets of anything, so I went to Prince Lumber. First, they didn’t like that I was building my own bookshelves instead of just buying some. Then they didn’t like that I wanted plywood instead of the much cheaper wood planks. They especially didn’t like that I wanted 1″ thick plywood and eventually talked me into using 3/4″ instead. They didn’t like that I needed them to cut it down to 7″x74″ strips. They didn’t like that I didn’t want my scraps, even though I might as well take them because I paid for them. I’m pretty sure they just didn’t like me, which is odd because I’m so wonderful. Eventually we settled on 3/4″ thick Canadian Birch plywood, which they assured me would be strong enough for the load and wouldn’t bow. Then they called me a trust fund baby at checkout. My new wood planks had to go through that plexiglass window in the cab on the way back. It was harrowing.
Anyway. I really like plywood. It reminds me of sweet furniture I can’t afford. I taped off the top and b0ttom and used one coat of Minwax Fruitwood 241 on the edges.

Then I used glossy polyurethane over just the edge. I used about 4 or 5 coats, since the first two kind of just get sucked in and I really wanted to seal the edge well for what comes next.
Okay. You know when you’ve read something a really long time ago and then it just pops into your head and you feel weird about remembering it? That’s what happened with the description of this awesome black floor that Anna from Door Sixteen posted forever ago:

So I figured I’d try it, because that is sick. The process involves letting steel wool steep in vinegar, the resulting liquid of which forms a chemical reaction with the tannin in the wood to turn it a grey/black, the darkness depends on the amount of tannin in the wood and the number of coats you do.

The steps were:
- Take some steel wool, put it in the bottom of an empty parmesan cheese container.
- Pour in white vinegar.
- Let soak 24 hours.
- Strain into a cup to remove any metal bits, which will rust if they get painted onto the wood.
- Get to painting (I used a small foam brush).
Be careful with this stuff, since I found that any errant drips (like on my walls!) left a reddish stain wherever they dried.

I’m not sure quite where I went wrong– I painted SEVERAL samples on scrap pieces, all of which turned out a delicious silver grey, but the shelves themselves definitely came out a sort of greyish-brownish. I topped it with a coat of tung oil (what you see on the right), which might have made it browner? It’s still a pretty cool finish, though not exactly what I was going for. I’m still going to count it a success since vinegar and steel wool changed the color of the wood so much. Like, slow down science, you’re blowing my mind.
Then, dress it up! Of course I just HAD to clutter the top up with too much stuff, some of which has already been edited out. I just got so excited.

I like the idea of the bottom shelf being for books and the top shelf being a nice forum for a rotating display of art and objects. Those are my boring nerdy school books, the cool stuff is on the other side.

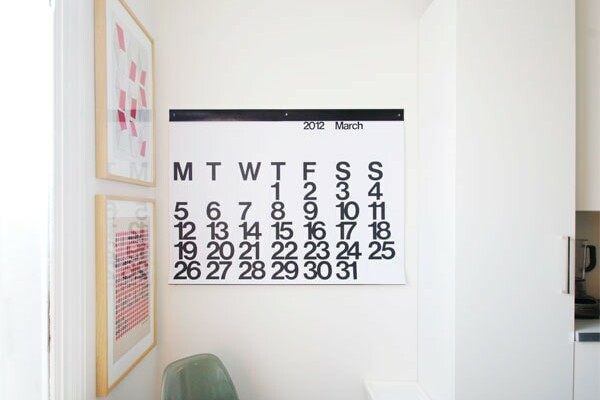
Yeah, I switched the picture above the desk to something smaller. It feels more balanced and makes room for the desk lamp, which had to switch sides so the right side of the desk wouldn’t look a hot mess.

There wasn’t a graceful place to put this, so here it is. The budget breakdown:
- All 1/2″ pipe: $54
- Screws: $6
- 1 Can matte black spray paint: $6
- 2 planks of 7″x74″ Canadian Birch plywood: $66*
- Vinegar: $2
- TOTAL: $134
*this could have been a LOT cheaper if I weren’t so insistent, but I wanted that damn ply.
So there you have it, a shelf. I like it.


Very cool. Although I miss the bigger picture above the desk. Does it have a new place somewhere?
By the way, maybe I will copy your desk. Right now I am struggling to decide between two desk ideas, both using things from my parents basement and one idea would be a ripp-off of your desk. But since I would only build it in the winter holidays I still have plenty of time to decide which way to go!
Do it! And send pictures! Yes, the old weaving thing is currently over my bed, but it’ll probably end up somewhere else. My poor art never gets a chance to settle in.
If I end up doing it I will of course send you lots of pictures.
Looks fabulous as per usual. Bravo, great job etc.
Two questions.
1. How did you drill the holes in the ply for the pipes to pass through without one side getting all splintery? Drill + hole saw bit, or did you have them done on a drill press? Everytime I try the drill+bit routine, the exit side of the bit gets all splintery and ruined.
2. Where/how do you store all your big tools and stuff in a tiny Manhattan apartment? The full-sized level in this case, but you’ve also obviously got a tall ladder for painting stashed somewhere. I presume that your place, much like every other apartment I’ve ever entered in New York is pretty much bereft of any serious storage space. Do you just rent all your stuff?
Inquiring minds want to know.
1. Ugh, I didn’t, the paddle bit totally effed up my wood. I’ll amend the post to reflect that, I kind of forgot. My brother bought me this Dremel Trio tool that has this little round sander bit, so for most of the holes I ended up stopping just short of where the paddle would break through and make a mess and switch to the Dremel to just sand away that final little layer.
2. Big tools, I wish! I wrote about it a little in this forgettable post, but that’s pretty much where all the tools are– in that drawer in my IKEA PAX wardrobe. The only big ones are my cordless drill and now this new Dremel tool, so they’re up on a shelf with the paints. I didn’t really need to for this project, but yes usually I rent stuff or have things cut for me!
You might try using the paddle bit halfway through from one side (just until the center point pokes through) and then drill the rest of the way from the opposite side – that has worked for me in the past.
Fantastic shelves!!!
I’ve always good luck using a few (2) layers of masking tape on either side. Seems silly, but it prevents the wood from splintering. Same thing if you’re using a table saw and you want to ensure a clean cut.
Paddle (Spade) bits are designed for cutting rough holes through wood. To achieve a smoother cut try a Forstner bit. The other positive thing about a Forstner bit is that they create square bottom holes.
I love the sides of yer wood. Very spunky.
Amazebox! Love this. You are so brilliantly creative; you really should be making and selling some of the fabulous creations you’ve come up with. You’ve really inspired me to get DIYing. I’m always a bit reluctant and unsure of the quality of the end result, but this super slick shelving has really given me the nudge to get working on some projects! Thanks for sharing! A super fun entertaining read as always.. 3 parts fun 3 parts informnative..Thanks : )
good call on the plywood, it looks great. i made a similar shelf after seeing it on brick house, except mine is floor to almost ceiling. i didn’t end up attaching it to the floor, i just put flanges on the bottom legs and gravity does the rest.
Oh damn, would you look at that! Love it! I’ll add it to the listy up top!
Great job, this looks awesome. And perfect size.
Love it! You’re just here to brag how great you are and to make me jealous of your handiness. I am :) Absolutely.
NIPPLES. Studfinders. NIPPLES!
Okay, now I’m actually going to read your post.
I’m hoping this does weird things for my stats.
Were the scraps that you tried it on birch as well? If so, I’ve got no idea why they were goregeous and your shelves didn’t quite work out. If they weren’t birch, but were probably oak, then your problem is the lack of tanins in the birch. Ebonizing only works on wood with tanins in it, and the best results come from oak and some of the exotics. But! In the future if you want to ebonize non-tanic wood, you can buy quebracho bark powder and mix it up with some water and put that on first and then ebonize and the tanins in the bark powder solution will soak into the wood and you’ll get an awesome black color. You can get the bark powder from taxidermy supply places. I did it on some pine shelves I made for a friend and it worked great. I found out about the bark powder from a popular woodworking article. A lot of the projects in it are ugly, but there’s usually some good information on techniques and processes that I think are really interesting. http://www.popularwoodworking.com/article/Ebonizing_Wood/
Regardless of the fact that your shelves didn’t quite turn out the right color, they look great. I’m going to reface my horrifying vanity this weekend using your method. So excited for a slightly less hideous bathroom!
Woah, thanks! Ebonizing wood is cool. The scraps were from the same wood (I did keep the smaller pieces, about 2’x7″), but it just looked different! I can’t figure it out. It’s still definitely grey-ish (it doesn’t look like stain, more like weathered wood), just browner than I would have liked. I’m hoping that as the tung oil dries out a bit it’ll fade into greyer territory.
I love your bravery with just attacking projects. You are simply impressive!
I wonder if maybe, due to its position next to an it’s-supposed-to-be-more-cluttery desk area, the shelves would look better with just books and bookends on it. I think that’s probably what I would do, but then again, I’m too chicken and lazy to build Ace shelves.
Incredible, you.
Nice…and good for you not compromising on the wood you wanted…it looks great. I hope you’re still blogging when you’re my age so we can see the kick-ass house you’re going to build!
pretty damn awesome
Hmmm. So I sort of landed here from Door 16 late yesterday night (or early morning around 4 am). I bookmarked it to go through it, but had to run off to class today morning and I guess I kind of forgot. I started reading your blog and could not stop at all. Even for loo breaks. In an afternoon, I followed your journey from the dorm room to your fab apartment. I didn’t know whether to comment on the posts that I particularly liked or just to post a BIG HELLO.
Anyways, I guess I just wanted to say that I really enjoyed reading your blog and lots of love from India.
Well thanks, HELLO back! If I ever make a Manhattan Nest trivia game, my money’s on you.
Damn! Love this, love your blog, love you. If only all roomates were handy dandy cool cats like you!
Nice work. Hope it was okay to re-post on my blog. Of course I gave you full credit.
of course, thanks!
Love this! Great work.
For future plywood projects, I have always found the guys who work at the Home Depot in Gowanus to be ready, willing and able to cut plywood for me — even when I want something absurd live twenty cuts. (I usually call first to make sure the saw is working — just in case.) Plus, they’re never given me a hard time about leaving the scraps behind. However, due to its location, you definitely want a car to make a visit. Oh, I’ve also had the Home Depot on Northern Blvd. make plywood cuts with no objections.
LOVE it! So much cooler than the CB2 shelf you almost bought, which I secretly find quite ugly. Your shelf, however, is fantastic. And that little corner of the room is awesome! I like the sleek and simple style.
OMG. You are the most incredible child ever. Love the creativity and your writing, as always, extremely well done and entertaining. Please explain the trust fund baby comment. Say what?
Awesome as always
I LOVE this! If I were brave, and if my walls weren’t paper thin with no existing studs (seriously, I’ve tried to find them and I think they ran away), I would totally try this! Kudos!
Pure genius! Love all those “trust baby” finishing details!
Do you think this plumbing pipe idea could be adapted to making a shower rod for a shower open on three sides, with an extra support pipe affixed to the ceiling or to the next wall? I see two elbows and three flanges (the flat, round parts that screw into the wall, right?)just fine, but what kind of part could attach the support piece to the u shaped structure so that it holds up the horizontal part of the U, zat is la question! Whew – does that make ANY sense?
Thanks if you can help -and thanks for sharing all that you do, even if you can’t…
It does make sense, I’m not really sure! I ALMOST made something exactly like what you’re describing for my bathroom, but I felt like the curtain rings would get caught going around the elbows on the corners, so I didn’t. I guess you could use a tee like 1/3 of the way down on the horizontal part and attach your vertical support there, then just accept that your shower curtain can only open that far? Does that make sense? I’ll keep thinking…
Thanks for thinking! You’re right…the elbows are going to cause trouble, unless I can find some that make a smooth curve! I would have to use smaller diameter and probably lighter-weight tubing anyway. What is supporting your already-curved shower rod, I wonder – that skinny bit??
if yoy have a pipe bender or know an electrician who can bend 90 degreed sweeps you could make the rod out of one piece of EMT electrical metallic tubing and then either hanger iron or threaded rod to hold up the horizontal part.
1/2″ copper pipe would serve too, use “caps” instead of flanges on the walls and ceiling and a “tee” piece below the ceiling cap. bore a hole in the center of the caps circular end and insert a washer to secure to the wall/ceiling
Yeah, that tiny piece of rusted rebar is somehow attached to the ceiling, but all that’s been spackled over. The shower curtain doesn’t open past that point.
brilliant job on the bookshelf love, just a quick tip if you really don’t like prince go to nuthouse on 29th/3rd ave they’re 24/7 i believe and are really really chill
studfinder. ha.
great post. Aside from being an awesome furniture builder, your writing rocks.
Wow, it’s amazing, I just love your version!
Brilliant! I have been googling pipe furniture lately because I want to make a desk with pipe legs, but not just boring straight ones. I’m not quite ready to figure it all out yet, but one day soon I’ll go sit on the floor at home depot. I have the top of an old ikea armoire to use for the top, I think the whole thing could be pretty cool or unspeakably lame. I’m hoping for the former.
And kudos too, for dealing with chatty man and unwilling wood cutters. I hate it when people get on my nerves.
WOWZERS!! Blink, blink Daniel. You are a superstar. My only regret is that you are not my husband…sigh! No seriously, you should definitely study Interior Design, not only do you have the flare, you are a super DIY designer. Many peeps only hope to have your design style and know how after they have graduated. Seriously think of going to Parsons or something you would do very well, and it seems like you really enjoy!
Cheers,
Jai
Dude. It is the best version so far.
Great job.
I’m going to have to try that vinegar trick…
I need to make one of these! Love it!
I need a stud finder. I went to hang a curtain rod when I first moved in and… it just… came out of the drywall… ON THE SIDE OF THE WINDOW how can there not be a stud there? I know nothing of construction but I feel like… there should be wood. Alongside the window.
Every time you post a new project I look around my house glumly and turns the lights off.
You WOULD think there would be studs there, but who knows! Since curtains aren’t too heavy, you could probably get away with some good drywall anchors as well if you want your curtain rod brackets in specific spots. They should be able to give you the right thing at your local hardware store!
Oh, I pretty much only show the good stuff. It gives a skewed impression, you should see the sorry state of the living room.
If you like pipe furniture, JunkArchitect at junkarchitect.com or at Junk Market Style has invented the most beautiful plumbing pipe dining table. It is really a beautiful table, it is hard to see what it is made of. Look for it. Daniel, you never fail to surprise me. Your vanity project: does that mean that you can turn all 70’s Mediterranean furniture into shaker by adding boards to the front or drawers?
I think your shelf is MUCH more amazing that the one you almost bought. I’m going to redo my bathroom and think this might make a fabulous shelf in that room.
Awesome! What’s the deal with employees at hardware stores being jerks? I don’t get that…you’re providing a service, folks! I get it too though, cuz I’m a chick and it’s supposed to be out of my territory. It’s good that you’re able to shrug it off and stick to your guns about what you want though.
Love your apartment-you’ve done some amazing work!
Amazing as always.
Wonderful, wonderful job. You are one talented dude. You have almost pushed me to the point where I will consider tackling my own DIY shelving project. A few more re-reads of this post and I might get there.
This is so incredibly awesome and makes me curse my home for having concrete walls. Next place we live, I am so implementing one of these!!
this really is amazing. And makes me curse having concrete walls that I can’t screw into. Your execution is great and I can’t wait to tackle something like this in my next home!!
Just wondering where you got the picture of the fisherman.
My grandmother had the exact same thing – I always thought she had made it.
She passed away last year and sadly I am in the UK and have no idea what my sister did with all of her things.
Love the room BTW.
I bought it in a Regina, Saskatchewan thrift store for a few bucks! It has the following written on the frame: “No 0640 Copyright 1977 National Paragon Corp.” I looked into it once, it looks like this company used make needlepoint kits, kind of like a paint-by-numbers, but for needlepoints. Maybe one of them will turn up on Ebay sometime?
Thank you! I assumed it was a kit, but wasn’t sure.
It just hit me when I saw it on your shelves. I always loved how kitsch it was.
To Susan: if you put in a permanent search to ebay for something like: needlework, fisherman, paragon kit, or something similar, you might find an unworked piece of cloth. These Paragon kits were very, very prevalent in the 60’s and 70’s. I’ll bet that you will find one within a year. If you just get the unworked kit, try it yourself, it is not difficult. Daniel: only needlecrafts with equally spaced holes are called needlepoint. These are worked so that the canvas is completely covered with yarn. What you have now and had in your Canadian apartment looks to be crewel.If you can stick a toothpick under the threads of the design, it is probably crewel. Crewel is an embroidery on a rougher type, more lineny type cloth with thicker, yarn like threads. Regular embroidery is done with two to four colored threads on a plain cloth usually preprinted with a schematic. I think this is what the fisherman is.
Thank you Ann :)
I’ve just done an eBay usa search and turned up two. Looks like I’ll have a project for the winter.
still loving it so much I had to add to my post faves this week:
http://spicklebee.blogspot.com/2010/11/fancy-friday.html
First off, thanks for the kitchen encouragement on my blog! I’m getting excited to finally have a kitchen, and a super awesome one at that.
Next, love your take on the pipe shelving. Great job! A few years ago, when he was just my sweet and charming boyfriend, my husband made a side table for me out of polished copper pipe for my birthday. His dad and grandfather are plumbers and he grew up working with them, so it was kind of an ode to his family trade. I’ve been in love with pipe furniture ever since.
Last summer he also made me a wheeled clothing rack out of pipes (and reclaimed wood from our old fence!) http://thirtyeight20.blogspot.com/2009/07/ss-reclaimed-clothing-rack.html
Pipe shelving will be happening in our kitchen as well — probably on roughly the same scale as yours. Perfectly rustic. Love it!
For readers who happen to be in places with non-useless Blue or Orange stores, always check the culls bin. I got a similar amount of similar plywood, cut for me (because nobody shops for lumber at 8am on Black Friday anyway) for …. 51 cents.
Hi! I tried making this shelf yesterday and blogged the process. Check it out!
http://larn.tumblr.com/post/2542670116/building-a-shelf
Hi again,
So I used your shelf design as inspiration to make a coffee table after discovering I couldn’t mount a shelf on steel studs. What do you think?
http://larn.tumblr.com/post/2803033810/demi-picnic-table-more-photos
Totally coool! Great job! A little late (sorry!), but in the future, you might try using some good drywall anchors if studs aren’t an option. Might not be able to hold a million books, but those anchors are quite strong and it would definitely be usable. But I’d say it all worked out! Congrats!
Thanks! I’m really happy with the results. The table is actually going in my application portfolio for an Industrial Design program. The blurb underneath the table portfolio pics will cite your blog as my inspiration. I also employed your technique of sitting on the floor like a 4 year old and playing with pipe pieces until I got what I wanted. You should have warned that the pipe threading will tear your hands apart! I had a Bruce Campbell screaming moment after I sliced my fingers unscrewing an end piece.
Apropos, drywall anchors- I’ve used them to hang other smaller items but am going to stick with bookshelves.
Awesome idea. I just found your blog today—it’s so inspiring! Nice work!
Fantastic post – thank you for sharing.
(UES, tiny apartment, shelving this weekend)
Daniel!
Awesome.
Where’s your little plant holder from?
Ikea!
Hey, been following your blog for a while now and loved it every step of the way. They way you write is just so entertaining that it’s fun to follow your crazy DIY projects.
Anyway, I’ve kept coming back to this project and wondered if I should do it myself because I’ve started running out of space for my books. So, yesterday I got my boyfriend to accompany me over to Home Depot to see what we had to work with. At first he was very skeptical of the whole thing since I’m not exactly known for my craftiness and more for getting way over my head.
However, once I got him on board he got really excited about this and seeing as he’s moving in in few months the simple wall shelf started developing to accommodate some of his things, like the TV. So now we plan on making an entire bookshelf/media center that still has to fit into my bedroom (I have a roommate). Needless to say, I’m getting really excited and have already started designing the selfs and figure out the math.
So I just wanted to thank you for your wonderful and inspiring work so far. Can’t wait to see what you’ll be doing with your new place.
Just a thought…. For your non grey turning, low tannin plywood shelves, you can try painting on a mix of well steeped black tea water first. It adds tannins to the wood ( that oak and other woods have naturally) and is easier to get than quebracho bark powder mentioned above.
. Once it dries, use your vinegar / steel wool mix…. It should be much less brown. ( movie/tv scenic artist tip– we have to do old grey fences and wood a lot)
Just discovered your blog, it’s fantastic
/ Lisa K
This is simply brilliant…and totally works with all the odd NYC properties. I’m thinking about adapting this for a stereo component shelf/stand.
Hey Daniel —
Just finished a shelf of my own using your tutorial — had fun reading this post, but not half as much as doing the project!
Here’s some pics if you were interested – stained mine dark with Jacobean
http://www.flickr.com/photos/chrisvanderwall/sets/72157607081696112/with/6354915787/
Thanks!
Oh man, that looks awesome, Chris!