

Since I’ve been dealing with something of a forced hiatus from working on the cottage due to the gas/heat issues, I’ve taken the opportunity to refocus on my own renovation. Remember that? A lot of people in my life have assumed that since I’ve taken on a whole other renovation, my own house must be close to completion. VERY FALSE. I could try to list all the things I still need to do, but it would take you like three days to read and give me a panic attack, so just take my word for it. It’s a lot.
I’ve talked before about the room at the front of our house, which was likely originally a parlor. It’s the first room t0 the right when you walk in the front door (you can look at a floor plan here), and essentially rounds out the side of this floor I’ve been working on since we bought the house—first with the kitchen, then the laundry room, then the dining room. A while ago, Max and I decided that this room would be a study/library/office type space (since there’s a much larger living room right across the hall), but we’ve since sort of switched gears on that. Realistically, the “big living room” is probably a couple years off—even though I’m dying to get to it, it’s low on the priority list. I don’t want to wait that long to have some kind of space to sit and hang out and entertain, though, so I want this to be the living room for now! It’ll still house the books (or most of them, anyway), but also a couch and a couple chairs and stuff like that. I’ve been working hard to get it done-ish before the cottage drags me back into its clutches.
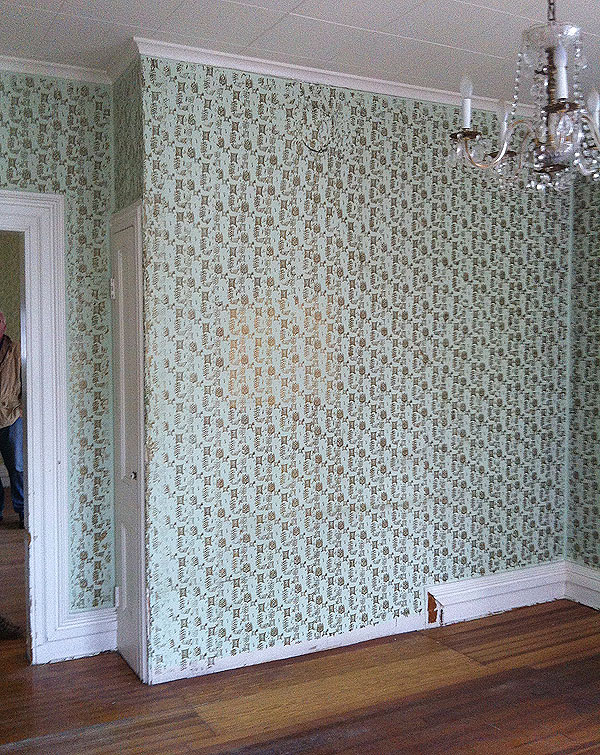
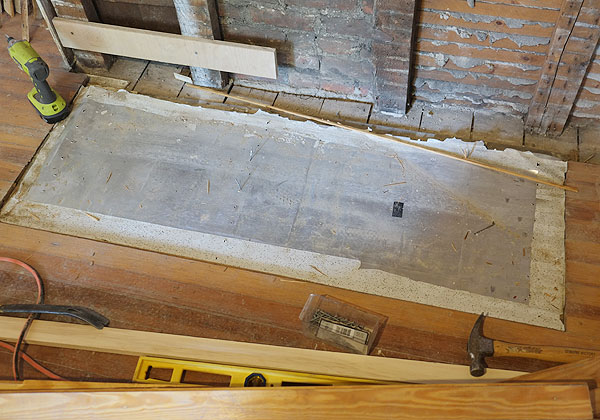
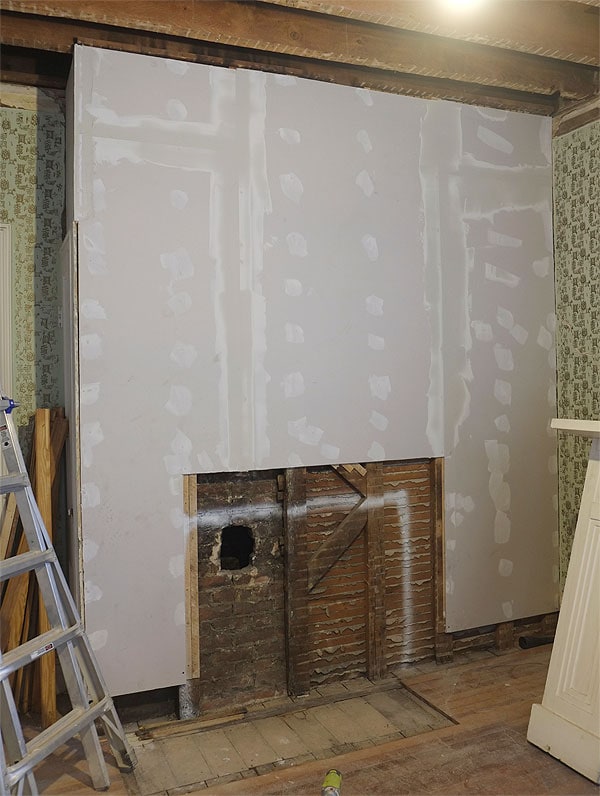
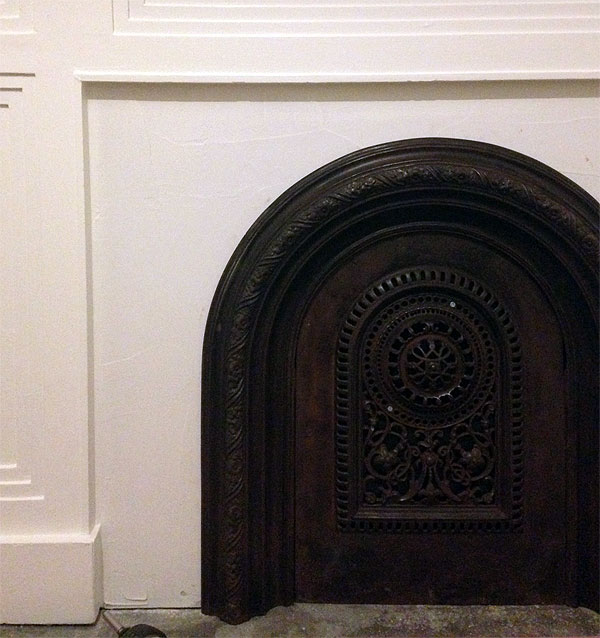
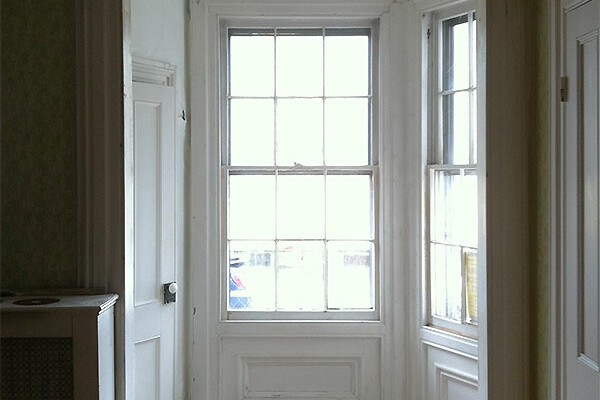
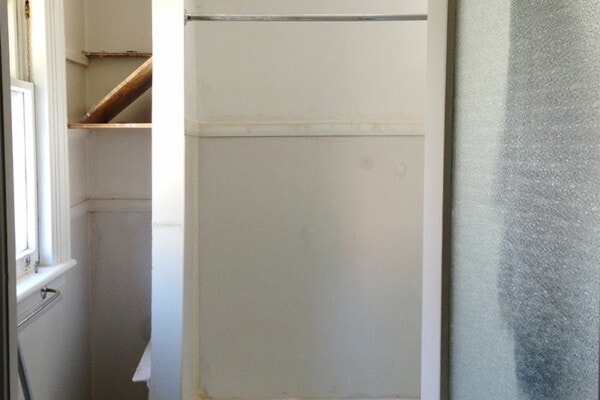
ANYWAY. I’ve talked about this before, but one of my big conundrums with this room was the feeling that there was something missing. The wall that the room shares with the dining room is bumped-out, and there’s this narrow/shallow little closet on the side that I’ve been informed is called a chimney cupboard, and would have been used for wood storage and whatnot. You can kind of tell from the crappy picture above (taken at our first walk-through) that there’s a large patch in the floor in front of this wall, and that the baseboard ends abruptly.
I’m not sure exactly what was here originally, but I have a couple reasonable guesses. There’s a chimney behind the wall (which has since been dismantled below the roof line, so doesn’t actually do anything), and a vent hole up near the ceiling. The floor patch indicates that there was some kind of stone hearth set into the floor here, and likely a wood-burning stove sitting on top of that. Our house was built around 1865, and since radiators didn’t come into use until the end of the century (and could have been installed here as late as the 1920s, perhaps), wood stoves would have been the original heat source. As for a mantel, it’s anyone’s guess. There’s a beautiful marble one in the big living room, but whatever used to live on this wall has been gone for a long time.
Given all of this, I had this big idea. Why not put something back in that spot? Even if it didn’t actually serve a functional purpose, a proper-looking fireplace would go a long way toward anchoring the room and providing some nice ambiance. The fireplace in our apartment is purely ornamental, but just the fact that it’s there gives the room so much. So that is what I set out to do. Fake fireplace plan: a-go.
A quick word about the fakey-ness of it all: I feel so weird about this kind of thing! I sort of think of myself as a modernist renovating an old house, and this kind of thing feels distinctly not-modernist. It’s the same feeling I get about putting up a bunch of foam ceiling medallions (which I’ve faux-aged on top of it!) or trying to recreate original molding work like I did in the laundry room. What’s so wrong with new work looking…new? Isn’t there something much more honest and authentic about just embracing all the original detail that does remain in this house, and allowing the new work and materials to just be what they are? I don’t know. I think about it a lot. But at the end of the day, I guess I want the house to seem more impeccably preserved than it actually is, for better or worse. So I’m going with it!
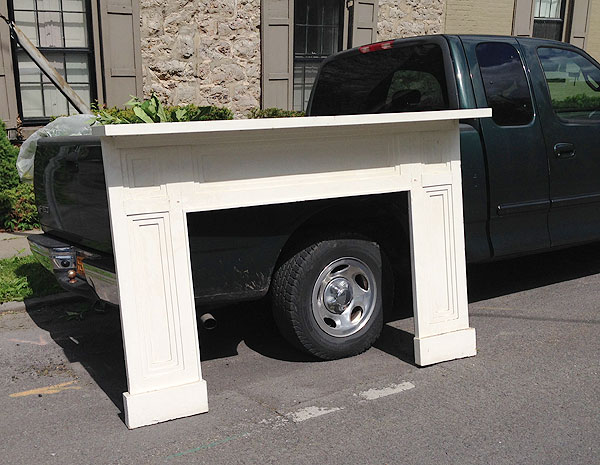
SO, now that I’ve written like 700 words and bored you to tears, let’s get into how this faux-fireplace party went down. It started with this mantel. Back in MAY. Yeah, this took a while from start to finish. My wonderful and insanely talented friend, John, ripped this mantel out of his house during his own renovation, but had stashed it in his basement instead of tossing it. His house was built in 1723, and this mantel was fabricated and added in the 1920s. I’d say John’s renovation sensibility is a bit more purist than mine, so he worked with a woodworker to custom build a more period-accurate mantel to replace this one (which is gorgeous, by the way). So anyway…John had a mantel, I needed a mantel, John didn’t want any money for it, I like free things…it worked out.
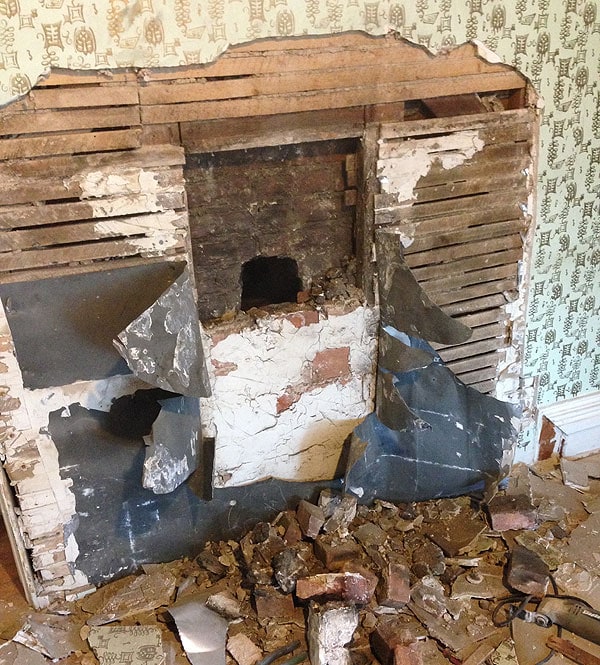
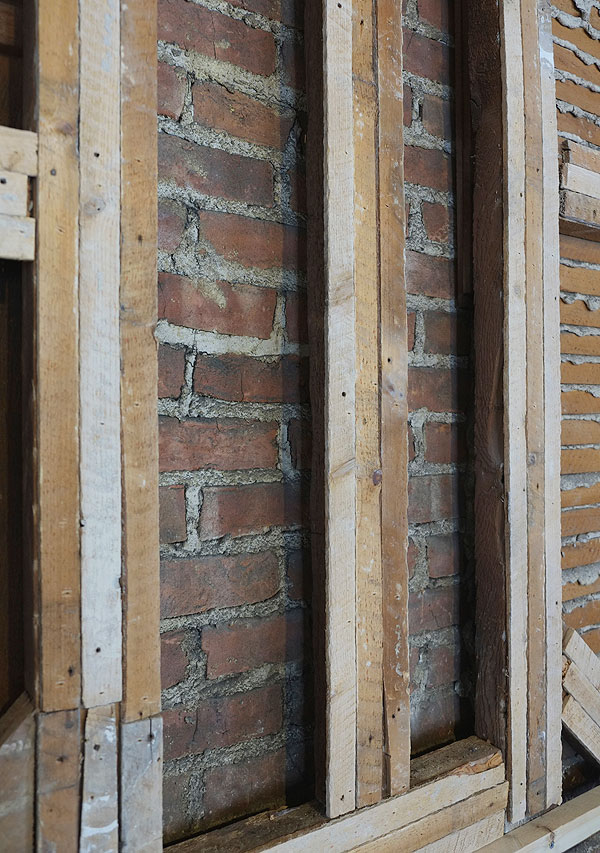
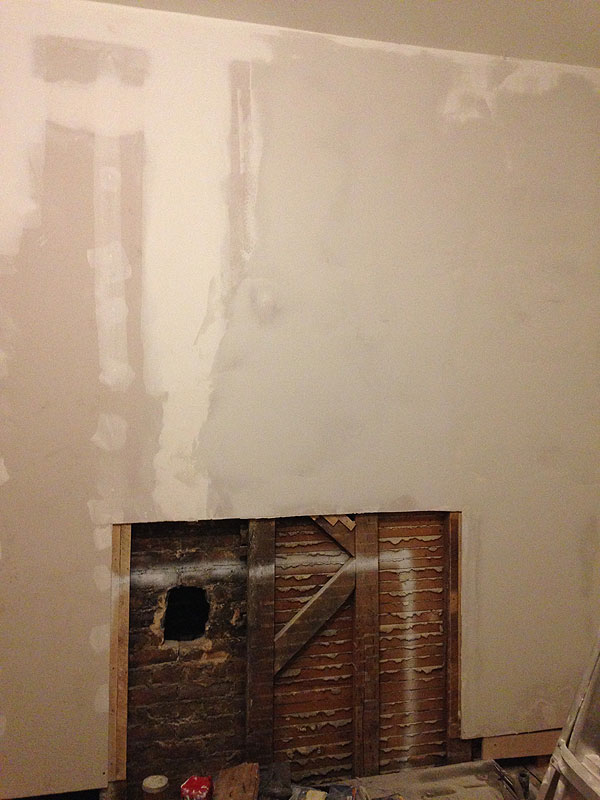
When I got the mantel home, I opened up the part of the wall where the old mantel would have theoretically been, wondering if I’d find a firebox or just the chimney. Just the chimney! Since there wasn’t any depth to work with inside the wall, whatever would go on the inside of the mantel had to be essentially flush with the wall. Hmmm. Hmmmmmmm.
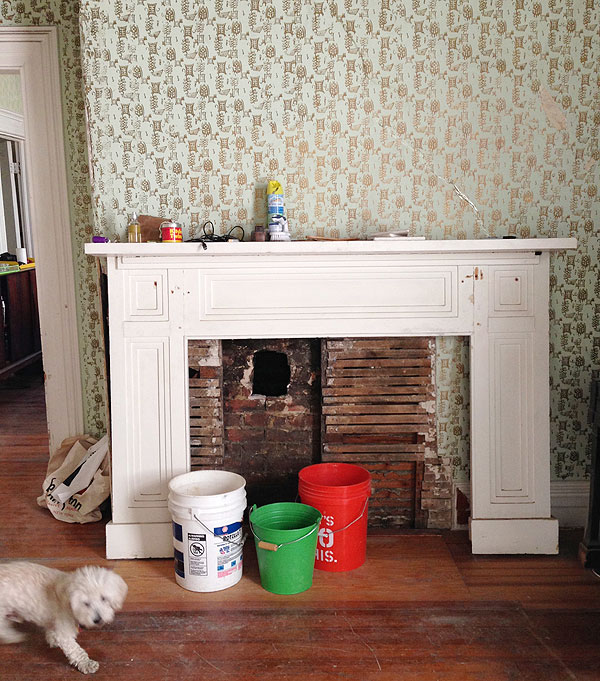
I dragged the mantel into place-ish (Linus assisted), just to get a sense of how it would look and feel. Even though this thing is quite a bit newer than my house, I feel like it plays really nicely with our moldings. As you can tell from the floor patch, it’s about a foot or so wider than what was here originally, which is something I sort of fretted over before deciding to just go with. I really didn’t want to get into trying to hack the mantel down to the “right” size (I liked the proportions of it as-is), and I really liked the idea of using this mantel in particular because I had it, I didn’t have to pay for it, and I liked the whole story behind it. Something new or salvaged just wouldn’t have held the same meaning to me.
So, onwards! I removed the old patch job with no real plan about what was to go in its place, but sometimes you just need to dive in and figure it out later.
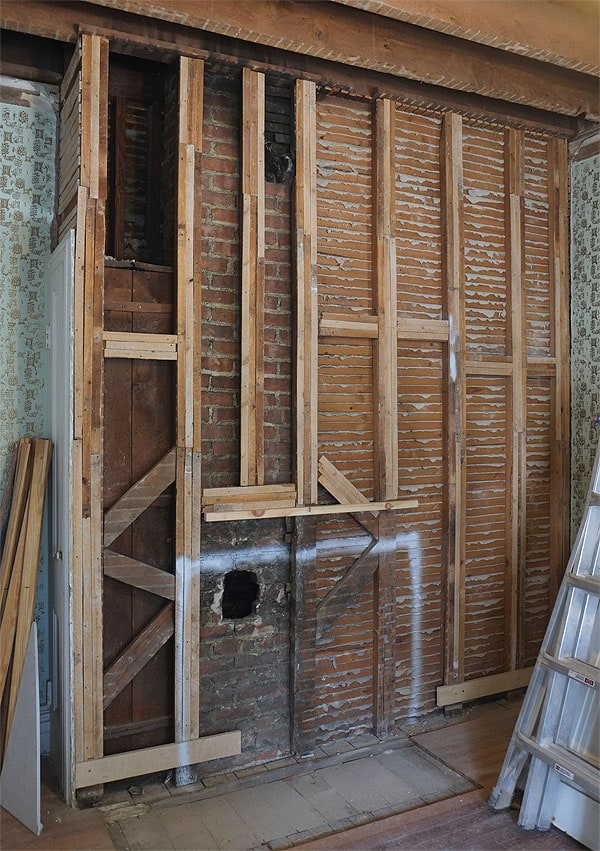
Unfortunately, this plaster wall was just beyond the point of trying to salvage. The plaster had separated a lot from the lath, it had some very significant cracks, and had undergone some failed repair attempts over the years with lots and lots of joint compound but nothing (like mesh tape, plaster buttons, or screening) to stabilize the plaster from further shifting. Even though I want to save as much of the original plaster walls in the house as possible, the best course of action here was to just start over, so that’s what I did!
Since new 1/2″ drywall wouldn’t match the original depth of the plaster walls, I experimented with reusing the original lath strips, this time nailed directly onto the wall framing. I could have also just left all of the lath in place, but I’d already taken it down and this allowed me to still salvage the bulk of it for some other use down the road. I have no idea what to do with all my lath, but I’ll come up with something!
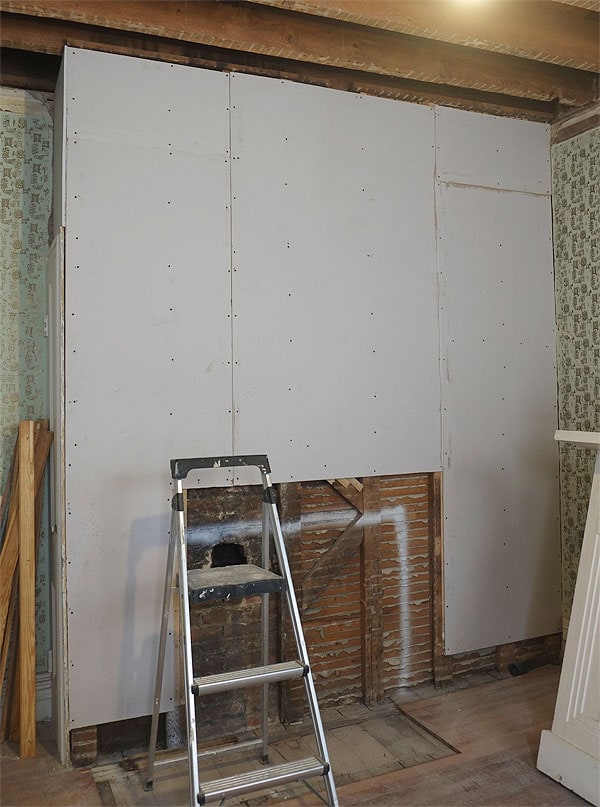
Putting up the new drywall was no big thing. Since the underlying framing wasn’t very smooth, the drywall wasn’t either—but I had a plan! I actually wanted it to be a little irregular to mimic the look of the other plaster walls.
I used fiberglass mesh tape and joint compound to cover the seams and screw holes. You typically do three coats of joint compound with new drywall and then finish off with a fine sanding before paint.
I wanted to experiment with getting more of an authentic plaster look, though, so I opted to skim-coat the entire wall with joint compound. I just used the pre-mixed all-purpose stuff, and I wasn’t too careful about it: I wanted the thickness of the skim-coat to vary slightly along the surface of the wall. In some places it’s barely there at all, and in some places it’s probably about 1/8″ thick.
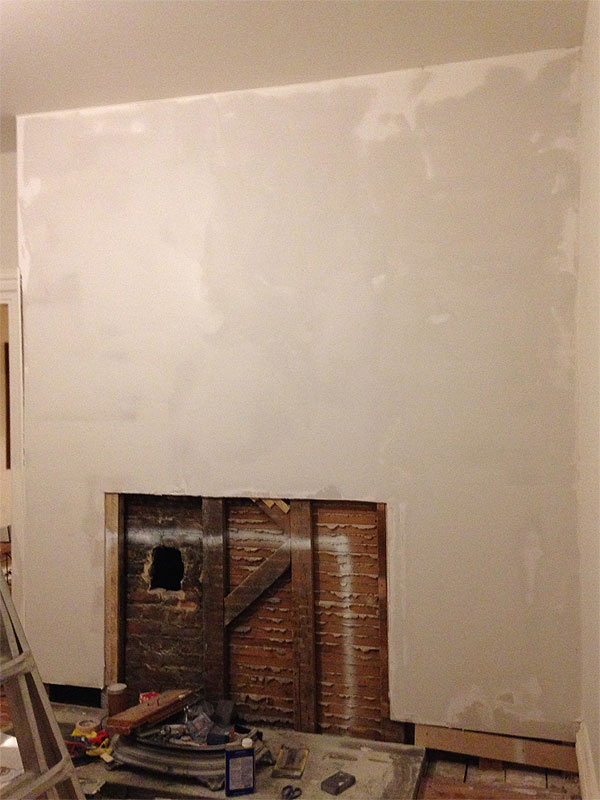
Here’s a terrible picture of the whole wall skim-coated. The whiter spots are where the joint compound is thinner and dried faster. It doesn’t look at all like a textured wall or anything—it’s just very very subtly uneven so that it doesn’t stand out as looking flat and new. I sanded it all before painting and it really is indistinguishable from the plaster. Yay!
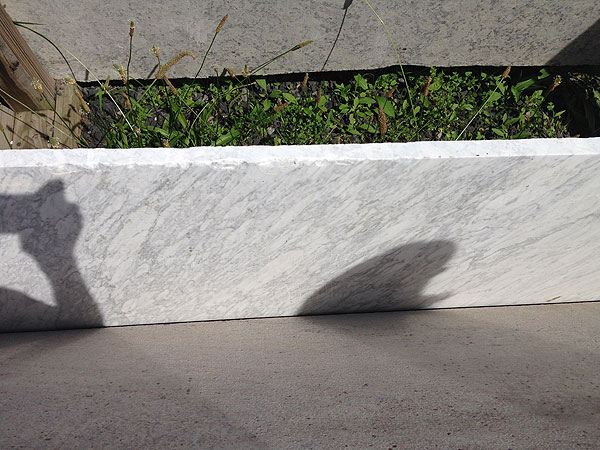
Ok, moving on…one of the big challenges was figuring out the material for the hearth. There were a few options here. Sometimes, like in our apartment fireplace, you’ll see a tiled hearth—but tile is tough to pull off without the whole thing looking brand new. New tile isn’t made the same way as old tile and doesn’t have the same character, so I’d either have to get really spendy reproduction tile or find something salvage. What I thought I really wanted, though, was a nice slab of honed marble. I mean, what’s more classic and pretty than marble, right? Since the size I needed was somewhat irregular (about 75 inches with a flexible depth, ideally between about 16-24 inches) I thought maybe I could find something cheap-ish in the remnant section of a stone yard.
Wrong! I took myself to a local stone place (that mainly does countertops and stuff) and found this really gorgeous slab. It was honed, it was about the right size, and it was even a little damaged along the edges and had a couple scratches, which I sort of liked. But then it priced out at over a thousand dollars, so I burst into tears and ran away. Soapstone was even more expensive, and granite was a little cheaper but still too much money, and I didn’t want granite at all anyway.

Then it dawned on me: what about good old Kingston bluestone? I suppose it’s even possible that that’s what was here originally, but who knows. I could probably find something that was locally quarried, super pretty, and much cheaper than marble or soapstone. It would reference Kingston history and even sort of tie into the exterior of the house, which is lined with bluestone sidewalks and pathways.
It just so happens that John, the same friend who gave me the mantel, worked for a couple of years as a stone mason when he first moved up here. My friends, bear in mind that this man is an optometrist. Almost 15 years ago at this point, he decided to take a break from optometry, pretty much just for the sake of learning something awesome that he felt passionate about, and I guess that thing was building stone walls and stuff. He worked as an apprentice under a stone mason named Sean Fox. So when I mentioned wanting bluestone, John knew who to call!
Sean was awesome to work with. I told him what I was doing and what I wanted, and he helped me find slabs that were good options. He also has the cutest German Shepherd named Dante, who is modeling the slab that I chose! The slab was thicker than I anticipated (Sean said that a thinner slab was likely to crack either during transport or once it was in place) and cost $400, which I figured was reasonable. I don’t know if I could have found the stone cheaper elsewhere, but at that point I was excited to have found something I liked and from somebody who understood what I was after. They had to cut the slab down slightly to fit my dimensions, and then burned the edges just a bit. I didn’t want it to look machine-cut, but I also didn’t want it to look overly rustic and rough-hewn, either. He did a perfect job, and I got to pick it up a week later.
FYI, bluestone is HEAVY. I don’t know how much this thing weighed, but I’d guess around a thousand pounds. Seriously! Sean loaded it into the back of John’s pick-up with a forklift, but it was up to me to figure out how to get it into my house and in place on the other end. Yikes! So one day, I finagled all of the people working over at Bluestone Cottage to take a break and walk over to my house to help with this thing. The whole ordeal was VERY STRESSFUL. I don’t have any pictures because I was helping and also shielding my eyes and generally terrified that the whole thing would go crashing through the floor and down into the basement and the whole house would collapse. But between about 6 guys, we were able to get it inside and into place and it wasn’t even as horrible as anticipated. I had to cut out a little more of the floor beforehand, but that wasn’t a big deal.
With the mantel in my possession and the hearth in the floor (and not going anywhere, ever), I still had to figure out how to sort out the space inside the mantel. I really fly by the seat of my pants, evidently! John actually gave me some cast iron insert parts that were with the mantel back at his house, but they were designed for a firebox and wouldn’t work here, since the wall doesn’t actually have any depth. I really needed something that would cover the entire surface and give the illusion of depth behind it without actually requiring it.
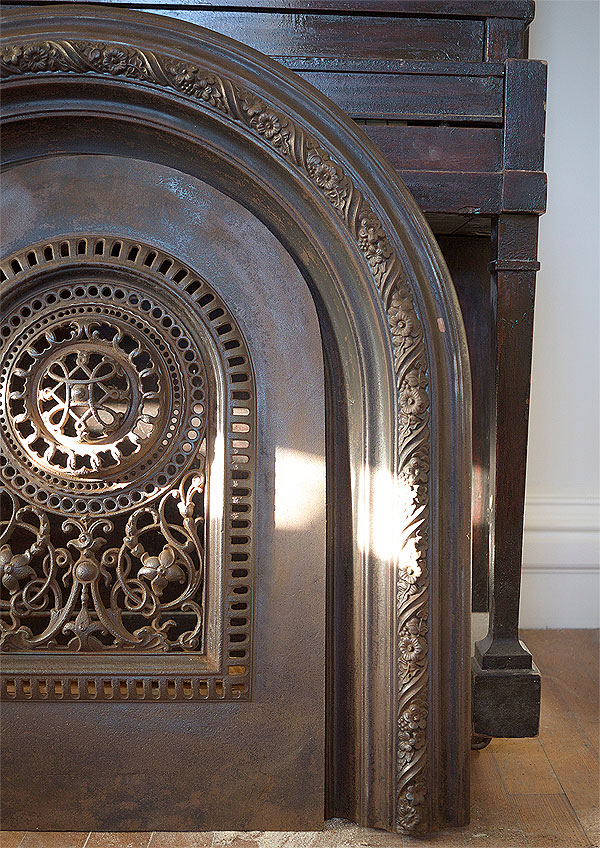
Enter: the fireplace cover! I went to one of the salvage places in town and found this big old rusty cast iron beauty. It isn’t so hard to find the arched (or sometimes rectangular) surrounding part, but the summer cover that goes inside it (exactly what it sounds like—a decorative cover to conceal the firebox in the months when the fireplace wouldn’t be in use) is a bit more rare—and finding the two together is even more challenging! I got really lucky that this one was waiting for me. The dimensions were perfect, and the detailing is just gorgeous! It’s definitely very Victorian (my house is more Greek Revival—in other words, pre-Victorian), but I love it all the same. It came home with me for $150, which is more than I wanted to spend, but after some poking around online seems to be a steal of a deal.
OK, so! Mantel—check! Hearth—check! Summer cover—check! The next decision was AGONY. What to put between the inside edges of the mantel and the summer cover? Usually I’m pretty decisive with this stuff, but this whole project seemed so full of unknowns and opportunities to royally fuck everything up and end up with something that looked super dumb and super faux and lame and I was very afraid of that happening. The idea of tile was kind of nice, but it was the same issue with the hearth—new tile would result in the whole thing looking new and kind of cheesy, and vintage or repro tiles are so hard to come by and so expensive, and I’d already spent way more money (remember, I’m $550 deep at this point!) on this project that is purely aesthetic and was supposed to be essentially free. Then I went through this long phase where I thought about doing brick veneer tiles and painting them, but I eventually got over it and nixed that idea. I became mildly obsessed with old fireplaces everywhere I went—studying them to figure out what would look authentic and be feasible, and what I landed on was a plastered treatment. You see this a lot in old houses—maybe a brick surround that’s been plastered over and painted. Often the hearth is also painted, but I wasn’t about to slap paint on my bluestone!
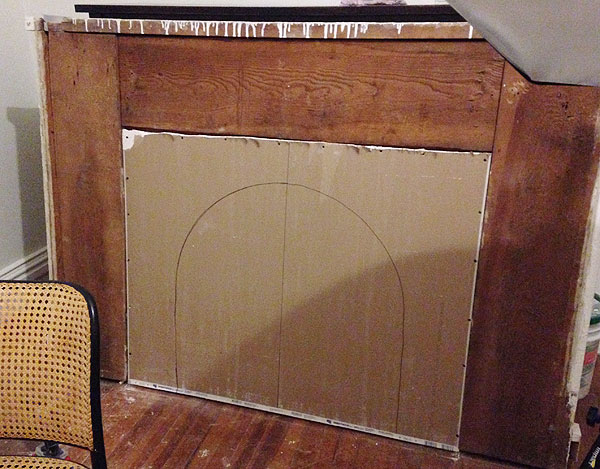
So anyway. More faux. I turned the mantel around, screwed a scrap piece of 1/2″ drywall in through the back, and traced the outer edges of the cover with a sharpie. The inner part of the cover is deeper than the outer part, if that makes sense, so the outside needed a lip to sit flush with, while the inside needed a little space behind the face of the drywall. I have no idea if I’m explaining this well. Then I took a drywall knife and cut an inch or two inside my sharpie line and removed the inner piece. Then I (finally!) moved the mantel into place and secured it to the wall by screwing a few 4″ screws through the front and into studs. Then I simply patched the holes (I like Ready Patch for small things like this—it sands down smoother than wood putty) and caulked the places where the mantel meets the wall. Then I just had to patch in a few floor boards and the original molding that I pried off and saved way back when I started this whole rigamarole.
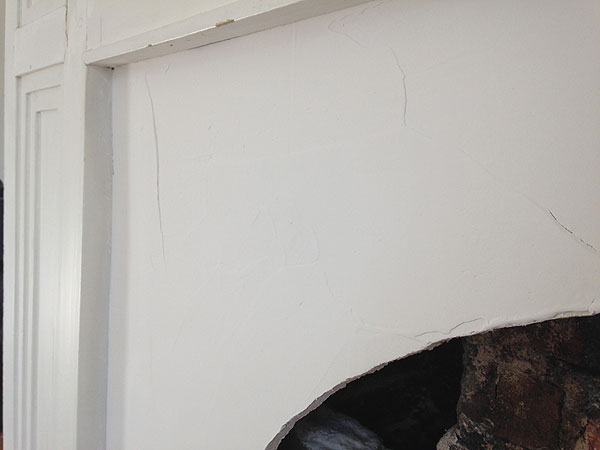
Since drywall is so flat and smooth, I used more joint compound to create the faux plaster effect. I was very liberal with it—sort of slathering it on with a 6″ putty knife, intentionally creating and leaving ridges and imperfections along the way. You can sort of tell from the picture how the texture looks, but it wasn’t super evident until I got to the painting step. Anyway, once everything had about 36 hours to dry, I gave it the lightest sanding and moved on.
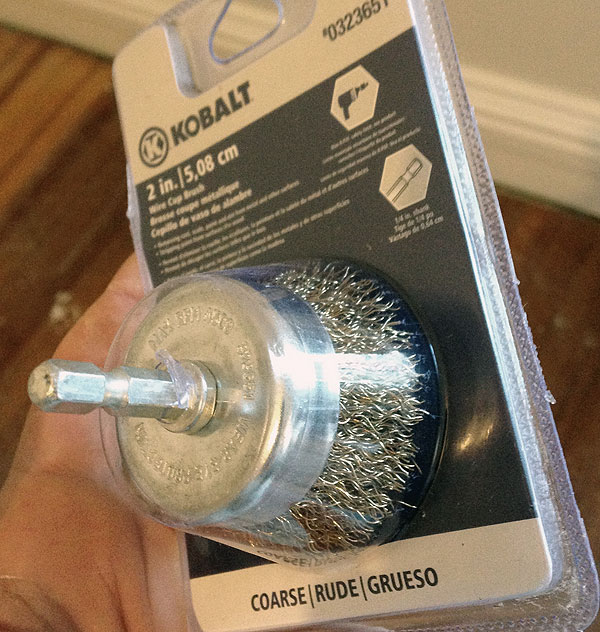
Because the summer cover had been sitting outside for so long at the salvage place and was covered in rust, I used this wire brush attachment on my drill to clean up the surface and prepare it for paint. These things are great for stuff like this! Then I went back in with a regular wire brush to get in the nooks and crannies of the pattern. I’d say all the prep took maybe an hour, and then I just wiped it down with a damp microfiber cloth and let it dry.
Securing the cover ended up being easier than anticipated. Before I put the whole thing in place, I painted a piece of drywall black and screwed that into the studs, so that you don’t see the framing through the holes in the summer cover pattern. Because the summer cover interlocks with the outer part, all I did to secure the whole assembly was use existing holes in the summer cover pattern. I drove two large screws into the studs behind—you can sort of see the screws in the picture above. The heads are sunk into the existing holes in the pattern, and after the paint, you have to really search for them. Nobody will ever notice except me. And everyone I tell.
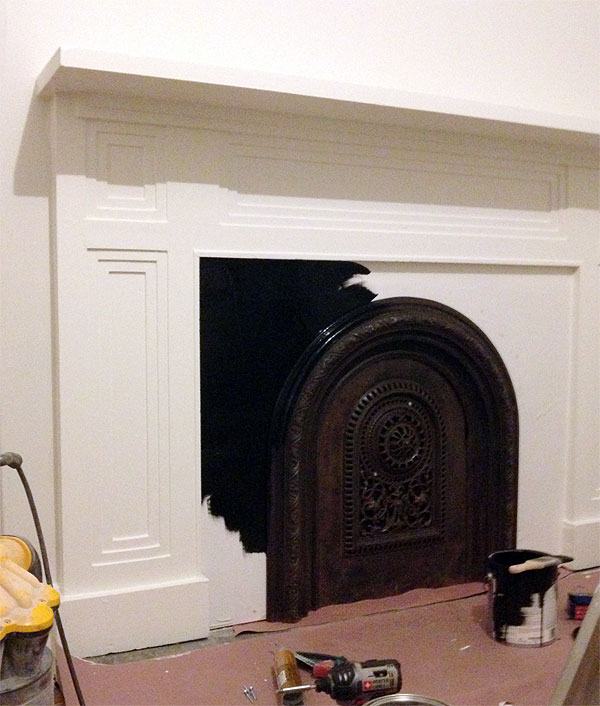
FINALLY, PAINT TIME! I had about half a can of high-gloss black oil paint from the failed kitchen floor experiment of yore, and so I broke it out here. This makes the project, as far as I’m concerned. The gloss black accentuates the texture of the faux-plaster business and the intricacy of the summer cover, but I think keeps everything looking understated and classic and pretty. Oil paint is so nice to work with once in a while for small stuff like this—there’s really nothing like it. After this first coat, I caulked at the transition between the cover and the faux-plastered surround and then painted a second coat. The finish is so hard and smooth and pretty. I’m thrilled with how it turned out!
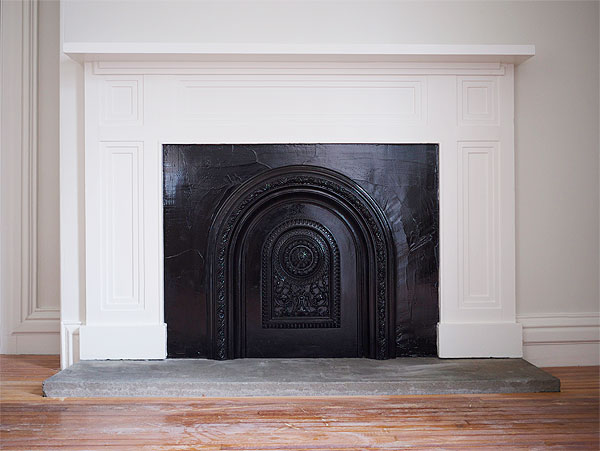
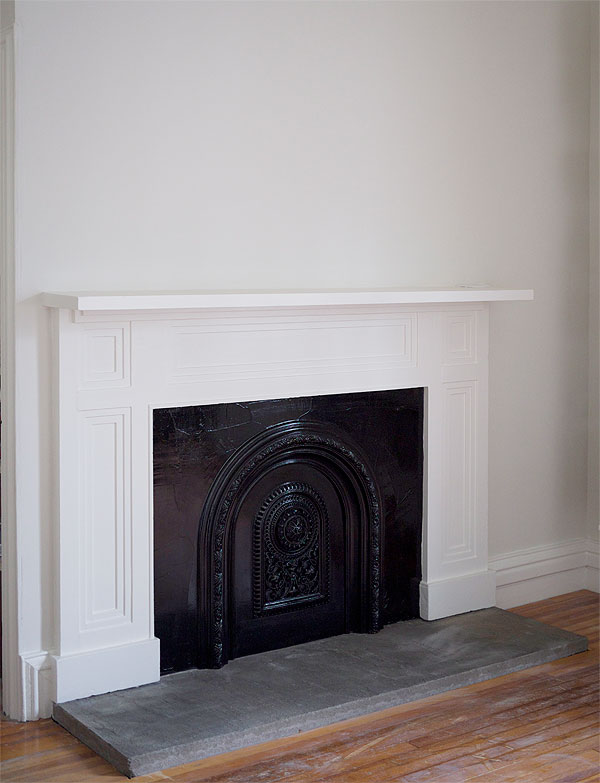
ANNNNDDDDD, DONE. I love it. I really do. It completely changes the room. I don’t feel like it dominates, but it does provide a focal point and just a certain ambiance that was missing before. And I feel like it just fits—like you’d never walk into the house and think it was added recently or even really pay a lot of attention to it at all. That’s exactly what I wanted.
I’m happy with the way it ended up fitting on the wall, too! Even though it’s a little wider than whatever was here originally, I don’t think it feels out of place or two big for the room.
I love the bluestone, but I do keep wondering what would happen if I tried to darken it up a little bit. I’m sort of afraid to touch it because I don’t want to ruin it, but I wonder if mineral oil would have the same kind of effect on this that it does on soapstone? I don’t know. I’ll live with it for a while and see how I’m feeling some other time.
I’m resisting showing wider shots of the room because it’s actually almost done! Told you I’ve been working hard. There are still a few major items to check off the to-do list, but I’m super excited about the way it’s coming together. It’s so weird and exciting to have this whole other usable space in the house! I can’t wait!


Nice! Looks like it’s always been there! :)
Even though it’s faux, it looks great! I love the bluestone, I really do. It just feels right :)
Don’t you have any remnants of your sidewalk outside in the bluestone? Slap a little mineral oil on that and see what it does :)
this looks fantastic! funny how the “free” projects never really are. i did something very similar in our last house too, even found a cover at a local architectural salvage. i ended up using marble tile though as the inset area, as well as the hearth: http://five2eight.blogspot.com/2011/05/fireplace-complete.html
i think you can get a general idea of what oil would do to the stone just by putting some water on it – at least that is what i was told when looking at soapstone counters.
Oh nice! That turned out great!
I thought the same thing about the water, but I’m not sure! The bluestone seems to really soak in whatever you put on it. I used a natural stone sealer on it (some product for granite) that we happened to have around and it did absolutely nothing, so I wonder if the mineral oil would just soak in or coat unevenly or something. I do like the color of the stone when it’s wet, though. Definitely deeper/richer.
Yours is beautiful too.
Did you put graduated wood around your hearth or is it flush?
I hope the television isn’t going over the mantle.
Or do I hope it is?
I can’t decide, but I know you’ll make the right decision. Can’t wait to see.
Nope, definitely not! There’s going to be a TV den type of room upstairs, so that’ll take care of that! I do need something over it, though…on the lookout for a big painting or mirror!
If anyone out there does a project like this where they *do* plan to put a TV above, it might be cool to build a little hidden shelf behind the summer cover for the ugly electronics (cable box and so on). The wires could be hidden in a channel behind the wall and the perforations in the face of the summer cover would allow the signal from remote controls to pass through.
Incredible! I love reading all the details and I love getting to see the guts of your house in the earlier images – so completely different from my 1930 west coast house. Really, really fun to read about your process from inception to now – so many different ways it could have gone and I think your choices were spot on (love your decision to make the wall slightly irregular and the plaster style surround).
-Could you try a little oil on the bluestone path in the garden?
Thank you, Katie!
OMG, I feel pretty dumb…your comment reminds me that not only is that an option, but I completely forgot that Sean gave me the offcut of my slab for EXACTLY that purpose, since I was asking him about it! DOH. This is what happens when projects drag on for months! Ha!
AARRRGGHH it’s so gorgeous I just want to stare at it forever! Seriously, it looks really, really good. Great job!
Awesome, awesome. And what Katie said above – play with the bluestone path in your garden! Scott and I have been oiling little sample pieces of soapstone, honed granite (we weren’t sure if that would work) and quartz for the last week, and it’s crazy how differently they work or don’t work.
Now, show us the room!
This looks amazing! I love the added texture to make it look like plaster.
Beautiful! It really does look to belong there. The before at the top of the post and the after at the bottom is amazing, you always do such a good job.
Find a bluestone sidewalk and apply mineral oil under cover of darkness to see what happens!
Gorgeous! I love how much effort you put into making these new pieces fit your home. Don’t worry about it being fake! The goal is to make it look authentic to your home’s era. You’re doing a great job.
Man, now you’re making me want to fix up the fireplace in my guest bedroom. We already have the fireplace cover for it, but it’s been boarded up since we bought the house in January (god knows for what reason) and I just don’t know enough about this stuff to even try to do it myself.
You can kind of see our other fireplace, directly below the guest bedroom here: http://instagram.com/p/jZLYysEXGI/?modal=true. I’m assuming the guest bedroom one would be identical, but I too worry about finding tile that fits, etc.Maybe someday I’ll be brave enough!
Keep up the great work and the inspiration!
Looks fantastic! I love following your projects, makes me itch to start working here too (shouldn’t though, I’ve had to many alcohol flued late renovation nights of the late ;-) ).
Here in Belgium we use a lot of blue stone too, the entire facade of our house is made out of it. Here, it’s common to polish it, and then treat it with raw linseed oil. We call it ‘sweetened’ blue stone, I love the depth and richness of it.
Good luck! Looking forward to the rest of the room! X
Why did I almost cry by the time I saw the finished product? It’s your house, not mine, but this is so perfect, I can’t stand it! I’m realizing how much I vicariously appreciate how beautifully loved this old house is, and the fact that it was lucky enough to find you to bring it back as hearth and home. It took every bit of willpower for me not to look ahead at the finished product as I was reading, so thank you for explaining every step so satisfactorily. I might just need to smoke a cigarette now (and I don’t smoke!).
As someone who used to own and love a much smaller old house (built in 1900), I later on bought a JC Penney catalog faux fireplace, just so I could stand living in a series of generic apartments over the following years. And although mine will never compare to the beauty of yours (nor the work!), it’s not half bad, and the best non-utilitarian purchase I’ve ever made. It’s brought some architectural interest and coziness to rooms possessing neither, and so makes me very happy. But even happier to be sitting near it as I read this post. Thank you, Daniel, for putting the effort into your blog, and giving me this lifeline to old houses. and old rooms. And now, I simply can not wait to see the rest of this room!
Dude this transformation looks awesome! It definitely looks original and the faux finishing is very convincing. Your eye to detail is phenomenal. Keep up the good work!
It’s just stunning, Daniel! (I love your brain!) Verrrry nice work!
Another amaaaazing project! End result is great and yes it does look like it been there for years! :)
Looks so great! Can’t wait to see the rest of the room!
Bluestone was a brilliant choice. It looks fantastic. Can’t wait to see the room all finished and propped up.
LOVE IT! This looks fantastic Daniel!
I do think some mineral oil to darken it a bit would give it a more authentic feel. I would think that bluestone that has been sitting on a hearth for a century or more would be somewhat dark with a few stains and imperfections.
MY GOODNESS. This couldn’t have turned out better! I love every detail, and the fact that you even go into faux plastering the walls just gets me!
I got scared there for a minute but it looks SO GOOD. You would totally think it was original to the house.
It. Looks. AWESOME.
Lovely work. Also, Dante looks so much like my German Shepherd, Radio!
I was going to suggest getting a scrap piece of bluestone from Sean, but see that’s been pointed out above.
Excellent! It’s beautiful, and I love it!
Great post. And you would never know that’s not a real fireplace. My girlfriend’s fireplace (1860) is closed up with just the mantel left and from the pictures yours looks more real/authentic. I just love what you created.
Flat-out gorgeous, and yes, it looks “right.” Must say, I prefer the bluestone to that handsome hunk of honed marble. Thanks for this post, a holiday present to your faithful readers.
Seriously. Love. Love. Love. It’s Dante’s Faux Inferno. I was a little scared as I was reading, and had to force myself not to scroll down to the final photo, but once again you and Linus did an amazing job! Can’t wait to see the rest!!! Happy holidays to you and your family.
You really need a dog over at the cottage. This post had two dog pictures in it, and that is much better than none.
Daniel that looks so beautiful! That black oil paint was the perfect touch. I’m in love.
So beautiful!
Nice! Did you end up reinforcing the floor below the hearth stone at all? Or is 400 lbs not enough to need reinforcement?
I’ve been checking your site everyday for any updates on anything – and this was just such a great post. It’s beautiful. Can’t wait to see how you decorate the mantel.
Happy Holidays and thank you for such a great blog to read. This is one of my faves and I don’t even do renos or decorating or anything. ;-)
Thanks so much, Andrea!
Daniel….great job..it looks like it belongs ..it’s the summer cover and that bluestone…perfection.
can’t wait to see the whole room finished and what you decide to put above the fireplace.
You continue to amaze….HAPPY NEW YEAR!
Stunning. Absolutely stunning. I can’t wait to see the rest of the room!!!!!
Absolute perfection! Anytime I wing it, you can tell I winged it. You have an amazing eye for detail and obviously know what you’re doing. It’s perfect.
Your work is so impressive! And I love your writing. There’s a book in here somewhere!
Happy Holidays…
Daniel you are an artist! The uneven plaster job (both on walls and firplace) is genius. Beautiful job!… and that georgeous wrought iron grate thingy is a thing of beauty. Well done!
Beautiful! So glad you found something creative and exciting to do during your downtime at the cottage. And it’s just beautiful! Can’t wait to see the rest of the room!
beautiful. i know santa will adore it. leave out some home-baked martha crackers and gorgonzola for him.
That looks amazing! I am so impressed with everything that you do. Gorgeous. Can’t wait to see the whole room!
Gorgeous! I wish there had been blogs around when I was remodeling/inventing/reconstructing my 1914 fiber-upper. I look at blogs now and find fresh inspiration for my completed projects.
Shoulda, coulda, woulda.
Great job!
Is there any chance that the fireplace in the large living room used to be in the library/den/parlor?
Fantastic!!!!
Brilliant! It looks marvelous. It looks original to the house. And I reread the part about your friend John taking a break from his job to do something different he felt passionate about three times. Maybe myself as well someday!
This looks incredible! This is my favorite project ever. The mantel fits so well here and looks so great — isn’t it amazing, considering there was never a fireplace here and the mantel is from the 1920s!
.
Wonder if this was the snug and warm family parlor-slash-dining room (as opposed to the formal parlor opposite) since it had a stove.
.
As for the surround and hearth, the section surrounding the summer cover would have been the same stone or wood as the rest of the mantel, not plaster. (Plaster over board was frequently used by later owners to block up openings, such as hearths missing their summer covers.) I’m not sure what a Greek Revival hearth would be made of — not marble, I don’t think, and certainly not tile (that was for mantels after 1880 or so). Possibly very dark gray slate. (Our hearths are dark gray slate, but our mantels are much later — faux painted slate from the 1890s.)
.
Very impressive work. I just love it!
The summer cover is so pretty and the bluestone is perfect the way it is!
you should get http://www.arielealasko.com to do something with all your laith. seriously, a collaboration post would be amazing.
Ha! It might happen! I’ve followed her since the very beginning of her blog—she’s so talented!
P.S. More old-house archaeology: Since the old molding does end where the old hearth started, maybe there was a very small mantel here — with, of course, not a firebox but rather a pipe sticking out of that round hole and going to a shallow and wide heating stove that would have sat on the hearth.
So Swoonie!! I love how it looks. You are a pro for sure! Don’t say the “F-word” it makes you sound uneducated!
Daniel, beautiful job! I always look forward to the next installmant of your renovation sagas (your house, Bluestone Cottage) and you never disappoint. I’m searching for two fireplace covers like the one you used here for a brownstone in Brooklyn. So far I have not found what I need. Do you have suggestions where I might continue my search? I can roam far and wide. Thank you for your inspiring blog. Nena
Sorry for the slow reply, Nena! I think you should be able to find them at an NYC salvage place…I’ve heard Build it Green is good, or there’s this really kooky salvage place under the bridge by the Brooklyn Lowe’s (you can see it from the parking lot…it’s bonkers). There’s always eBay or Historic Houseparts but prices definitely seem to be a little higher when you turn to the internet, not to mention the cost of shipping. Hope that’s a little helpful!
Amazing!
I vote for the bluestone as-is. The dusty-blue-grey goes so well with the black oil painted plaster.
It’s beautiful.
However, I know my toes would find the edge of that hearth. :(
Ha! Luckily I’ve avoided that so far…but I’m sure it’ll happen at some point! Originally I wanted the stone slab to be flush with the floor, but that’s not the way it worked out. Oh well!
It turned out gorgeous, but I’m curious with all that aged brick underneath that you didn’t choose to expose some of it. Maybe not fitting with the age/style of the house? I do love old brick.
Thanks, Jill! The brick chimney is inside the wall (a few inches behind the surface of the plaster/drywall), so I’m not really sure how you would expose it! Even if it could have been, though, I don’t think I would have done it…not in this room, anyway. I think exposed brick can be GREAT in certain houses/spaces, but I think it’s too rustic looking for this house.
It looks great, Daniel. We just redid our old unsafe fireplace (took everything down from the top of the chimney to the hearth and built it back up). It was a huge job, but the hardest part was moving in the hearth stone. Our mason ended up having to come at 6am so that my husband and I (and my very kind FIL) could help him carry it in before we left for work. Unfortunately, we don’t have a crew of folks to call on during daylight hours! Our dog, Baxter, was helpful just like Linus. It was a stressful move (“Please don’t break the 8′ long $300+ stone slab!”), but I did manage to capture it on video. This post has the clip if you’re interested: https://homeon129acres.wordpress.com/2014/12/15/fireplace-update-week-2/. Looking forward to seeing the rest of the room!
I was stressed just watching that video!! Your fireplace looks great! :)
Nothing to do with the fireplace but I had to mention this; just spotted a mention of Daniel and a link to Manhattan Nest on Gardenista, the piece is entitled “Domestic Dispatches: What I love and hate about Ikea” by Michele Slatalla… Here’s the link : http://www.gardenista.com/posts/domestic-dispatches-what-we-love-and-hate-about-ikea
This looks amazing! Could you use fireplace blacking for the bluestone? I’ve seen stuff called slate blacking too. I’m in the uk, so it might have a different name over there… I’ve also heard of people using mineral oil, shoe polish or WD40… Might need to test a few things and see what suits you. I love seeing your projects take shape.
Huh, I’ve never heard of blacking before—I don’t know!
Wow! Just breathtaking! That summer cover was an amazing find!
This is gorgeous. And I loved the telling of it; very suspenseful. Yet also full of laughs.
It looks amazing and you have given me great inspiration for an 1800’s beach house we are renovating. I thought it was amazing as I scrolled down to the white background and then you painted it black”¦absolutely fabulous!! Pondering over here”¦
Nice job, and lots of work to give this lovely room an anchor. Beautiful improvement, great problem solving to get to a warm and inviting space. Love it.
This is one of my favorite things that you have done. Yes. It. is.
The fireplace is delightful. It made my day.
Don’t sweat the bluestone. If you absolutely want to age it, rub some mineral oil and dirt into it! I’ve always rubbed dirt in things that need a little age. Sounds a tad bit crazy, but it works.
Love love love the bluestone. Your instincts are always right, and if you want to oil it, oil it, but it looks so pretty as is. Way better than marble, too. More in line with this house.
Wonderful job! Would you share the resource where you found the summer cover and surround? I have no idea where you’re located, but you got a gorgeous set for a very good price and I would love to GO THERE!
I’m in Kingston, New York! There are a few salvage places up here and in the surrounding area. This one comes from a place called Stan’z!
(fauxerplace, anyone?)