
This post is in partnership with Lowe’s! Thank you for supporting my sponsors!
Admittedly, with everything going on in the world, taking on this kitchen renovation right now—of all times—felt somewhere between foolish and extra-super-stupid, even by my standards (which are considerable), just a few weeks ago. But really, it’s gone amazingly smoothly? I was thinking about why that is. In part, I think it’s because I’ve had to really focus on planning ahead and ordering things to avoid frequent shopping trips, and luckily shipping has remained reliable and timely. Sure. Makes sense.
But also? I’m basically a doomsday prepper, except instead of canned goods and toilet paper, I have stockpiled lumber and other construction/renovation supplies for years, like a total lunatic. And now? This is my time to SHINE. I think this global health crisis has pushed us all to use what we have around just a little bit more. I have just happened to prepare myself by having a lot around. No brag.
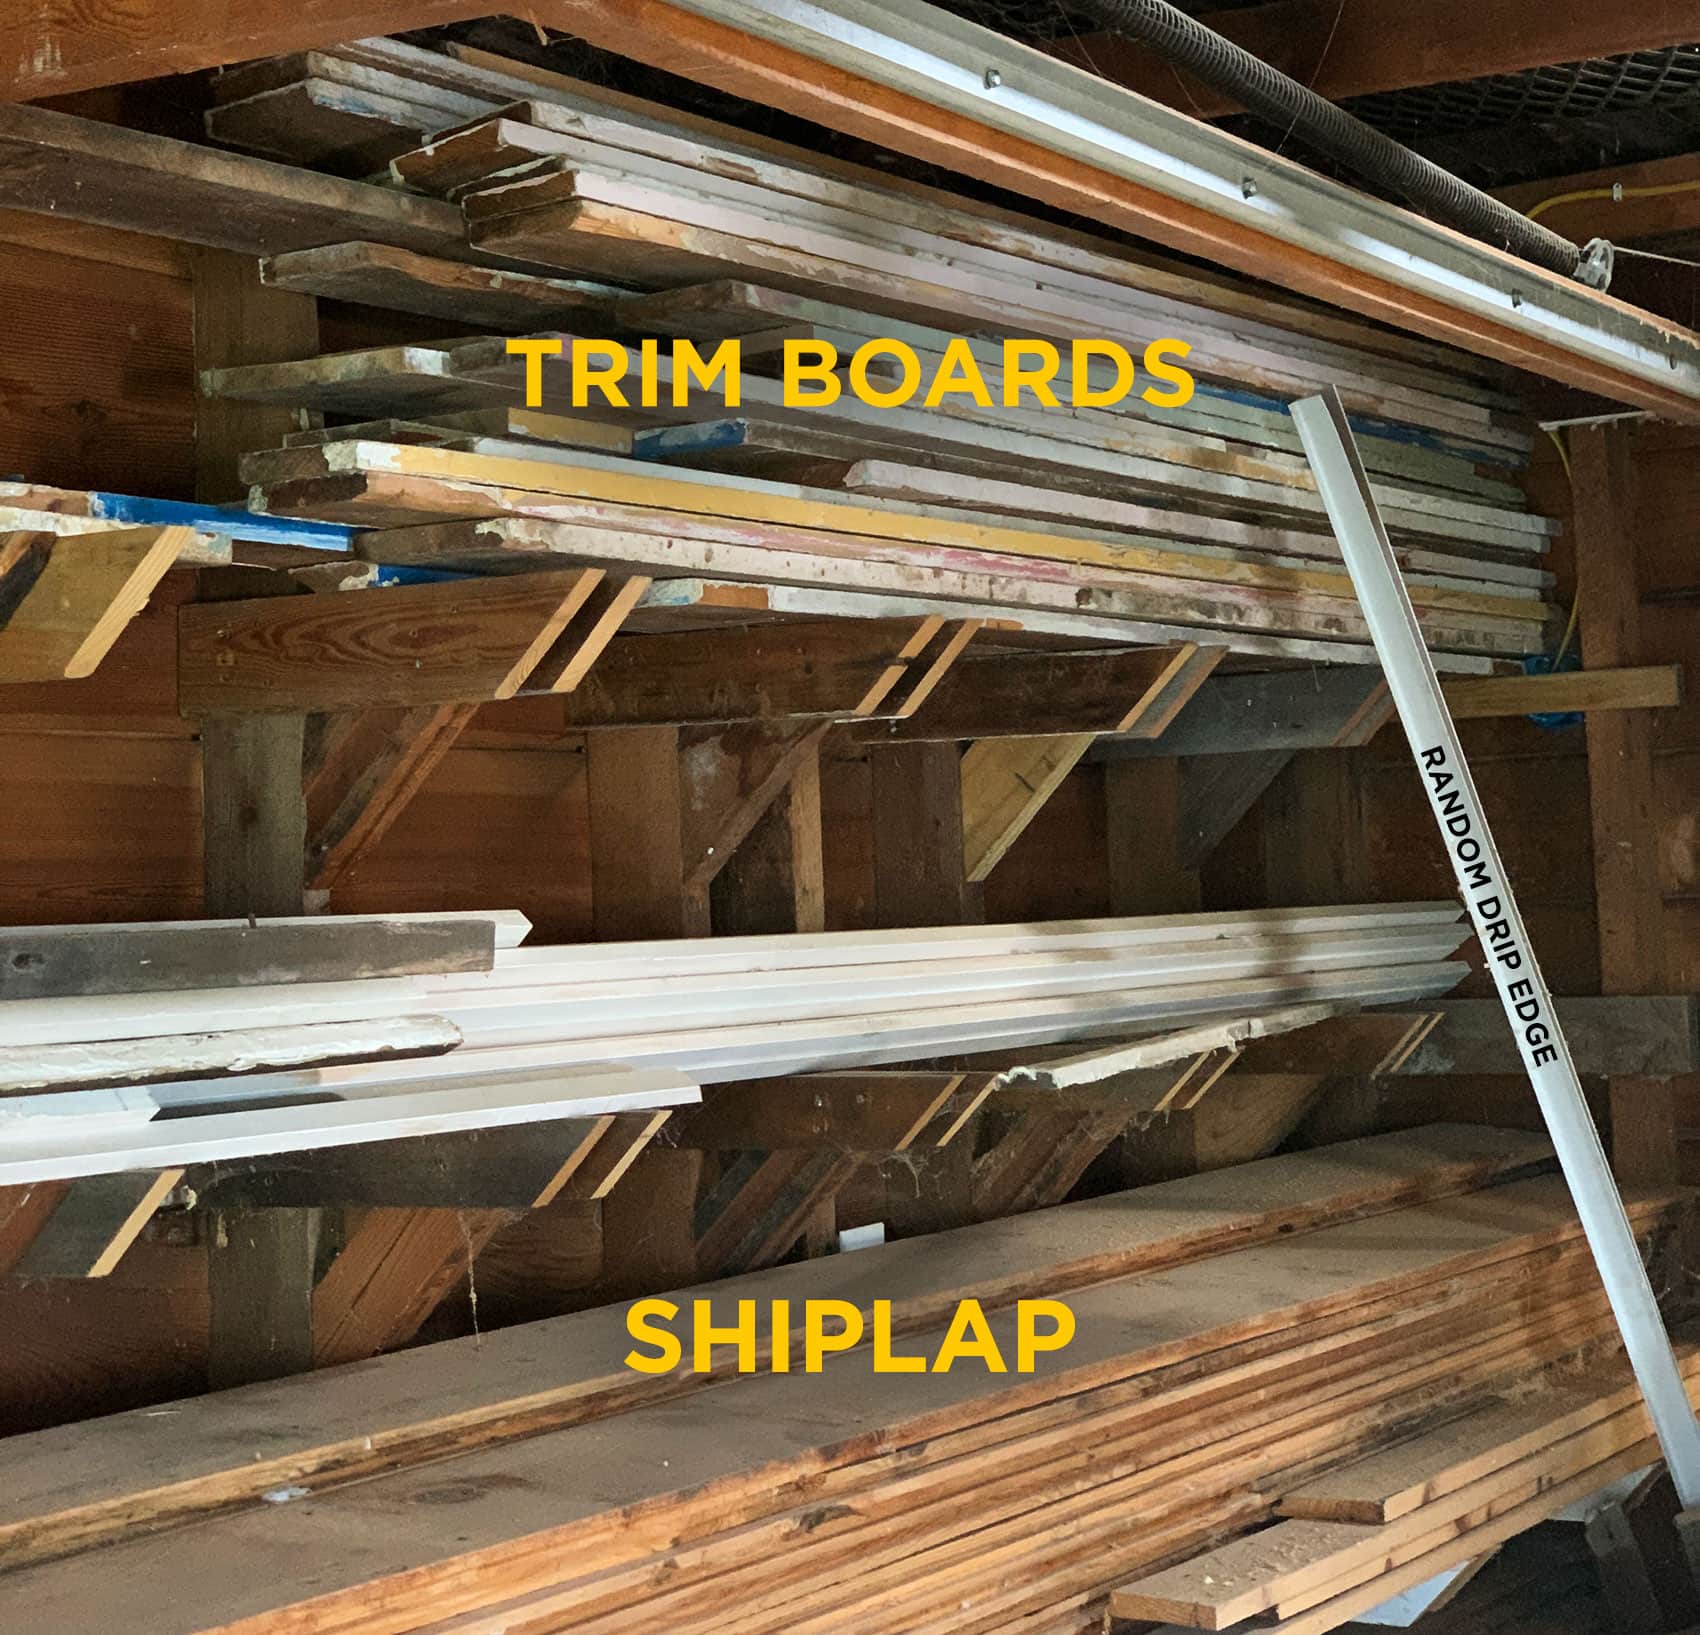
Behold: this is but one corner of my garage, which is really just a glorified wood shed at this point. No car has entered its walls under my stewardship. I swear I keep it somewhat organized for occasions such as this.
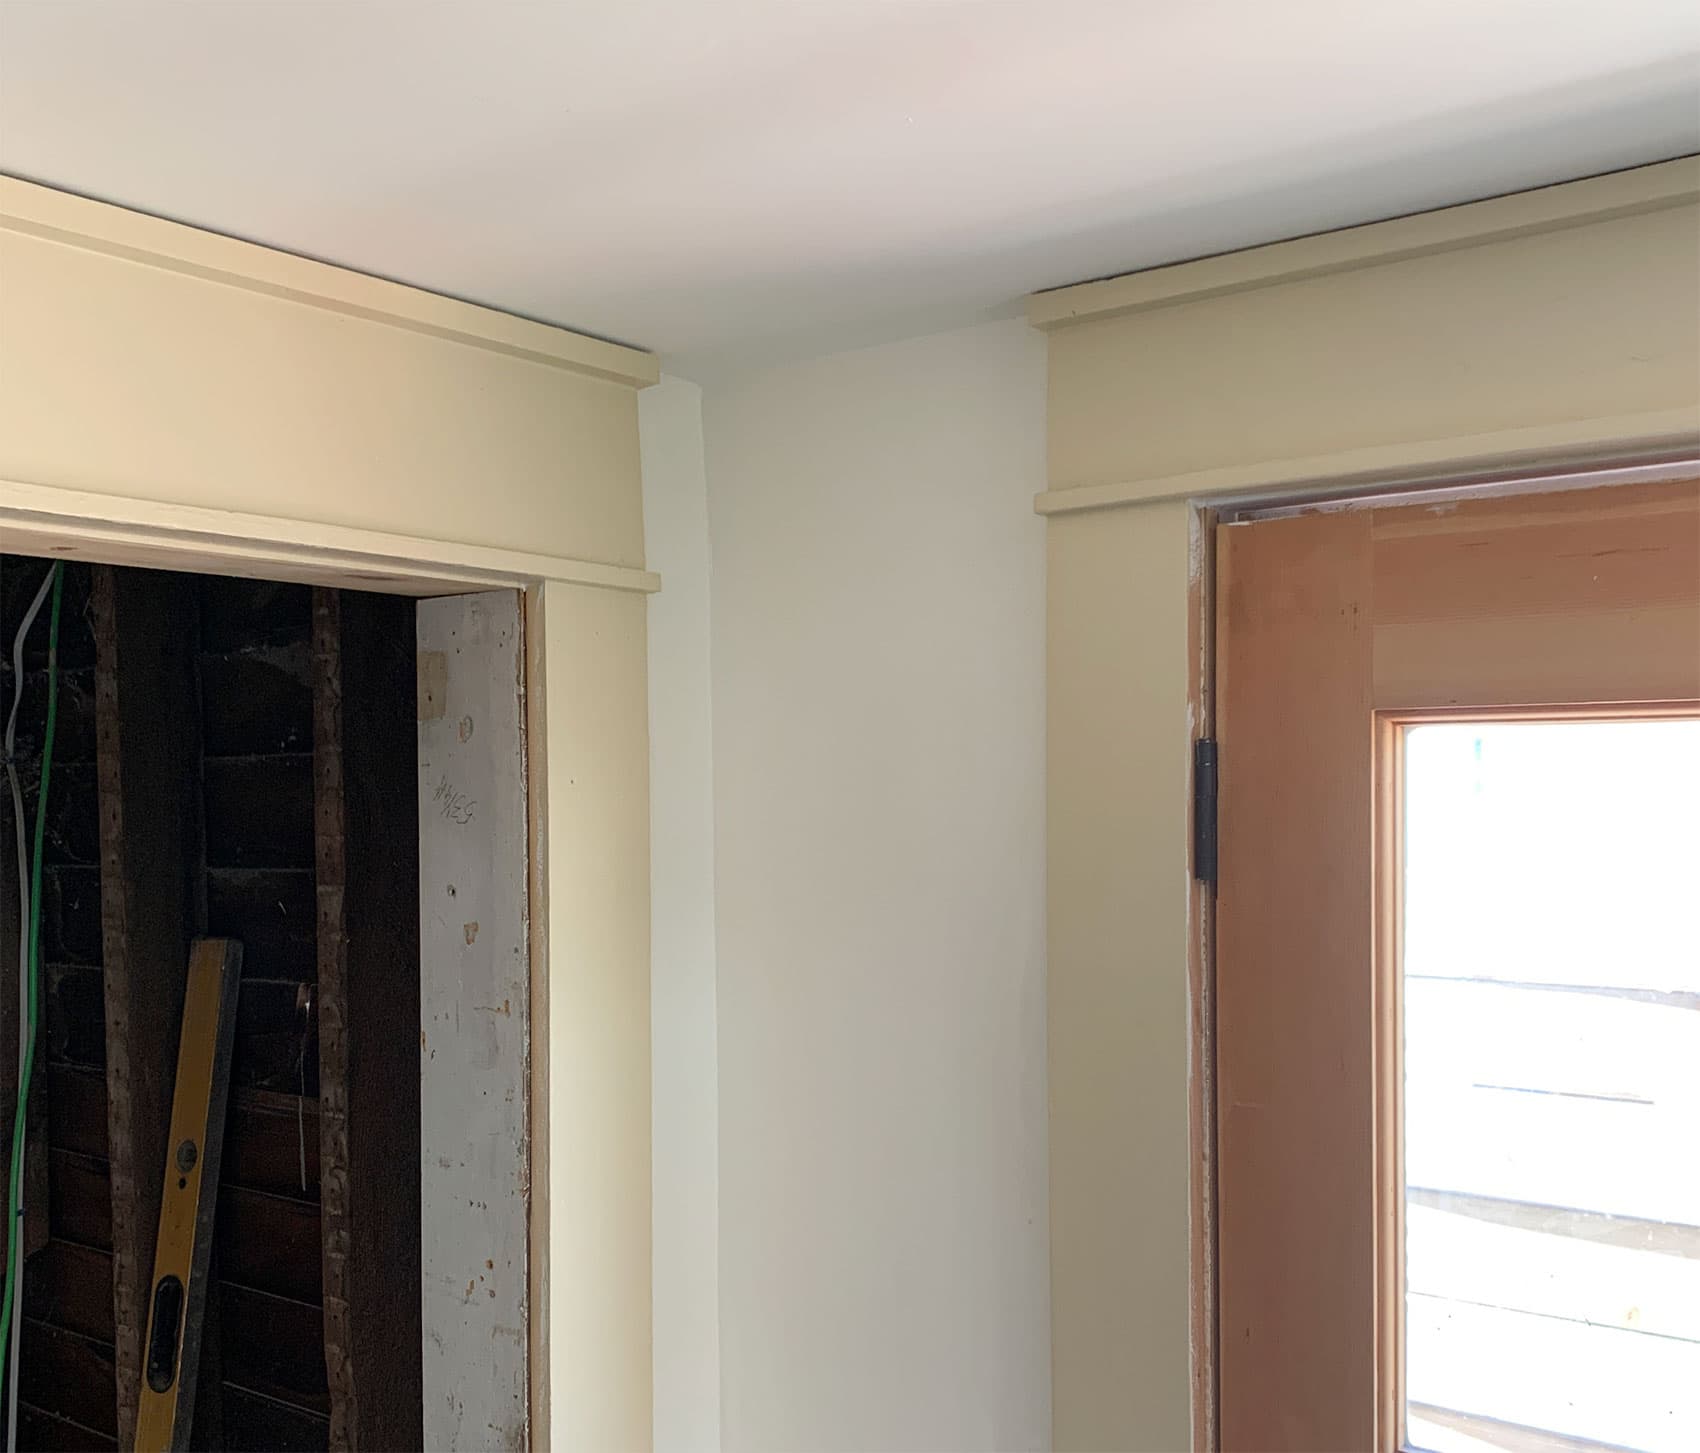
Up top is a stack of crazy painted and abused 1x lumber. It is the remaining majority of everything that came out of Bluestone Cottage during demo that has been in my garage ever since. The rest I’ve already transported back over to the cottage. Actually putting it back from exactly whence it came doesn’t really make any sense because the floor plan and fenestration has changed, and I want the molding to have a bit more detail than just a simple 1x board, but it’s solid material? I mean the dimensions are all over the map, and it’s beat-up, and paint-covered, and riddled with staples, and holes from old curtain rod brackets, and some of it still has phone line stapled to the top, and it’s filthy as all get-out, but otherwise it’s fine??
And that’s my problem. I will over-complicate my life forever in the name of avoiding a trip to the dump and possibly, potentially, someday having the option to perhaps save a dollar because I have something lying around that will do the job.
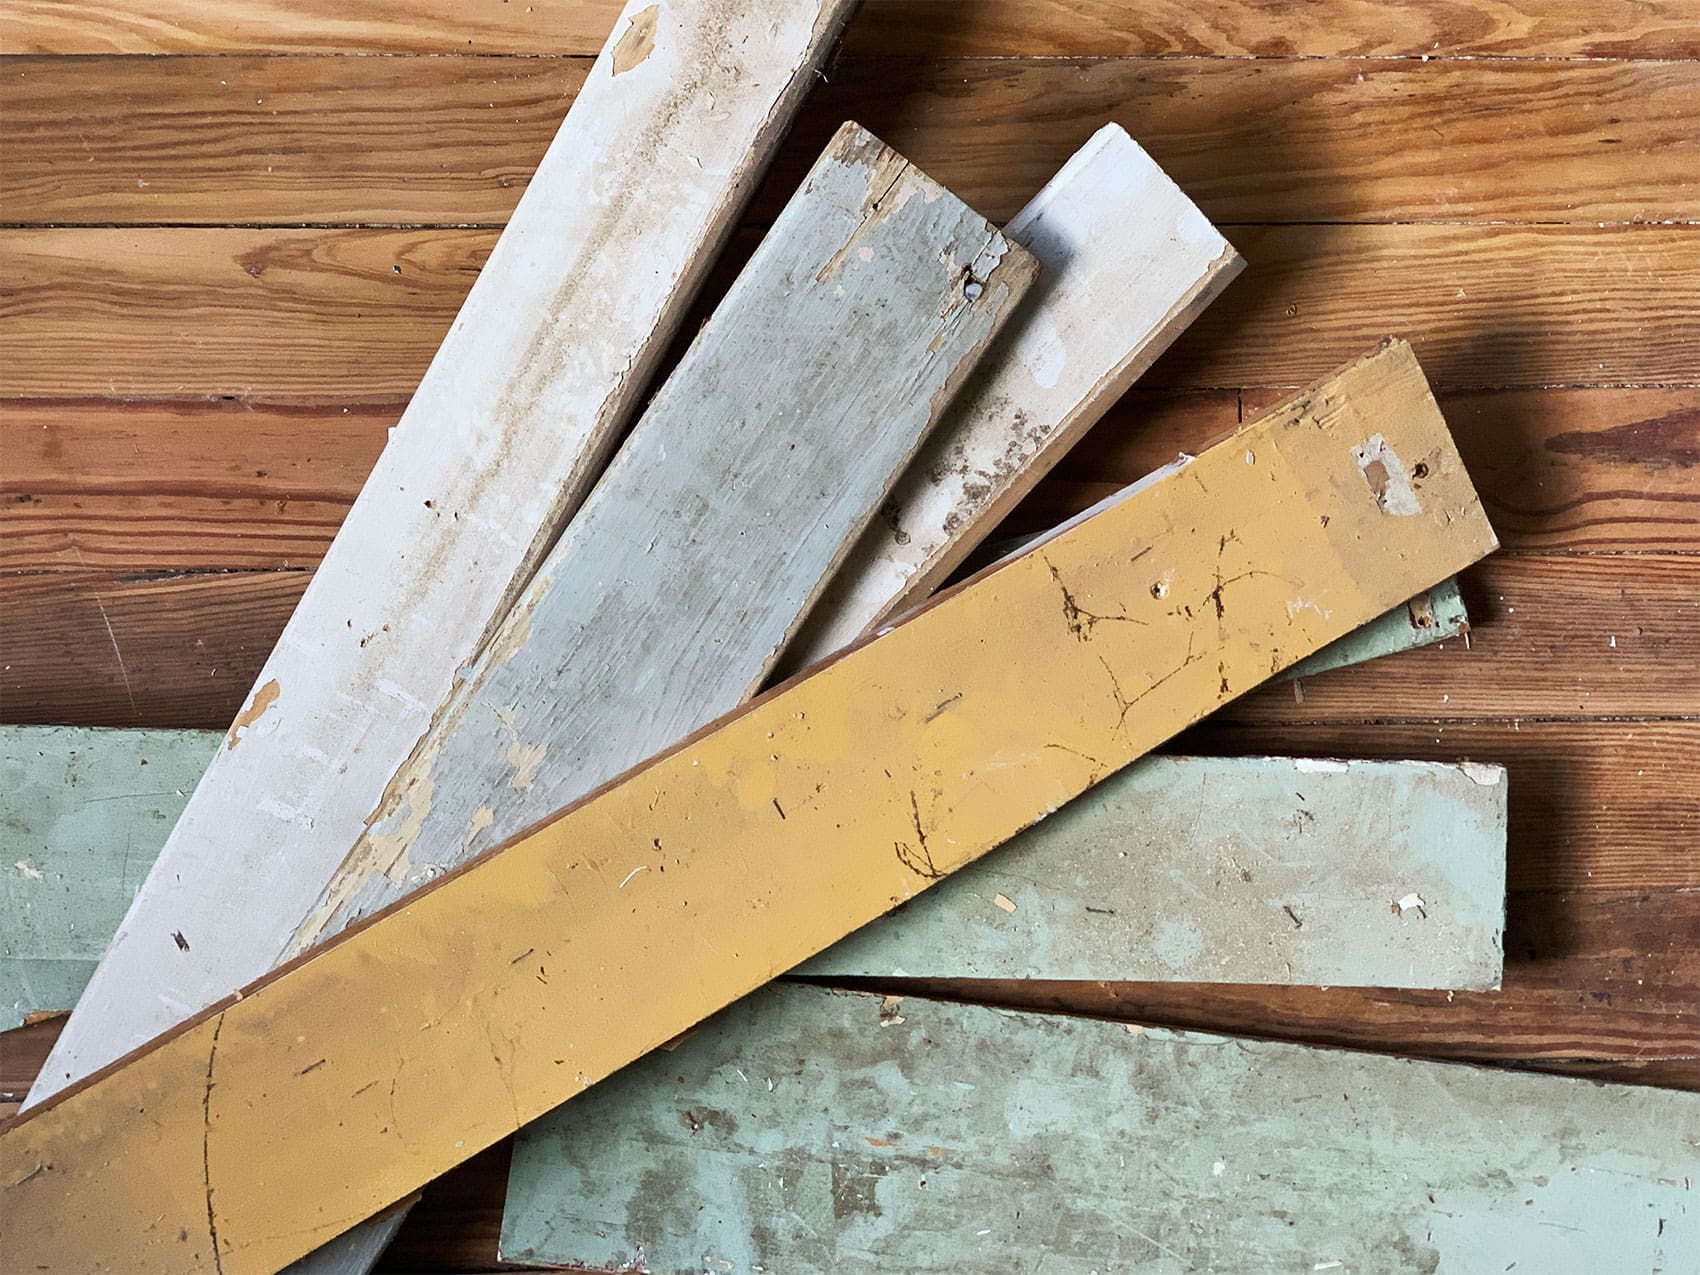
Here you can get a better sense of what kind of condition this stuff is in. It’s pretty special.
Using some very basic carpentry (table saw, chop saw, nail gun), I turned it all into what I think is a rather nice, appropriately modest and simple molding treatment, like so!
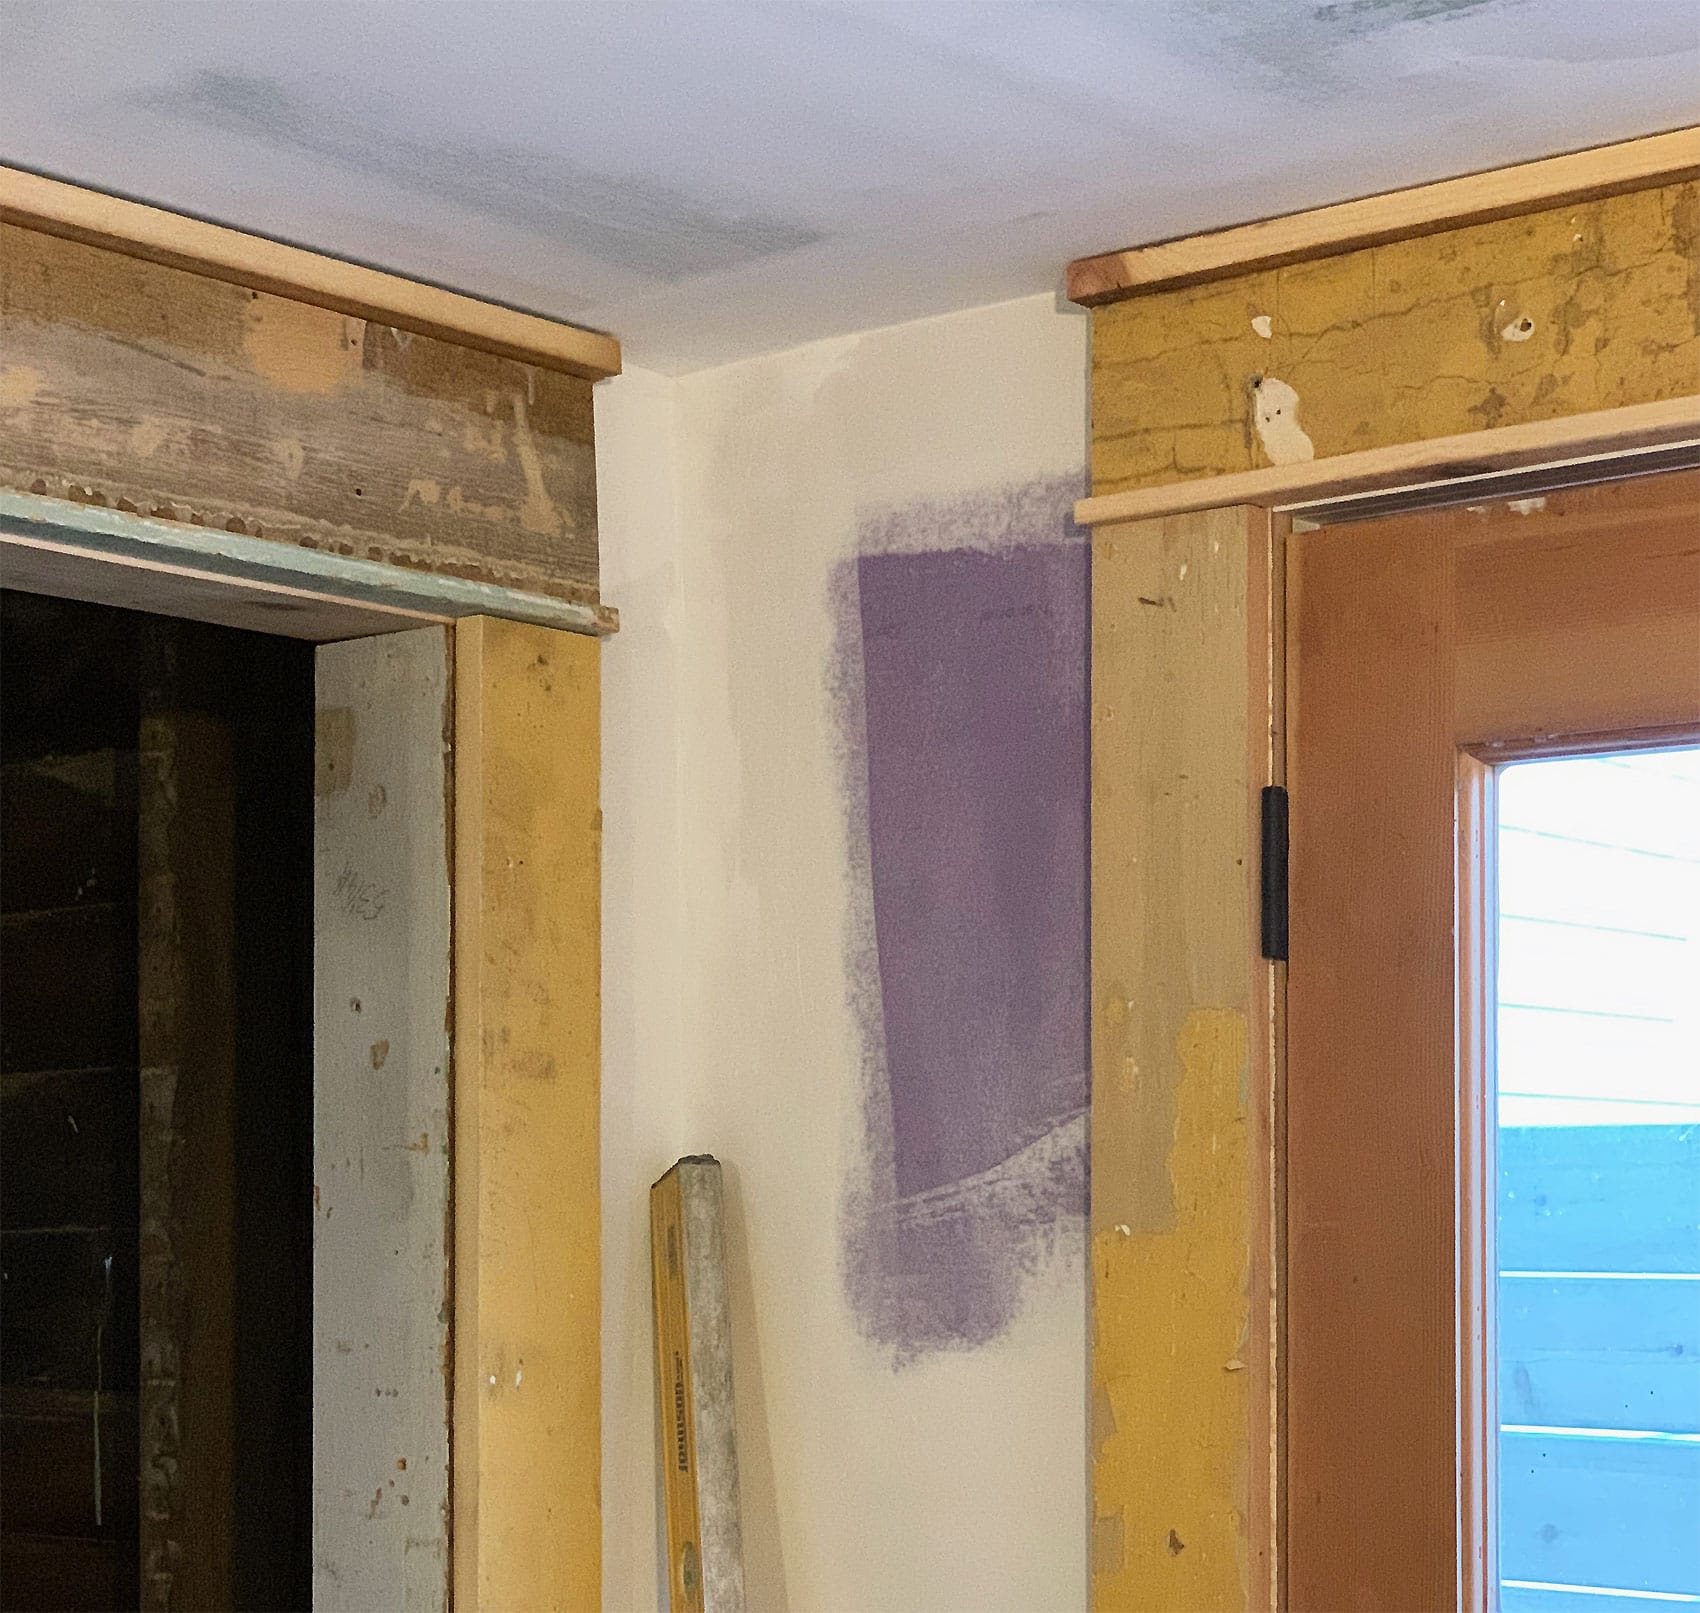
BEAR WITH ME. I KNOW IT LOOKS NUTSO. But the thing about historic moldings that separates them from new moldings is that they’re generally composed of various moldings layered together and combined, unlike new moldings that tend to have a lot of detail but not a lot of dimension, because they’re generally machine-made from one 3/4″ board. Historic moldings typically extend further out from the wall, which creates more dimension and shadow—they tend to be large and in charge and that’s why we like them! Make sense? I feel like this hits that goal and hey—free!
(If you still think I’m being ridiculous, let’s just note that so far we’ve managed to lay a wood floor, trim all the doors and windows, install wainscoting, and make all the cabinetry look custom and built-in with 2.5 sheets of plywood and a pack of shims as the only new lumber purchases in this space. SO LAUGH ALL YOU WANT. Of course, you could do the same thing with all new lumber, and experiment with combining different stock profiles to make something custom and unique! The combinations are endless, so look around for inspiration and have some fun seeing what you come up with! I’ve had to try to match a bunch of historic moldings over the years, but I wrote about this simple one 6 years ago, too!)
Back to the garage.
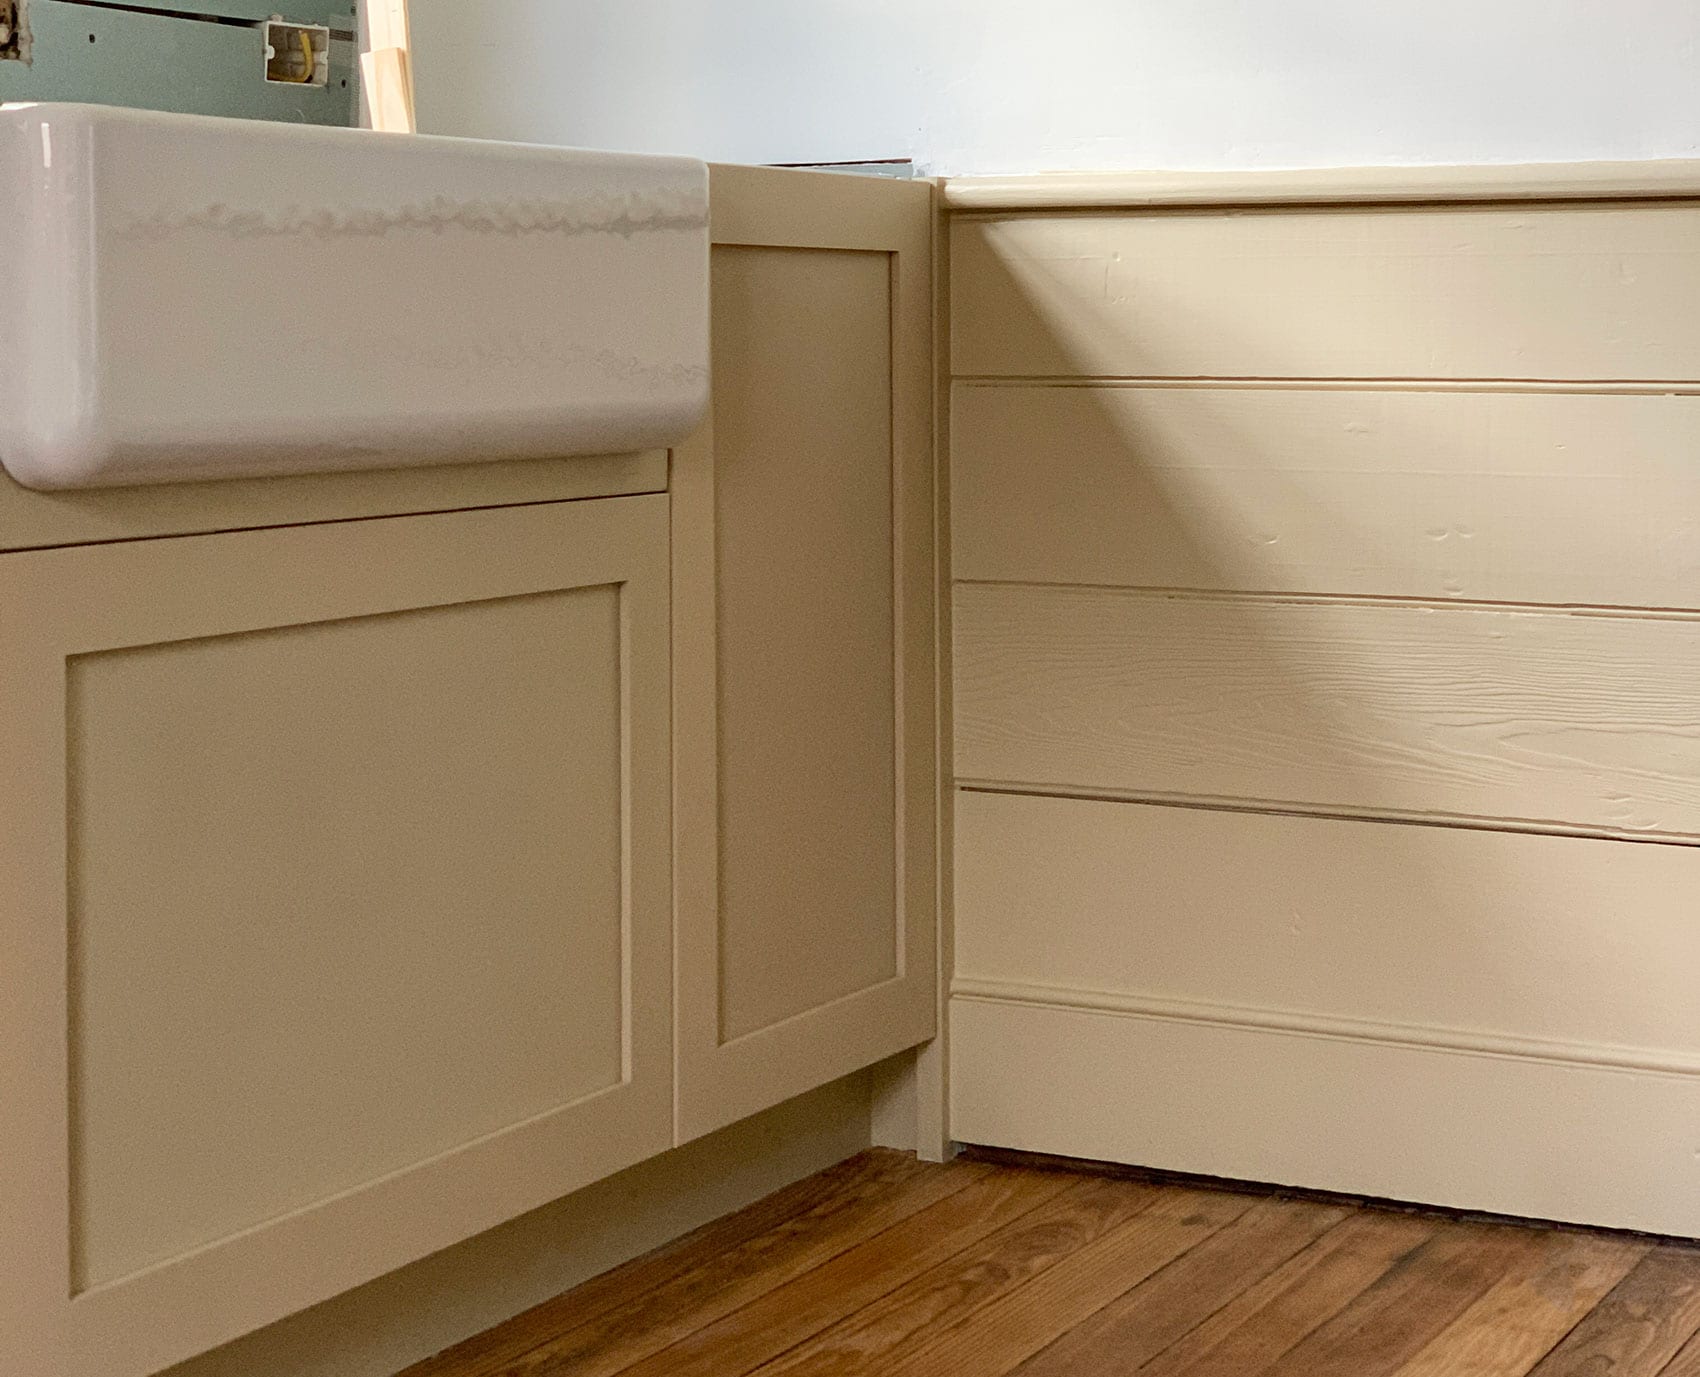
Below the trim boards, we have a large and impressive stack of 8″ pine shiplap, rescued from a house I worked on several years ago. You might know what shiplap is because a certain Joanna Gaines loves her some shiplap. The oft-overlooked reason that JoJo loves shiplap is because it’s a historic wall treatment down in Texas, which makes sense, because the Gaines family lives in Texas! I, however, live in Upstate, NY, where shiplap was commonly used on houses from around the turn of the century until…the 70s?…as exterior sheathing—that layer right over the studs (or rafters) that gets covered in housewrap and siding (or shingles).
My point is that shiplap itself doesn’t really make sense as an interior wall surface in this area; it just wasn’t used that way traditionally so it comes off feeling trendy. But you know what totes does make sense? Shiplap’s glamorous rich cousin, beadboard. Beadboard all day long. East coast historic houses love their beads.
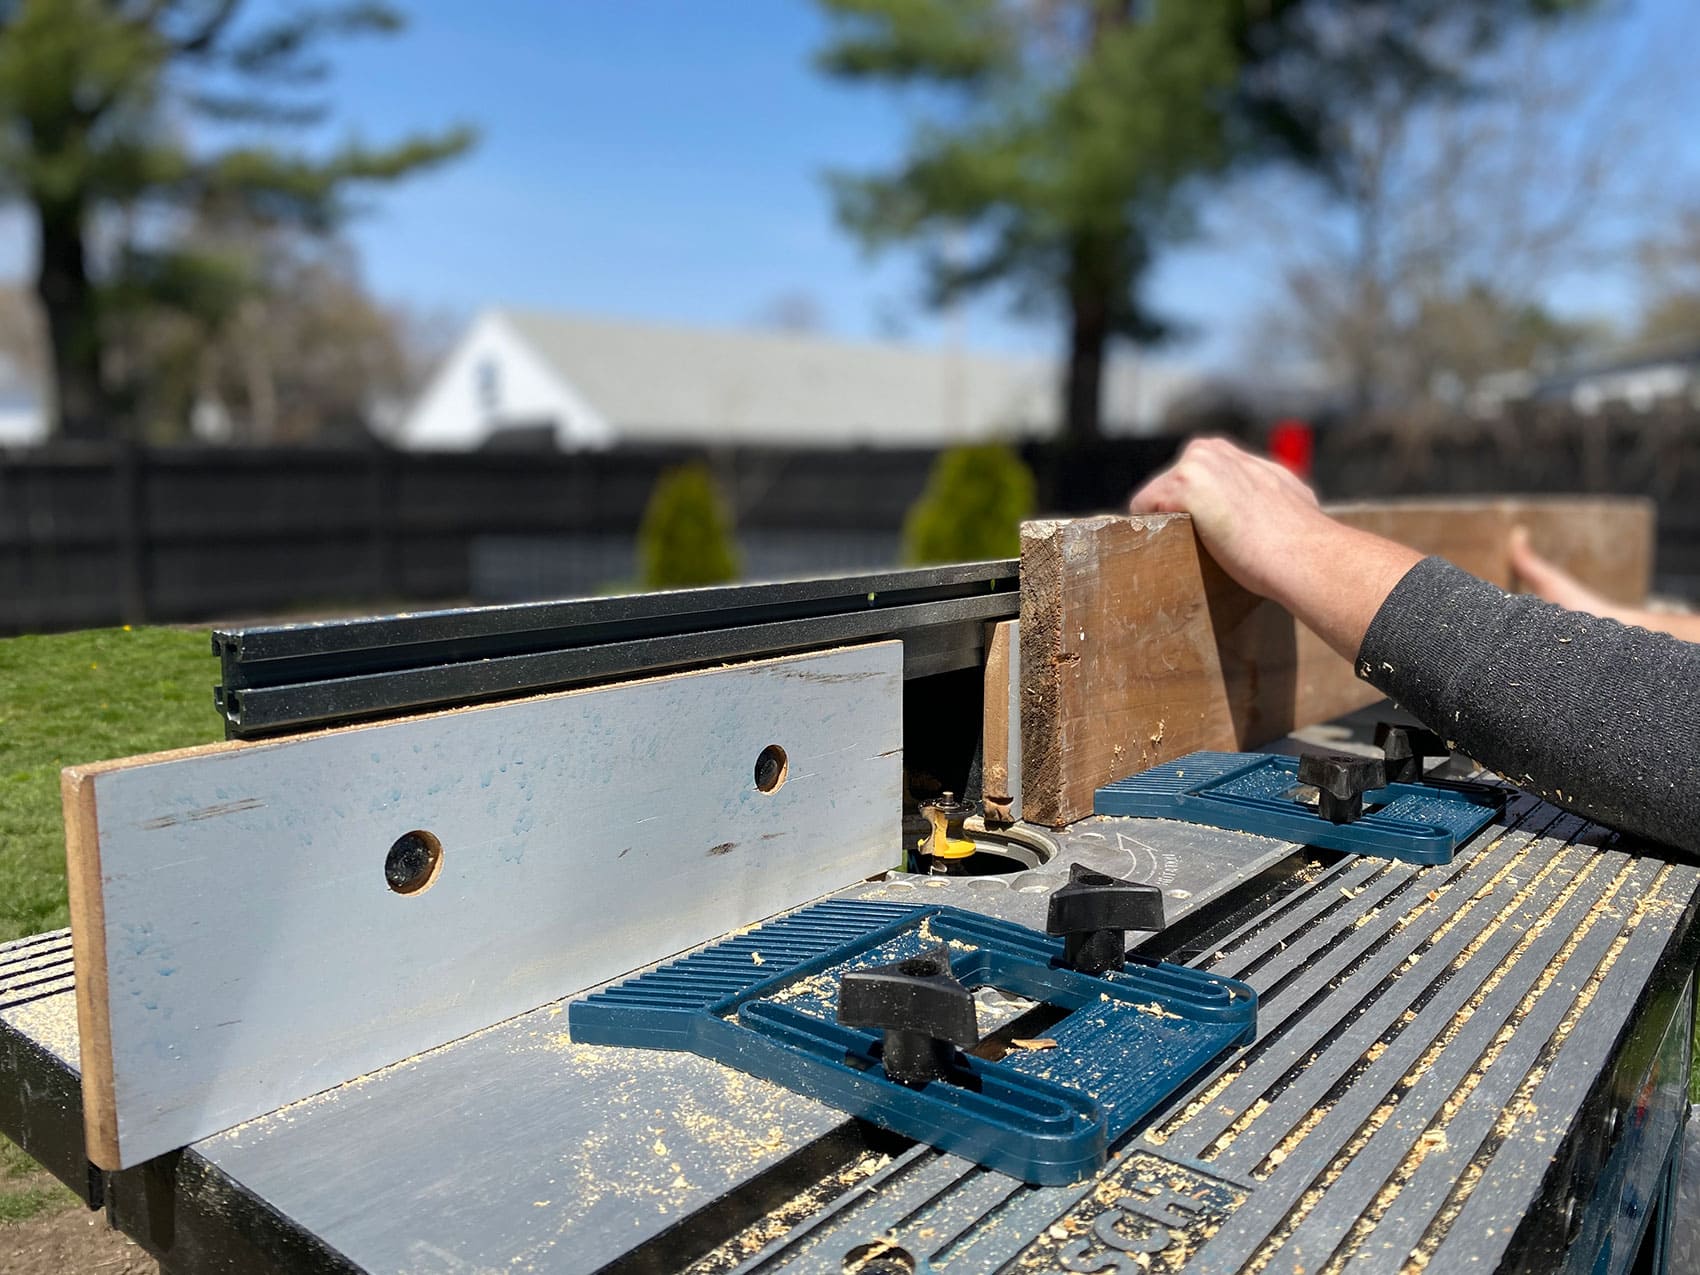
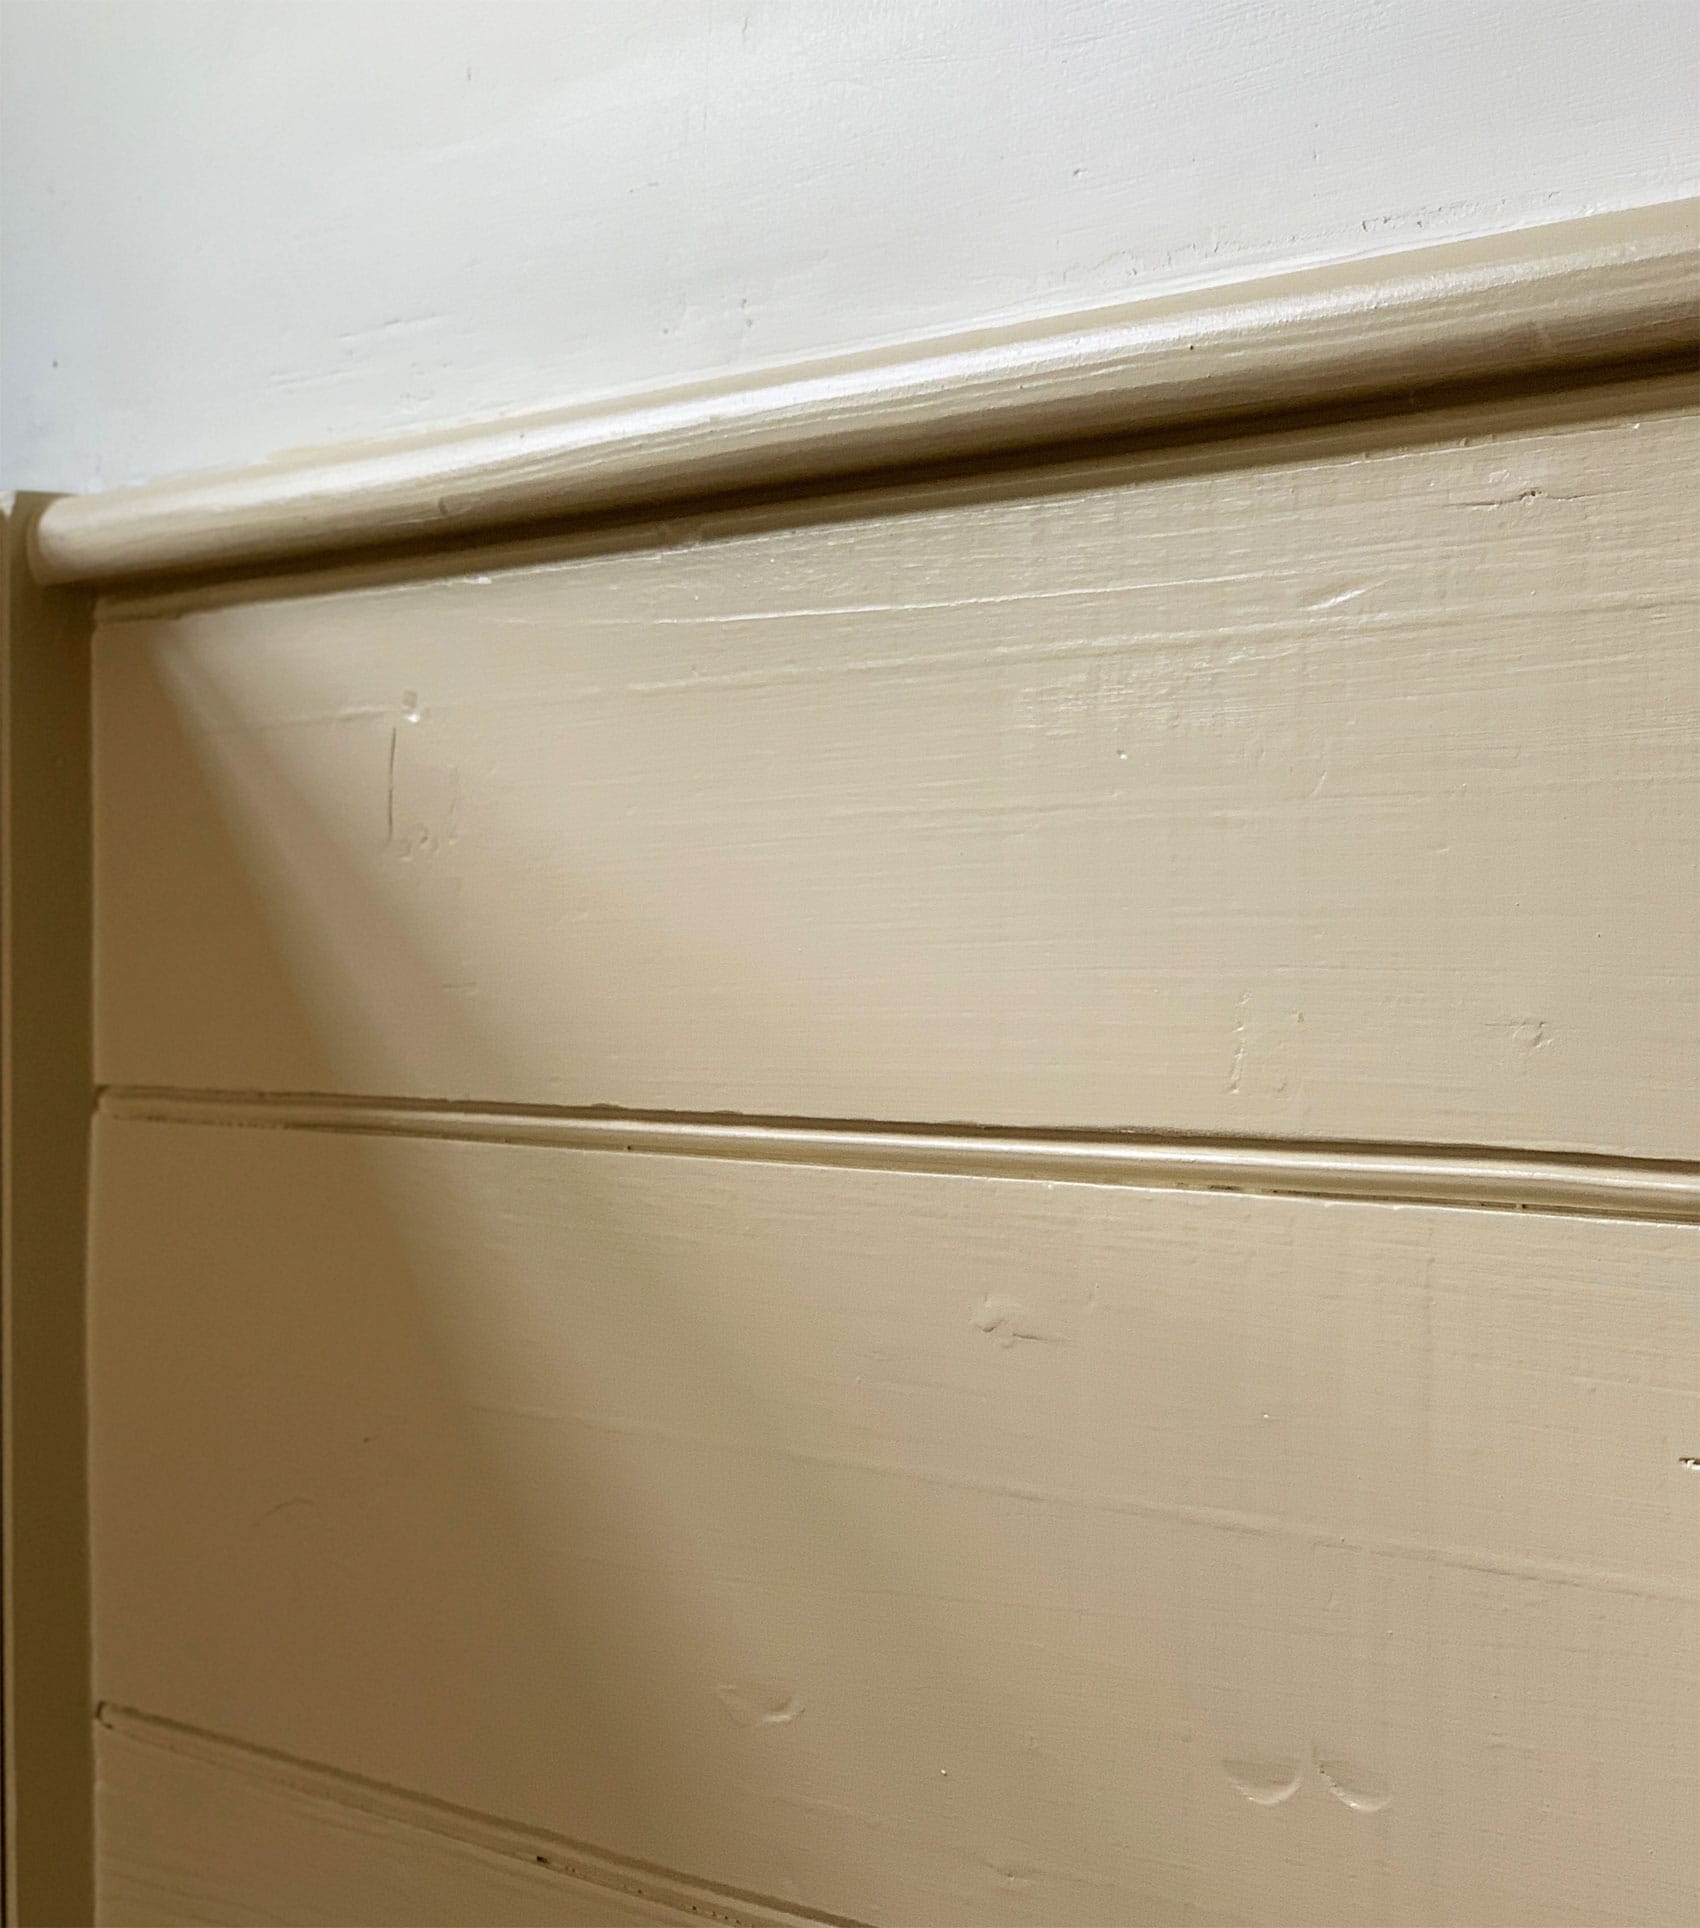
First I had to make my baseboard, using the same supply of old 1x stock I used for the window and door casings. All it really takes to create an easy historic baseboard is adding a bead to the top of a piece of 1x stock. A 1/4″ bead added to the top of a 1×6 or 1×8 board both tend to look good and appropriate, particularly for more modest houses (like this one) or more modest spaces (like a bathroom or closet) in a more grand house. I have my Porter-Cable router installed onto this Bosch router table, which just makes milling a lot of material at once go faster and easier.

With the baseboards fabricated, time to get that shiplap beaded! For beadboard a smaller 1/8″ bead bit will generally look best, and again—it’s just a matter of running it through the router and voila! Beadboard!
NOW. Taking all this trash and turning it into parts of a house is all well and good, but it’s really only worthwhile if it also looks good when it’s all done and stands the test of time. Otherwise we’ve just nailed garbage to the walls and called it “reclaimed.” Which is to say: the paint process is KEY. And I have discovered a few new (to me) things to tell you about THAT.
We have three distinct challenges here:
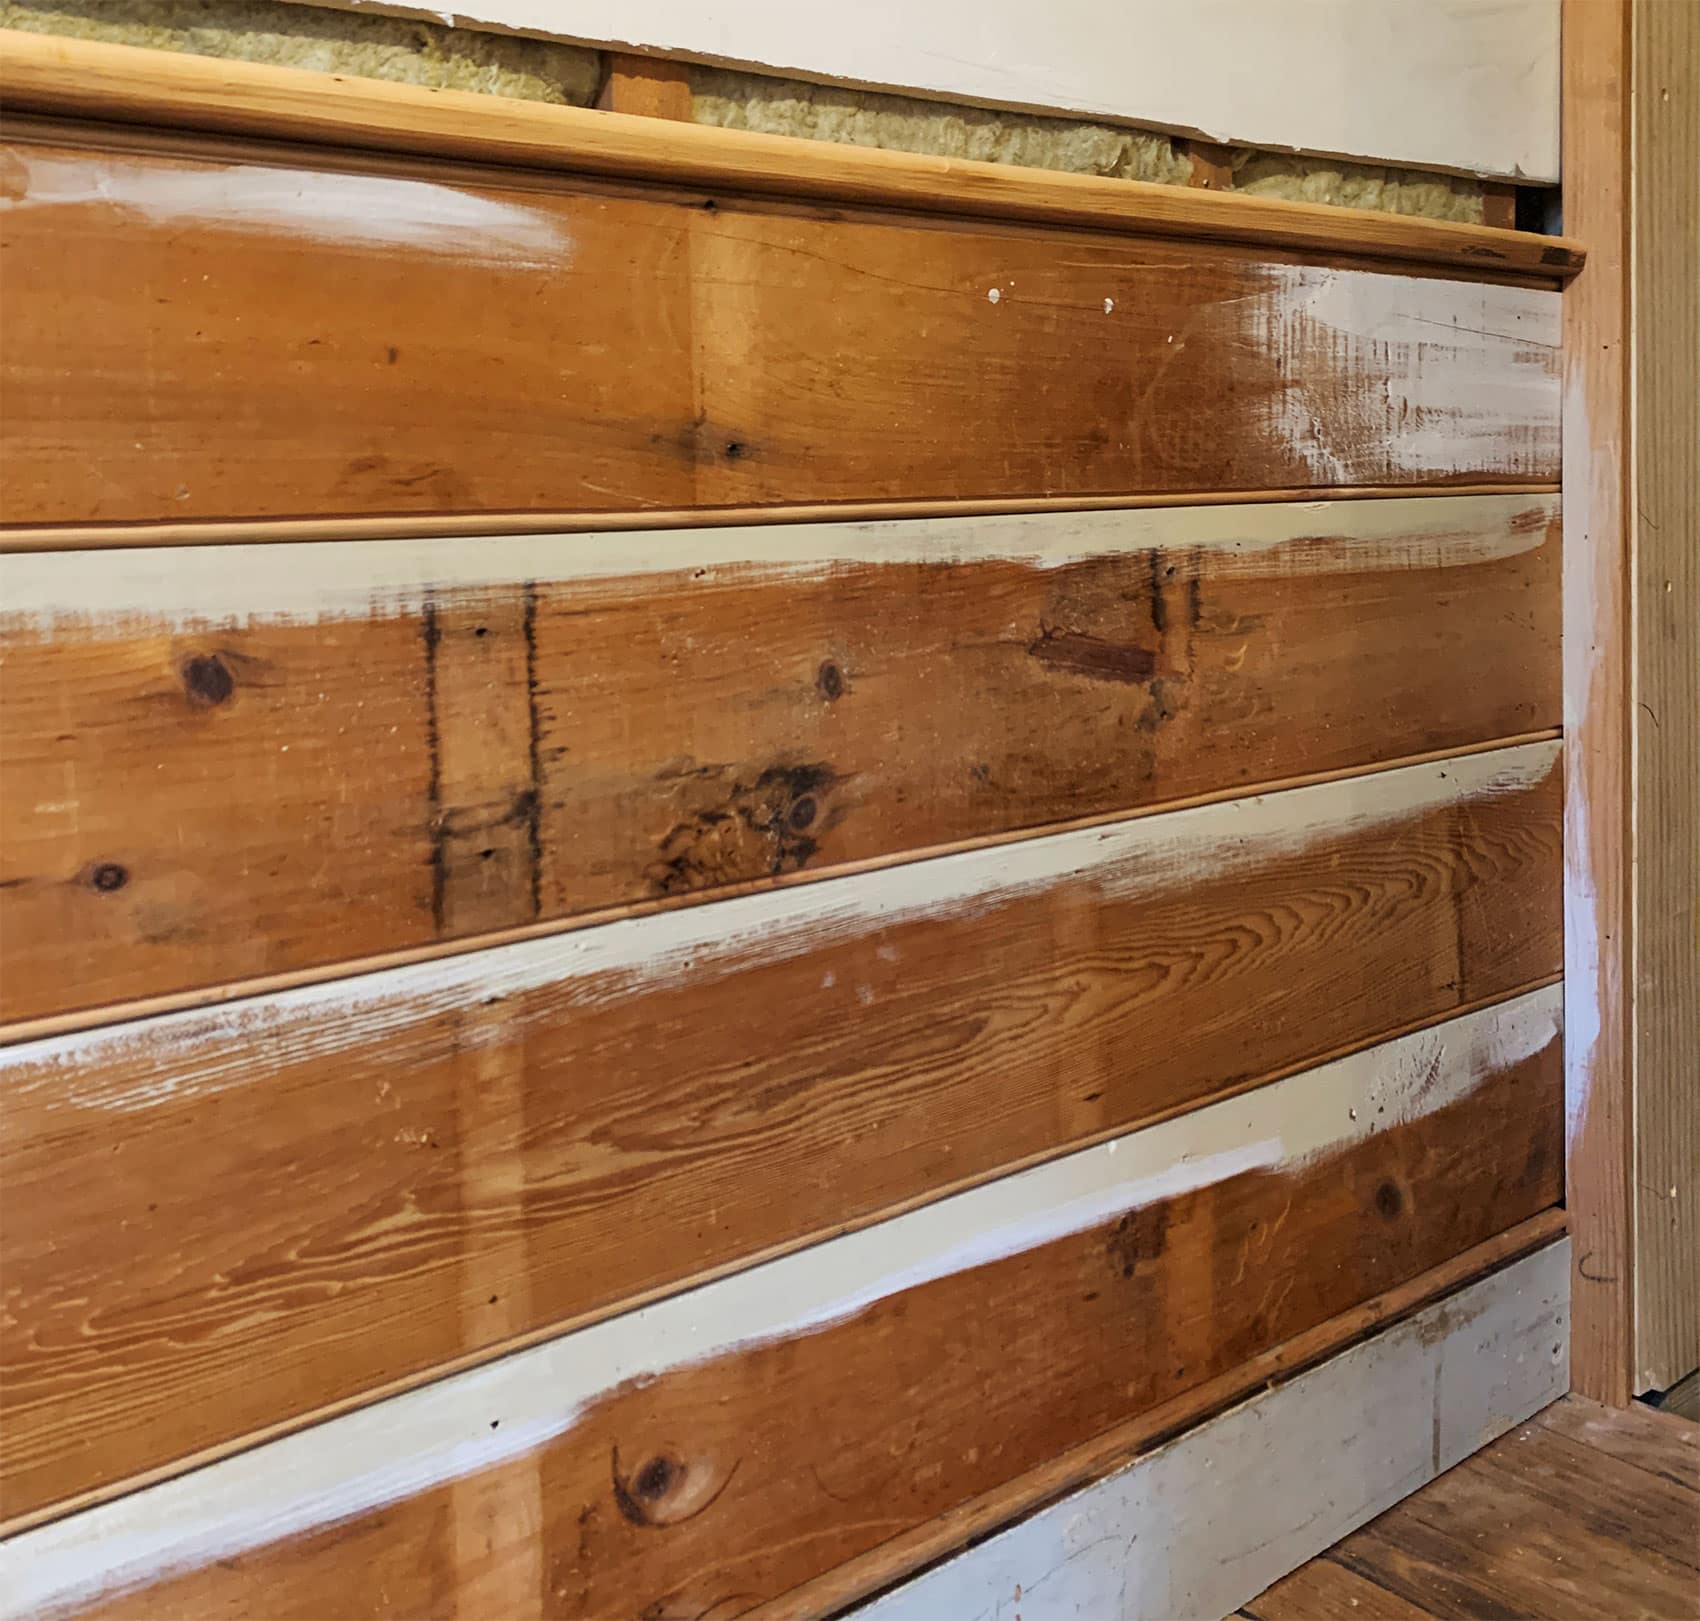
- Old trim painted with god-knows-what. YES it’s all dirty, but underneath the grime, some of it is shiny whereas some is fairly matte, some appears to be oil-based paint, some appears to be latex, and some—I swear—appears to be some kind of acrylic art paint that is definitely not for painting the moldings in your house. So we need to worry about coverage, stain-blocking, and adhesion.
- Raw old knotty pine. Knotty pine will break your heart if you let it. Or if you treat her wrong. But it doesn’t HAVE to.
- Ultimately with these rough materials, we’re still after a smooth finish—for me, preferably one that looks and feels like it’s been here forever, still allows plenty of texture to show through, and will clean easily without losing its finish. It’s a kitchen, so things need to be easy to wipe down!
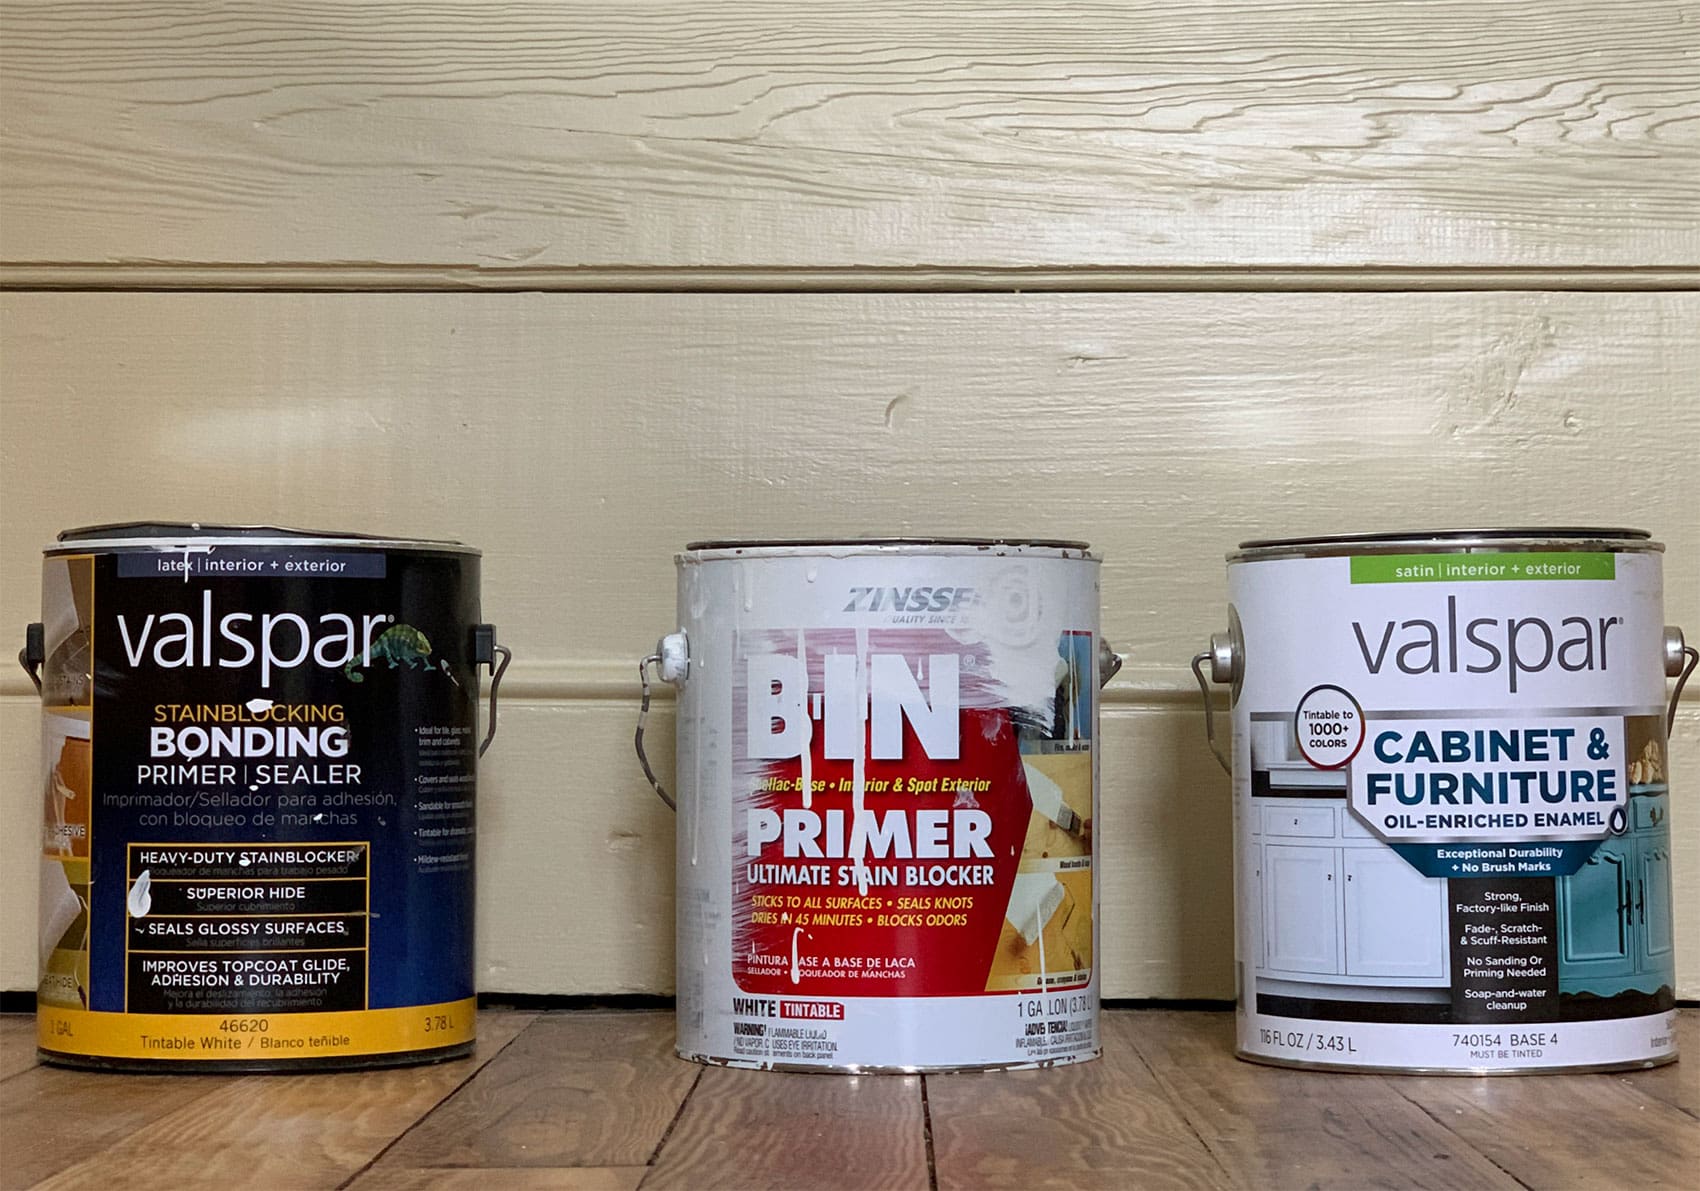
Meet my best friends. The two on the ends are new friends and the one in the middle is an old faithful. You can tell because she’s a mess, like myself.
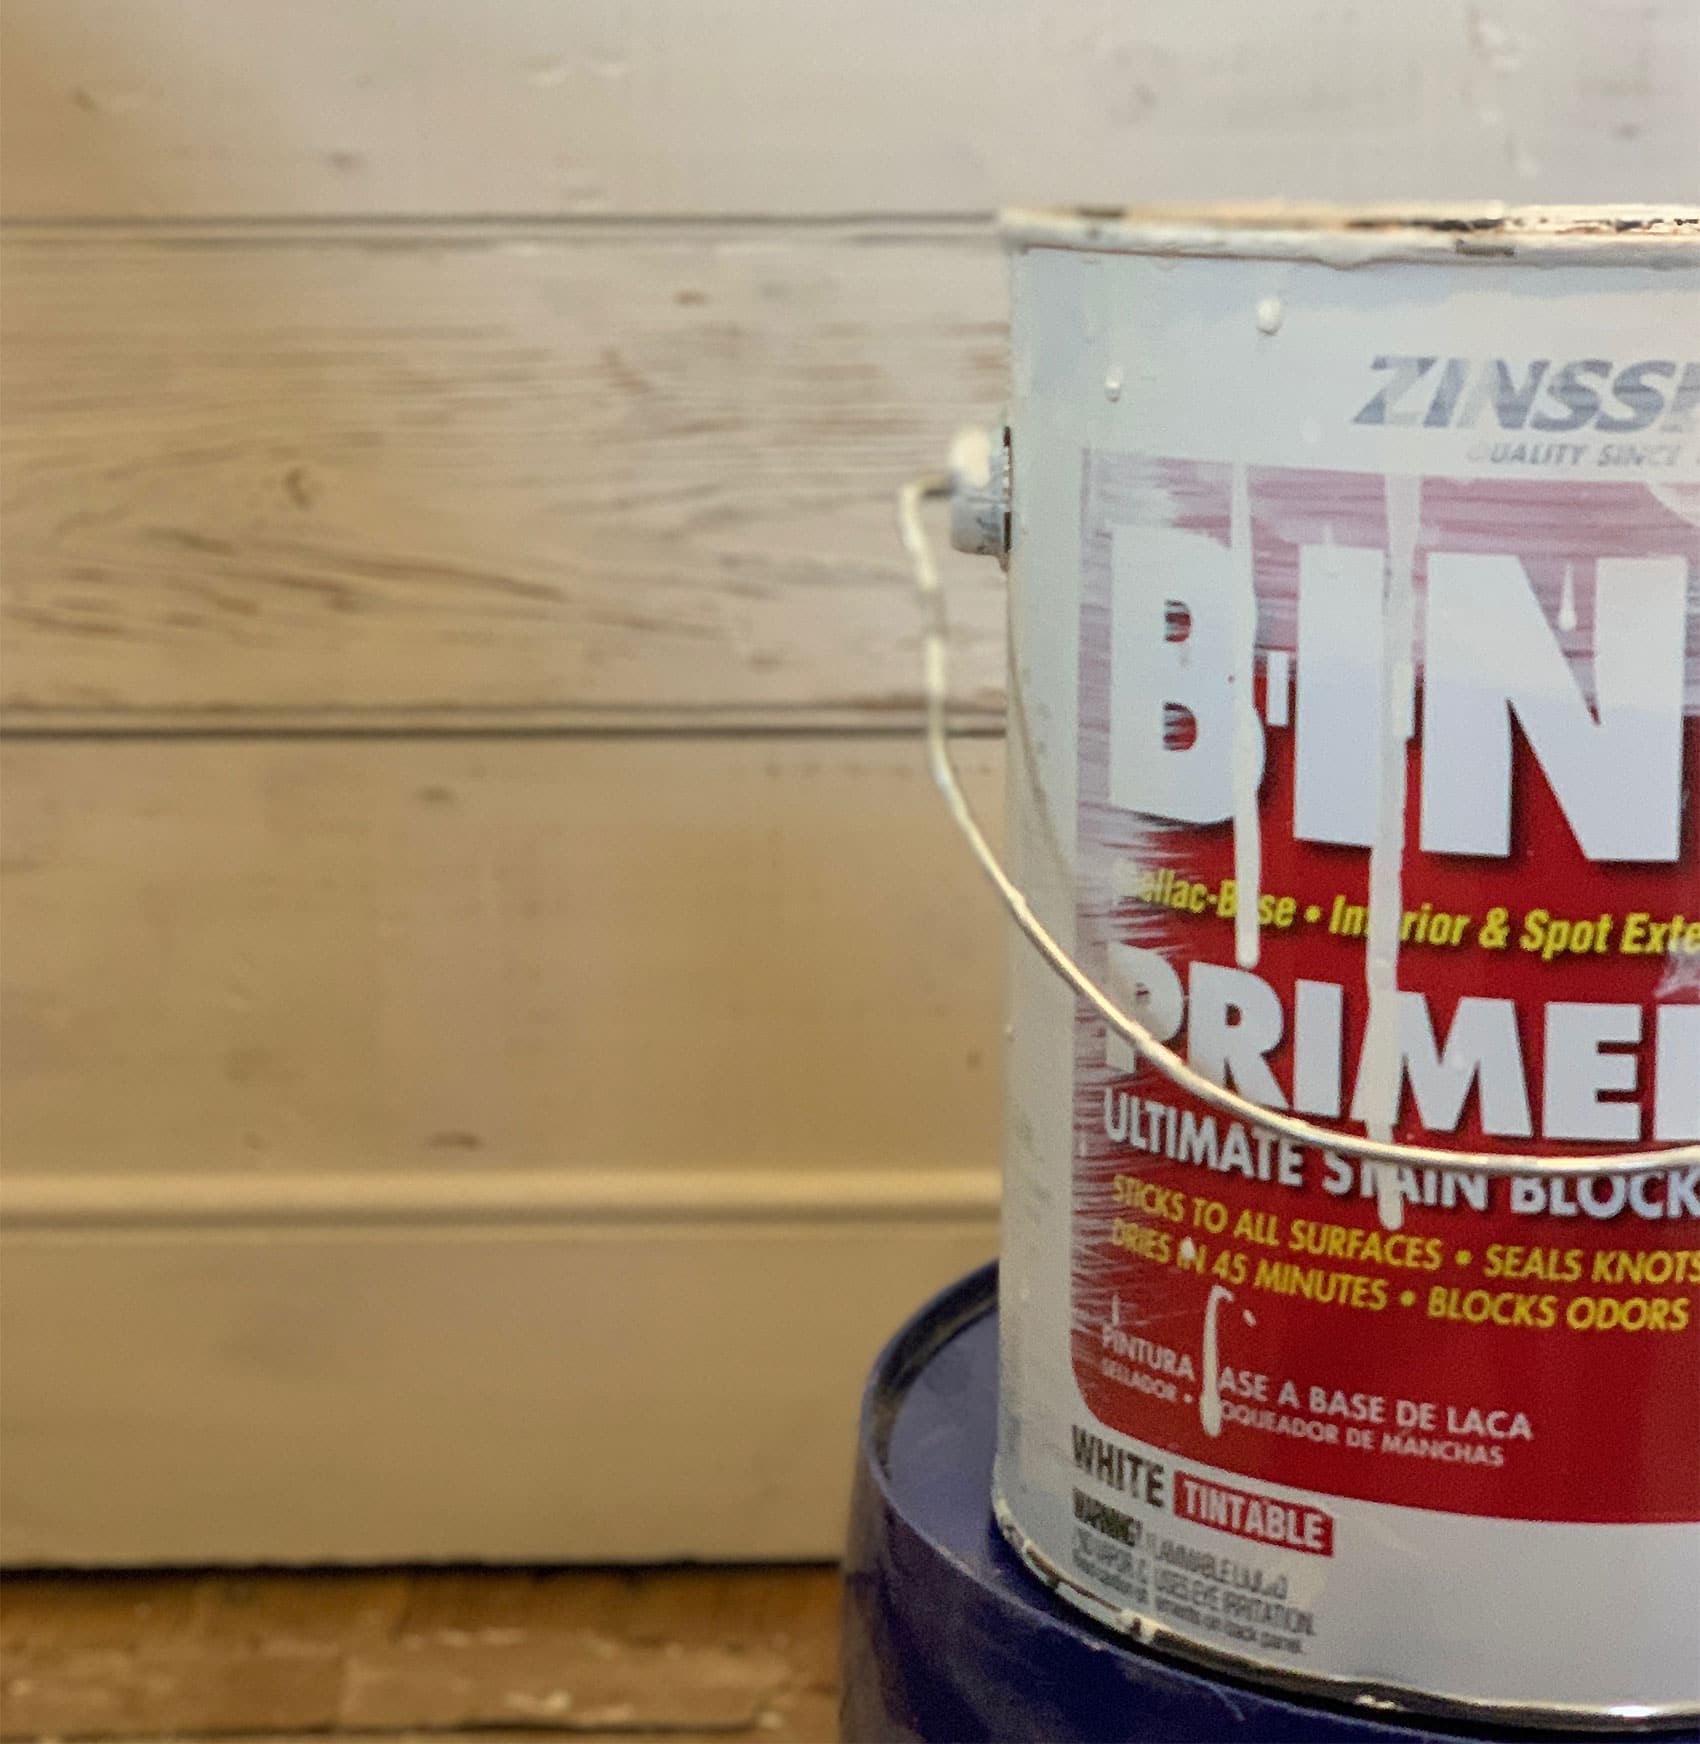
Let’s start with the Valspar Stainblocking Bonding Primer. It is really good stuff.
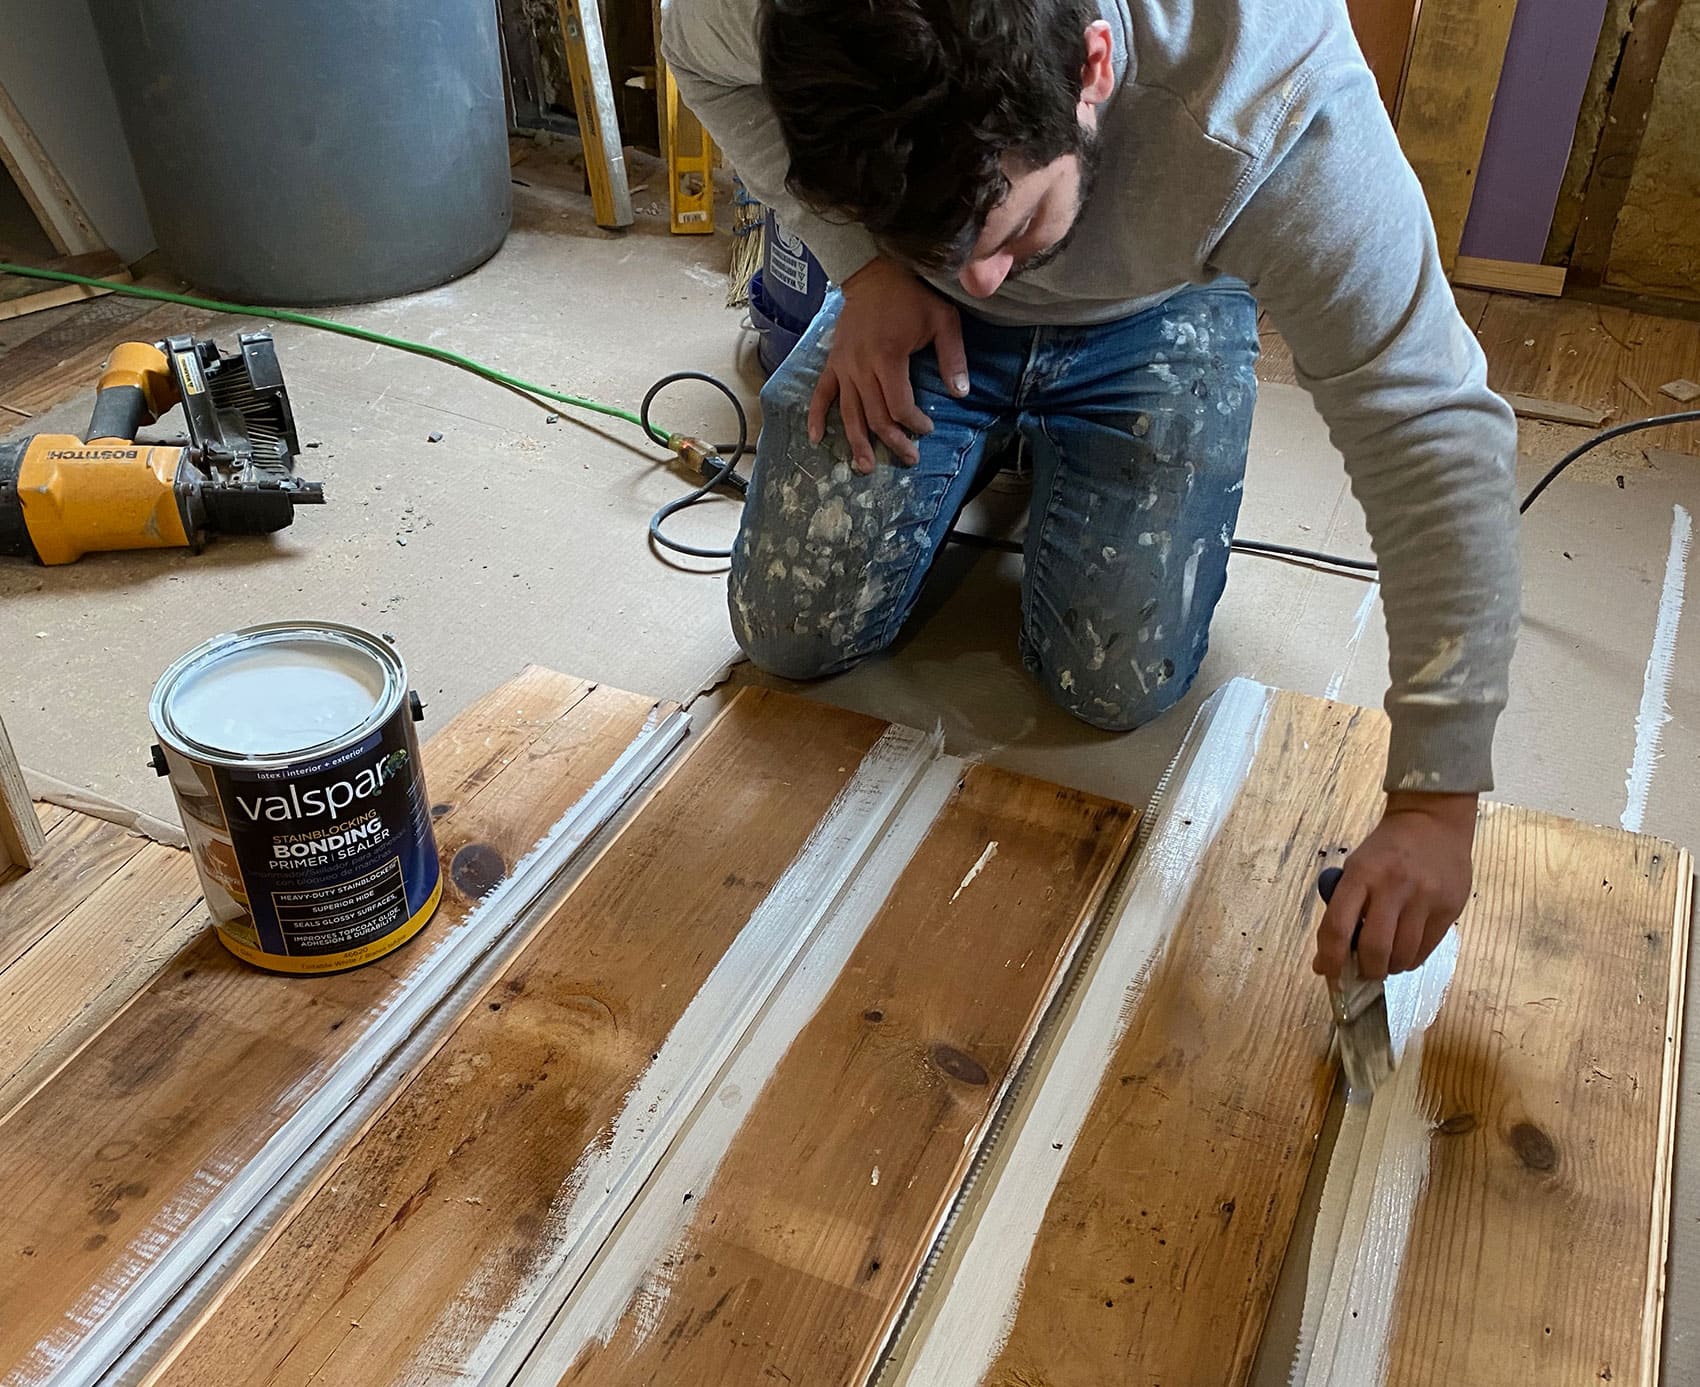
With any material designed to expand and contract at a joint (like tongue-and-groove, shiplap, or clapboard), it’s smart to take the time to pre-prime your boards, paying special attention to the part that won’t be visible (and therefore accessible with a paint brush) after installation. If/when the wood contracts, you don’t want to see a sliver of unpainted wood peeking out! Because I lack patience, resent pre-planning, and find pre-priming to be a tedious task, I chose to only pre-prime the rabbet joint and worry about the rest once it was on the wall.
This isn’t my first rodeo with this shiplap/beadboard, and in the past I’ve been pretty adamant about only using oil-based primer for this task. Traditional wisdom says that oil-based primer will adhere and stain-block better than latex counterparts, but it’s a real pain to work with and clean up, and it’s worse for the environment, and it takes a while to dry, and it stinks…all reasons why I was excited but apprehensive about using this $25 can of latex Valspar primer that claims to perform as well as what I’m used to, but with a much faster drying time and easier clean-up and improved workability and not a lot of stink.
I mean, look at that wood. I’m demanding a lot of this primer.
With the beadboard installed, I rolled a pretty thick coat of primer over the whole thing and followed up with a 3″ brush, smoothing it out side-to-side and making sure the primer made it all the way into the crevices.
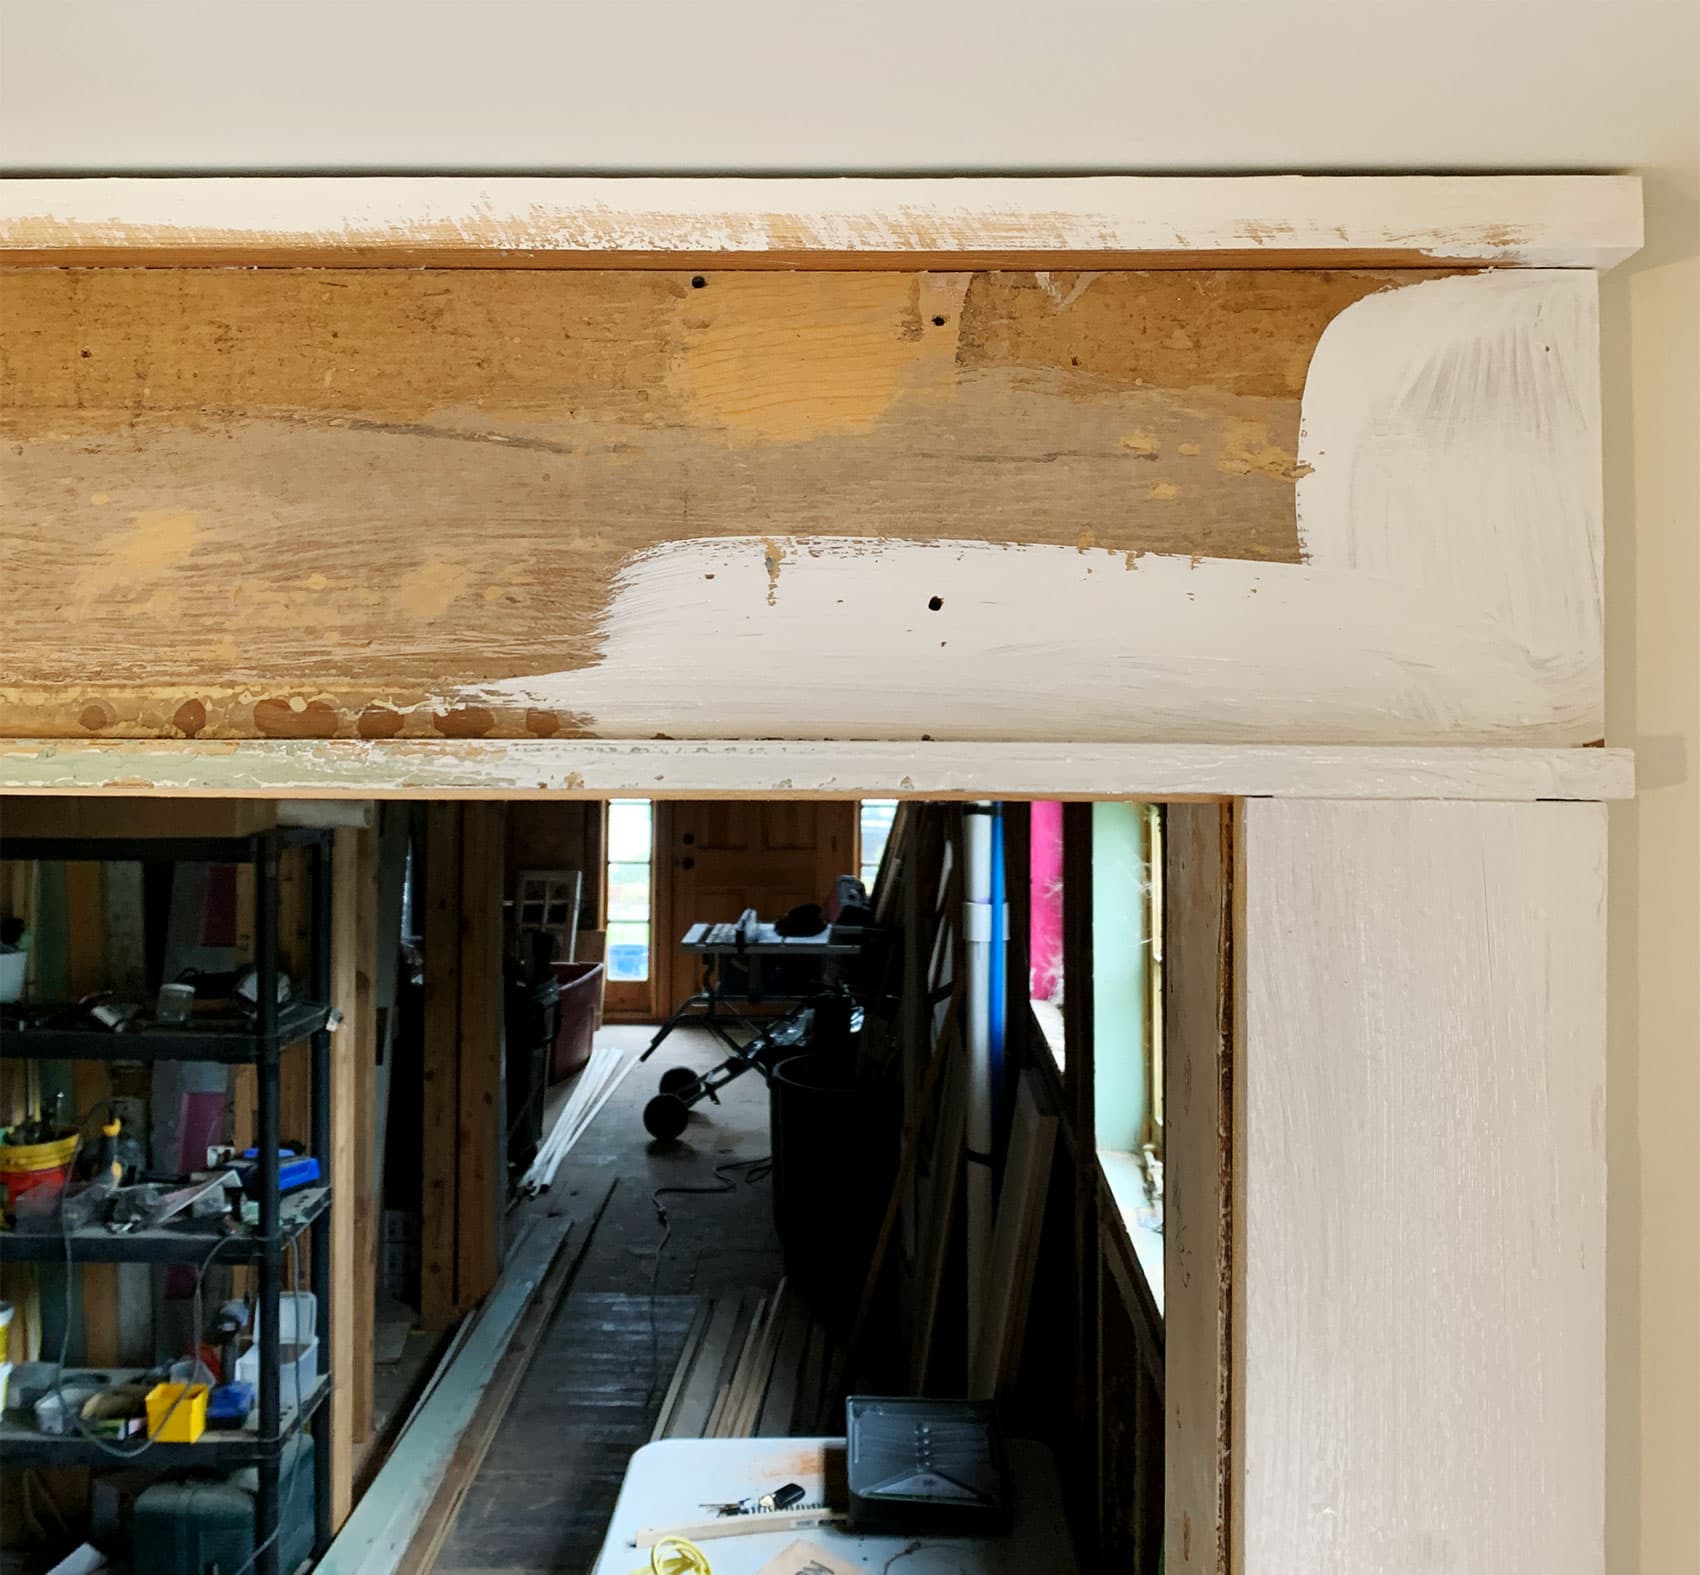
To prep these multi-colored moldings, I followed the same basic steps I normally do: scrape off what’s flaking, sand down weird high spots to smooth things out a little, and clean it with TSP substitute. Because the Valspar bonding primer claims to adhere well to glossy and previously-painted surfaces and I like to test the limits, I didn’t worry at all about knocking down the shine on the glossier bits of old trim, or even being that thorough with my TSP rinse. Just kind of gave everything a once-over with a rag and a few minutes to air dry before priming.
VERDICT? This stuff works GREAT. It’s really thick but not gloppy, coverage is really very good and adhesion is excellent. I’m stoked to find a latex product that feels like a real alternative to oil-based primer—ESPECIALLY one that’s suitable for interior and exterior use. It worked perfectly for both of these applications, as different as they are, and because it was dry in an hour or so, I could get back to work faster! I’m psyched to have this in my arsenal next time I have to pre-prime a bunch of clapboard.
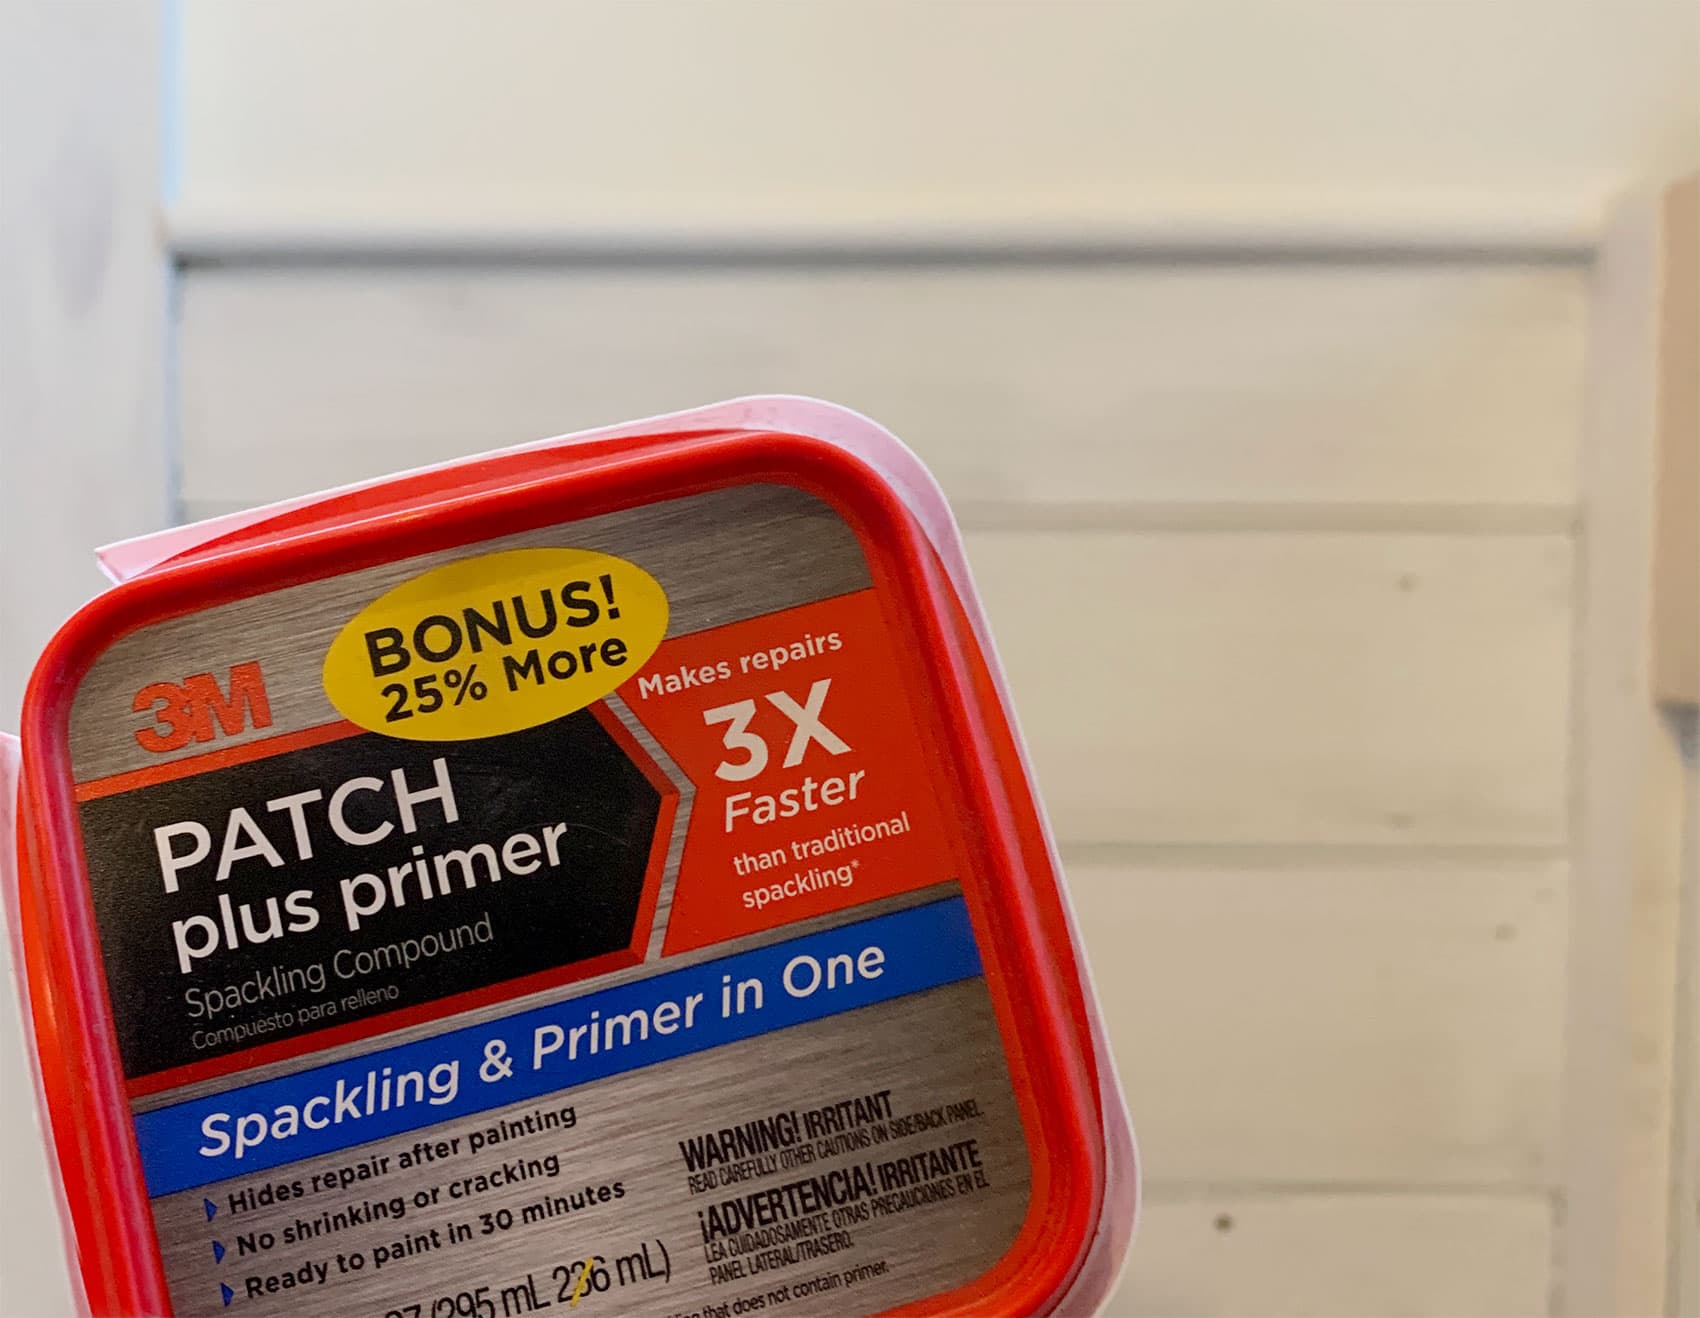
Next up: PATCH. I kind of enjoy patching salvaged wood because there’s the slightest amount of artistry involved—I try to strike a balance where it feels solid and easy to clean, doesn’t look newly installed, and still shows plenty of character and texture. So I pick and choose what to patch and what to leave alone. ANYWAY—said it before and I’ll say it again: 3M Patch Plus Primer is the best thing I’ve used for small patches in walls or moldings, full stop. Everything it says on the package is true, and I’ll add that it sands smoother than other patching compounds, which leads to a nicer painted result!
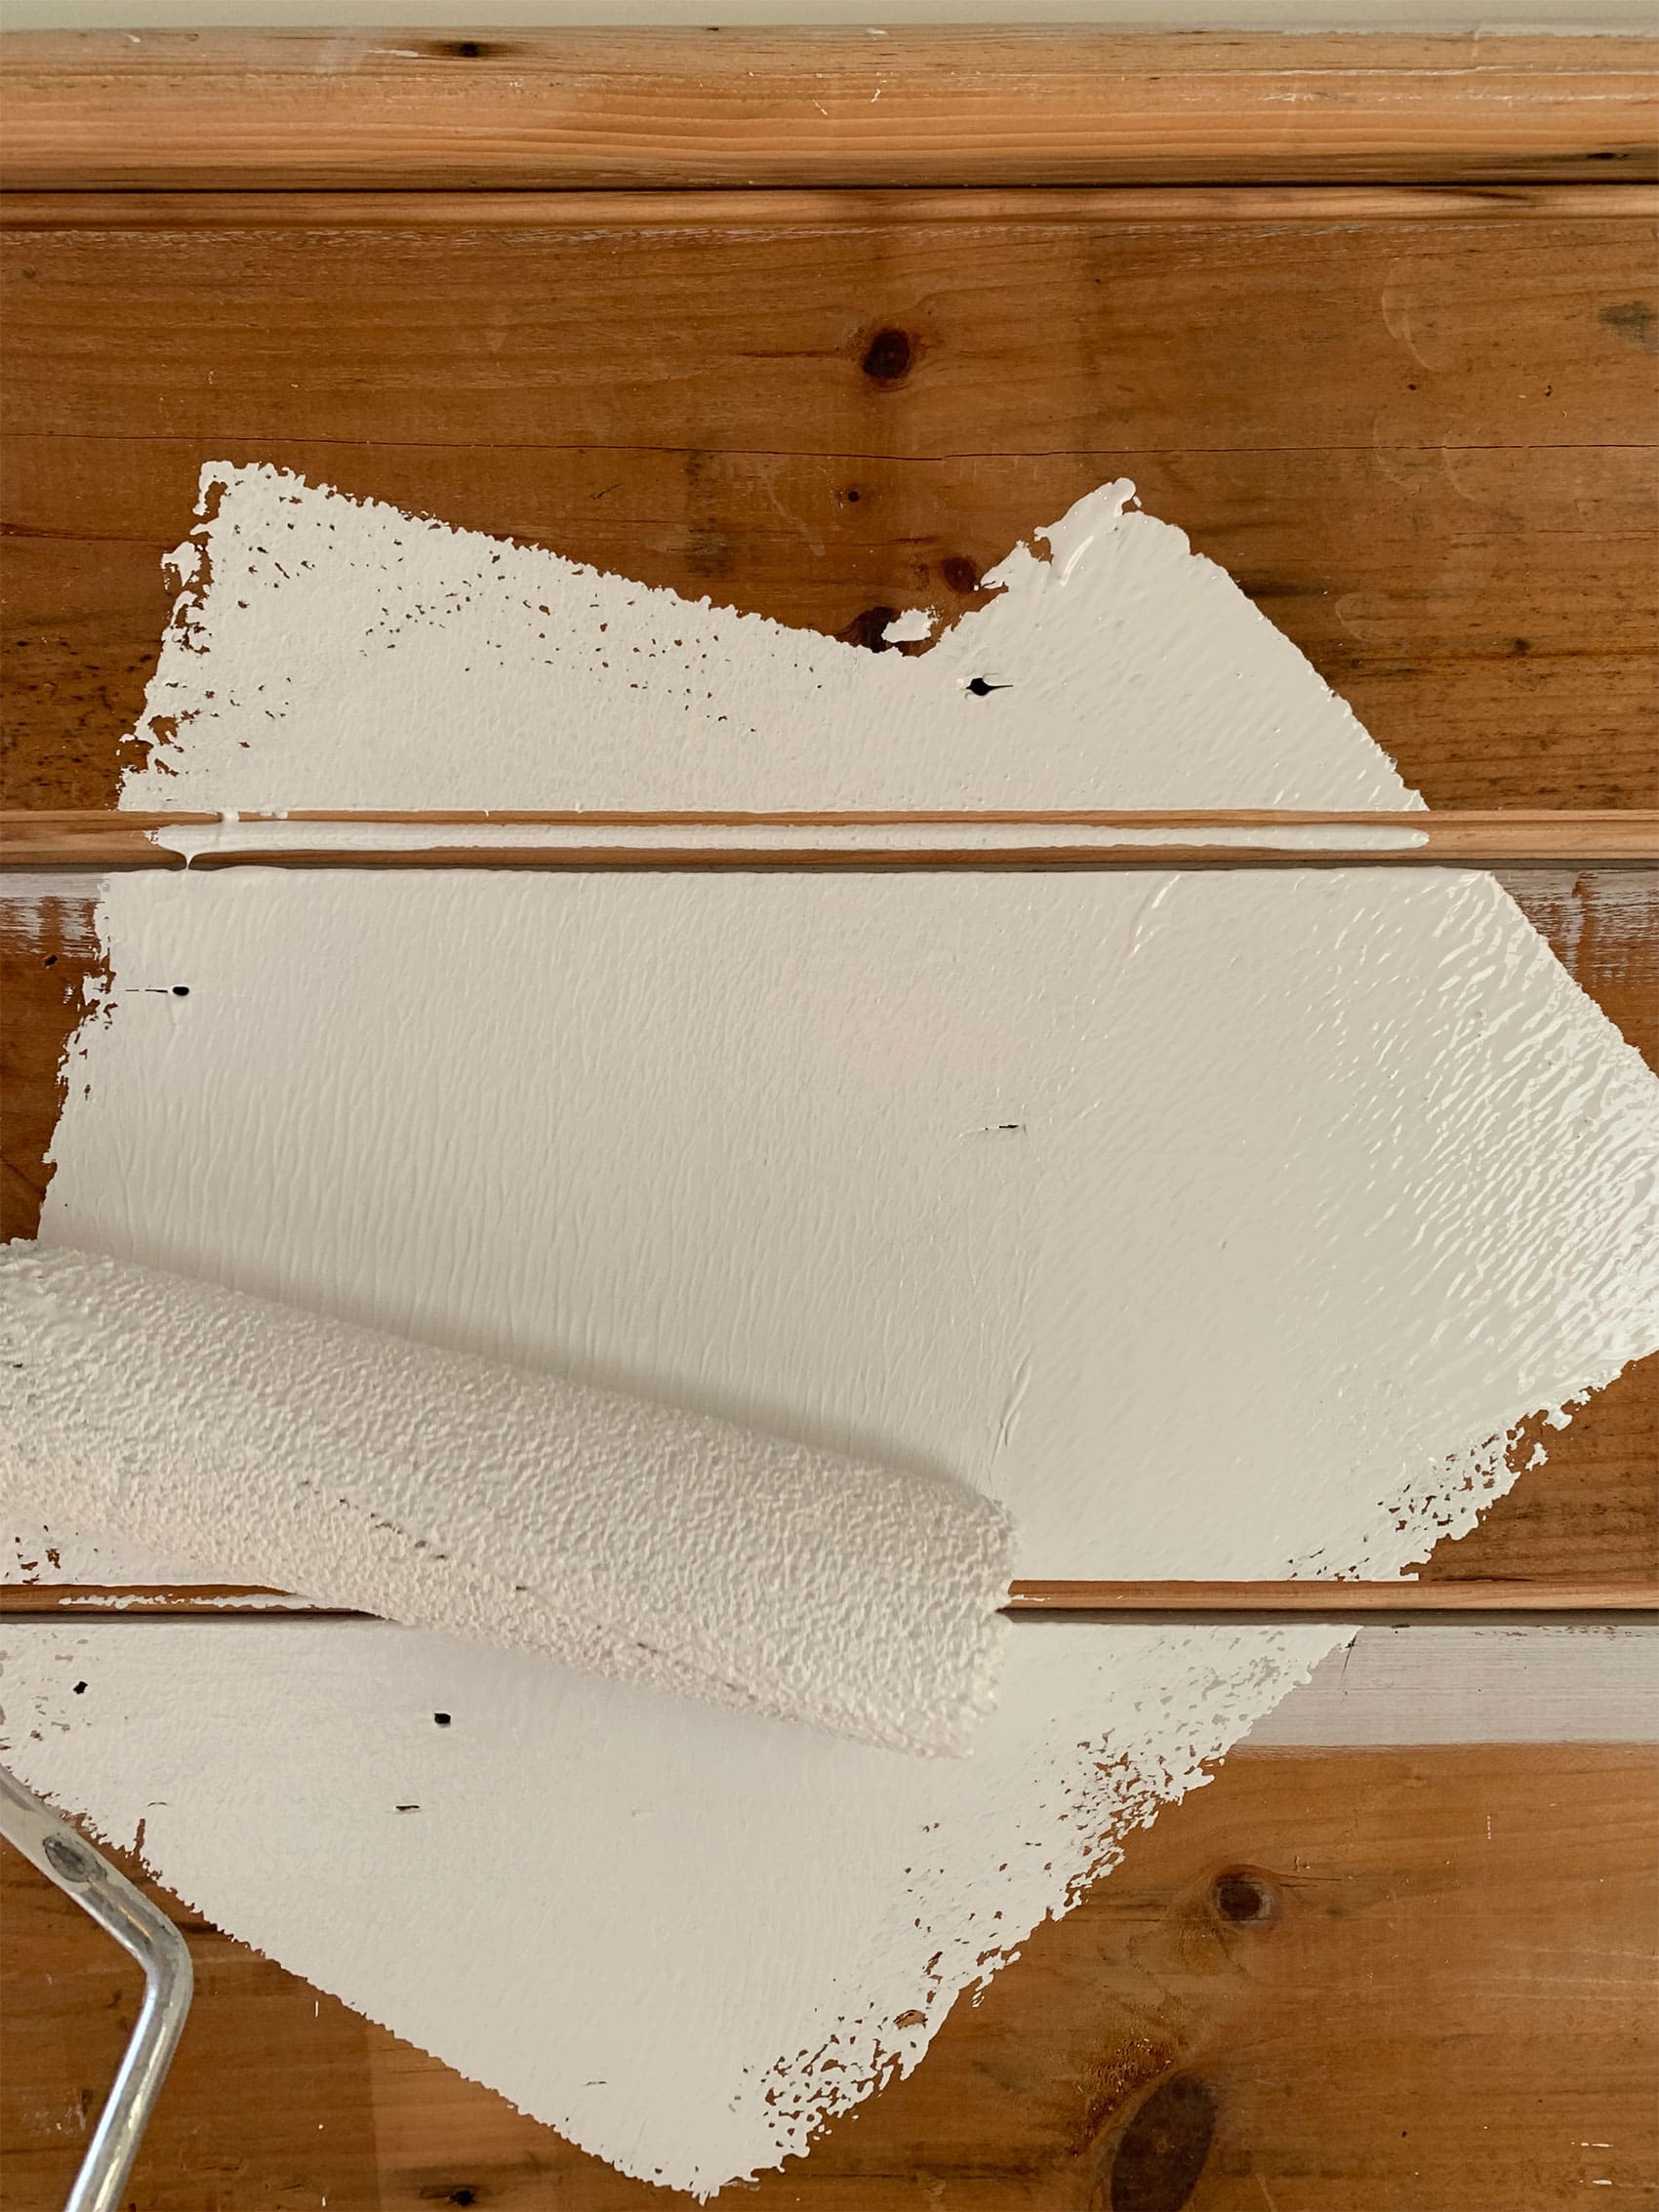
Now here’s my paint secret that I discovered too late in life. You know how sometimes when you’re working with unpainted softwood like pine, you can sand and sand and it’ll still have a sort of fuzzy texture? And then when you paint, that fuzzy texture dries and it feels kind of rough, and you’re annoyed because you did all that sanding and still have rough wood?
The secret is to let the primer fully dry (and patching compound, if present), and then go back over the whole thing with sandpaper—I like a 120 grit pad on my mouse sander for faster work. This pulls double-duty of smoothing out the patch compound and knocking down that dried painted wood fuzz to give you a truly smoooooth surface for the paint. Try it! You’ll like it. I’ve never lead you wrong before!!! (unless I have in which case, my apologies.)
Of course, after sanding, give everything a good vacuum to remove any dust.
I apologize profusely for the poor quality of this photo. You may be pleased to know that your support on Patreon has now bought me a long-needed replacement lens for my nice camera so I can stop using my phone for everything like I’ve never even heard of Pinterest. (THANK YOU, PATRONS!)
The point here is that while Valspar’s latex bonding primer has addressed most of my problems, I think the “stain-blocking” refers more to more common household stains, like nicotine or, say, blood spatter. But staining that results from the knots bleeding through the paint is a different animal, and one that I’ve found can really only be adequately addressed with shellac-base primer. Skipping shellac-base primer (whether you use oil or latex-based primer) on knots may seem OK at first, but days or weeks or months later, those knots will inevitably bleed through the paint and then you’ll have to decide whether you want to chock that up to character or repaint (in which case, if you think one or two more coats of paint will eliminate the problem, you will be going through the same thing a few days or weeks or months later). But through the unending power of shellac (I mean, what other all-natural product can fix your paint job AND coat the outside of a jelly bean?!), we can quickly fix this existential problem by just pre-treating knots with shellac-base primer and moving on with our lives. It IS stinky, but that’s mostly just the alcohol content and the smell doesn’t linger once it’s dried and the alcohol has evaporated. Otherwise, though, it’s easy to work with, dries VERY quickly, and most importantly is EFFECTIVE. And because I’m not all sticky and pissed off from forcing myself to use oil-based primer rather than my fancy new Valspar latex Bonding primer, spending a half-hour spot-priming with this stuff feels like an easy extra little step to ensure a good final result.
Finally, I caulked! You definitely want to be done with any sanding steps before caulk. I used my old faithful, Big Stretch. It hasn’t let me down yet! On the pricier side, but so, so worth it.
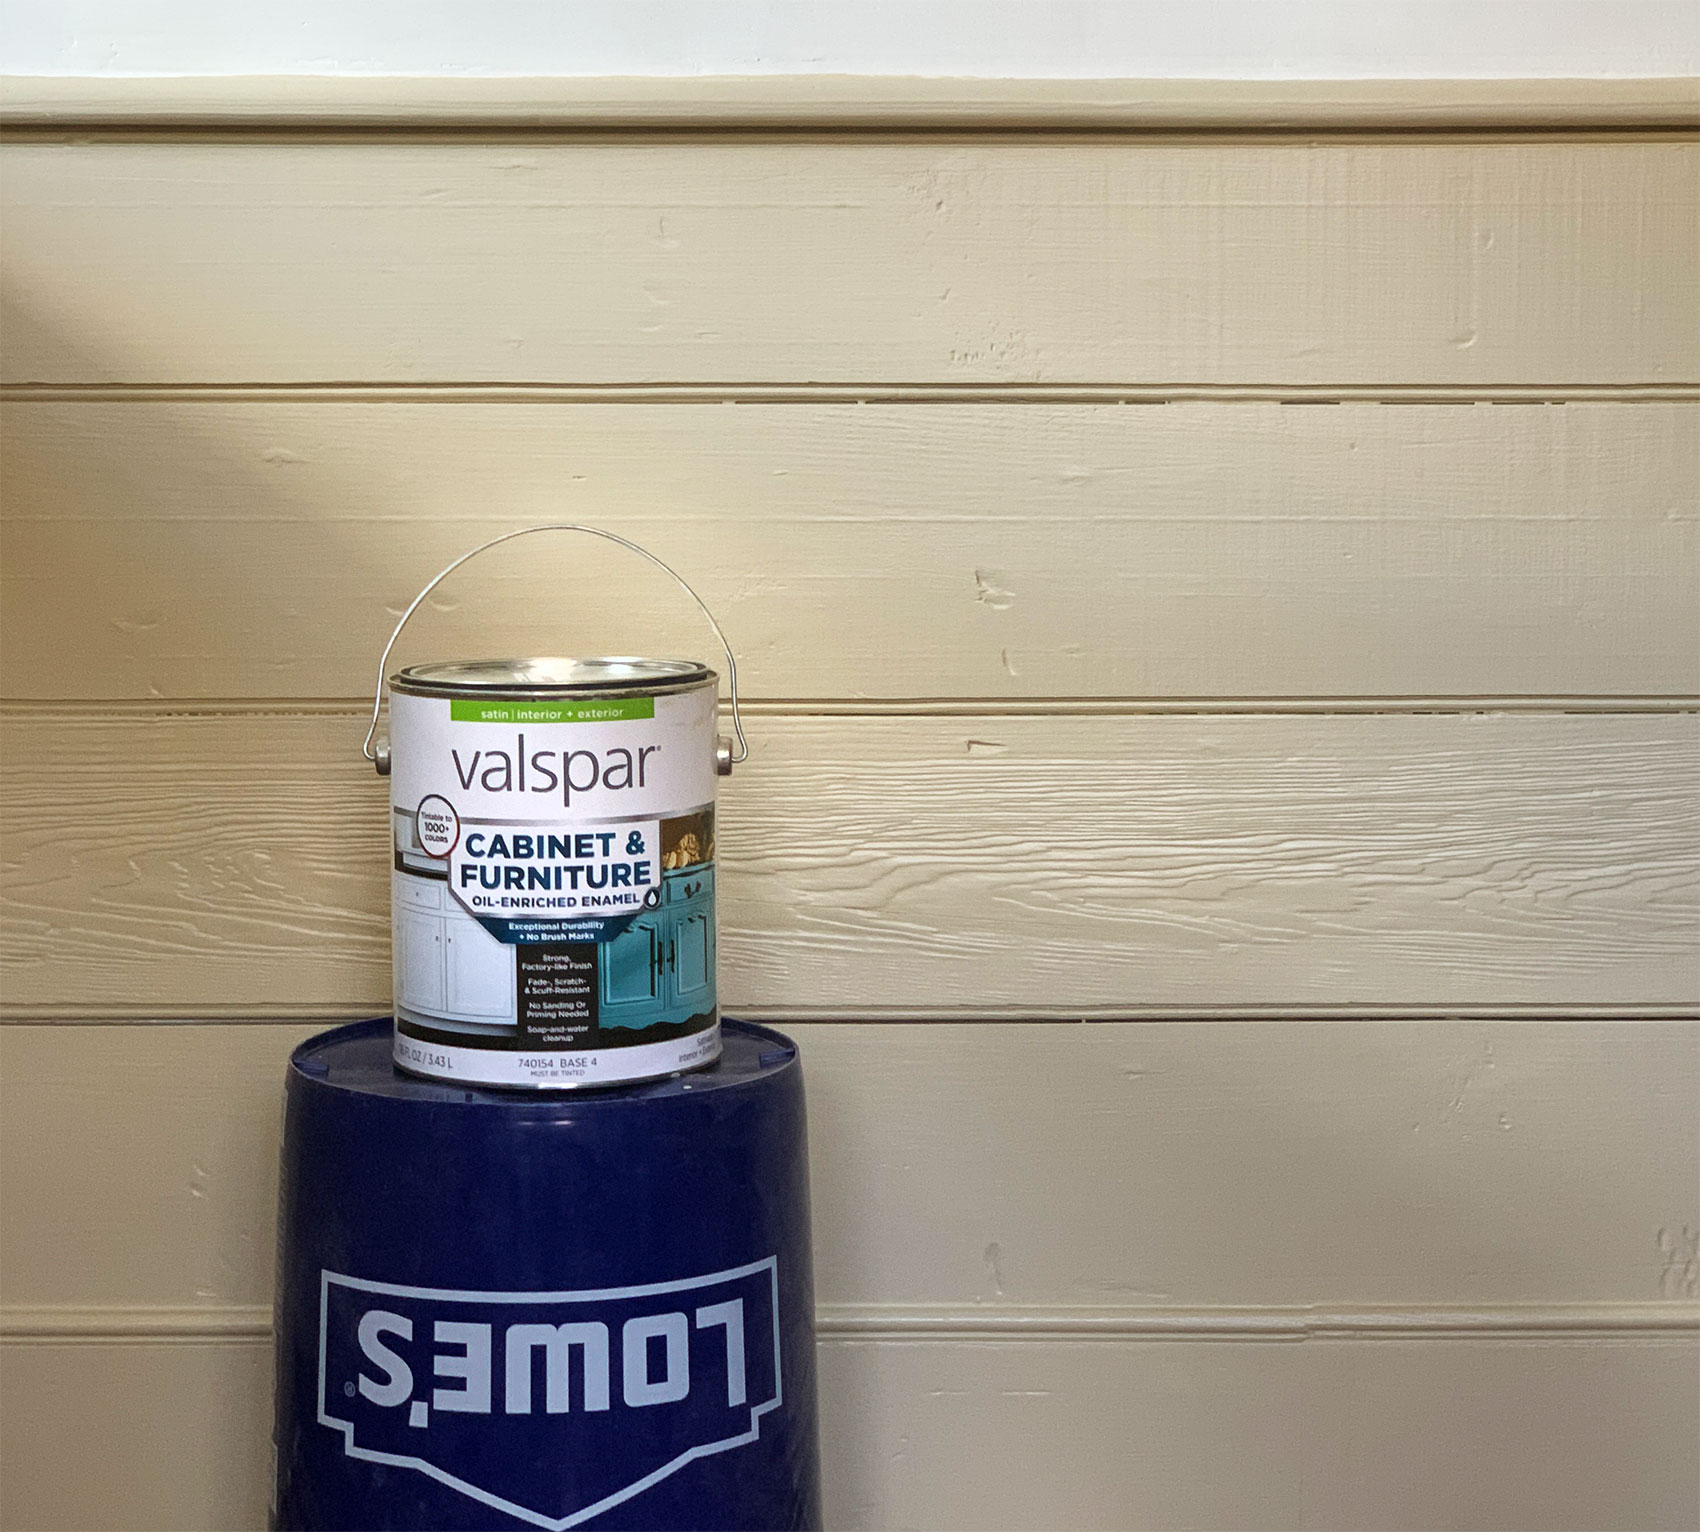
And now. The new light of my life and fire of my loins, Valspar’s Cabinet and Furniture Oil-Enriched Enamel.
I’m not sure what this particular flaw in my personality is called, but my immediate reaction to new products I’ve never tried tends to be one of immediate suspicion and speedy dismissal. I have painted plenty of things with perfectly nice paint that turned out perfectly nice, so surely this new thing I’ve never needed before is a marketing ploy that I can swiftly ignore. This is exactly how I approached high school trigonometry, and my private (now public) feelings about that new dish spray when dish soap has held it down for my entire lifetime. WHY. WHO ASKED FOR THIS. I’M NOT INTERESTED IN TRYING YOUR ~MILLENNIAL SOAP~, DIRTY HIPPIE!
I digress.
This is to say: in the last kitchen we renovated together, I used Valspar Signature paint on the cabinetry, inside and out. Which is great paint! I’ve used it a billion times for walls and trim and doors and shelves and cabinetry. No complaints!
And yet. Curiosity got the best of me, which is how I ended up giving the Cabinet and Furniture Oil-Enriched Enamel a shot, fully expecting it to be the same paint I already know but in a different package.
Fine. I admit it. THAT is some dope paint.
I can’t honestly explain to you what “oil-enriched” means—I did some cursory research and immediately felt overwhelmed and remembered I’m not a chemist. What I can tell you is that this paint has the convenience of latex (relatively speedy drying time, soap and water clean-up), but behaves much more like oil paint. It’s on the thinner side and has an extended drying time (dry to the touch in about 4 hours), which allows the paint to self-level really nicely and avoid visible brush-marks or texture from a paint roller. I painted two coats over my primer (same technique as the primer: roll on a thick coat, even out with long with-the-grain brush strokes), and the final finish is like VELVET. The satin has the perfect amount of sheen for me, too. It just turned out so slick. I couldn’t be happier with it.
It’s also scuff/scratch/fade resistant, and I feel really confident that it’ll stay looking great for years to come and be able to handle the day-to-day use and abuse that gets thrown at kitchens!
The color is Valspar’s Country Charm, by the way! I tried a bunch of samples but ultimately this won out, which is funny because I used it about a year ago in my bathroom! Beige = controversy, and I live for controversy. I used Valspar’s Wedding Cake (Valspar Signature, Flat) for the walls and ceiling.
As whacky as all of this stuff looks in a pile in my garage or when it first gets installed, I really do think all the layers of history and signs of age are a huge asset in this situation once it’s all evened out with the right combination of paints! I don’t think it translates super well to pictures, but having that subtle texture really changes the feel of a space, and I think will keep it from feeling immediately obvious that this was a complete gut renovation rather than a sensitively updated old house! Smoke n’ mirrors, baby!


YOU ALWAYS MAKE ME LIKE BEIGE. SORCERY! The kitchen is looking great Daniel, I can’t wait to see more!
100% this.
HOW??! WHY!?!!! AM I NOW PAINTING PIECES OF MY HOUSE BEIGE, WHO KNOWS!
Gorgeous! Love that you take the time and consideration to make it look not quite brand new and keep the texture and details so perfect. You’re a genius!
Looks wonderful! Love how you used soooo much from your amazing and apparently endless stash. Thanks for all the info, soaking it up and planning my own kitchen reno! PS I love Lowes. And not just not because they are the closest home improvement store to me, ha.
Me too! And HD is closer and yet I still go to Lowe’s just because of their awesome sponsorship of Daniel. (OK, in full transparency, Lowe’s is an extra 1/2 mile beyond HD, it’s not a huge sacrifice. Ha!)
Wanted to not love ur work but , sorry its outstanding. And u have inpeckable taste ps in love w Juliette
Masterfully done as usual! Can’t wait to see the finished room!
Beautiful and with recycled texture – perfect post lockdown kitchen. I really like the sheen on the new paint, too.
Can you talk about why you chose flat paint for the walls? I always thought you weren’t supposed to do flat paint in kitchens since it needs to be wipe-able. Are you just expecting the tile to be the only thing that needs to be cleaned, or is there another reason why flat is ok?
Sure! So that’s kind of the traditional wisdom, but I think at this point it’s become a bit outdated with the new paints on the market since they’re formulated to be much more tough and scrubbable without also scrubbing off the finish/color like paints a decade or two ago. I’ve used matte or flat (depending on the brand) in plenty of kitchens and baths and haven’t found them more difficult to maintain than glossier finishes! I also just prefer the look overall, generally. :)
I used a flat paint that is marketed for kitchens and bathrooms in my kitchen a few years back. It still looks good, including the bit of wall that gets washed often because the dog likes to lean against it. I can’t imagine that there aren’t similar products in the US?
It’s also about moisture levels in the air. Pick a paint formulated for the area and flat will be fine!
I love the moldings so much! So simple, and yet the perfect amount of detail. Can’t say I’m completely convinced with the color at this point, but I say that a lot looking at your choices and I always eat my words later, so I’m sure that will happen this time as well! (p.s. I didn’t get an email notification for this post, even though I did for the last one, so not sure what happened there! thought i would let you know….)
Huh! Maybe it’ll come through later?? I was so relieved we’d fixed it! Grrr. (thank you for the kind words!)
I also got an email notification last time but not this time!
I am seriously loving this reno and you and Juliet are both keeping me glued to IG for updates (reno and randomness). She is a gem.
Your writing, as ever, is hilarious and educational, and I may have laughed like a demon when you bastardized Nabokov to introduce oil-enriched enamel. Taking all the notes for when I can finally tackle my falling apart kitchen, which I am even more annoyed with now that I seem to spend half of my life cooking & then cleaning up.
P.S. Also v v excited about all the new windows! Let there be light!
Ahhh, it looks BEAUTIFUL. This kitchen has been the highlight of my quarantine so thank you for the hours of entertainment.
It looks BEAUTIFUL I love this color so so much!
When fixing things in my own house I like to think my house cares that it’s being looked after again, fixed, cleaned, appreciated (as it was neglected for a decade before we bought it). I guess it’s the crazy old lady in me – giving objects feelings. ;) Watching your transformations always has me thinking, “this house must be so happy to have Daniel making it pretty again”. Can’t wait to see the finished space.
I like to think the same thing! I hope this little house is happy eventually. It’s been a long road but she’s cleaning up nice!
I think houses have a soul and come alive to welcome each family! They love to be cared for.
Warm neutrals (e.g. beige, ecru, some shades of taupe, etc) are replacing greys tones as is the ever-evolving interior schemes. Cool toned greys came & replaced “builder beiges” (e.g. bandaid/pinky flesh tones *shudder*) but now grey is redundant & over saturated for anything related to interiors, so the trend is moving from cooler tones to warm neutrals.
I take great (some say a bit too much) pleasure in making things from what is considered trash. Mostly metal, but wood is a sort of metal, yes? To the point where one Xmas, one of my favorite gifts to receive were a can of old railroad spikes and a leaf spring from a junked truck. My shed looks a lot like your garage, but less (not) organized. Nice work.
You’re the master of sneaky timing between insta stories and reveals!! This little peek is (obviously) amazing and can’t wait to see the finished product!!!
Haha! It’s really not intentional but those insta stories take a big hunk of time to post (I don’t even understand how, they just do) so I tend to fall behind! But then I don’t want to skip stuff either, haha!
I’ve been following you for many years now, and you are getting better and better. Great job. I can’t wait for the final revelation.
I also love your writing style– witty, entertaining, and educational! And of course, your projects are amazing! Loving Juliet, too!
Perfect timing for me! I will be painting my kitchen cabinets next month (first time for me and it seemed overwhelming.). I’m happy to support Lowe’s as thanks for them supporting you, and really appreciate the detailed process steps.
Even though I will probably never need to make and install beadboard, or even paint one, I fully enjoyed this and every detailed post you wrote. Your blog is really excellent, I spent hours reading through old posts as there is a lot of details and explanations, not just before and afters. I love your explanations on IG stories too and am so looking forward to seeing this kitchen and the whole house done. This post doesn’t even feel like a sponsored post and I will definitely consider Valspar paint in my next painting project.
Your beaded board is amazing, and I love the color. You are so correct. Leaving in some dings and pits just adds to the charm and authenticity.
Today I finally found out what TSP substitute is meant to substitute for (AKA what TSP is – trisodium phosphate for anybody else who wonders).
This is the sort of post that leaves me exactly in the middle between feeling sort of empowered that these things are doable but also intimidated by just how knowledgeable you are. But I guess that’s just the reality – this stuff is totally doable but thorough knowledge (and, if possible, experience) are pretty vital. Luckily for your audience we get some vicarious experience here.
Your designs are peaceful and exciting at the same time. Classy and realistic. Happy and balanced. Love the colors.
As always, you do such a great job explaining your choices and detailing what’s involved in making your vision happen, including taking shortcuts! It’s really soothing to see you reno everything so lovingly, taking care to retain history and character whenever possible. I never fail to learn from your posts.
I can’t wait to hear more about the kitchen!
gorgeous — the color was not at all what I was expecting, which makes it event better!
Loving your progress! Any books or sources you recommend for learning more about the old compound mouldings? I live in a 1918 apt building and we have naturally stained compound crown in our entry vestibule. my unit however had the saddest cheap ass three inch baseboard and quarter round for base shoe (cry) and I refuse to do that “Pinterest hack” of adding a small piece a few inches above, painting the wall below it white and pretending somehow the drywall is now magically baseboard. Hahaha keep up the awesome work!
Check out archive.org! they have dozens of original source material. I searched “millwork catalogs” and they have not only illustrations but dimensions so you can replicate the scale too. Most of the catalogs have windows, doors and cabinets and other awesome house porn but also trim and mouldings.
Dear Sears Roebuck, I would like to order the plain red oak Roman Collonade for $13.90
oh cool! thank you!!
So pretty!
Wow a big thank you from me and my roommates for solving the mystery of those weird stains on the baseboards of our rental house! They still look like shit but at least now I know!!
I love the beadboard and the beige! (Just call it ecru or paper mache or something and it will be en vogue.)
Question for you because I imagine you’ve thought about these kinds of things before. I DIYed my kitchen and have still not added a toe kick. Instead of a straight plain board, I would like to add some kind of bevel or bead or something, but I haven’t been able to find a picture of a recessed decorative toekick that wasn’t full of those weird turned furniture legs, and I’m not visionary enough to design my own. Any ideas?
Get too decorative on the toe kick and you’ll just have a dust bunny trap.
So interested in this Montaigne-like response to rona. Let death find me cultivating my cabbages, he said. Not pointing out there were enormous punitive entities like the church and the king stipulating how death should (could and would) find him.
People planting gardens — read somewhere one seed catalogue guy got 1,000 orders a month this time of year. This year, 10K a month.
Sourdough starter, it’s everywhere.
https://kddandco.com/2020/05/11/one-loaf-or-two/
Alicia P designing cross stitch for men.
https://www.posiegetscozy.com/2020/05/list-of-projects-and-not-so-much.html
Are Juliette and her musical colleagues coming up with art for the plague? Will she do a guest post for us? Write a Bluestone Cottage Song?
You all are the best. Thanks for helping us get over this thing with positivity.
Aaahhh! You always trick us in the stories for immediate gratification and I love it!
I love watching you take scrap, that most would throw away, and make it look amazing!
Love! Love! Love! I didn’t even need to take notes because it’s a “blog post” which shall live forever! It will never be the same when someone brags about their bead board because I’ll just be thinking about Daniel Kantor and the perfect 1/8” bead for the router…and I’ll have to bite my tongue.
Hugs!
Kelley from Boise ☘ï¸
Beige forever! I love what you are doing.
I used both of these Valspar products for painting my kitchen cabinets recently. A small warning: be gentle with the finish for a week or two. It seems to harden over time. I was antsy to get my stuff back in the cabinets, and had quite a few chips. No chipping once it hardened though!
Your lumber hoarding is environmentally responsible. Actually it’s pretty cool that you can put some of it back in the house. I have a bathroom vanity that’s stuck in the 80s that I have been afraid to paint. The Valspar cabinet paint looks like a winner! I’ll have to give it a shot once I decide on a color. The kitchen looks amazing so far. Cannot wait to see more!!!
So glad you’re using all of the reclaimed wood, but in a way that doesn’t obviously scream reclaimed wood. It’s genuine character and age that, to me at least, is much more preferable than all new everything.
Did you add Floetrol to the Cabinet and Furniture Oil-Enriched Enamel or did it level well without it? I’ve been looking at this paint all week as I’ve been stripping my 1936 bathroom cupboard and preparing it to repaint, so you post is super timely for me! :)
I didn’t! I wanted to see how it performed on its own and it just wasn’t necessary!
Your new wood trims have really added a lot of character to this cottage. And, all the products you used improved every step. I have never heard of self leveling paint but it make a big difference on the beadboard.
This is incredible! You sneaky thing, with your instagram stories making us all think you hadn’t painted the cabinets yet.
If you don’t mind sharing, what are the dimensions of the pieces of your amazing door mouldings? I would love to replicate this in my house, and I’m trying to puzzle it out from the photos. The bits that stick out in the top section: how wide are they? how proud of the 1x5ish are they? As you can tell, my technical vocabulary is topnotch.
Well, the woodwork looks great and your creativity with putting salvaged materials together is always impressive. I’m not totally sold on the color yet, like one of the other commenters. It looks like a really yellow beige on my computer screen and I’m allergic to yellow. However, I can see that it’s going in that English Country/DeVol/Farrow & Ball direction in general, where they use colors you’d question in general and make it look great, so I know you’ll do the same.
I love that you put that big, beautiful sink in this little kitchen! I have a small kitchen with not much more counter space than this one, but it does have a big, deep sink with an offset drain (the best thing ever! Why do they even make center drain sinks anymore?). Even though the big sink takes away from the counter space, I think it makes the kitchen more efficient – I can stack dirty pans and dishes in the sink and free up counter space to keep working. Definitely a worthwhile trade-off!
What a transformation! I have to say, you have won me over (selectively) to the beige side. I’m still a saturated color boy… but it looks really clean and classic in older character-y homes!
Love following you on blog and insta!
~Lir
I am agog!
Love, Love, Love how you re-using materials and don’t try to cover up all the age! I think that cottage is a very happy lady now.
And I love the education you give out, too. I’m with you on new products — I’m always SUPER skeptical.
Totally asking out of curiosity (former Texan now in Pennsylvania): is it common for beadboard to be installed horizontally as opposed to vertically? Or is this creative license? Which I support BTW ^_^
both are pretty common here! thinner beadboard profiles typically run vertically but not always!
Thank God for products that protect against blood spatter!
You saved me with this post. Valspar here I come. Thank you.
Smoke, mirrors and a LOT of hard work and incredible creativity. Pat yourself on the back Daniel, it’s looking great!
Well, I feel better about myself. The color of your beadboard is about the same color as the doors we painted in our new house. The wall color is very like our wall color. The molding at the top of the door looks very like ours. The only difference is that we used dark cherry for the door and window frames.
We had wanted to move to Prince Edward Island to retire–but they aren’t letting the less-affluent into Canada any more–so we settled for renovating a house in an Edwardian look. The local craftspeople made arch remarks about how we must not be from “around here,” as no one locally uses cherry (so, it was cheap–works for me).
Maybe we will be able to sell the place for a decent price down the road when we go to the old folks home–despite what the contractor kept saying. Yes, I feel much better–as I stumbled upon similar design choices. I think I will very much enjoy seeing the rest of the kitchen–and look forward to it.
I don’t think shiplap is a traditionally visible wall material in Texas, either. I think it’s like the trend of exposing brick walls that used to be under plaster. I first found out about shiplap years before Chip & Joanna because lived in an older house in GA that used it in the interior wall construction. It was stud covered in shiplap covered in plaster. We didn’t think to uncover it as a textural element because we din’t even conceive of it as a thing that could be exposed.
Love the clean lines. No shaker cabinet deserves to be trimmed with frippery. When I see that blasphemy, it always reminds me of a puppy wearing a cone of shame.
We just did something similar on our last home reno/flip project. I sent you a link at your info@ address.
I love everything you do. And your posts are the kind of information and wit that makes them exceptional.
Serious question: how many hours a day do you put into a project like this?
Is it dusk to dawn? A few hours here and there?
I’ve been fixing up my house for a little over three years and I’m at the point where I can take about an hour of painting a day. Right now I’m painting woodwork with Benjamin Moore’s Advance paint. It needs 16 hours of drying time between coats which is basically one coat per day. It works out for my ‘one hour of painting a day’ plan.
My mantra is ‘it’ll get done when it gets done’, but dammit I really wish I was done some days.
oh i feeeeeel that. it depends on all kinds of factors but i’d say on average, in the thick of it, we’re talking maybe 5ish hours a day? i don’t keep track bc i start (lol) to feel like a crazy person. but lots of things can swing that needle in either direction.
Beautiful results, Daniel!! Love your millwork and color choice for the kitchen trim and beaded shiplap. I do have a question about the beaded shiplap, if you don’t mind… I’d like to replicate the look but couldn’t figure out exactly how you used the shiplap to get the bead on the edge. Any chance you have an older blog post I can look at for more details? Thanks!