
I’ve been so excited to get it together and finish the little office room upstairs. I talked about some of the early progress back in the middle of November, and then shared my big exciting plan for the space, and I really wanted to have it done by Christmas (HAHAHAHA). And then things happened, like the holidays and the new year and tearing out a ceiling and then another ceiling and closets and”¦I don’t know. Life. The little office room more or less sat there, leading me to feel like a sad failure.
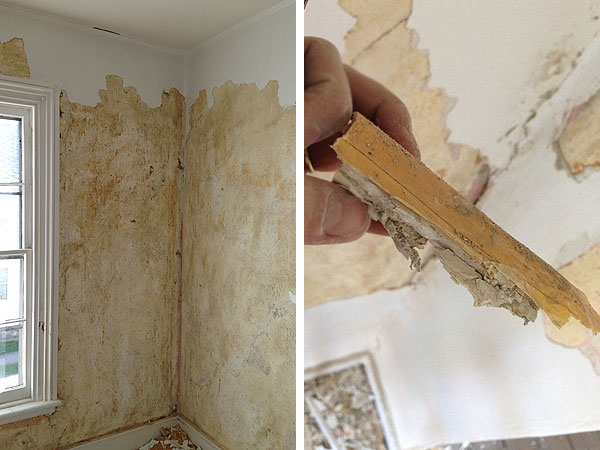
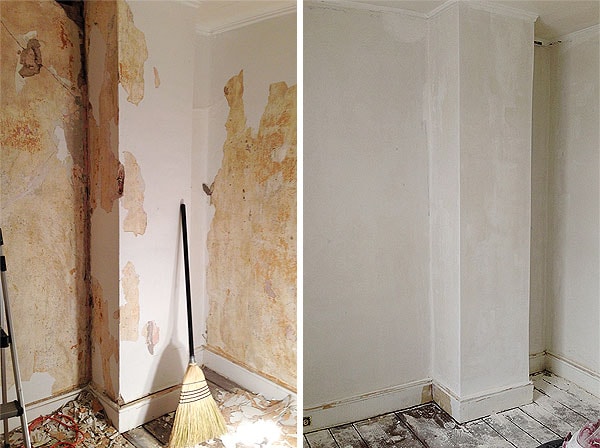
As you might recall, the walls of this room were riddled with pretty much every problem plaster can have. What looked like a fairly regular white room was actually layers and layers of paint on top of the original wallpaper on top of the original plaster walls. Unfortunately, over the years, the adhesives in the original wallpaper (and probably the wallpaper itself) began to break down, leading to lots and lots of cracks and flaking. In order to really restore the walls and prevent this problem from recurring over and over again forever, I decided that the best course of action was to strip ALL of the old wallpaper/paint off the plaster.
There were other major problems, too: all of the corners of the room had been repaired with a crazy (and very bumpy) layering of masking tape, joint compound, caulk, and paint. Same with the cracks, areas of missing plaster, and places where the plaster had come away from the lath but was still present. All of this was problematic because:
1) I want an office with solid walls that are not falling apart and looking a mess and made mostly of masking tape.
2) I plan to wallpaper the main wall of the room, and wallpaper really needs to adhere to smooth walls. None of this bumpy flaking crazy business.
It’s long been common knowledge that once plaster comes away from the lath (you can tell by pushing on it”¦a solid plaster wall will be, well, pretty solid, while a damaged one will give under pressure), the only thing to really do is tear it all down and replace it with drywall. Not so! Even plaster that looks pretty damaged and messed up can be revived with lots of plaster buttons and TLC. Plaster buttons are those little metal disks. They have a hole in the center, so all you do is insert a drywall screw into the hole and screw it in to either a framing member or lath underneath to pull the plaster back into position. I’m still getting my buttoning technique down, but that’s the basic principle. They’re great for ceiling repair but effective for walls as well.
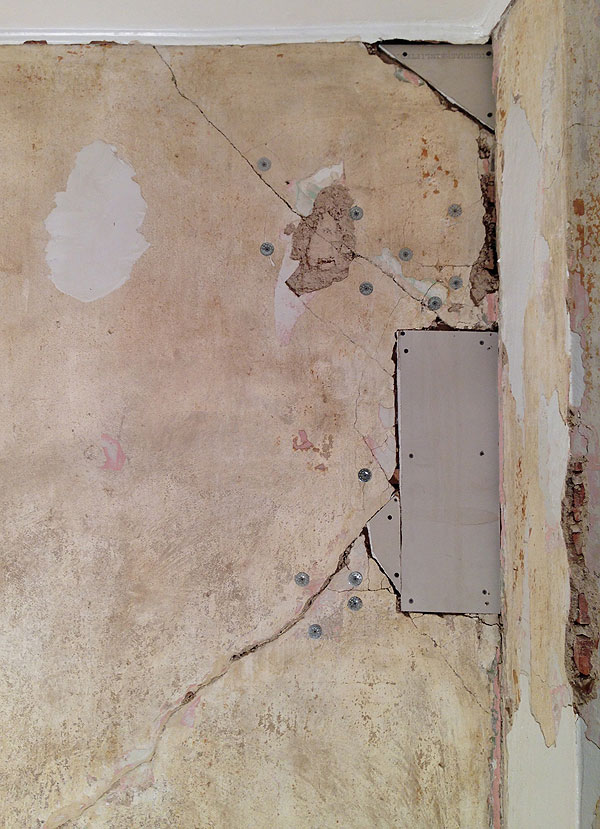
This main wall of the office (the one that I’m planning to wallpaper!) was a disaster! Huge cracks, crumbly parts, missing parts”¦yikes. The first step was to scrape out any areas of plaster that were truly beyond saving, then implement the plaster buttons, and then patch missing areas with drywall. I used 1/2″ drywall—it’s best to just find the thickness that’s closest to your plaster. This might vary pretty significantly by the room, or even the area of the wall that you’re patching.
After this stuff is done, it’s time to start filling the voids and taping and patching the cracks and seams. Then the skim coating! Skim coating is the process of coating the wall in a thin layer of joint compound (or actual plaster, if you’re fancy/skilled/are applying it to bare plaster). It’s typically done over the course of 3-5 thin coats, depending on how much texture your wall has.
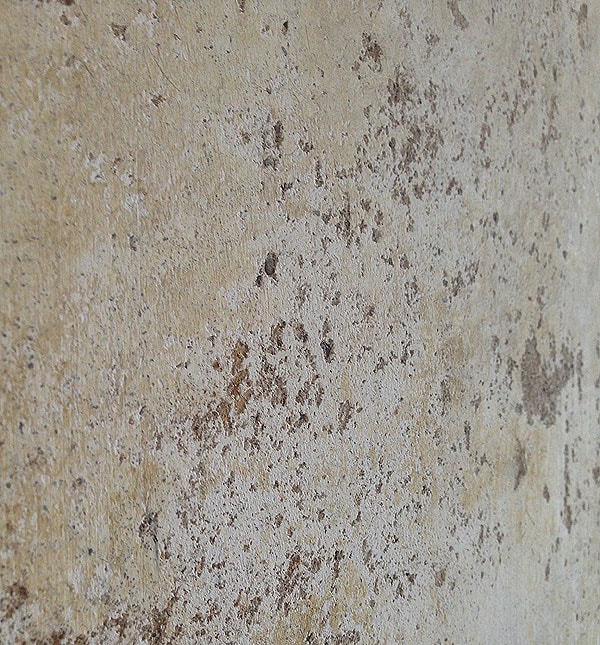
The reason that the skim coat is pretty necessary is not only to smooth out areas of major damage, but also to create a smooth surface on areas that aren’t really damaged. I tried to take a close-up to show the actual texture of the walls before the skim coat. This is what all the walls in the hallway/entryway look like post-wallpaper-stripping, too. Just lots and lots of small areas of pitting and damage to the outer plaster coating, which will NOT look good if just painted over. You really need to smooth that stuff out for your walls to look like”¦walls.
Now, I was pretty pumped to be great at skim coating. I read over the Plaster Repair Series over at Old Town Home (Alex is such a wealth of knowledge and detail if you’re renovating an old house) probably 25 times to make sure I really understood the process. It didn’t seem that hard, and besides, people on the Internet tell me sometimes that I’m really handy (not really true at all, but I’ll take it). I bought all my tools and supplies and I was feeling pretty confident and amazing about the likelihood that I was a plaster repair prodigy and the whole thing would be a cakewalk and I’d have smooth, beautiful walls in a couple of days.
NOPE. NOPE NOPE NOPE. I have no idea which part of skim coating was so incredibly hard for me to grasp, but I could not do it. Seriously. I made one attempt, felt like I destroyed one wall, and had to walk away for a few days just to recover. Then I made a second attempt on a different wall and felt like I had destroyed that one, too, and I couldn’t even walk back into the room the next day to survey the damage. I think there was a third attempt in there, too. I just could not.
I think this is why I started demoing so many things. Destroying stuff made me feel like I was still in control and capable of making forward progress. Skim coating made me feel like I was completely inept and my chances of fixing this house were hopeless (seeing as I have to do this in”¦pretty much every room?). Things were not going well. At all. Like really badly.
I think it had to do with the consistency of the joint compound, or something. You want it to be fairly watery and loose, but actually getting it from the bucket to a trowel and onto the wall and making it smooth is a whole different story. In high school I took Physics and received a B- in the class, so this kind of thing has never really gone well for me. Gravity. Friction. Mass. Slipperiness. Science.
The point is this: I was pretty stoked to rehash my skim-coating experience and break down my technique and be awesome. That will not happen because my skim-coating experience was basically just a lot of chaos and confusion and incompetence and emotional distress. BUT! I think I figured out a general technique by the end that worked for me, so I’ll be really detailed next time, when I’m not so frantic that I don’t really take any pictures because I’m too busy panicking.
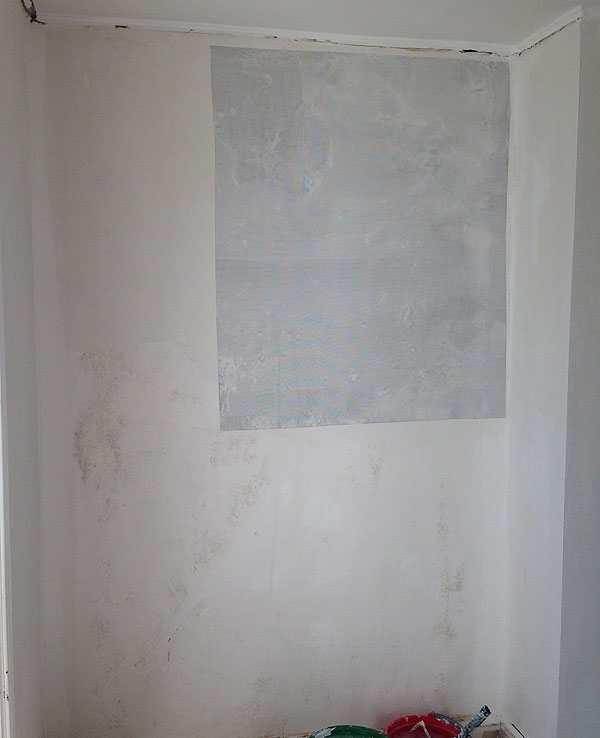
Here is that same wall that was a disaster before. I borrowed Alex’s technique of using fiberglass mesh window screening material to do large-scale patching over areas that were really damaged and cracked, which worked out great! Since plaster will continue to move and crack over time, the idea is that the fiberglass screen isolates the top layer from the movement of the wall underneath, helping to maintain a crack-free surface. This is just after the screen was embedded in the joint compound (I used another screen on this wall, too, but didn’t take a picture apparently), but after a couple more layers of skim coat it’s completely embedded in the wall. You’d never know it was there!
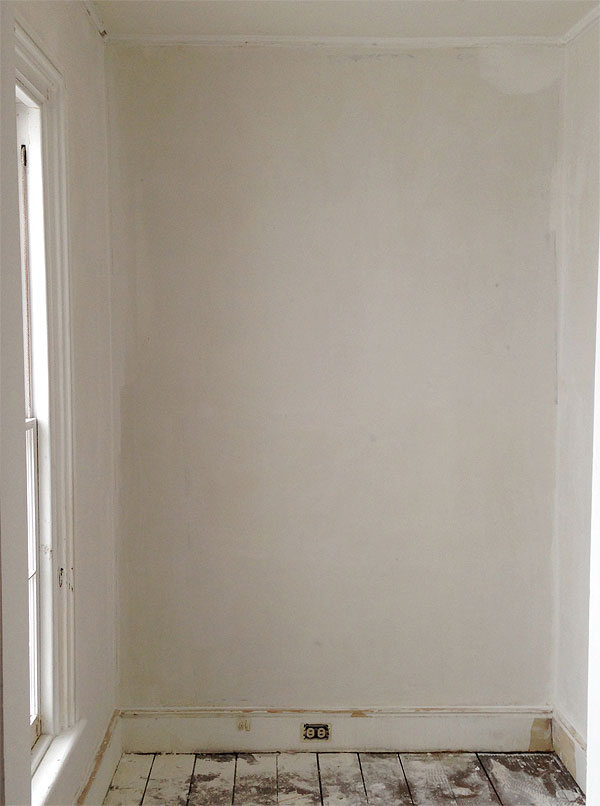
CHECK IT OUT. Does that look like a smooth wall to you? It looks like a smooth wall to me! With crisp beautiful corners and no crazy cracks or visible patches or anything. Totally ready for priming and wallpaper!
The rest of the walls, like this one, will just be primed and painted, but that part seems comparatively easy and silly. Like being allowed to play with crayons for a while after having to read War and Peace in one sitting without blinking.
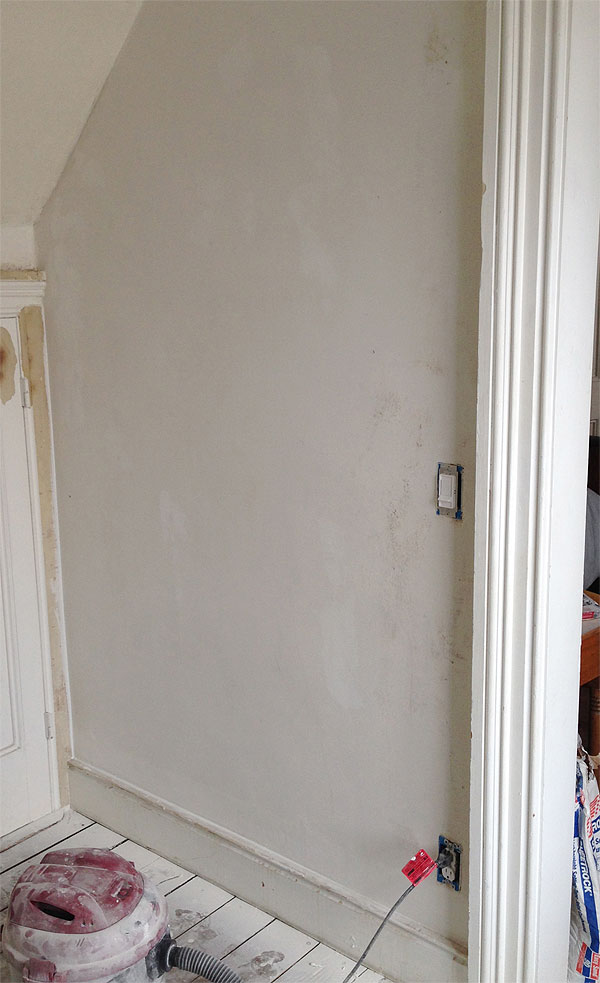
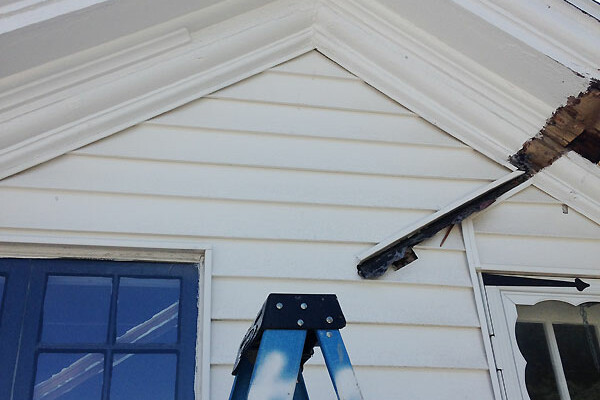
Also, take note of the new electrical! I said that I planned to have a ceiling fixture installed in this room, and now there is one! And a new plug! And a switch! It’s so modern you guys. Right now the ceiling light is just a temporary light, but I plan to buy a ceiling medallion and a real light soon (MEDALLION INDECISION ALL OVER AGAIN). I think I want to see more of the room come together before making a final decision on hanging vs. flush-mount for the light. It’s a very small space and the wallpaper is pretty bold and I’m worried that a hanging fixture will just be too much going on.
Ahhhhh. It looks so”¦real? Like being beautiful is realistic and within reach?
The one thing I’m already feeling a lot of regret about is leaving the tiny little crown molding in place. The ceiling of this room is actually drywall over acoustic tiles over furring strips over the original plaster ceiling (I know, I know, but it looks fine and there’s no real reason to take it all down), so the “crown” was put in place to create an easy transition between the plaster walls and the drywall ceiling. I was so overwhelmed with everything else during this skim-coating adventure that I opted to just keep it, and now I feel like the walls look so good that I want it gone. It’s just so dinky and damaged and it’s not even the same molding all the way around the room. But I also REALLY don’t want to spend several more days patching and taping and sanding and patching some more, and I feel like for this tiny room, I should just let it go, but”¦argh. I should have taken it down to begin with.
Maybe I’ll gather the strength. Maybe I won’t. Maybe I’ll just put up new, better crown, but that sounds hard too. And maybe expensive. And maybe like something that might not look great. But could it look worse? Maybe it could. It probably could. But it also could look better.
This is the type of thing that keeps me up at night.
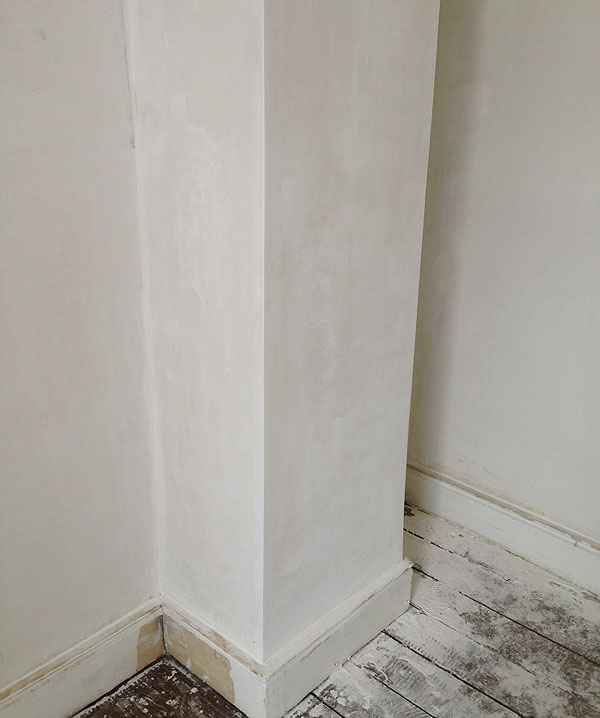
I feel really proud of my corners. All the interior corners were restored with joint compound and fiberglass mesh tape, and the exterior corners were repaired with new corner beads. These corners are a little wonky (it’s plaster over a brick chimney, and there was a lot of damage and weirdness), so I chose to use vinyl corner beads instead of the more conventional metal ones, since they seemed more flexible. I have no clue if this was a good idea, but it happened and it looks OK right now?
So this is what I learned, I think:
1. For corners and small cracks, you want to use fiberglass mesh tape. Do NOT use paper tape to patch plaster. For large scale patches, fiberglass mesh screens are effective and WAY cheaper than large fiberglass screens made for this kind of thing. It’s very hard to work with sections of screen larger than about 4’x4′, so cut and plan accordingly.
2. Give yourself options with the joint compound. I used a mix of pre-mixed joint compound and lightweight setting-type joint compound (90 minute setting time) that you mix yourself from a powder. The powder kind is more cost-effective, but I found it helpful to have the pre-mixed on hand for various things. Somehow I used up almost an entire 65-pound tub, along with a few bags of the powder kind.
3. Experiment with tools. I honestly just could not get my hands and arms to do the things necessary to handle a hawk and a trowel. I think I’m incapable. I pretty much used a mix of a 6″ spackle knife, a 10″ drywall knife, a paint roller, a Magic Trowel, a spray bottle, and lots of rags. Also, corner trowels are VERY necessary. I really can’t recommend the Magic Trowel
enough. It saved this project and my sanity.
I know that’s not specific at all, but it’s kind of all I have! I’ll get much more detailed with how I go about plaster repair when I’ve done more of it and really have a technique down, but I don’t want to pretend to teach anyone something I barely know myself just because I pretend to be good at this stuff.
Getting the walls to this point feels like a huge step. Next up is primer, paint, wallpaper, and the floor! The fun stuff.


What a fantastic job and learning curve. It looks beautiful. Me, I probably wouldn’t bother with the crown molding. But I think it will drive you crazy in a small room. I would let my victory sink in and enjoy the progress for a while, and then I would put on my big girl pants and take the crown molding down. Again, in a small room in which you spend a lot of time, it will make a difference to you.
Great job, thank you for the courage you give all of the rest of us to tackle the spackle.
That looks amazing!
That wall is looking SMMMOOOOOOTTTHHHH!!! Great work! Good on you for going back and trying it again—fight the good fight!! Loving your blog, and your amazing house adventures! Someday soon(ish), you will be writing about your next big project from your cozy and completed office, in your fantastically restored home, with two pups at your feet, and Max bringing you a cup of tea. Enjoy it all, as I know you are!
I spy a two prong outlet! Our house has those, most of them are so worn out that plugs won’t stay in them. It also has several ungrounded three prong outlets (previous owners are so great, right?) Dreaming of updated electrical once my bank account recovers from paying for our new roof.
Not gonna lie, those plaster walls look terrifying. I commend you for all the work you’ve put in to repairing them. I bet the final result is going to be amazing.
Thanks, Jaimie!
You may want to do a little research about replacing the outlets yourself—it REALLY is not very challenging to change an outlet, and in many cases with old wiring, there are correct ways to install grounded 3 prong outlets (which are only like 75 cents a piece), even if there isn’t a grounding wire present (for example, all of our old wiring is wrapped in BX cable, which acts as the ground, and I believe you can also legally ground the receptacle to the metal box, assuming the box is metal”¦don’t quote me on this stuff). You can also install a GFCI receptacle if you’re unsure, but even that might be an unnecessary cost. I’d recommend picking up a book on basic household wiring (Black & Decker makes a good one ) to see if it’s something you’re comfortable doing yourself.
I have actually looked into trying to ground the outlets myself. The sheath(?) for the wiring is cloth rather than metal, and I don’t know if if it would be safe to ground to the metal electrical box. We actually did try replacing some of the outlets with GFCIs as a temporary measure, and discovered most of them are daisy-chained, which means they end up popping each other constantly and had to be removed. Electrical is just one of those things that I’m very hesitant to DIY without being absolutely certain I’m not going to burn the house down. Thanks for the book recommendation though, I’ll definitely take a look at it!
Hmmm, yeah, that’s tough! I think with the GFCI method, you’re only supposed to change the first one in the circuit, and then use regular outlets for the rest. Again, don’t quote me!
You might also be able to just ask your electrician. I find that tradespeople are pretty generous with their knowledge, especially for simple stuff like that. Mine said to ground the outlets to the metal box and then test it with a grounding tester (which is a little device that’s only a few dollars from the hardware store). I’m not sure if that was because of our BX cable, though. Our electrical is really crazy and confusing, too, so I don’t blame you for being overwhelmed!
I have the same kind of wiring in my apartment – cloth covered wiring. I changed out all the outlets without any problem. Most of mine were already three-pronged, but painted-over and generally gross. None of them were grounded. I think with that old wiring it’s sometimes just not possible to ground the wiring. Hasn’t caused any problems in 10+ years, even when running energy hogs like window A/C units.
Be careful, Laura! I appreciate what you’re saying (really!), but it’s important to bear in mind that most electrical problems don’t happen right away. Even if you don’t have a grounding wire in your cable, the safest thing you can probably do is use GFCI receptacles to protect your circuits from overheating. There are pretty strict electrical codes surrounding how you can safely replace outlets with old wiring (and how many amps a particular circuit should have”¦for example, if you’re running a window A/C unit, you should really have a dedicated 20 amp circuit), and the safest thing to do is follow those. Just because it works for X number of years doesn’t make it safe, unfortunately!
Oh goodness! I am so impressed that you are tackling this kind of work on your own. We have plaster walls in our house as well (they’re in pretty good condition, thankfully) but this is great info if we ever need to patch them. Your room(s) will look fabulous when you’re all done and you will be so happy!
Definitely progress! (I now see why your earlier reference wasn’t a tease, poor boy.) Can’t wait to see the big reveal, with paint, wallpaper, and ceiling light. And furniture, of course. Your posts are a smile-light of these cold New England days.
ok WOW. Those walls are simply beautiful! (who knew that was a thing I would say one day!?) I seriously admire your persistence in tackling something like this.
But I think you should take down the dinky molding. After all you’ve been through in this room–you’re gonna let that stop you? Really? A gorgeous wallpaper and then “plink–little molding here to get in the way of your visual pleasure”. Besides, installing new crown isn’t that hard, really (so I’ve heard, anyway!). I’d love to see you take this 100%….because my opinion matters SO much haha! Just a few thoughts from Austin…
I think you are doing such a good job! Those walls look amazing, and I can’t wait to see how it all comes together :)
If the dinky trim bugs you now…it will be THE thing that haunts you every single time you go in that room. I think you have already answered your question of, “Should it stay or should it go now?” You could replace it with beefier stuff, or leave it sans trim-both would look good.
Can’t wait to see the wallpaper ( like you stated, the fun stuff!)
We removed a built in ironing board in our old place in OR. (From the dead set middle of the eating area in the kitchen…go figure)It was in a 1948 plaster/lath wall, and we learned all about mesh/plaster patching etc. It’s quite a learning opportunity-goodonya for taking on the job! Well done.
Looks fantastic!
Could you do a faux molding at the ceiling? This was the best I could find looking quickly on my lunch break, but something similar to this?
http://www.hgtv.com/home-improvement/how-to-create-faux-crown-molding/index.html
I thought about doing something similar to that (except I’d probably use 1/4″ thick board or something instead of leaving the wall bare, just to give it a little dimension), but it’s really not even worth it. The existing molding is in terrible shape and is different on two walls than is it on the rest, making the transitions really weird and noticeable. I think the best solution is really just taking it all down, but GUH”¦more work. I really wanted to be done patching and reconstructing corners for a while! But yeah, everyone is right”¦I’ve come this far…
oh please remove that molding… it isn’t even crown, it’s tiara, and you will never be able to look at yourself in the mirror if it stays.
but, yeah, more work sucks. I’m sorry.
I know, I know. :(
Ah, this takes me back. We redid a one-owner Victorian house built in 1898, and it had layers and layers of paint and wallpaper, all covered with a final layer of Mamie pink paint. These plaster walls look SO familiar.
This was in the 70s, so I didn’t have internet resources or anything much more than the advice of a little old man who worked in the downtown hardware store. But we got it done!
Most satisfying project I ever did. I envy the adventure ahead of you.
Wow. I mostly lurk here, but having just spent over a week – A WEEK – repairing some damage from ice dams on my kitchen walls, using fiberglass tape and joint compound, I am in awe. You did really well. Bravo.
About the crown. My process would be: 1) I won’t do it, it’s not worth it. 2) I could paint the crown the same color as the wall and it would disappear. 3) Maybe I’ll just nail another molding below it to create a compound crown. 4) I’d end up ripping it out and reinstalling new crown.
Because I am a martyr and a perfectionist and because I would know that if I didn’t do it, it would bug me forever. And it would take weeks longer than any sensible person would think. And I’d have to redo parts of it over and over until it was right. And in the end, I’d probably barely notice it when the room was put back together. So I’m not at all sure that this would be the right decision. I am looking forward to seeing what you do. I trust that whatever you do will look great.
I’m thinking that you need to take down the dinky mis-matched crown. I have it in my bedroom and when I paint this summer, it’s going AWAY. Not sure if I’m doing a large scale crown, a more period appropriate triangle Arts and Crafts moulding or what, but it’s going. (Also, there will be plaster repair on inner corners, so thanks for the trowel recommendation.)
You know that undersized crown will bother you no end. Do it now while the rest of the room is torn apart because otherwise you are going to be working on a blog post and all of a sudden you will find yourself standing on your desk with a crowbar…….
Hi Daniel,
You and I must be home repair twins because I’ve still got plaster in my hair from working in my kitchen this morning as I’m reading your post. A couple of ideas for you, if you don’t mind. I like to use a 14″ mud pan (like a small trough for the mud) and use the big knife on the bigger sections. If you are moving your putty around and it starts to pill up, it’s getting too dry so a quick mist from a spray bottle will help it be a little pliable for a few minutes.
Also, in regards to the molding, go for it. Buy bigger molding and put it over the top of the dinky stuff. You will be happy you did. Get the Kreg Crown molding pro jig and watch the videos. The only hard part about doing the crown with the jig is remembering if you are doing an outside or inside corner and if you are making the left or right cut. I get a little spatial-relations challenged and I managed to do the crown on my kitchen which had different depths of cupboards to go around.
I didn’t know about the plaster buttons but I’ll be sure to look for some because I have a couple of areas that need help. Love your walls and can’t wait to see the rest of the room.
Awesome! I’d leave the molding for the SomeDayList. In a few years you’ll prob want a new wall color, or new wall paper, or you’ll use the room entirely differently. You can deal with them then. But for now…My dad taught me the (rather politically incorrect) phrase “good enough for government work”. Sometimes goodenough is ok. He knew that I had some perfectionist tendencies, and sometimes a person just needs to let go and move on, ya know? If it’s truly going to drive you mad, keep you up at night, well… But if you can – put it on that SomeDayList.
Beautiful space! Beautiful work!
Oh man I’ve been contemplating repairing the plaster in my bedroom ceiling (rental) because it’s so sad up there but I knew it was going to be hard. Reading your testimony of an emotional breakdown confirms I need to let the ceiling just be — ha ha — or at least wait for you to sharpen those plaster skills :)
You need to hit a punching bag, do some sit ups, eat a great meal, meditate and then go back to rip down that horrible crown molding. Each time I don’t wanna tackle something I just do all of the above to reset my emotional tank. It works. I come back like Rocky IV and knock that stuff out. You can do it!
Those walls look smooth as buttah now. Kudos, mister! I am so excited to see this room painted.
Well done! Plaster repair is just the worst. I’ve gotten marginally better at it over the years, but my earliest efforts left imperfections that still glare at me from under layers of paint.
You did a great job! That’s really messy work.
Wondering if you could use a larger wood crown molding that would just hide the smaller plaster one. It looks small enough that it wouldn’t get in the way.
Thank you, Steve!
I think larger crown is definitely an option, but after thinking about it some more, I don’t think it’s what I want to do. This is pretty much the most modest, un-fancy room in the house, so I actually think that putting any crown molding in it (particularly since we don’t have crown even in the fancy spaces!) would just look really”¦wrong? I think the only think that won’t feel like a big compromise in the end is ripping down what’s here and patching all this in, too. It sucks since I really thought I was DONE with wall/ceiling repair in this room, but it’s my fault for not thinking about it the first time around! Live and learn…
congratulations, those walls look great, I had a go at applying plaster when I was doing my apartment, but made a real mess of it, it is deceivingly difficult to get a really smooth finish. Luckily I had a professional plasterer on hand to tidy up the mess, otherwise I think I would still be living with crumbling bare walls!
That looks great. Your corners are great AND you don’t have huge globs of joint compound on the baseboard molding. You’ll forget all about the crown molding once the room is finished. Maybe you can paint it the same color as the ceiling and it will vanish. Plus, it’s nice to have future projects in mind for when you’re finished with round one of renovation. And can I just say as someone who has spent the past TWELVE years working on re-doing a once-shambolic (now-habitable, but still not finished) old house, you are making really, really, really swift progress.
Thanks, Erica! I think I wouldn’t worry about it if just painting everything the same color was an option, but since I’m planning to wallpaper the big wall, I think the crown will end up being conspicuous and annoying! And of course once the wallpaper is up, I’d have to lose the wallpaper in order to fix this dumb issue someday that I could just suck it up and fix now. I’m being a baby!
So you pretty much single-handedly rescued me from feeling like a failure for deciding to resuscitate our 102 year-old original plaster-under furring strips-under faux-brick pressboard walls.
Ripping everything out was amazing – empowering even. I hated the almost-brick crappiness for almost four years! Then staring at sections of lath missing plaster was unsettling, like seeing someone in holey underwear. And then trying to get my repairs and skim coat to look anything like a smooth wall made me cry like a baby. And I like to think that I’m handy and pay decent attention to detail.
I’ve been pretending that my half-assed attempt didn’t exist for the past week and a half. But armed with that magic trowel, that wall is going to get beautiful this weekend whether it likes it or not!
I remember skim-coating the backsplash area of my Mom’s kitchen a while back. I felt like my arm was going to fall off my the end of it (that that was just a small part of the walls!). So, I’m duly impressed.
It IS strangely physically exhausting!! I worked for days on this, and I was DRAINED every time. I think some of it had to do with trying to move around in such a small space with all the supplies and the crap and all of that, but yeah”¦it’s a workout!
Looks fabulous! You are a braaaaave soul. Its a good thing that people like me don’t end up with old homes because I don’t think I’d have the patience to repair plaster walls and I’d be attempting to drywall those suckers in a heartbeat. Mudding and taping is truly an art and I’m pretty willing to attempt anything, but have left mudding to the pros for now. I’m very impressed by your work!
Wow! Thoroughly impressed – looks fantastic! So cannot wait to see why you do next!
Crown takes some practice but it isn’t that hard. If you take down the old stuff and put in larger crown, you may not even need to patch anything else.
Looking good!!!
Hi! Many years ago we completely renovated an old house we bought – this included removing layers and layers of wallpaper and fixing the plaster walls – and painting all the walls in ALL the rooms – a BIG JOB! At the time, a know-it-all neighbor would come around and tell us we would regret not tearing all the plaster – it will crack, discolor – give us all sorts of nightmares – according to him. We ignored him and did our own thing of course. Our old plaster walls turned out great and other than a few hairline cracks over the 12 years we lived there, we had no problems at all. We cleaned the walls well after the wallpaper removal, patched, primed and painted. A lot of work but so worth it! I did see the neighbors house later (they tore out all the lath and plaster and put up sheetrock) – no baseboards anymore!!! – it looked like a new modular home – awful. I hate it when people rip the soul out of a old house – sad!
Wow, good for you!! Your neighbor sounds a lot like my neighbor with the windows, ha! It’s amazing the extent to which so many people just don’t care at ALL about the historic integrity of their houses! No baseboards?! Yikes.
I love watching you do this stuff, and reading what you write about it. When you mentioned the plaster buttons I googled them and found articles on old house web and TOH talking about a method where you drill holes and then inject adhesive behind the plaster. I’m going to try it on my walls, where putting screws in just seems to crack the plaster.
IMO mudding and skim coating is all in the sanding. You have to just leave ridges and the like because they easily sand off and trying to level them when it’s wet just makes it worse.
My advice for crown is to invest in a nail gun. When you hammer a nail the whole thing gets twisted, but a nail gun is so fast it secures it exactly where you want it.
I read all about that glue stuff, too! I remember reading that it was VERY expensive, though, and honestly seemed way harder, so I sort of forgot about it. Plaster is finicky stuff so I won’t pretend to know it all, but I do find that the plaster buttons take some finesse. If you screw too close to the crack, they just create more cracks, and if you tighten too much too quickly, ditto. It might be worth it to play around with them a little more, but I know know how your walls are!
I have a nail gun! I’m pretty sure I’m not going to do crown in here (see my response to Steve above), but it’s soooooo helpful for all sorts of things. I wish I hadn’t waited so long to buy one!
Good for you!!! I’m one of the readers who has encouraged you in the past to try plastering/sheetrock-taping work since you are so handy. As you probably don’t recall, I told you that it is the one thing you cannot “learn” right away. It really is a practice thing to get the hang of it (and don’t give up on the hawk and trowel; it makes the whole business soooo much easier once you get the hang of it)! Seriously, with such an impressive (albeit, traumatic!) start, you will be excellent at this eventually. Just keep taking these small, less visible rooms first and save the big, public spaces for later. Honestly, it took me a full house to get good and I’m pretty good for an amateur. And once you learn it, it’s like bike riding. You’ll never ever lose your touch. Good luck!!!
For a light fixture how about something
Like thishttp://www.houseofantiquehardware.com/victorian-lighting-6-fitter-flush-mount?sc=9&category=229638
I have to replaster a curved wall in the back staircase of my old farmhouse. Any suggestions on how to handle the curved part of the wall? It needs redone eventually but it is such a scary project I’ve been putting it off. It’s all bubbled from previous water damage. I’m definitely bookmarking this post for this future DIY project and look forward to the next one! Thanks!
I don’t really know! Do you just have to skim coat it? I’d probably water down the joint compound a lot, roll it onto the curve with a paint roller, and smooth it with a magic trowel (holding the trowel perpendicular to the floor and sweeping it across the curve, rather than up and down). I have to do a curved wall in our hallway, too, so I’ll let you know when I get there! :)
Awesome! Standing ovation on the smoothness and the finished wall. I know exactly how you felt, both about hoping to be a plaster prodigy and the horrible reality that it’s initially far more difficult than I realized. Now that you have a few under your belt you’ll keep getting better each time. It’s all about muscle memory and (as you know) finding the right tools. And I’m like you, no matter how I try, using a hawk and standard trowel just won’t work for me. If I ever want to be a plaster’s apprentice I’ll likely get laughed off the job site.
Also, thanks for the mention and the kind words. I’m very glad some of our experiences have been helpful and hope to keep putting up useful stuff that you can use. (FYI, going to be doing a crown post soon that includes dealing with massively wonked up walls.)
Thank YOU! I come back to your blog and read the same posts over and over again. It’s not that easy to find really detailed information online about so much of this stuff, and OTH has been such a good resource!
Alex, you are going to SOB when I eventually post my “process.” I tried to be all pro and ended up skim coating like”¦I don’t know. Someone who can’t do anything. But it worked, so maybe I’m just a pioneer!
I’m so unbelievably impressed (since I have yet to figure out how to mud and tape, or even just repair, drywall properly and thus have a corner in our downstairs bathroom that is still an embarrassment and a ceiling in the living room with two cracks I can’t fix). Once again you have given me hope. Should I be sanding down that corner and using fiberglass tape to re-make the corner, I wonder? Perhaps I need to check out Alex’s website (whoever s/he is). AND GET A MAGIC TROWEL. I think you just changed my life (again). At any rate, I’m gonna give it another try. Thank you, Daniel!
This is just the boost of confidence I need to attempt to repair our living room walls! No, I mean it! I appreciate your candor and relate so much to what you have been through with this house (the only difference is that we are so complacent that we have lived in this place for 4 years!). I am staring at abhorrent (non-asbestos) stained acoustic tiles and out-of-scale skanky crown molding. BUt the real issue in this room is taking the plunge to remove the wall paper, to reveal sandpaper-textured, cracked 1919 plaster walls. I’ve talked myself into thinking that the nicotine-stained silhouettes of old frames are somehow charming but they ARE NOT. So my main questions are: how did you finish off your skim coat: sanding or “burnishing” (wetting down the dried skim coat)? and: How to best deal with the molding details around the doors and windows (there are 7 of them in this room…ugh)?
Sanding! I tried the “burnishing” thing and I must have been doing something very wrong, haha. Although I have to say, with the Magic Trowel, the sanding really doesn’t feel like that big of a deal. I’m not sure quite what you’re asking about the moldings”¦I’d say just skim-coat up to where they start and try not to get joint compound all over them? Joint compound is water soluble, though, so it’s not so hard to scrape/scrub off any errant drips and globs.
Thanks- yes the errant drips and blob is what I was referring to. THe profiles of the window molding on the walls have lots of nooks and crannies, so I think Ill end up with putty on them, but it sounds like an easy clean-up. The good news with all of these windows and doors is that there’s that much less surface area to skim coat!
I love a little room with gigantic crown molding. Sherry and John make it look pretty easy: http://www.younghouselove.com/2013/10/how-to-add-extra-beefy-crown-molding/
Yeah, I remembered them talking about a tool (Kreg Crown Pro) that seemed to really facilitate the process. http://www.younghouselove.com/2013/03/crowning-achievement/
Do it, Daniel…but whenever you damn well feel up to it.
I think that looks good for a different kind of house, unfortunately! It’s REALLY hard to install crown in an 1850s house and have it look authentic, and since this room is so modest in nature, I think it would just look really phony (even if it looked good, just because none of the other rooms have it). I wanted to convince myself it was an option, but alas! Looks like I have some more patching to do…
Daniel, you are a wizard!
Oh my…you are amazing! The hallway down to the basement in my old house has walls just like that and I’ve been too scared and confused to do anything about it. I am really going to try this. Thank you!!
It’s looking so good! I do NOT miss all that dust, so I feel for you. I know it’s going to look amazing with the wallpaper and whatever you decide on the light fixture!
I don’t even know you, but I am proud of you! Good luck and keep us posted.
I was waiting for your post on doing this. About three weeks ago I pulled the hideous, busy and curling wallpaper our of my tiny guest bath and knew that I needed to skim coat two of the walls before painting. I waited a week to see if maybe you would be so kind to as to put up a post before I had to do it. Nope. So I forged ahead anyway, apparently it is a talent that i possess. Who knew. But even though I was able to do it, it was a pain and I muttered to myself several times that “If Daniel knew about the pain in the butt that this is he would run screaming from his house because his walls are waaaaaay worse than mine.” or the one I muttered more often…”Just take down the wallpaper, no problem he says. Noone mentions that you have to fix the stupid walls after” and finally “The dust, how can sanding such a small wall make soooo much dust, this is impossible!”
I’m sorry you had problems, but I’m glad you learned something in this small room that is just for you. You’ll be able to apply what you know to the rest of the house when the time comes.
WOW! I have messed with small patch repairs/joint compound, and it really takes a lot of patience/finesse, I would never trust myself to do all over based on my iffy results on the small. Even Young House Love hired out that job recently. Very impressed.
oh i’m so glad that something worked out well. I was not sure at the beginning of the post! It really looks amazing! I am toying with the idea of skim coating/floating all the nasty textures walls in my house myself. Maybe I can do it after all! Great job!
I think that sounds totally doable, Annie! A lot of why this was so hard just had to do with the plaster being in such rough shape, but if your walls are just textured but otherwise OK, that seems like it would be pretty simple!
I read this post and smugly thought, my plaster walls are in great condition. And then I actually looked at them. Damn you, Daniel! What’s this about plaster buttons?
Things are looking great! This is such a large job! I admire you for taking it on!
Aw, I know the feeling when you just want to be done…but if you’re going to be spending any time in that room (which duh, you totally are), that crown is going to bug you forever! It’ll be worth it. As for crown, it takes a couple youtube videos to figure out, because it’s sort of backwards to how you intuitively want to cut it (like, I had to do mine three times because my brain did not compute, and I may have been a little stoned, don’t be stoned when you do this OK?) but then I DID IT! http://instagram.com/p/e7rVkKJhvB/ (please pay no mind to the gap between the gold ceiling and the crown, it’s in a 36 x 36″ vestibule in my house that is by no means straight. at. all. And I fixed the corners with the greatest invention of all time, Dap. But anyway, even a stoner can do it so I think you would do it at least 17 times better. That’s it, really. You never regret taking the time to do something right. :)
I know, I know!! I had to put up some little pieces of quarter-round around the ceiling in my kitchen (I just had to match what was there”¦it’ll all come down someday when we really renovate the kitchen!), and it was maybe the most mentally taxing thing I’ve done in my life! And I wasn’t even stoned or anything! There’s no way I could put up crown stoned. Respect.
Your blog makes me really happy – I get so excited when it shows up in my inbox! Keep up the good work!
Need to mini-vent here. I rent, and you rent/rented (congrats on home-ownership though), and I know you also have read all of the comments of, “HOW COULD YOU DO THAT WITHOUT LANDLORD PERMISSION,” and, “THAT IS SOMEONE ELSE’S HOME YOU ARE DISRESPECTING,” and the classic, “Why waste your money, just wait until you have your own home!” So because I live in a city and don’t have loads of money I should just be a second-class citizen who hovers carefully in apartments for YEARS? And because I’m a renter clearly I can’t feel like anyplace is my home? Maybe I should just live in hotels for years since I’m never supposed to touch or paint anything?
All of these people yelling about how much you or I disrespect “someone else’s house” are like 50-year-old men yelling about Plan B. Each apartment I’ve lived in has been a hell of a lot more like my home than the landlord’s home. I’ve cared about it more, and taken care of 90% of the problems that come up from landlord’s shit maintenance. If a landlord is so concerned about anything in their rental property being changed, maybe they shouldn’t make money by letting strangers live there (and also it’s a fucking apartment building, not their grandma’s precious house). I’m 100% willing to forfeit my deposit or to revert any changes I make if asked. The end.
Also I love your blog.
Good grief, I think this is awesome. I love reading what you’re doing. Thanks for writing the blog.
I’m here to attest to the effectiveness of plaster buttons. There were several cracks in our 100 year old plaster this summer that we had to repair and our contractor used the buttons. (I’m no DIYer but I love blogs like this to learn about what our contractors’ options are.) We were greatly relieved because the time investment and cost were minimized and the walls look fantastic. His name is now in my phone for the other cracks that will (inevitably) pop up! (My house needs so much TLC … it’s a labor of love.) Anyways, the buttons are an awesome cost-effective solution.
I’m really interested in seeing what you do with the bathroom with the awesome sink. I love your use of subway tile and dark grout but hoping you go with something like carrara or calacatta this time. Maybe you could consider some 2″ calacatta hexagons etc on the floor. Message me if you want to know where to get it cheapest or want some free layout sketches. Ive been a tile designer for 10 years at the design center in San Francisco and can let you know which vendors have what etc on the cheap. Not that you care about my opinion :) love your blog and have been a long time reader very excited about your new house!!!
Thank you! I’m interested to see, too!! That bathroom reno is probably a long ways away, but I’d love to do marble somehow, somewhere, someway. Downstairs bathroom (with less cool 1930s fixtures, but still cool!) is going to happen first. They’re both pretty small and we’re keeping major fixtures and doing everything but plumbing and electric DIY, so I’m definitely hoping we can go a little higher-end on materials.
You got me hooked on Rehab Addict so when I hear that you covered the brick fireplace with plaster I see Nicole Curtis hijacking your project, smashing the wall with a sledgehammer and screaming “I want brick!”.
Nice work on the plaster I can’t even patch a nail hole without making a mess of it.
Ha! Well, the brick chimney was (and always has been) covered in plaster–I just repaired it! I thought about removing it, but it would have meant serious patches to the (original) floor and (not original) ceiling, and would have sort of ruined the wallpaper plans! It’s a super small room, so it definitely doesn’t need painted walls, wallpaper, AND a huge brick chimney. It’s better this way, promise. :)
(And it’s always there, just in case!)
You did a great job! Sanding joint compound is one of my least favorite things, ever, so I am really impressed with your accomplishment!
In our house, someone covered the plaster with drywall, which I could live with, except that they applied the drywall in such a way that it overlaps the trim in many areas, so it looks like our baseboards are being eaten by the wall. (I’m assuming the correct procedure is to remove the trim, put up the drywall and then replace the trim.) Anyway, it has been driving me crazy for nearly fifteen years. Once our last kid is through college (he’s a freshman in high school now) I think we’ll undertake a major wall restoration.
Yikes!! Yeah, they definitely should have removed the moldings, put up the drywall, and then put the moldings back! If the walls are still in good shape, you might be able to still do that and just patch in drywall behind the moldings?
Hi Daniel-
I’ve been reading your blog for awhile now – I love your writing (I laughed so hard I cried over your conversation with Mekko) and I love that you are sharing all the good, bad and ugly with us when it comes to work on your house.
Now, please don’t throw the guide to home restoration at me for this suggestion – but what about foam crown molding. http://www.foamcrownmolding.com I had a small room in my house that I wanted to put crown in. I started looking at the price of wood crown and nearly passed out. Then I started researching on the internet and found foam crown molding. The price was reasonable and I thought it was worth a go. I actually really like how it turned out. It was easy to put up and while it might not be historically accurate for your home, maybe it could be an alternative to the itty-bitty not so pretty trim in your office. :)
Thanks, Michelle! I’ve never worked with foam moldings before, but they seem like a great alternative to me! I’m not a purist with stuff like that…if it looks good and functions the same and you can’t really tell the difference, who cares!
For this room, though, I think just taking down the crown and squaring off the corners with mud/tape is going to be best. It’s a very modest space in the context of our house (which doesn’t have any crown), so I think trying to fancy it up is just going to look very fake-y, you know? I was mostly thinking about adding crown just as a way to get out of doing MORE mudding/taping, but I’m sucking it up!
After removing wallpaper I tend to sand the walls down just a little bit, with a very very fine grit or paper that has already lost most of it sharpness, to remove the largest protruding bits and pieces, and to roughen up the parts that haven’t been damaged so that whatever I’m going to apply on it will hopefully stick a little better. As you didn’t mention this I guess you didn’t do this?
I noticed that you didn’t cover your floors, any plans with them later on? I’m asking because I’m in the middle of plastering my brick walls in what will be our kitchen, and it’s a total mess. I covered half of the floors (under the walls), but wherever you look there’s still plaster on the floor as well… Hope I’ll be able to get that off after I’m done with the walls. I still have to steal my plastering guy’s technique for finishing the wall, I’ve already learned the basics but I’m not able yet to finish it to perfection, it’s a special trade indeed.
When looking at your before-and-after comparison the crown struck me immediately, “why o why did he leave that crown on?” and then I read that it isn’t even the same all over the room, so my advice would be to take it down asap, especially since you’re in doubt about it as well. My belief is if you don’t replace it, you’ll regret it whenever you look at the old crown (and believe me, you’ll notice it way more than you want). There’s dozens of alternatives, from crown in wood over styrofoam crown to drywall crown, so I guess you should be able to find something that isn’t too expensive, looks great and isn’t that hard to place. You did a great job on the walls, it would be a shame to ruin it with the molding now wouldn’t it?
I didn’t sand the walls, but I did give them a pretty hearty scrubbing with a mix of vinegar and water and the rough side of a sponge to try to get the remaining adhesive off. The joint compound seems to have adhered VERY well, although I guess it’s a bit early to judge.
And yes! The floors are getting painted white. They’re going to require a lot of prep work anyway, and while I probably could have made things a little easier on myself if I’d covered them, it’s OK. Joint compound isn’t very hard to chip off or scrub away. I think plaster is a much different story, though!
Crown is gone, don’t worry! :)
Beautiful house! Just wrapping up a 7 year reno on a 2-family Victorian (except for the downstairs kitchen and bedroom) and had to chime in that I’ve been there and I relate. 90 minute mud and rolls of mesh tape were my best friends! I dubbed it “Meshcavating” because I’d open up the cracks with a utility blade making them worse and bigger (excavating) and then I’d mesh the entire wall and then do 2 coats of 90 with a final of regular joint compounds. Pretty bulletproof system. You should mesh the entire wall–not just the areas that are cracked–because the cracks like to come back in new places and there’s nothing more heartbreaking than to see them return. On some walls I just drywalled with 1/4 sheetrock and skimmed over that. Still look great!
We need a preview of the wallpaper! :)
Well, I haven’t started putting it up yet, but you can see the whole plan for the room here!
WHOA. Nice work (and perseverance)! The walls look so good maybe you shouldn’t even put up wallpaper. Joke. You definitely should. Can’t wait to see!!!
I definitely WILL! The wallpaper is my huge motivation to get this done and to do it well!! I want that wallpaper to look gooooood.:)
My FIL was a plasterer in Chicago for 30+ years and he told us how long the apprenticeship is – ususally several years with an experienced mentor. Skimming is very difficult to do from what he says. I’m glad you were able to get the walls smooth but it’s hard to learn something like that on your own!
It was hard! Although if he was doing real plaster work, that’s a wholllleeee different thing. Real plaster has a very short working time and dries SUPER hard, meaning it can’t really be sanded. Once it’s up, it’s pretty much up! The technique seems incredibly difficult and while the results (if done well, obviously) are extremely beautiful, I don’t think that’s something I’m brave enough to tackle! Joint compound, on the other hand, is comparatively very forgiving——it can be applied in a number of ways and at various consistencies and mistakes can often be compensated for with more layers and good sanding. That isn’t to say it’s necessarily easy or doesn’t take a certain amount of finesse, but it’s certainly nowhere near the level of artistry that real plaster work requires!
Love your blog! I’m on a similar journey with a late 1800s Philadelphia rowhome. I’ve just begun the skim coating in one room and I’m slightly concerned that I didn’t clean the walls well enough after removing all the paper. Did you do anything special to clean before skimming? I did a pretty basic soap and water wash but I just worry that my labors so far might be jeopardized. Also do you have a specific primer to recommend that worked well after using these methods? Thanks!
I cleaned the walls with a sponge and a mix of water and vinegar (about 50/50) just to try to cut through the old wallpaper paste. It’s REALLY gummy stuff, so I found that really removing all of it didn’t seem very realistic. I skim coated directly over whatever remained”¦so far, so good, but it’s only been a few months!